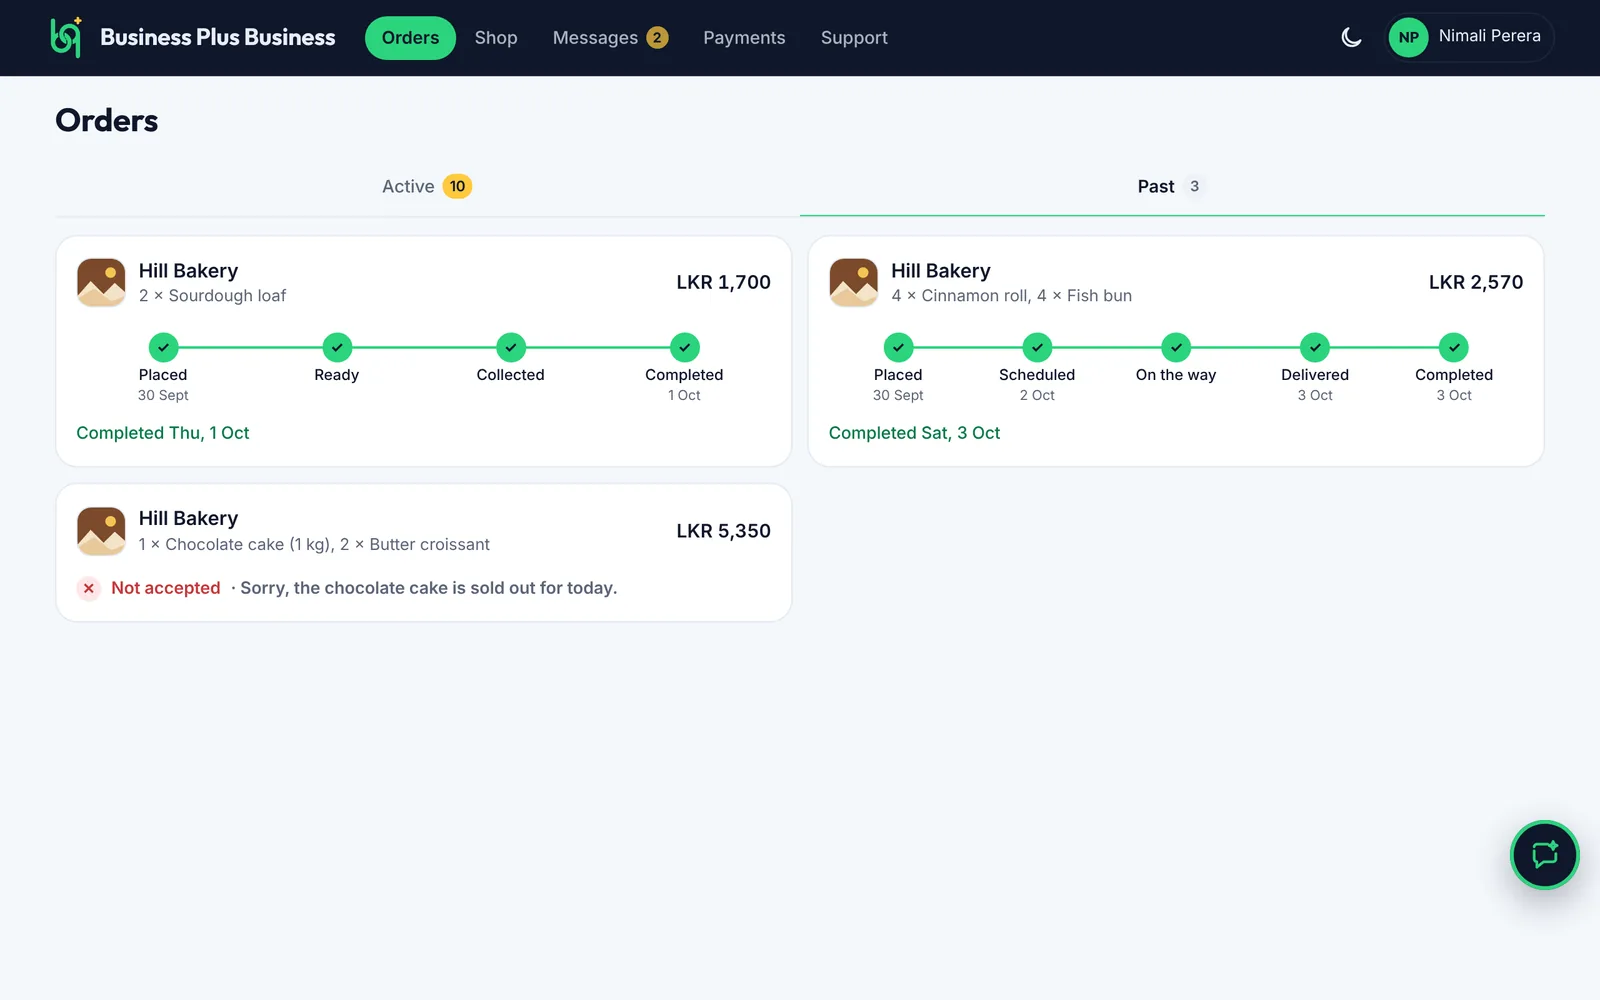
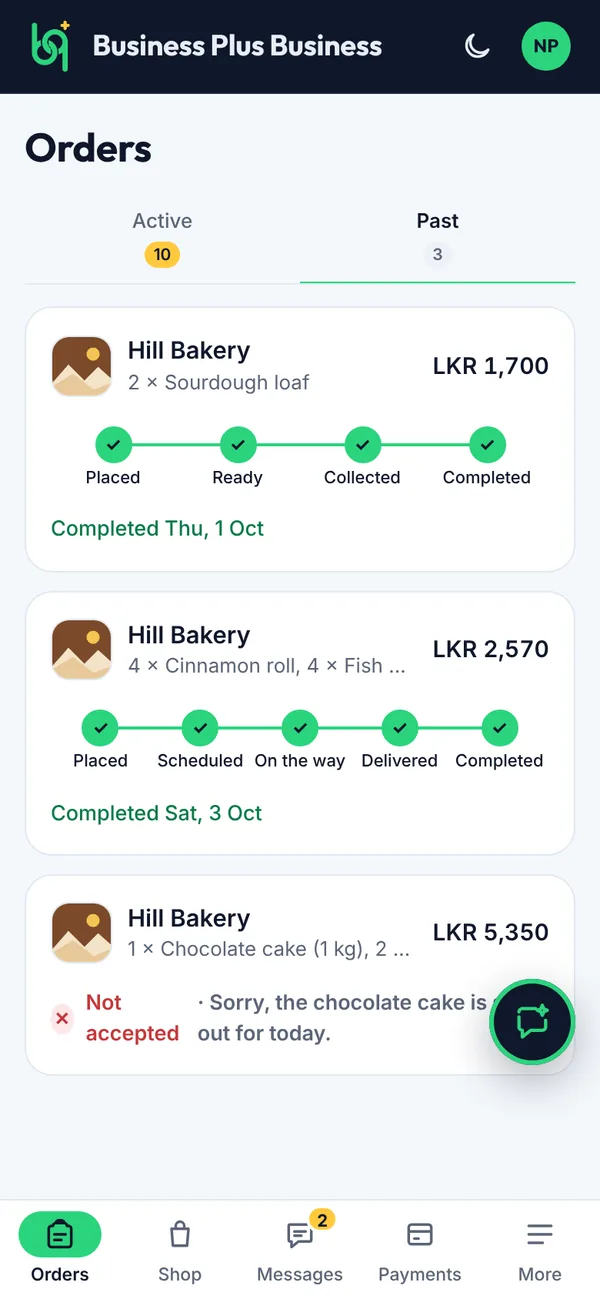
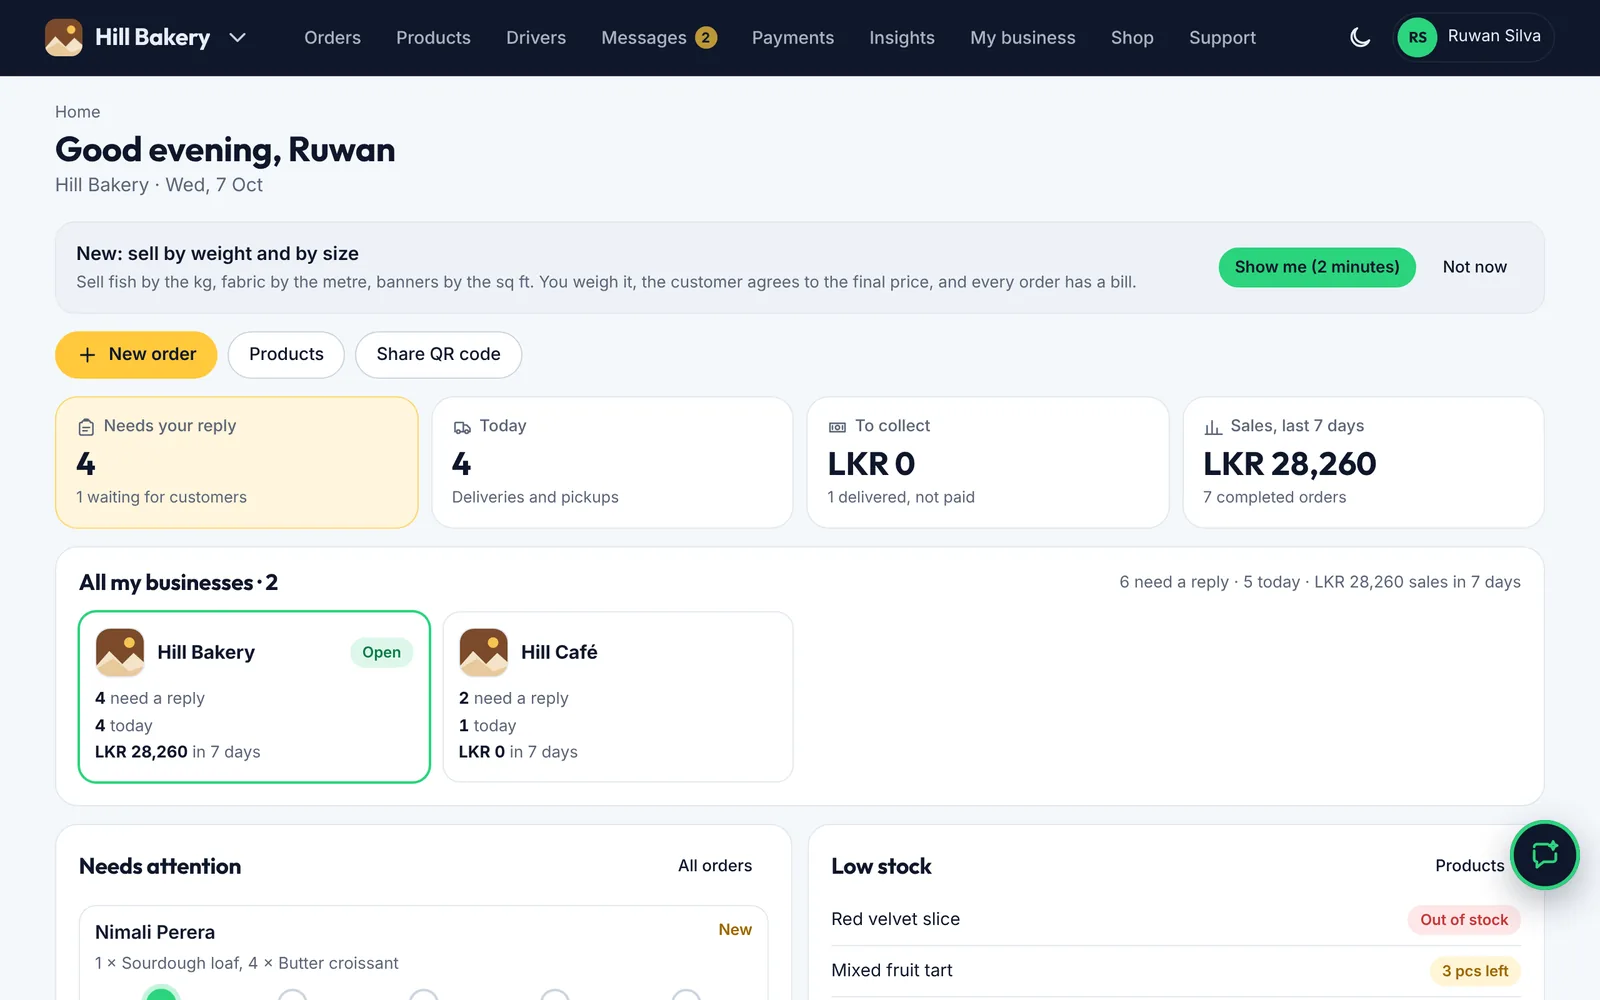
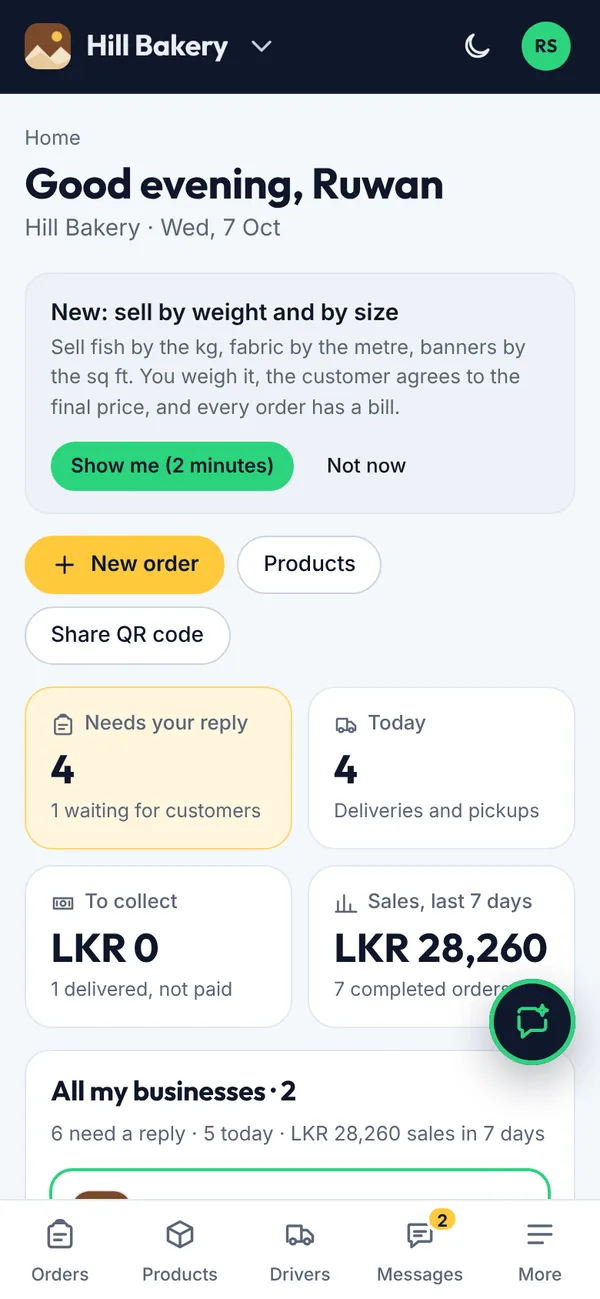
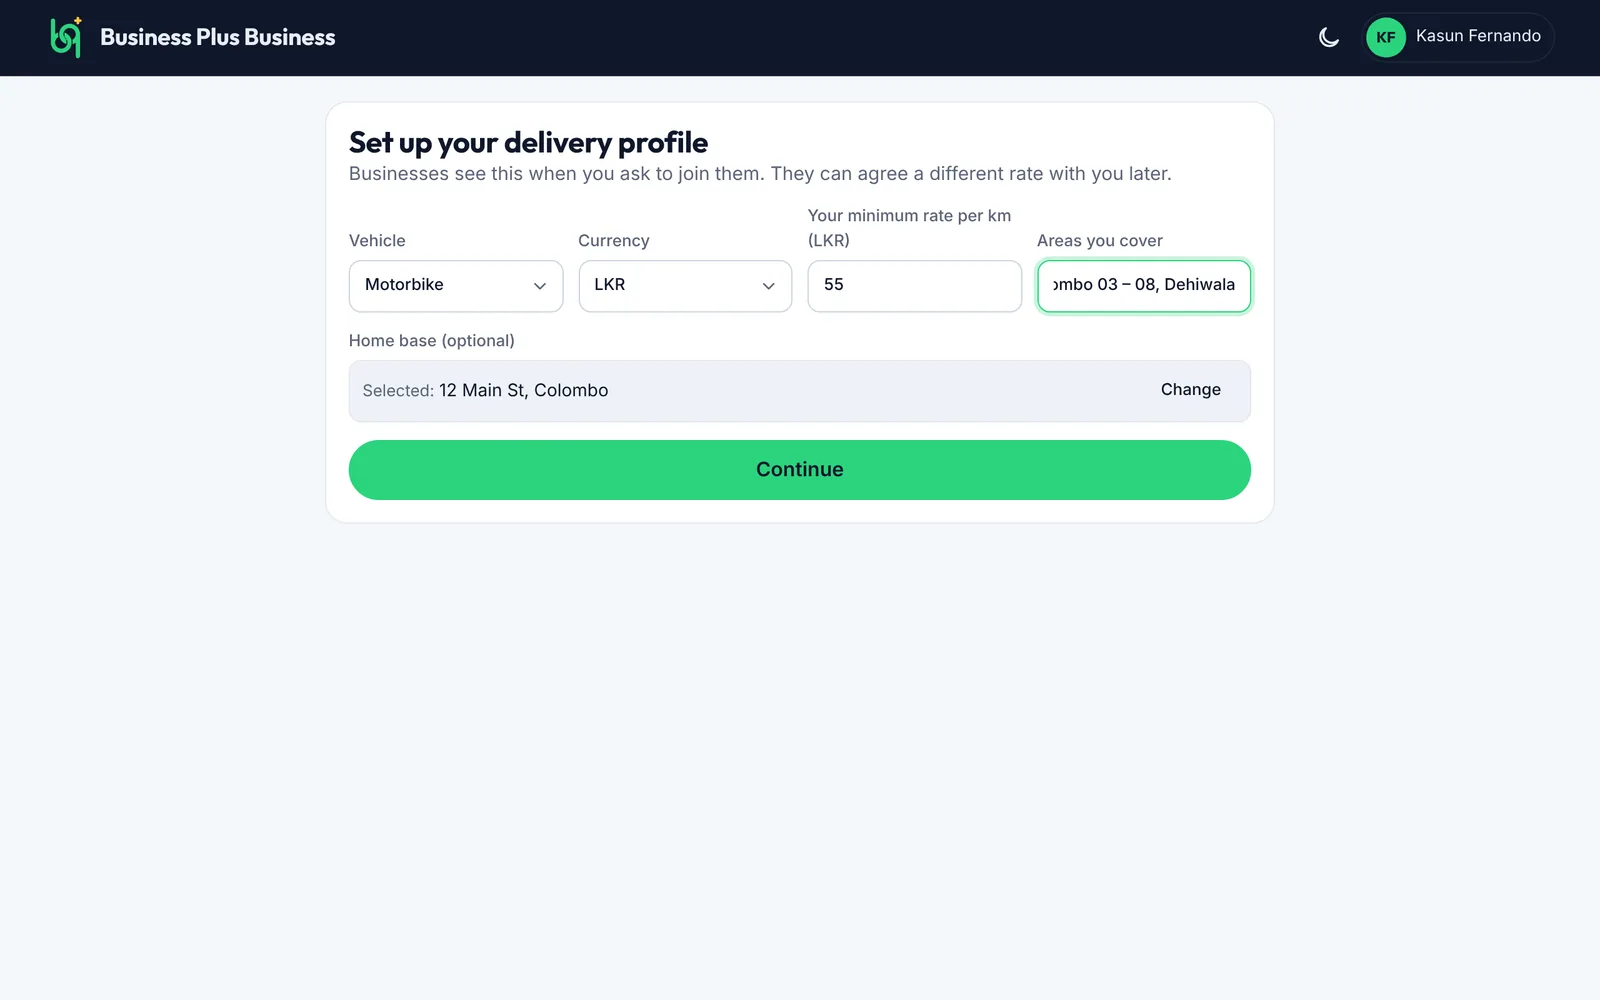
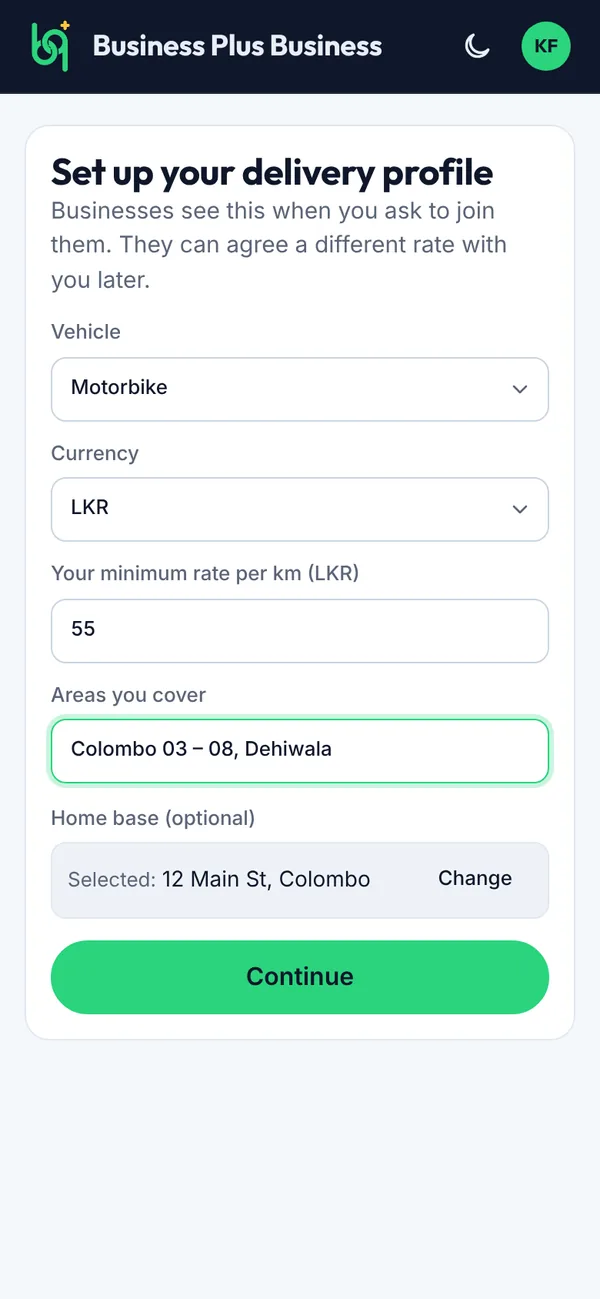
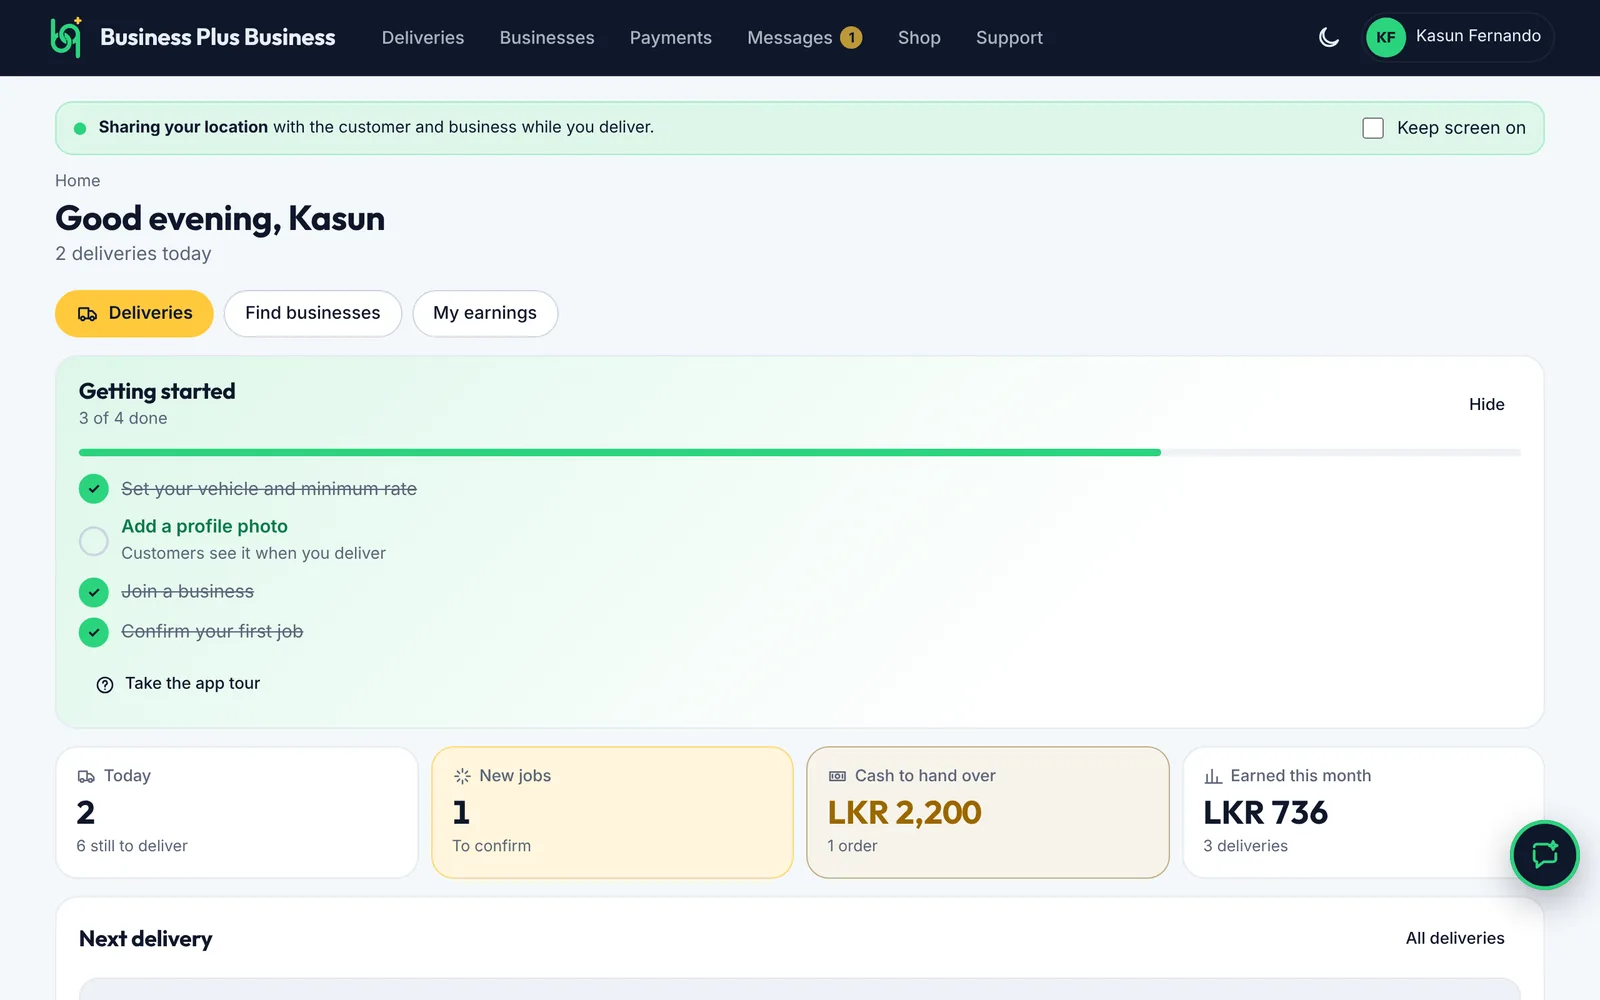
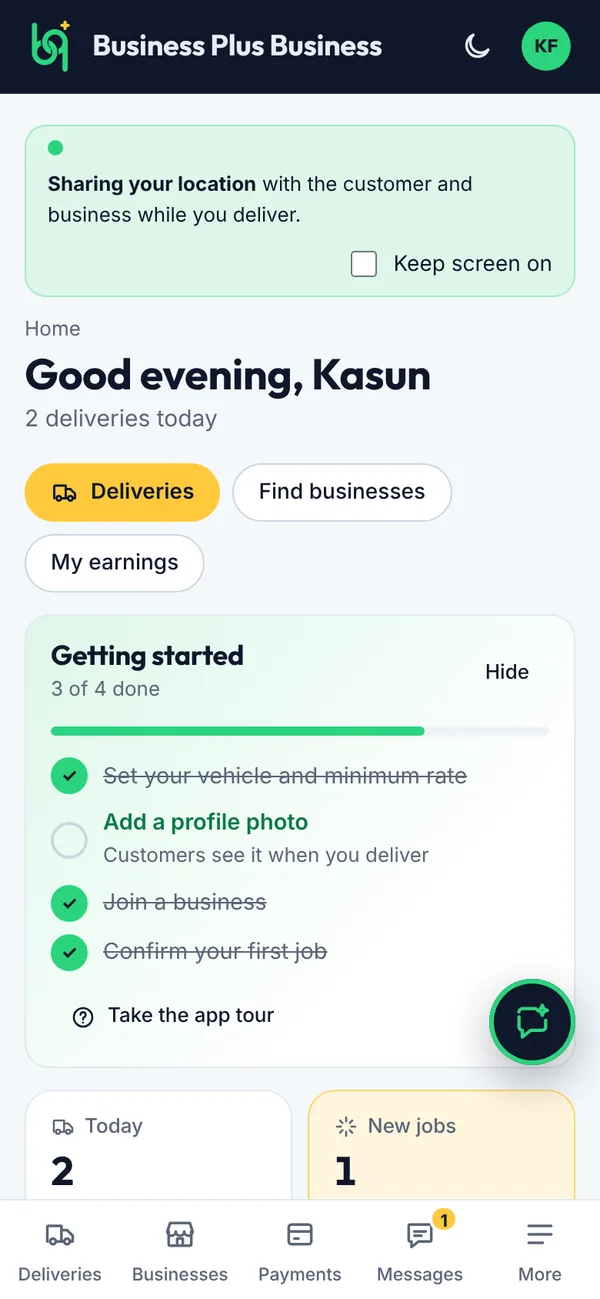
Step-by-step help for customers, business owners, sub-owners, delivery people and Store Creators. Every picture is the real app with example data. Choose Computer & tablet or Phone at the top to match the screen you use.
Business Plus Business connects local businesses with their customers and their delivery people. Everyone uses the same app, and each person sees the pages for their role. You don't need any technical knowledge. A phone, tablet or computer with a web browser is enough.
CustomersOrder from businesses, pay cash, by card or by bank transfer, and follow deliveries.Go to section 3 →
Business owners and sub-ownersTake orders, manage products and delivery people, and collect payments.Go to section 4 →
Delivery peopleJoin businesses, confirm jobs, deliver and track earnings.Go to section 5 →
Store CreatorsApply, train, get certified and build stores for local businesses.Go to section 6 →
Super usersReview Store Creators, give training and set the rules.Go to section 7 →
Everyone should read section 2, Getting started first. It shows how to create an account and find your way around.
1.2How an order moves through the app
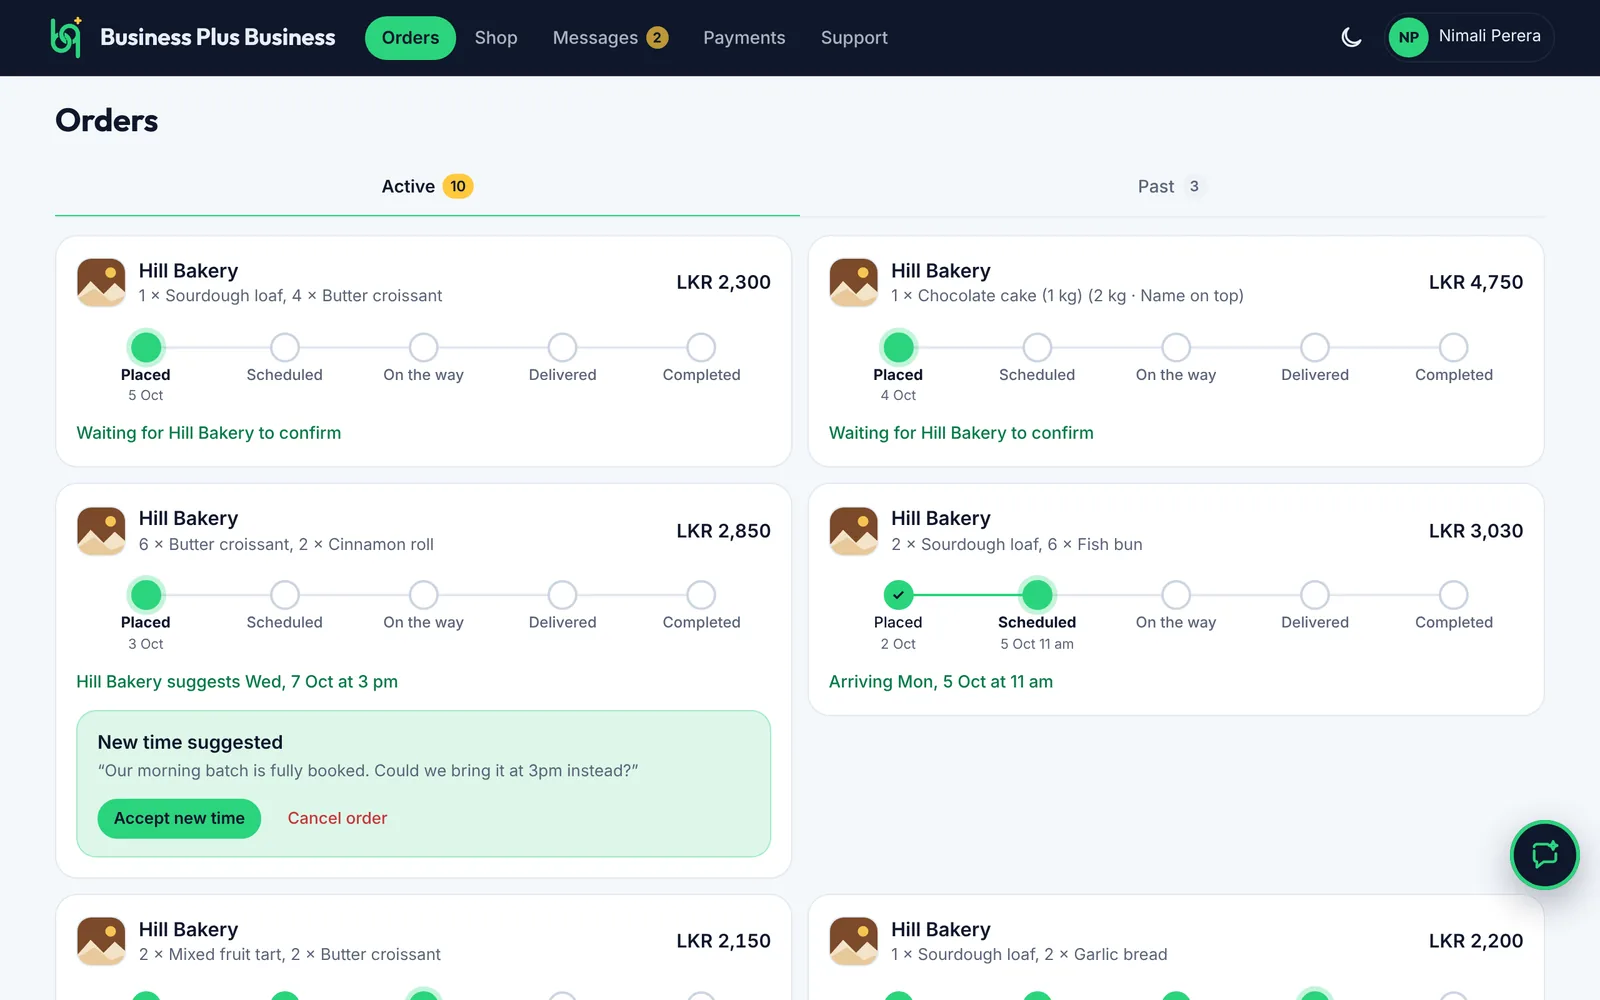
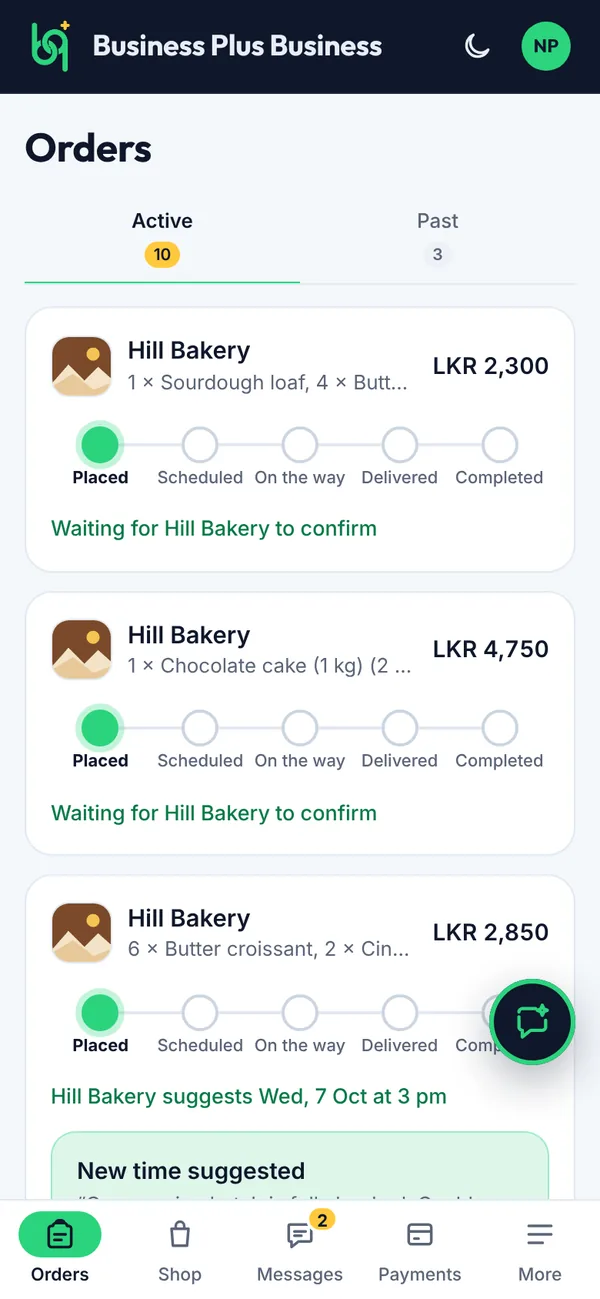
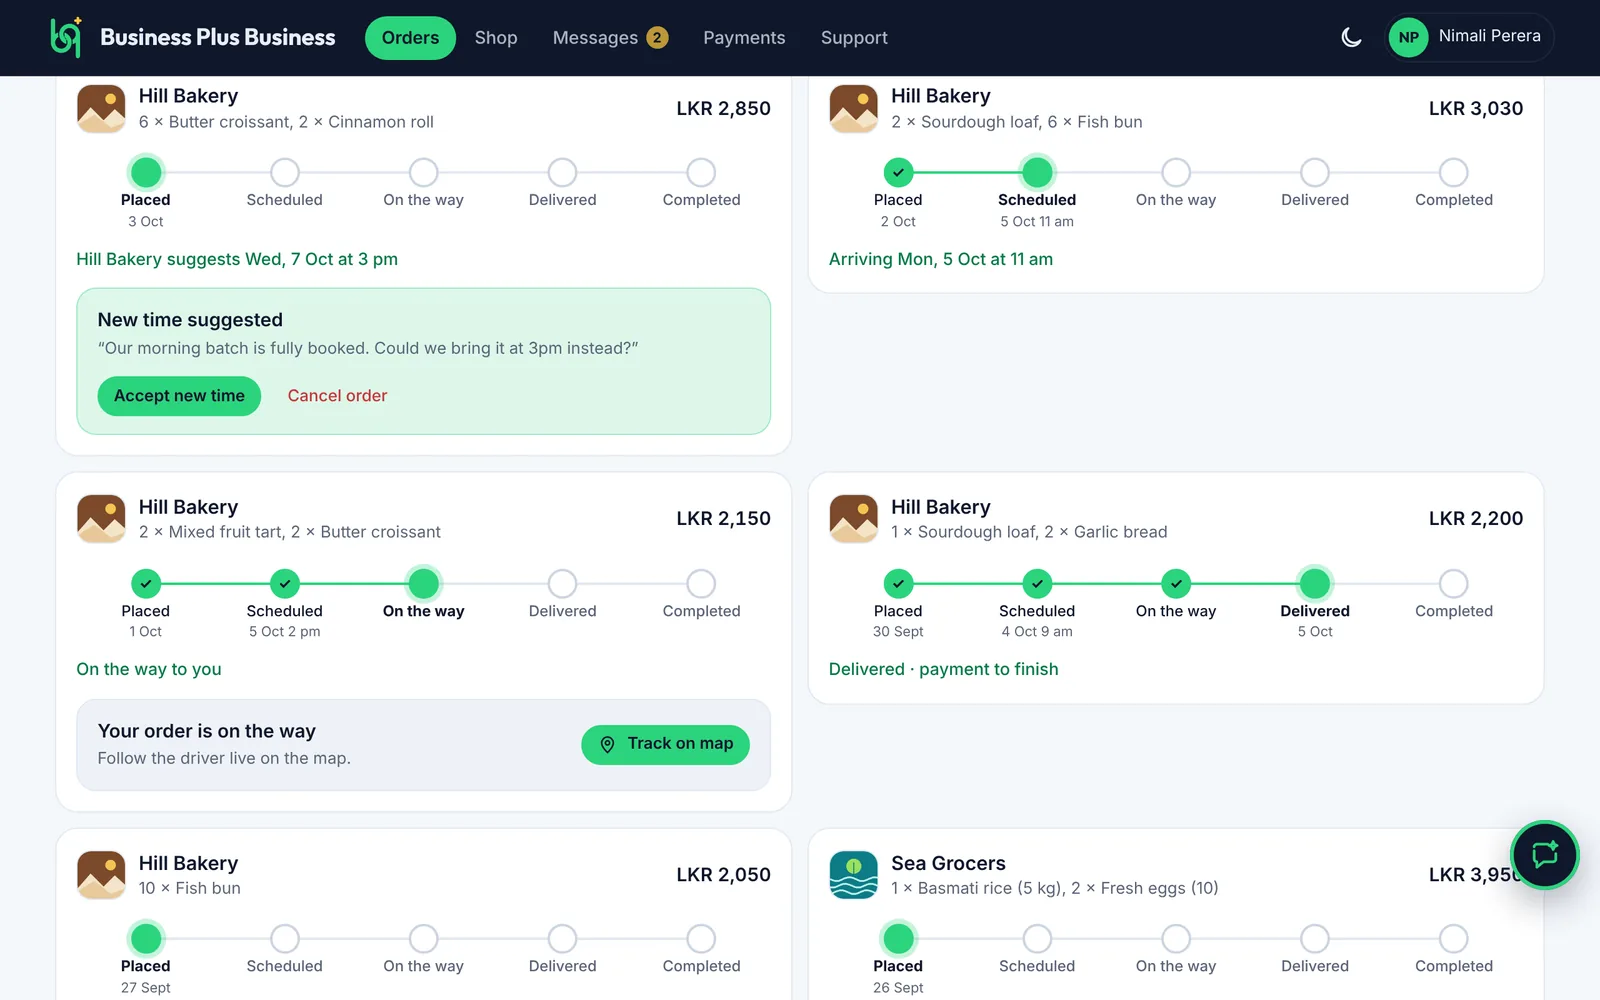
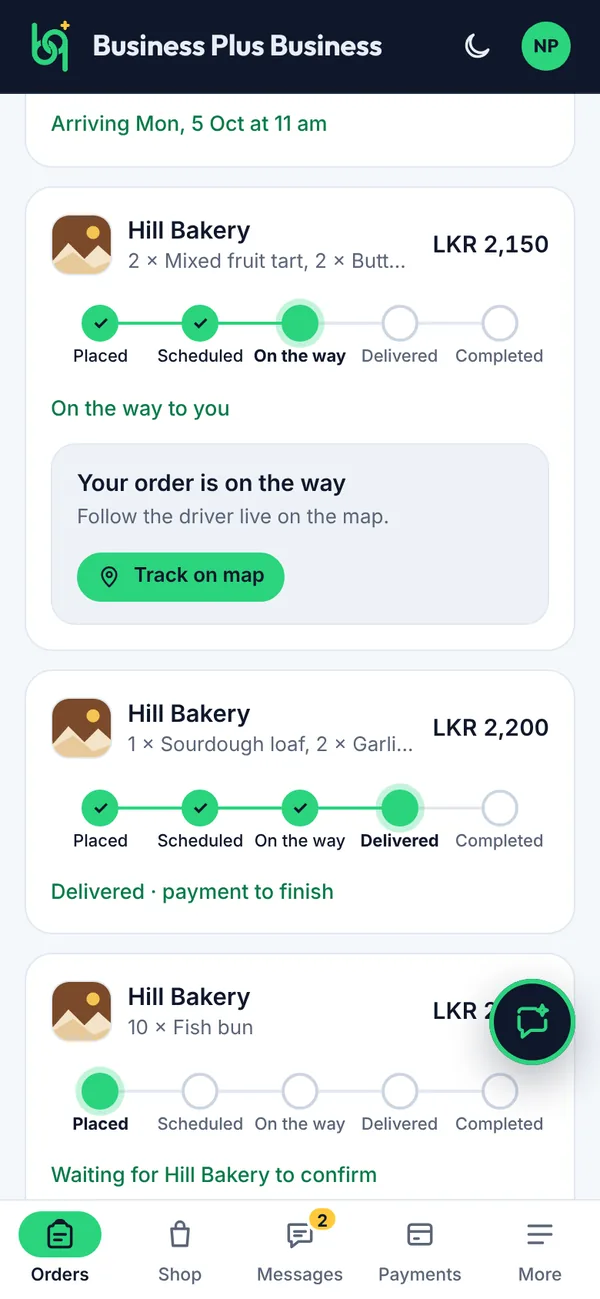
Every order follows the same path. Knowing who acts at each stage helps you find the right part of this manual.
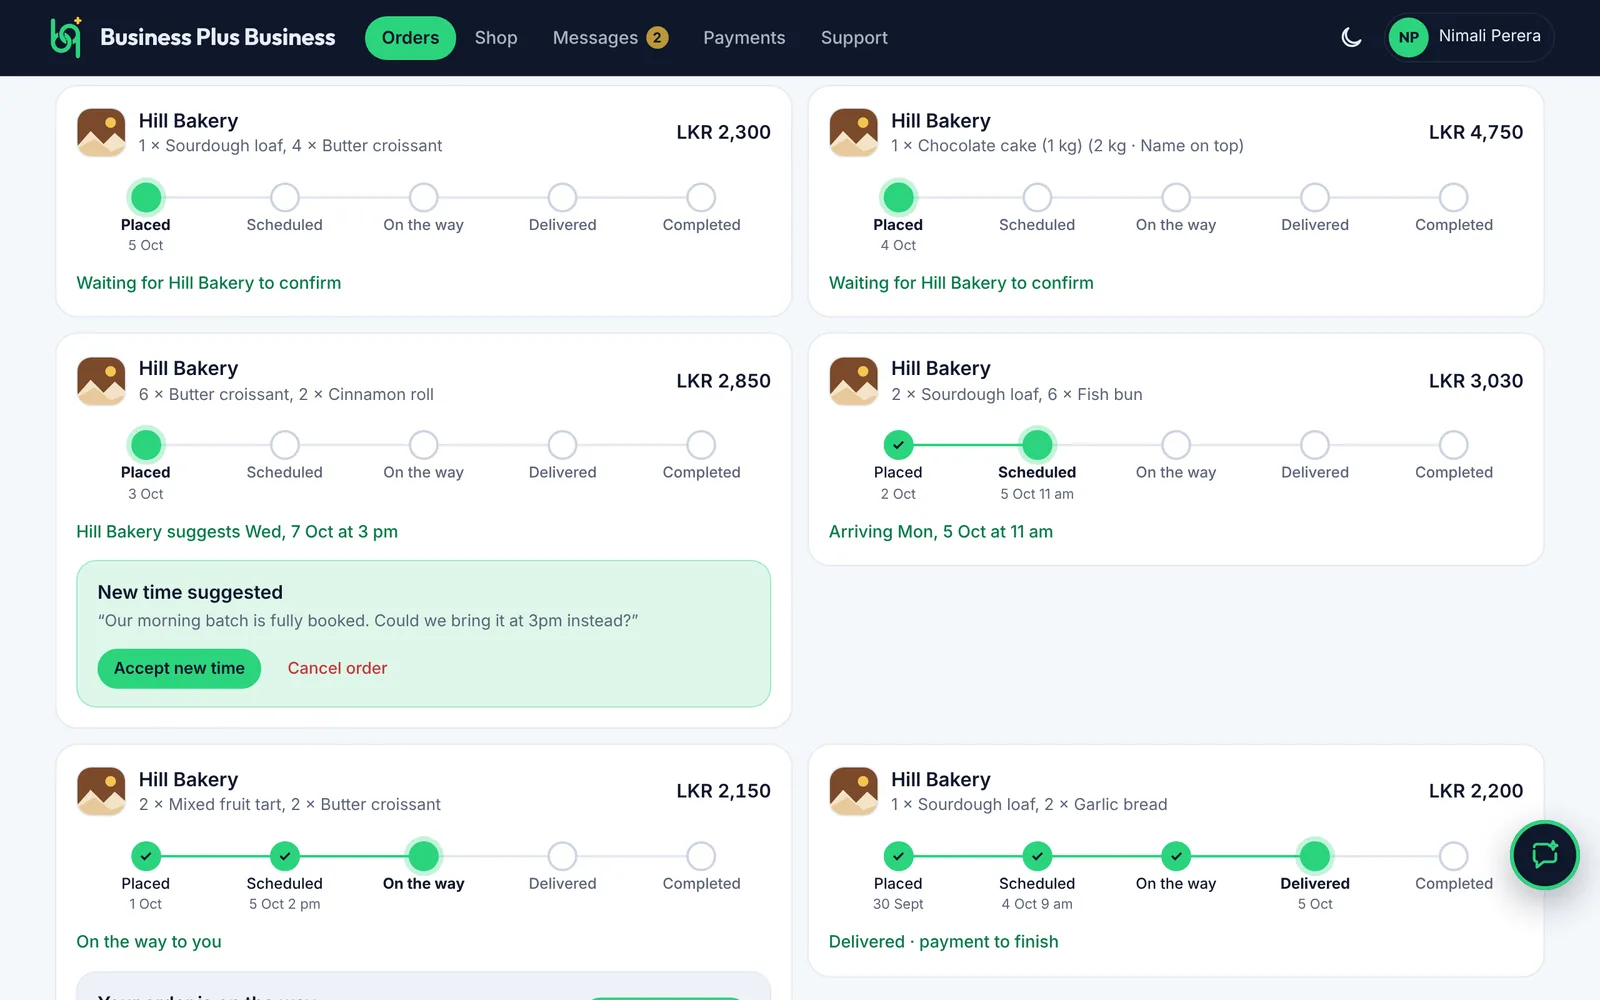
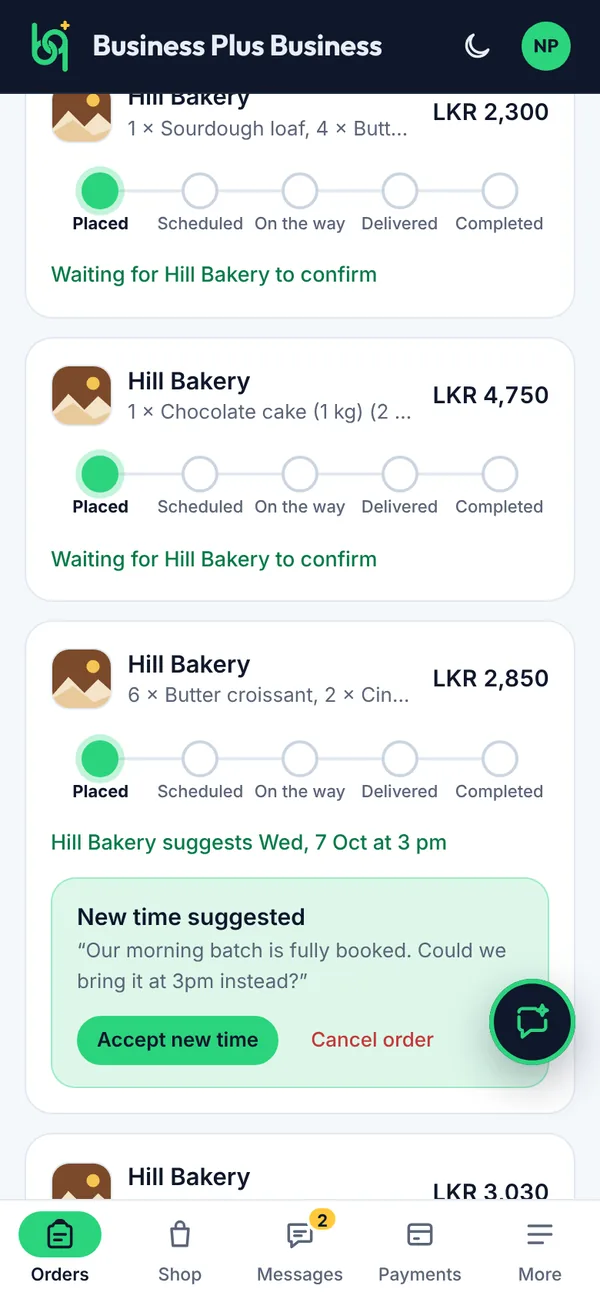
PlacedThe customer orders from the shop, or the business enters it.Customer · 3.7
ScheduledThe business confirms a day and time and picks a delivery person.Business · 4.17
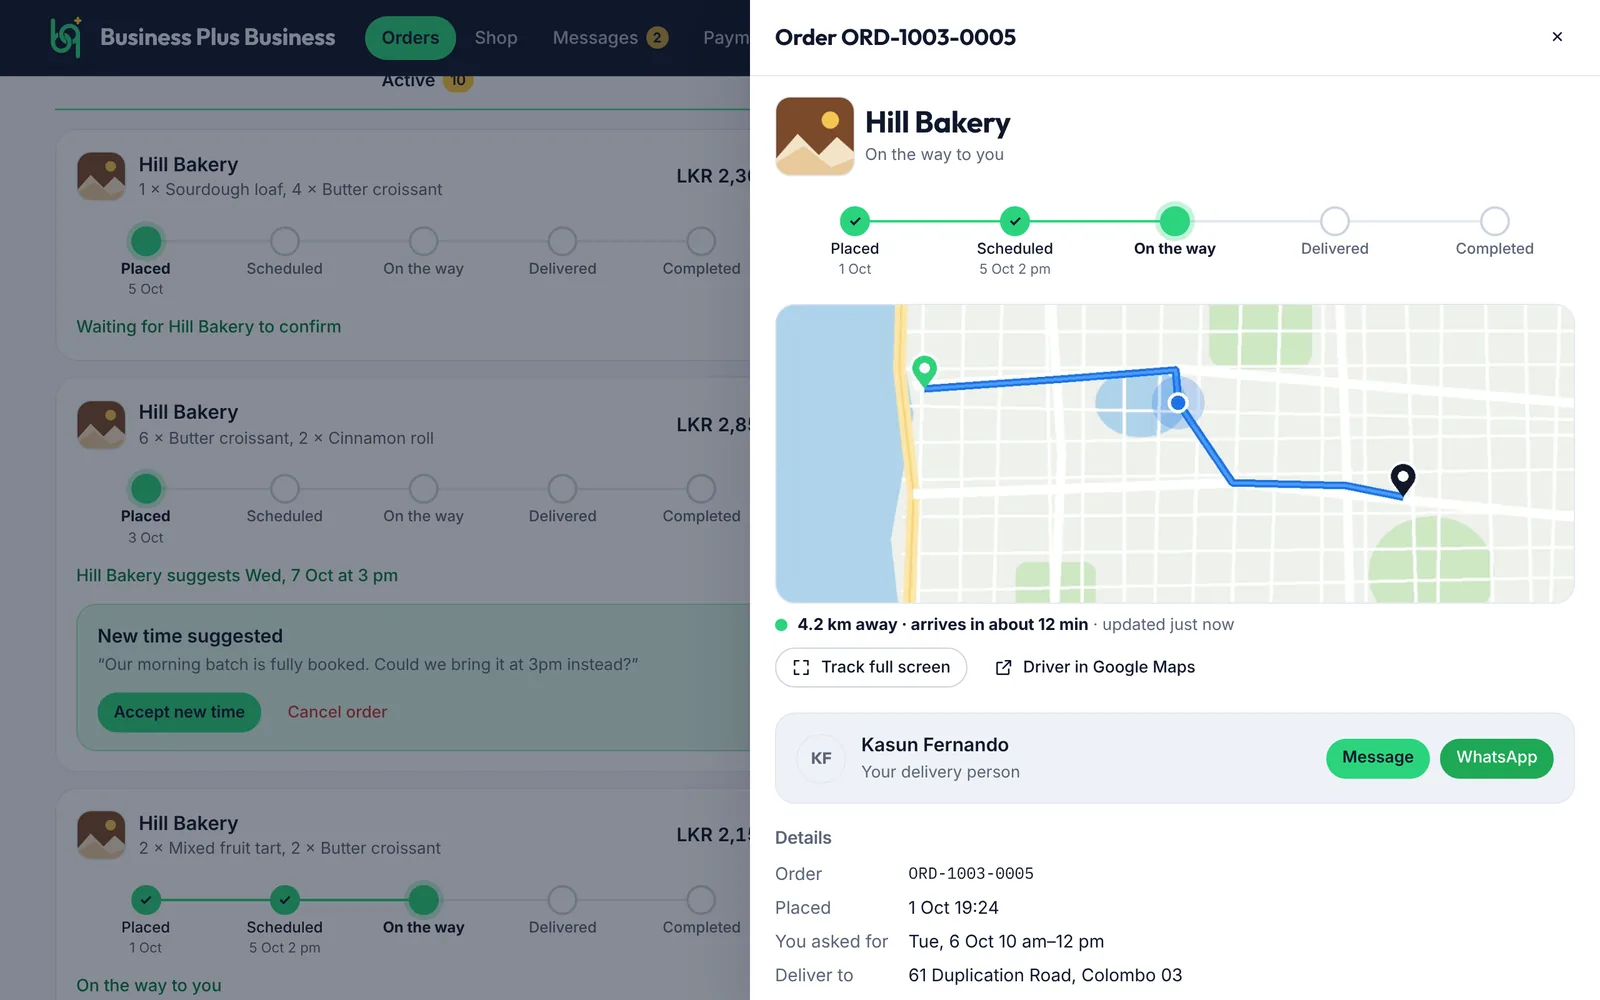
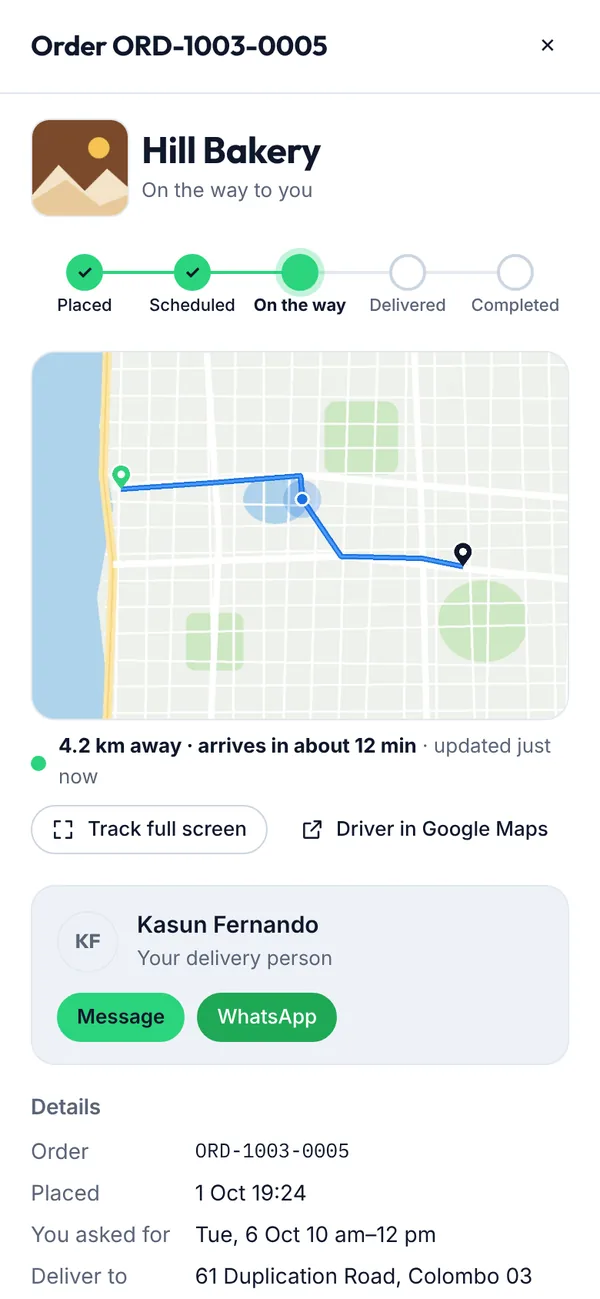
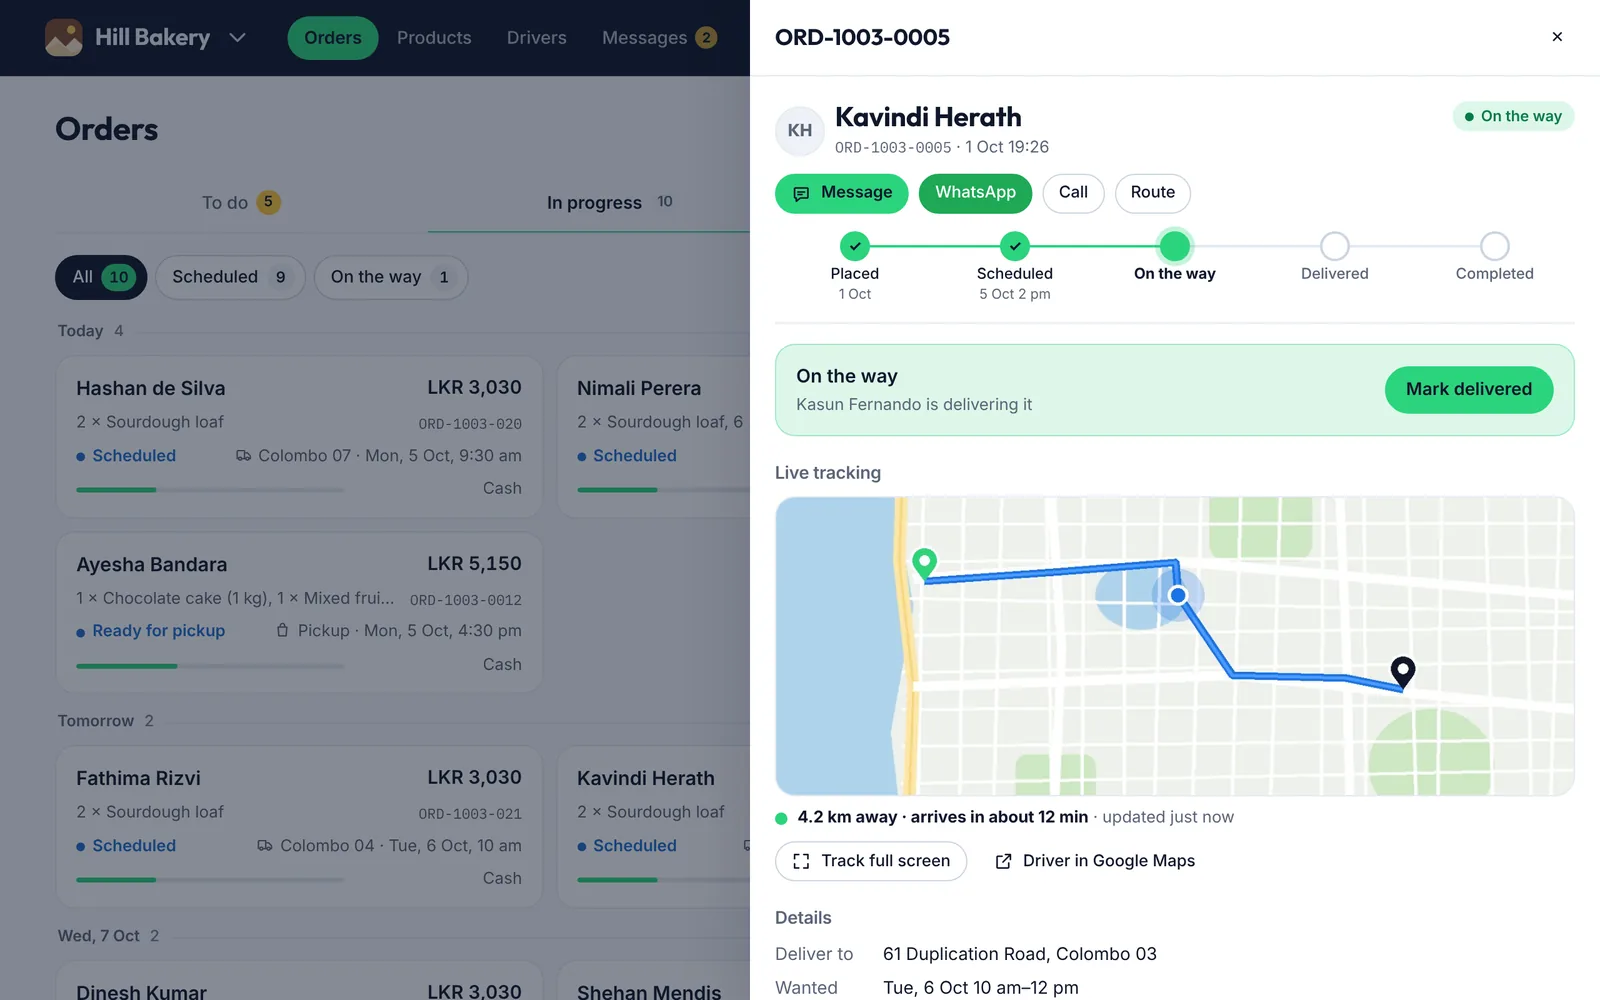
On the wayThe delivery person starts the trip. The customer can track it live.Delivery person · 5.6
DeliveredThe order is handed over. Card payments are charged now.Delivery person · 5.7
CompletedOnce paid, the order closes. The customer can rate it.Business · 4.20
An order can also be New time suggested, Not accepted or Cancelled. Everyone involved gets a message at each step.
1.3How to use this manual
This manual is organised by role, and each article covers one task. You don't need to read it from start to finish.
Search. Type in the search box above the contents, for example “refund” or “QR”, to find a topic.
Choose your device. Use Computer & tablet or Phone at the top of the page. Every picture changes to match the screen you use.
Follow the yellow numbers. Steps with a yellow number match a marker on the picture below them.
Figures are numbered by section, for example Figure 3.4, so you can refer to them when you ask for help.
Section 2 · For everyone
2Getting started
Create your account, sign in and learn where things are. This takes about two minutes.
Create one account for your role. The app asks for your country so prices, currency and phone numbers are right for you.
Before you start
Open the app and tap Create an account.
Have your WhatsApp number and address ready.
Steps
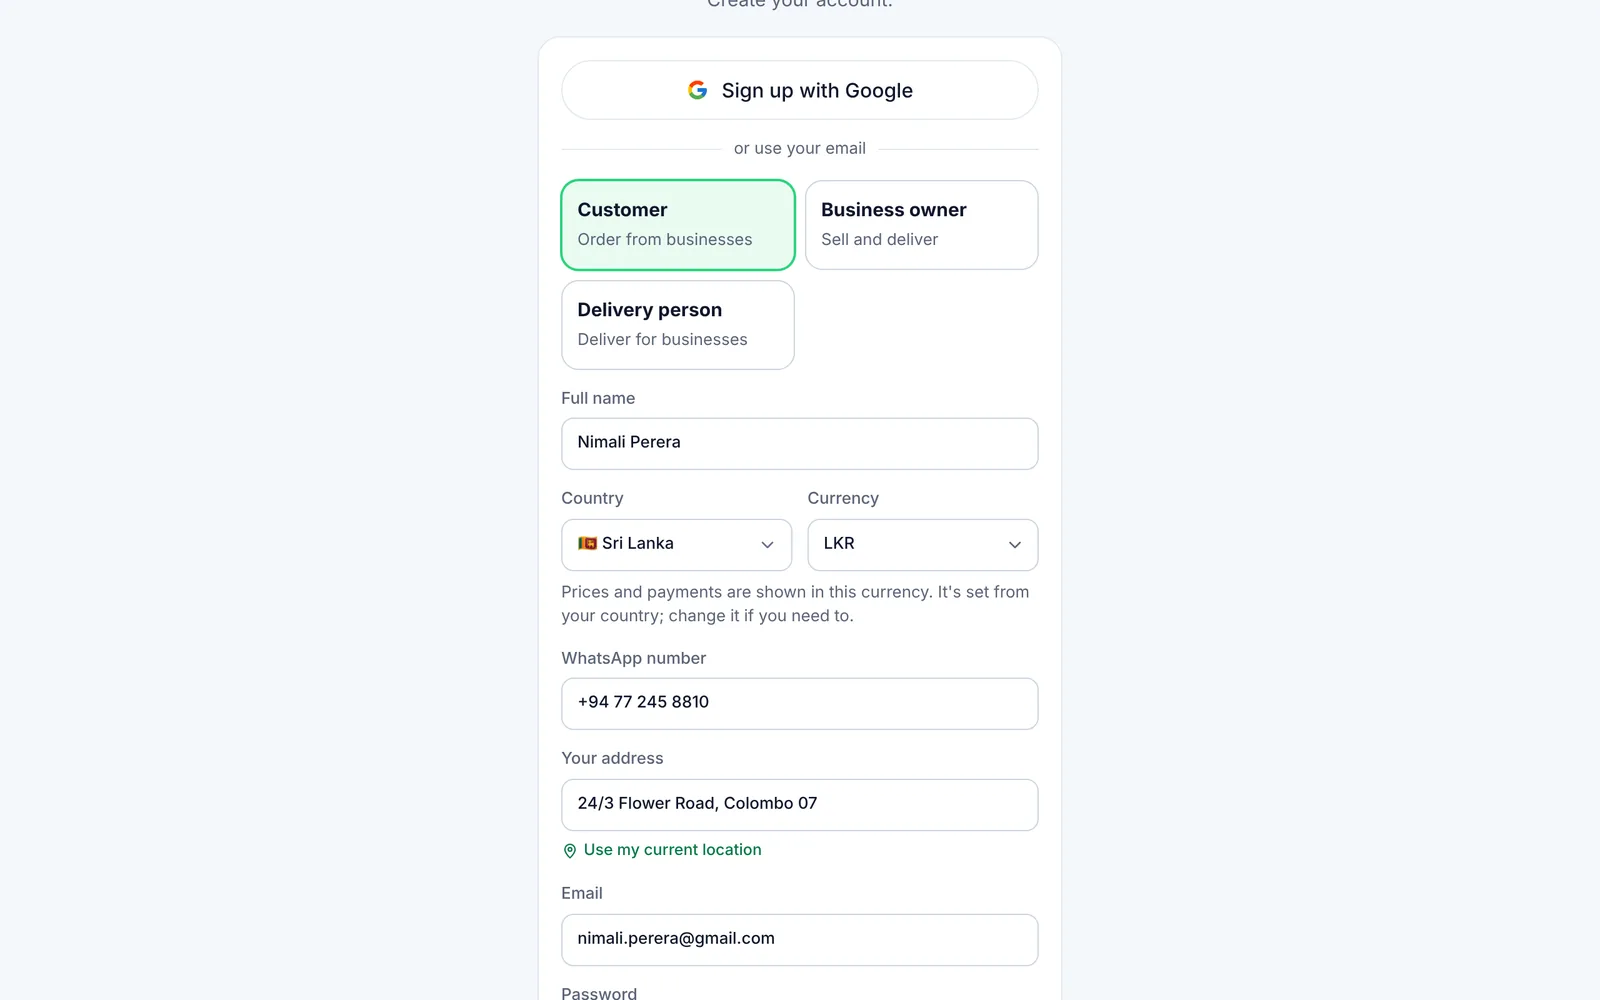
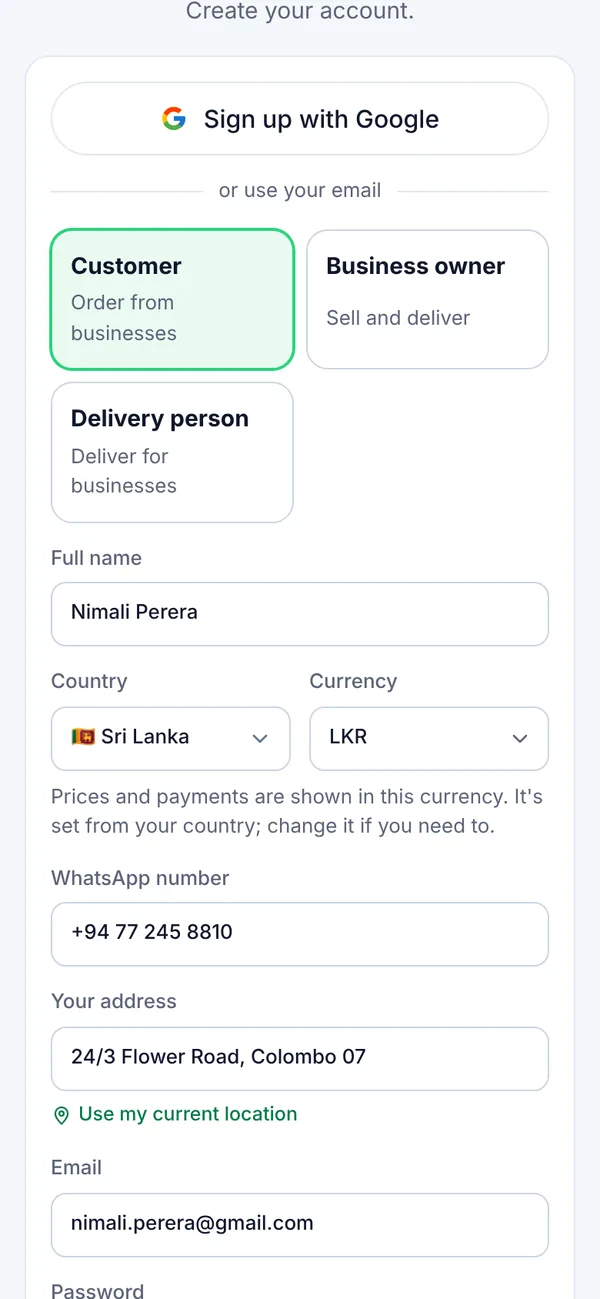
Choose who you are: Customer, Business owner or Delivery person.
Enter your full name. Delivery people also choose their vehicle.
Choose your country. Your currency and phone code fill in by themselves.
Enter your WhatsApp number with the country code.
Figure 2.1Create your account: role, name, country and phone
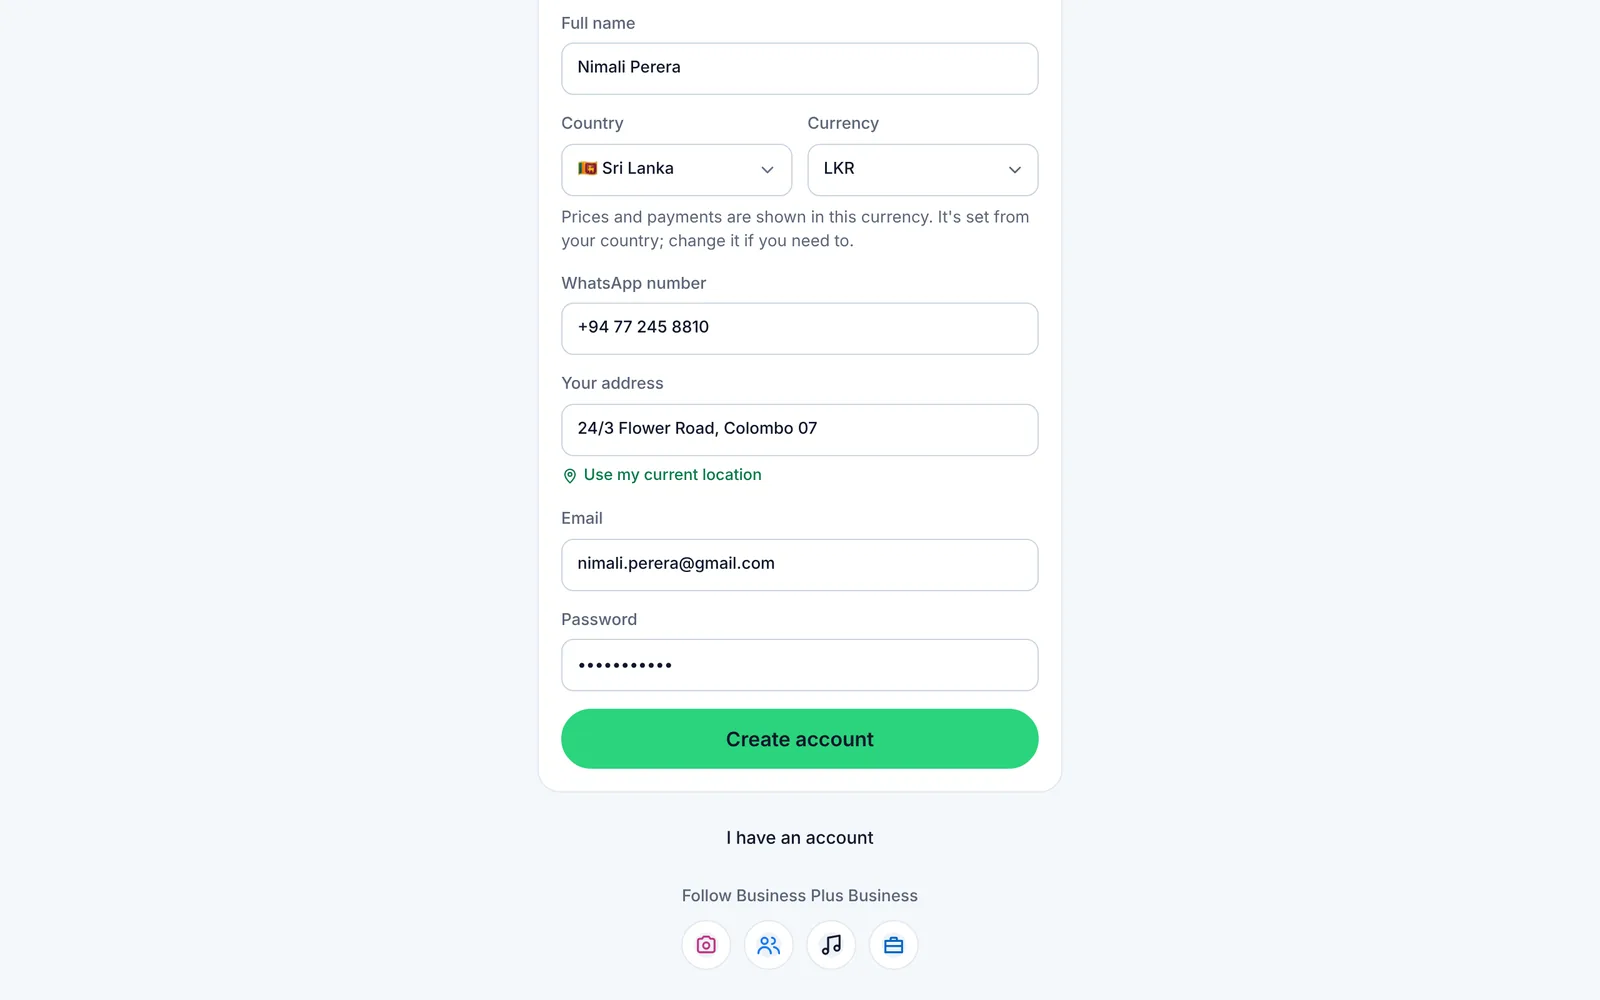
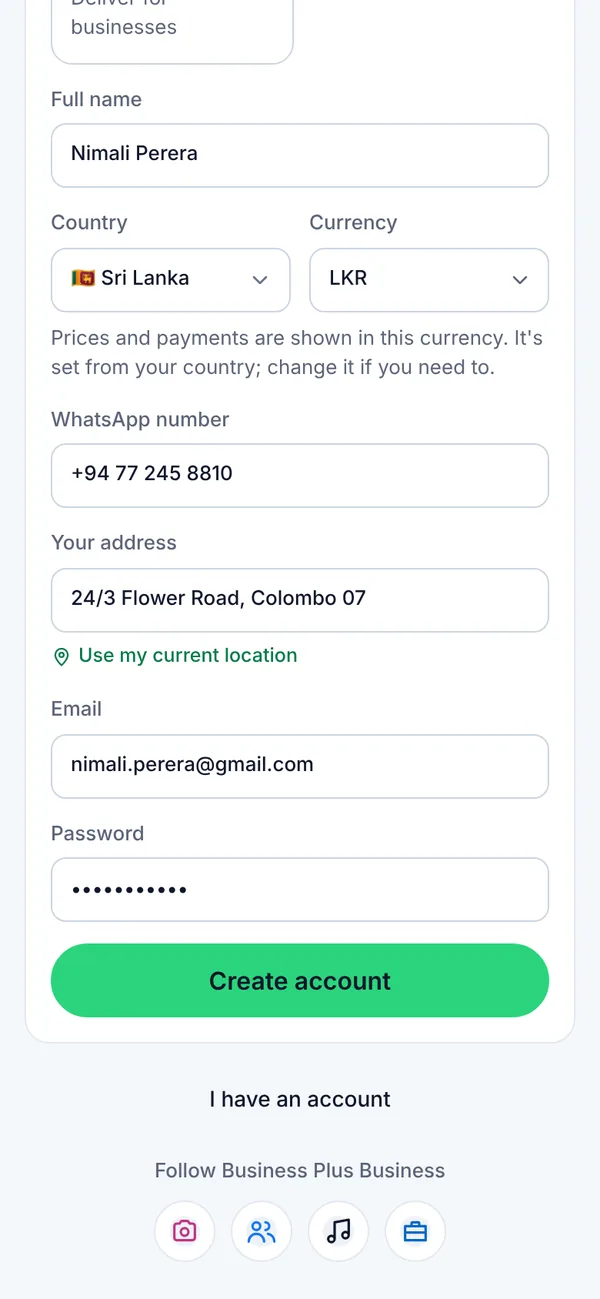
Enter your address, or tap Use my current location.
Enter your email and a password of at least 8 characters.
Tap Create account.
Figure 2.2Create your account: address, email and password
What you’ll see
We email you a confirmation link. Tap it, then sign in. If you used Sign up with Google, the app shows an “Almost done” page with the same questions instead.
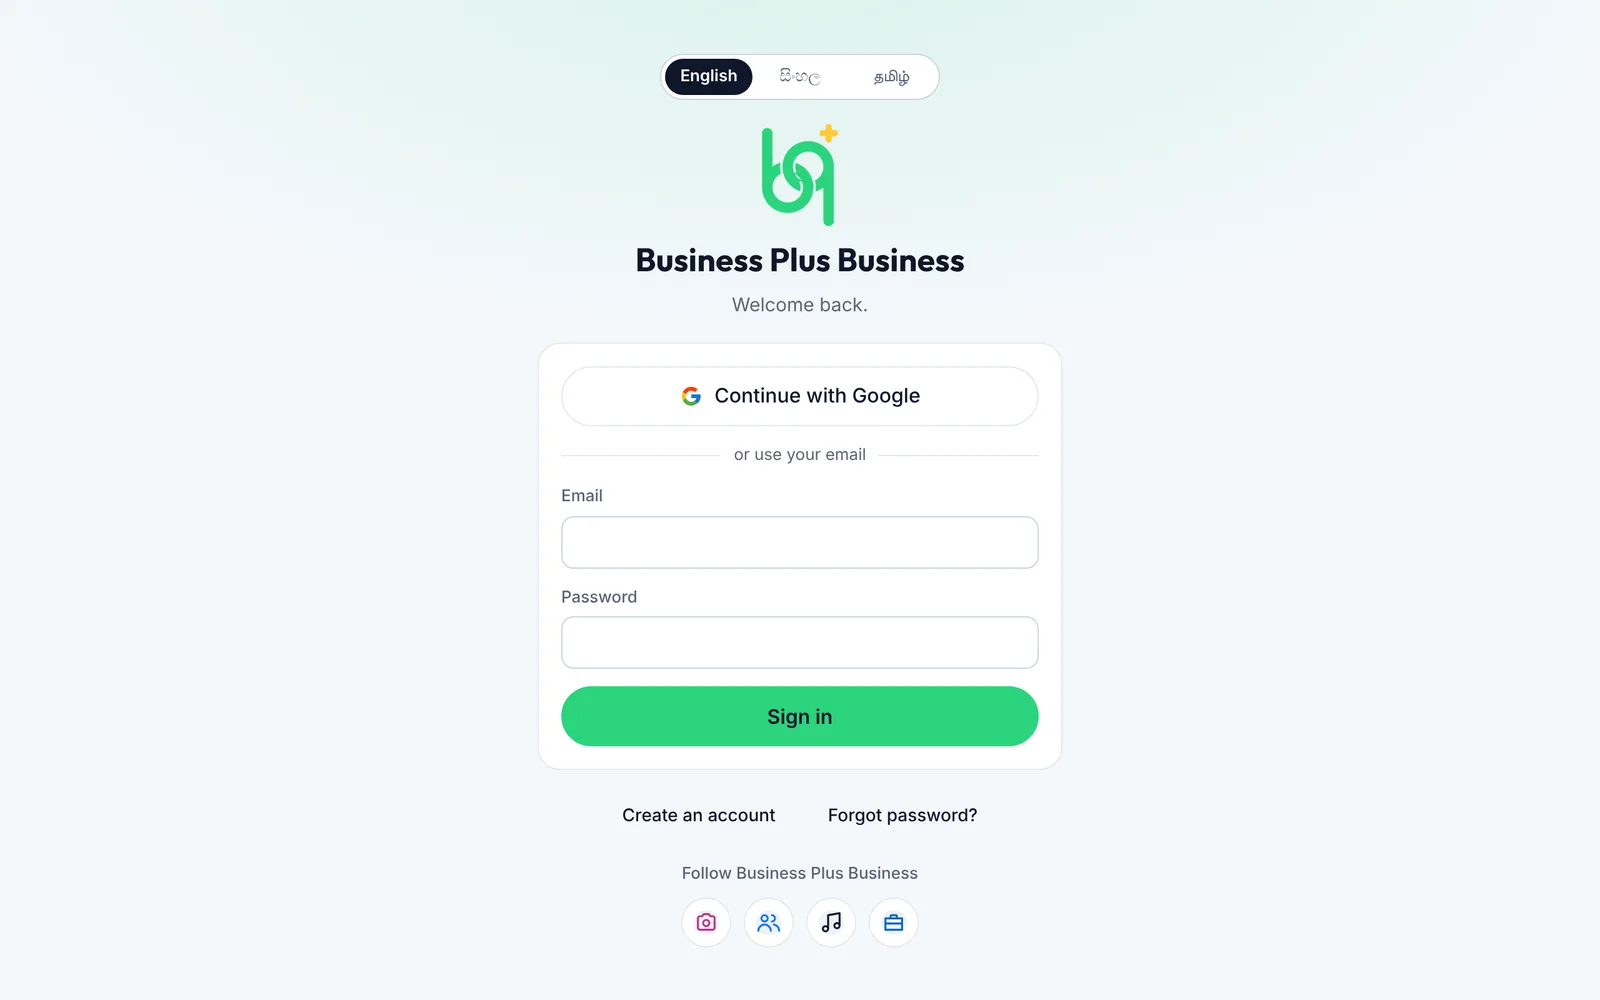
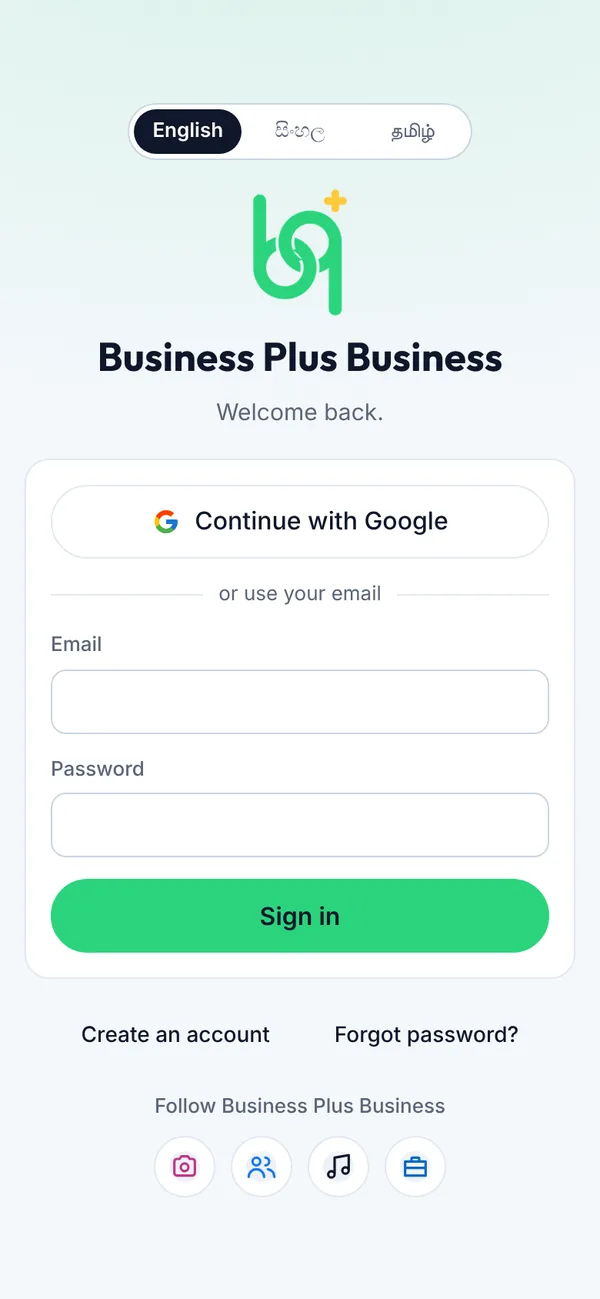
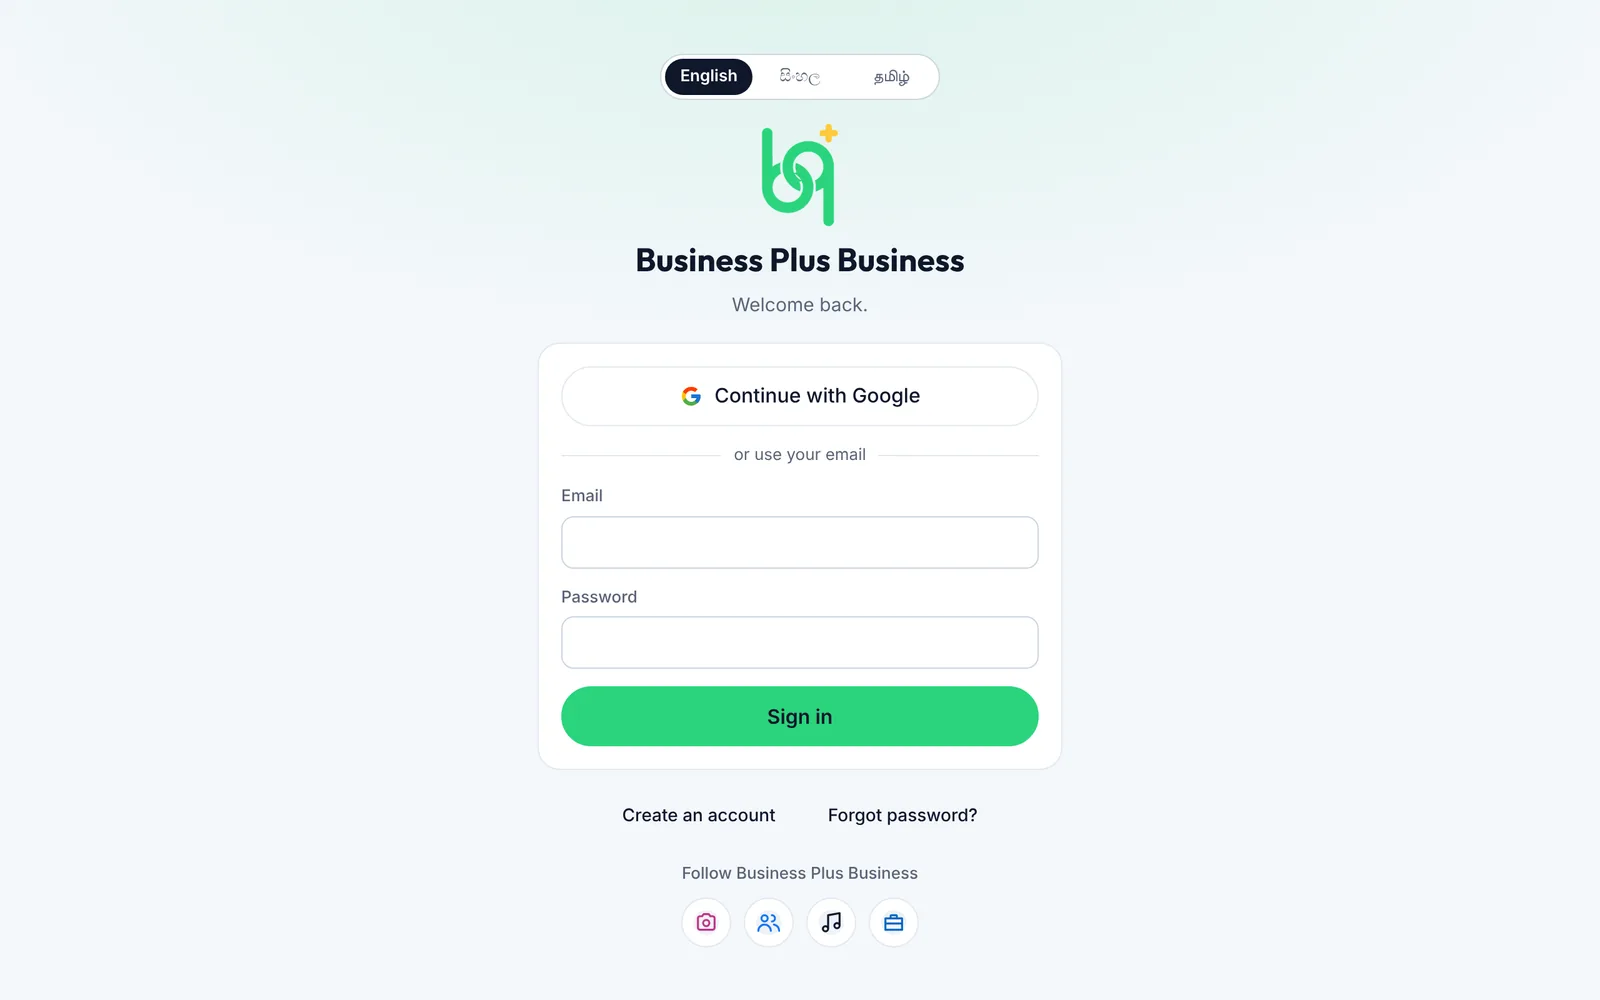
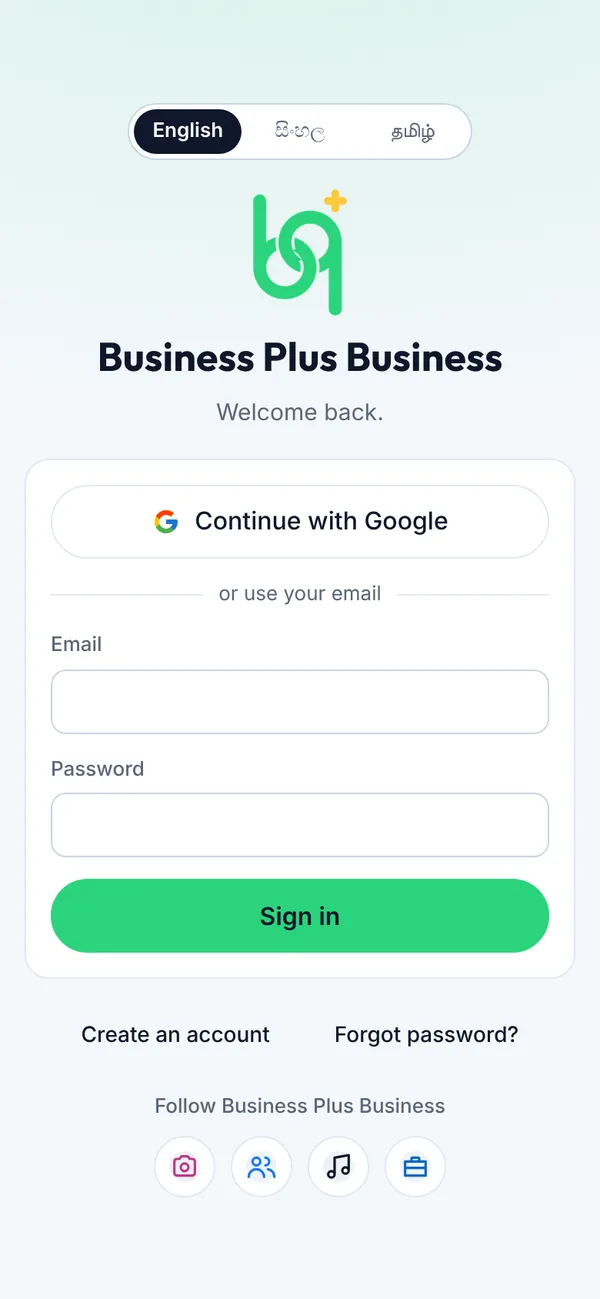
Sign in with the email and password you chose, or with Google.
Steps
Tap Continue with Google to sign in with your Google account, or
enter your email,
enter your password and tap Sign in.
Forgot your password? Tap Forgot password?, enter your email and follow the link we send.
Figure 2.3Sign in
Sub-owners don't sign up. The business owner adds you and sends your sign-in details. The first time you sign in, the app asks you to choose your own password.
Your most-used pages come first in the menu. Account and Support are always last.
Steps
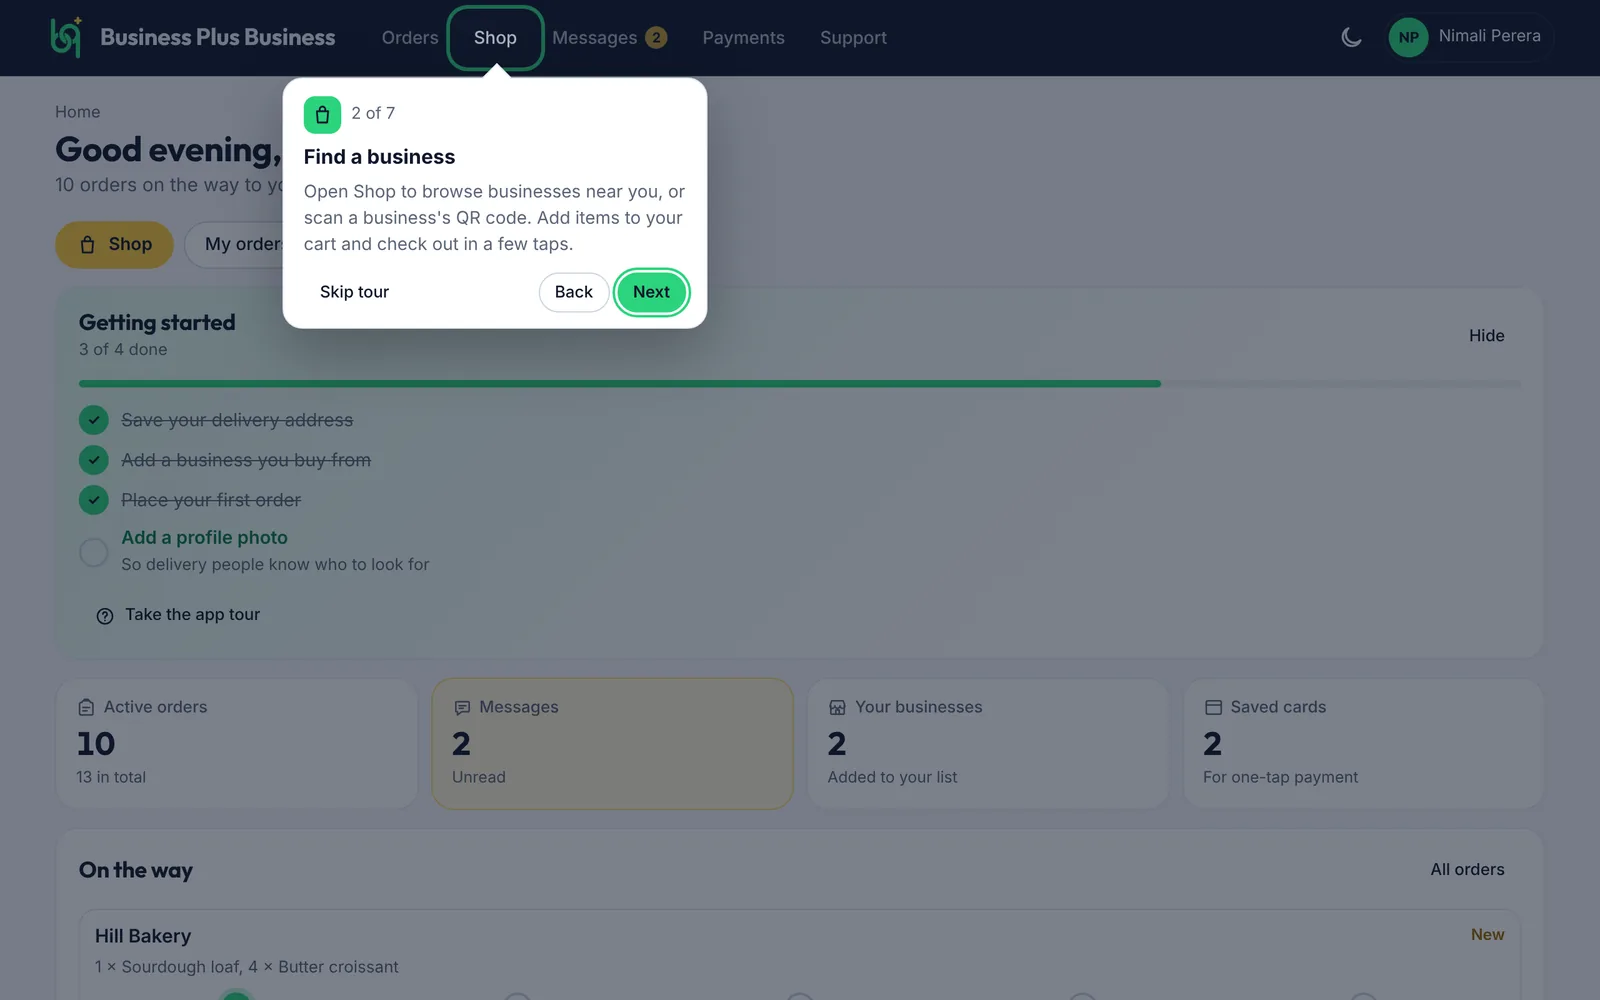
Tap the logo to go back to your Home page from anywhere.
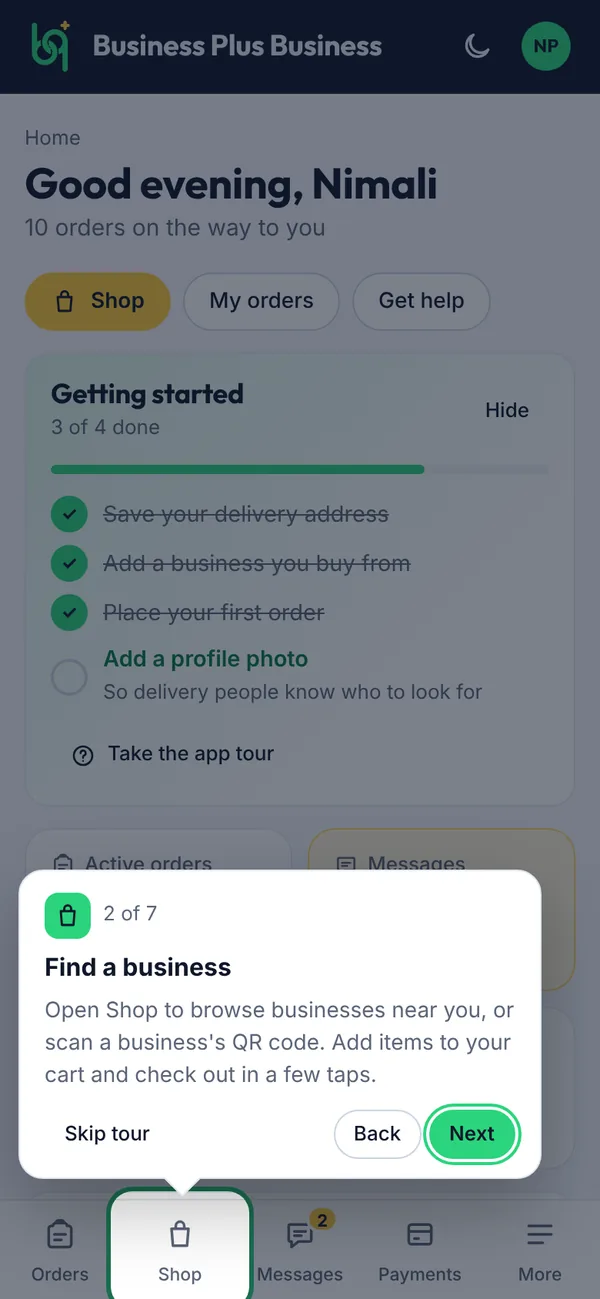
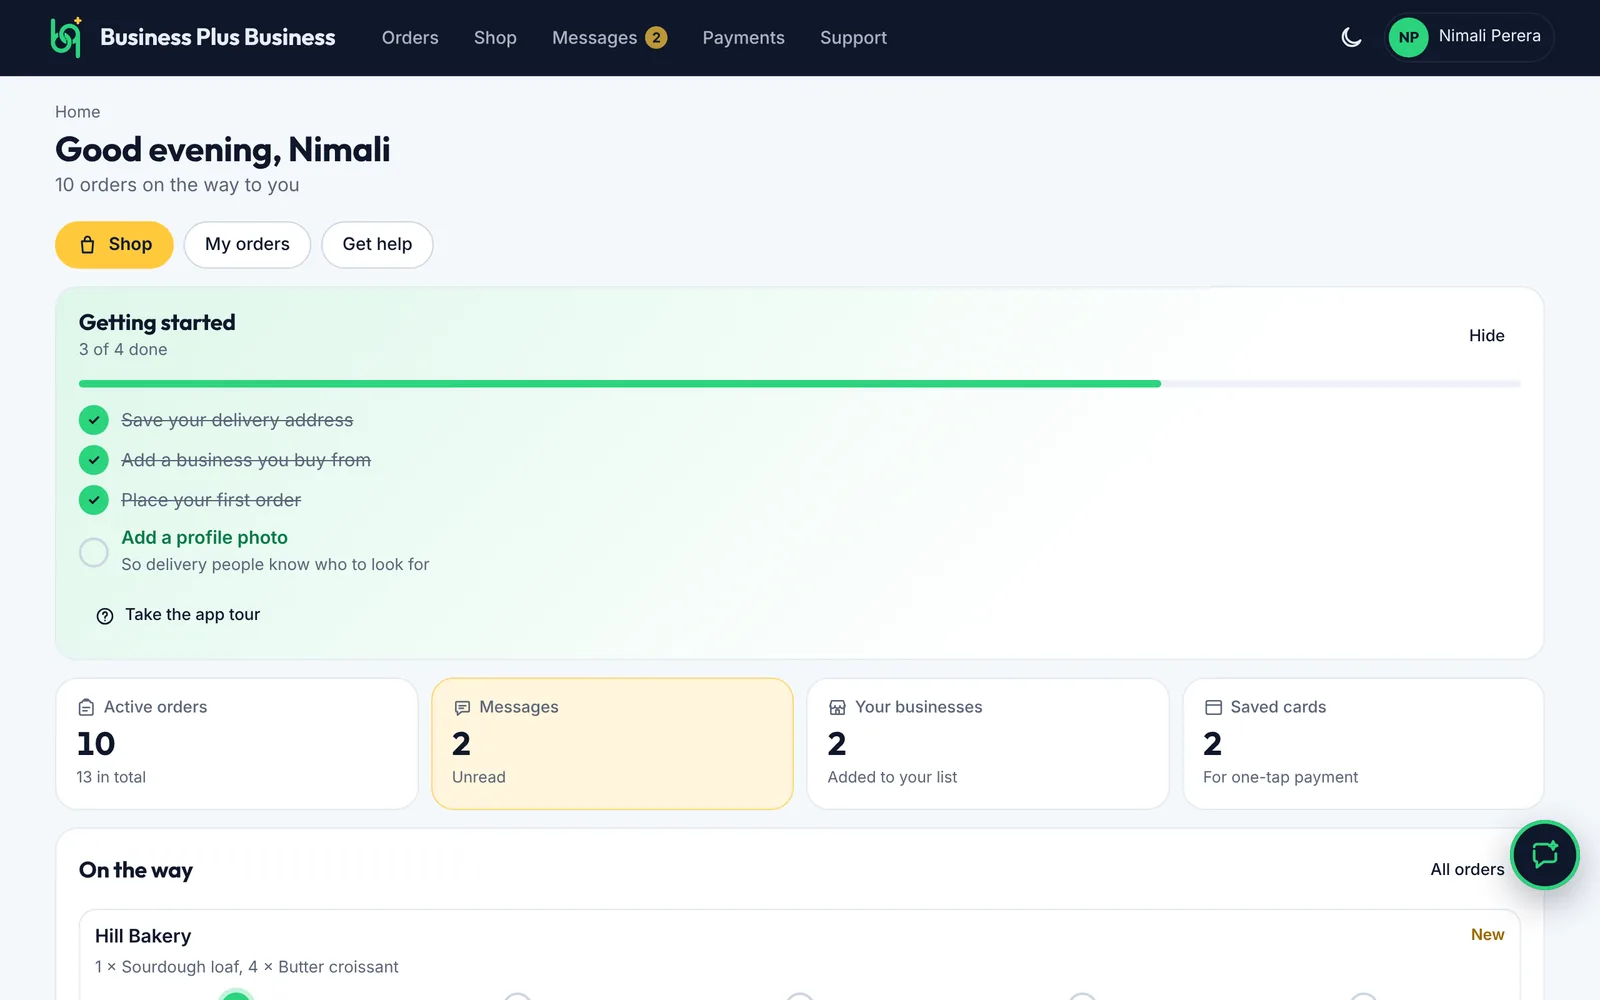
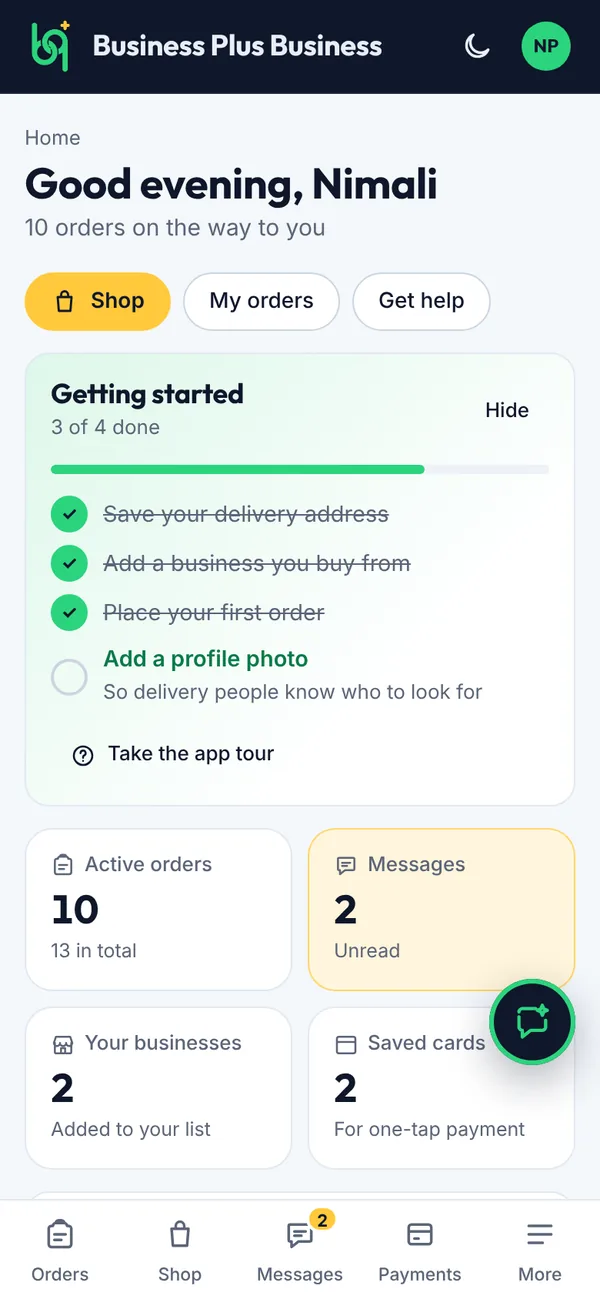
Use the menu to move between pages. On a computer it runs along the top; on a phone it's the bar at the bottom.
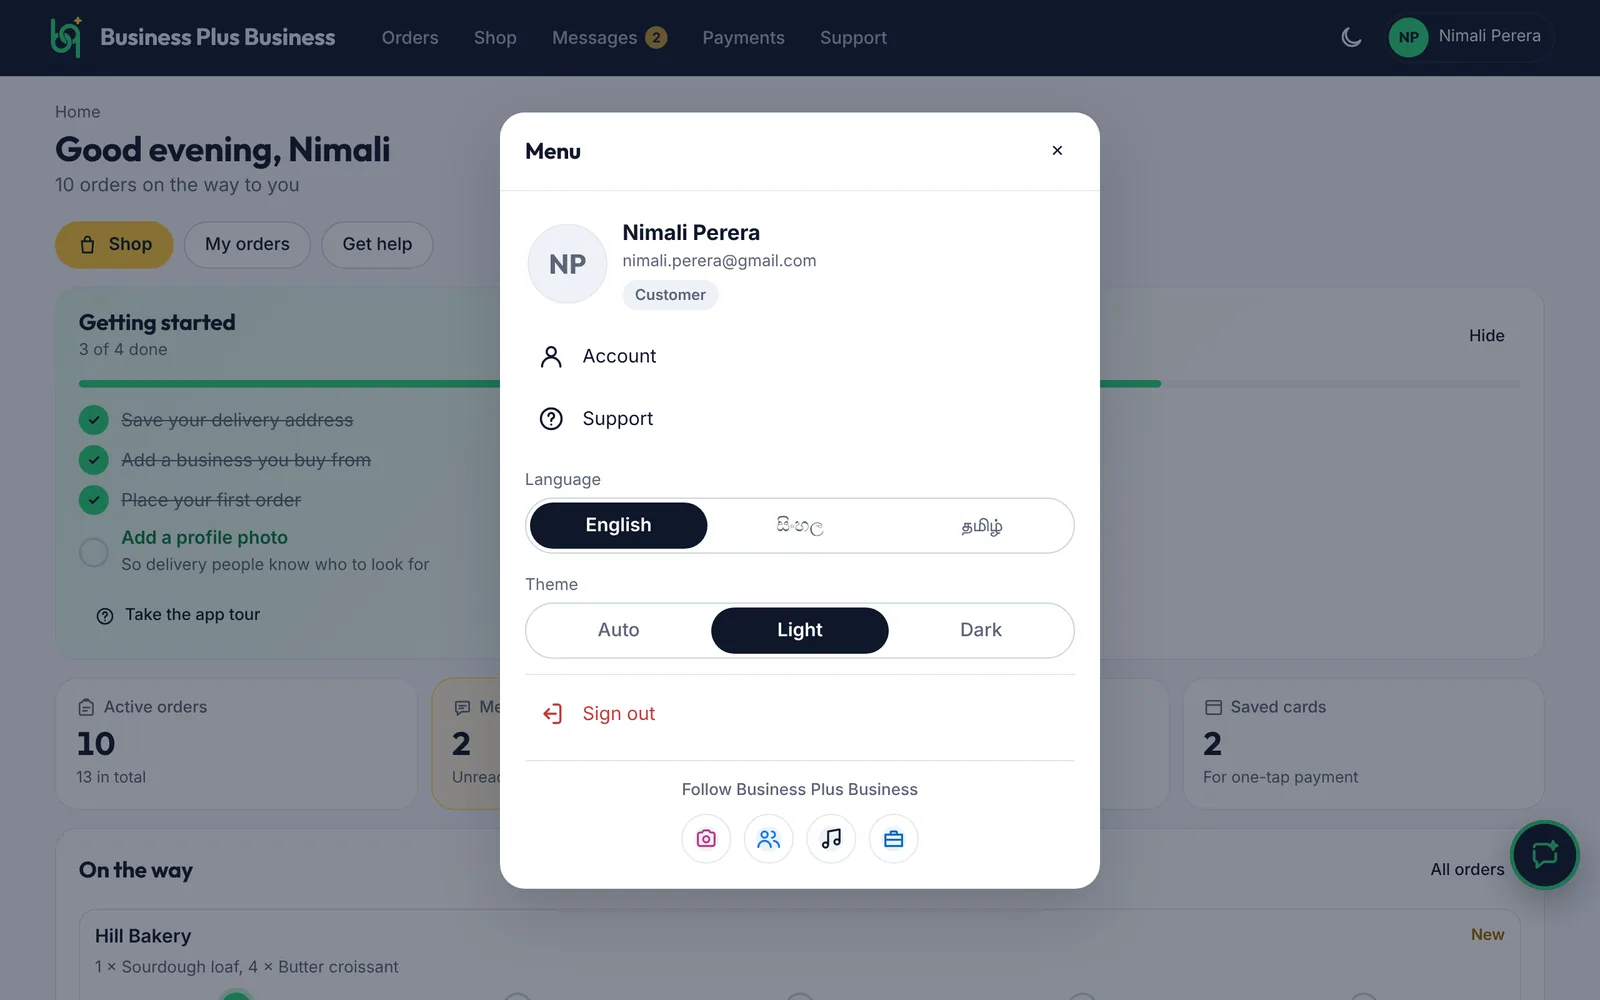
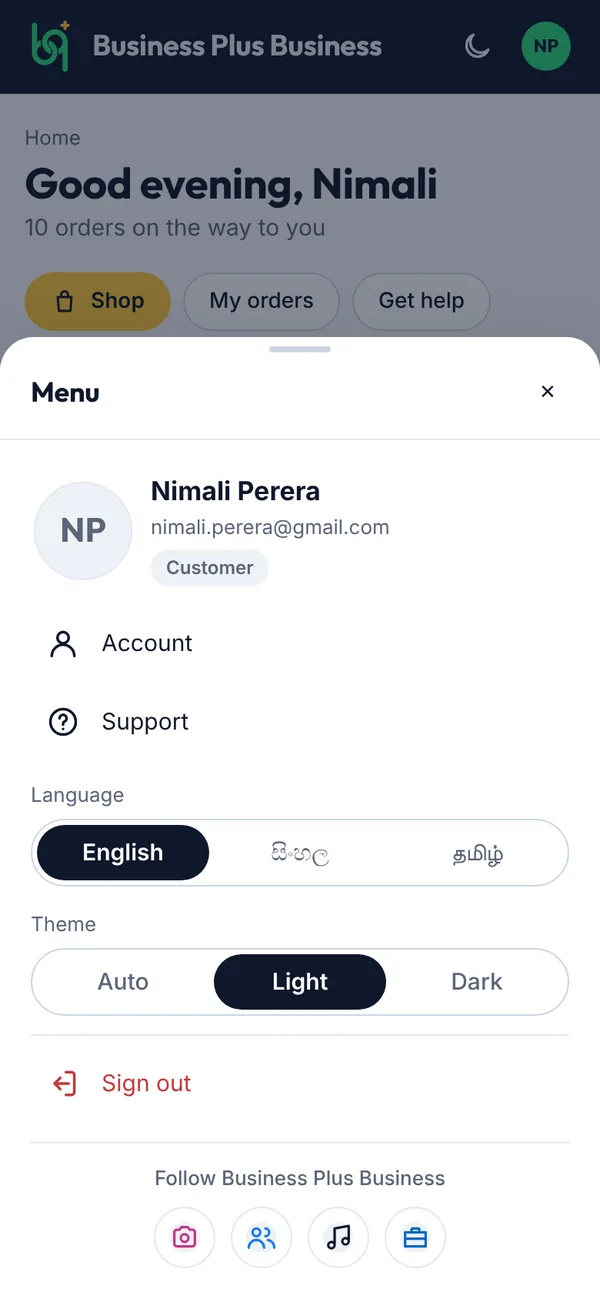
Open your menu: tap your picture on a computer, or More on a phone.
Figure 2.5Home page and the main menu
Figure 2.6Your menu: account, theme and sign out
In your menu you'll find your pages that don't fit in the main menu, Account, the light or dark Theme, and Sign out. Your Home page also shows a Getting started list that ticks itself off as you go. Tap Hide to put it away.
Put the pages you use most in your bar. On a phone the bar has 4 places (plus More); on a computer your 4 come first in the top menu. Your choice is saved on your account, so it follows you to the phone app and the website.
Steps
Open your menu (tap your picture on a computer, or More on a phone) and tap Edit on Choose your bar.
Under In your bar, use ↑ and ↓ to change the order, or − to send a page to More.
Under Under More, tap + Add to bar to bring a page up. When the bar is full, remove one first.
Tap Save. Reset to usual puts back the usual pages.
What you’ll see
Account and Support always stay under More, so you can always reach them. New pages added to the app later show under More until you pick them.
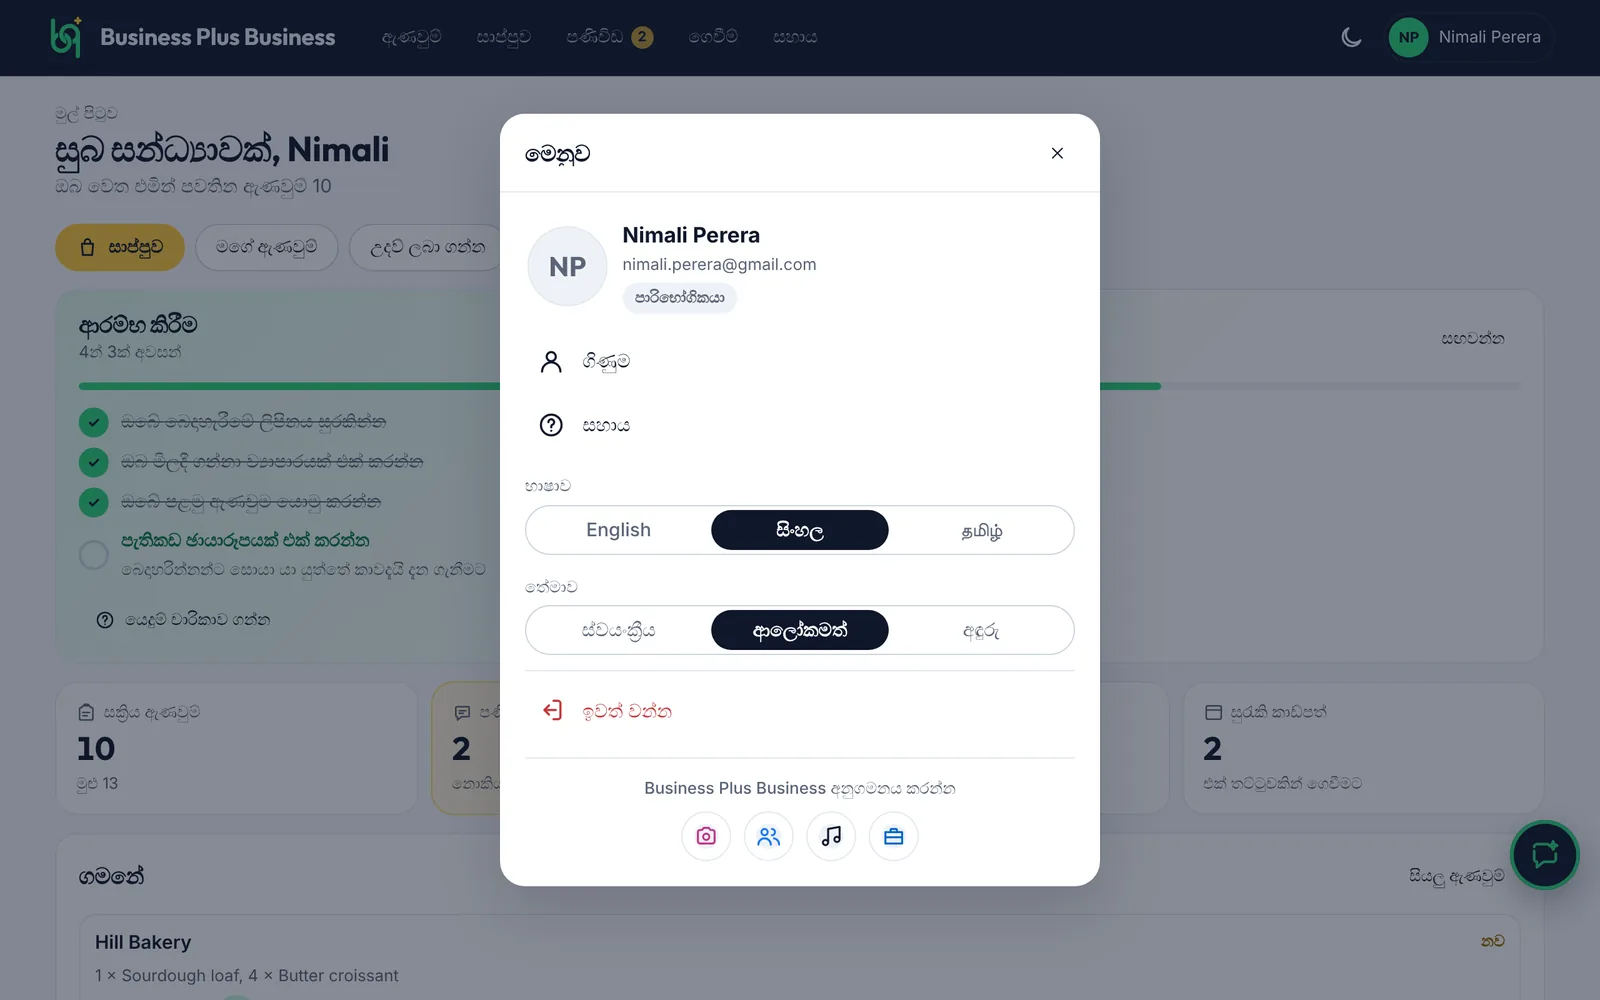
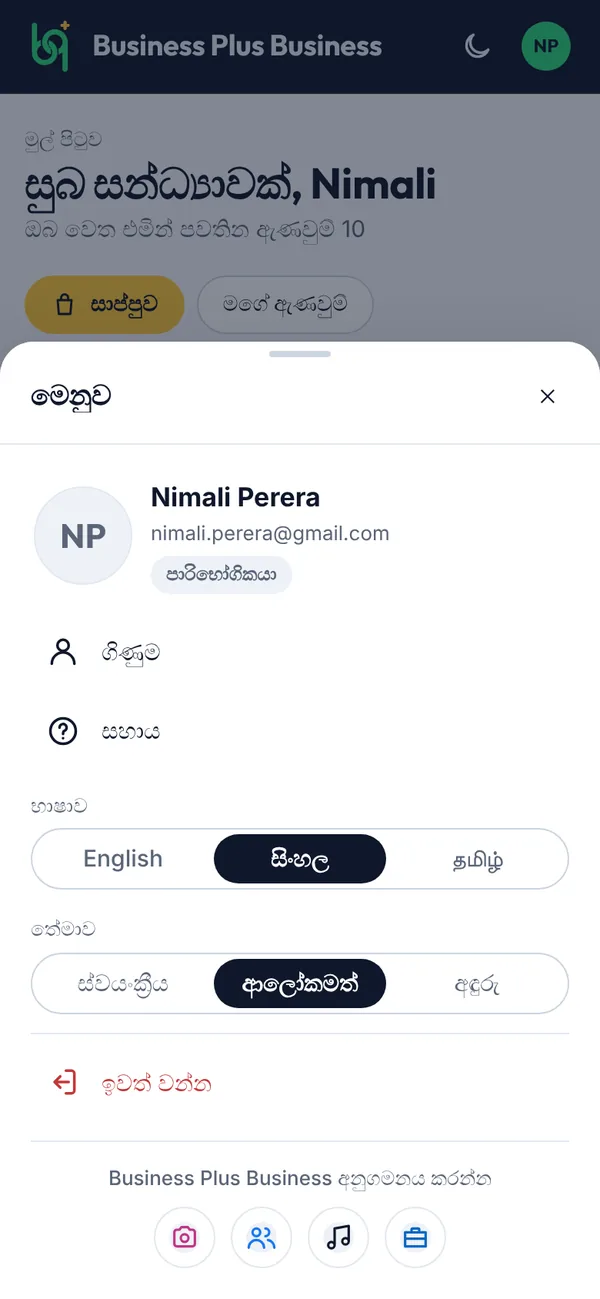
The app can be shown in English, Sinhala (සිංහල) or Tamil (தமிழ்). Your choice is saved on this device.
Steps
Before you sign in: tap English, සිංහල or தமிழ் at the top of the sign-in screen.
Figure 2.7Choosing a language before you sign in
After you sign in: open your menu (tap your picture on a computer, or More on a phone) and pick a language under Language.
Figure 2.8The app in Sinhala, with the language choice in your menu
Good to know
This user manual is in English. If a word in the app looks wrong in Sinhala or Tamil, tell us from Support so we can fix it.
What you’ll see
The page reloads in the language you picked. Dates and times follow it too. Names, addresses and messages people type stay as they were written. The Ask B+B assistant answers in your language.
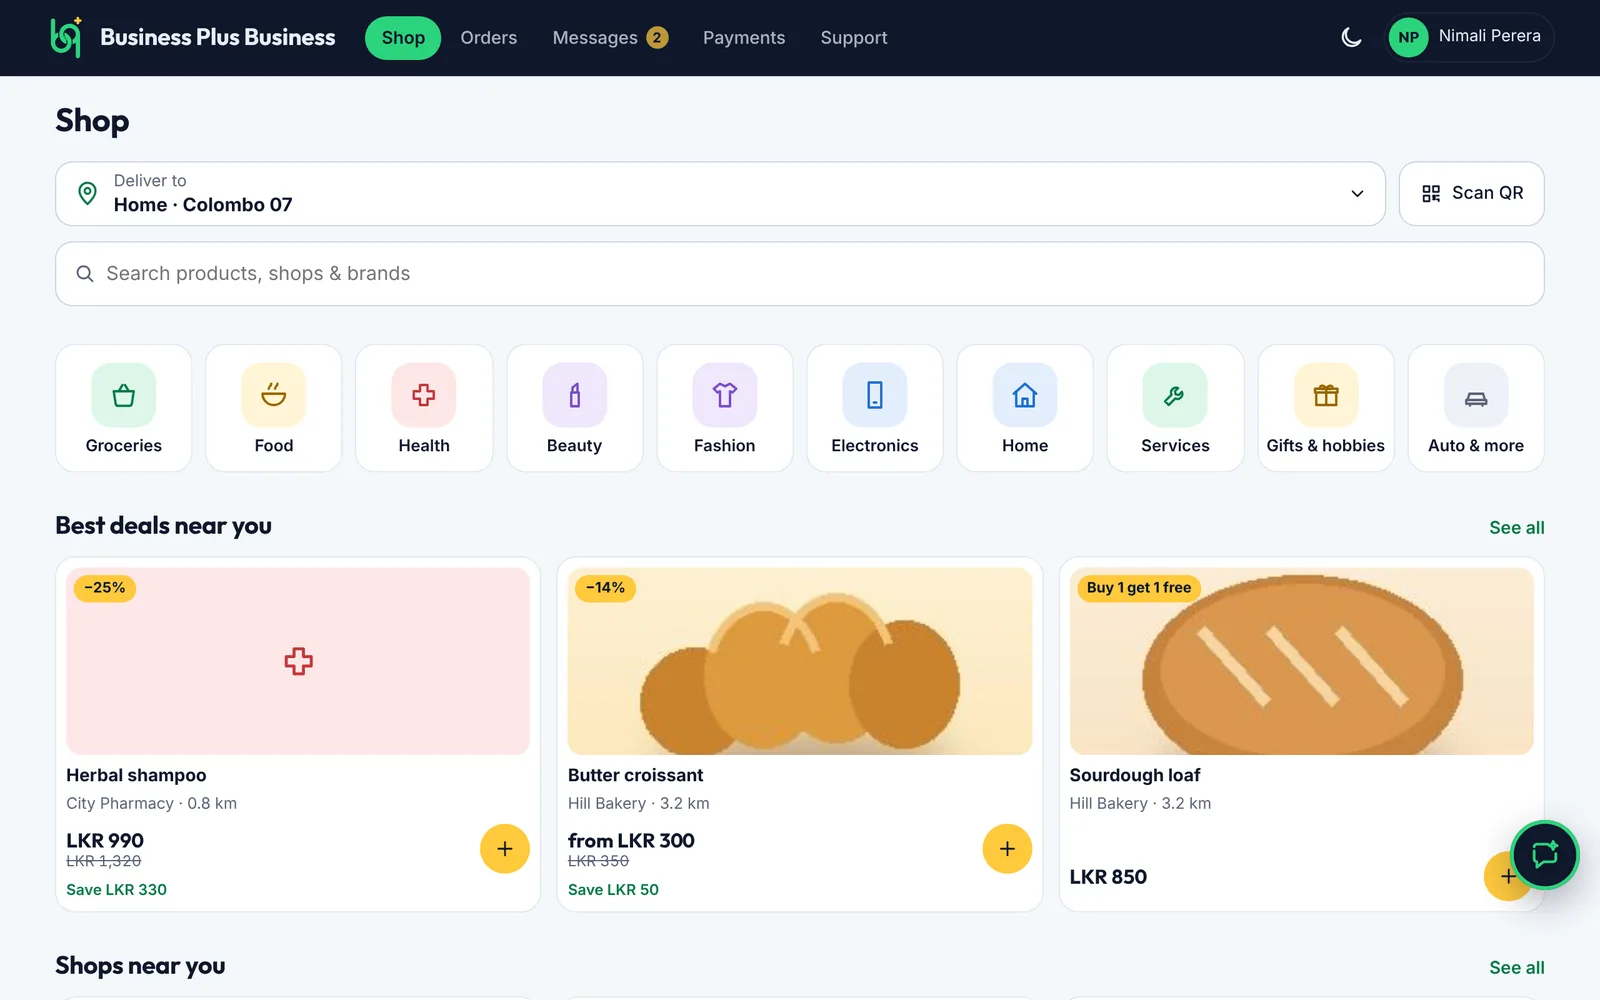
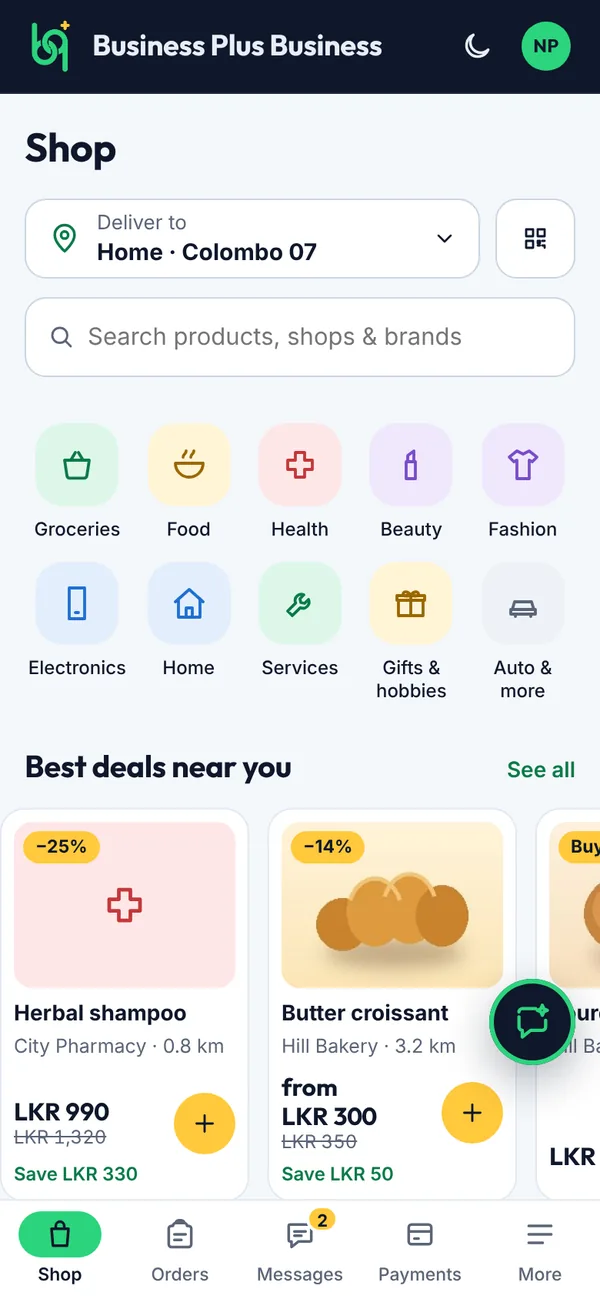
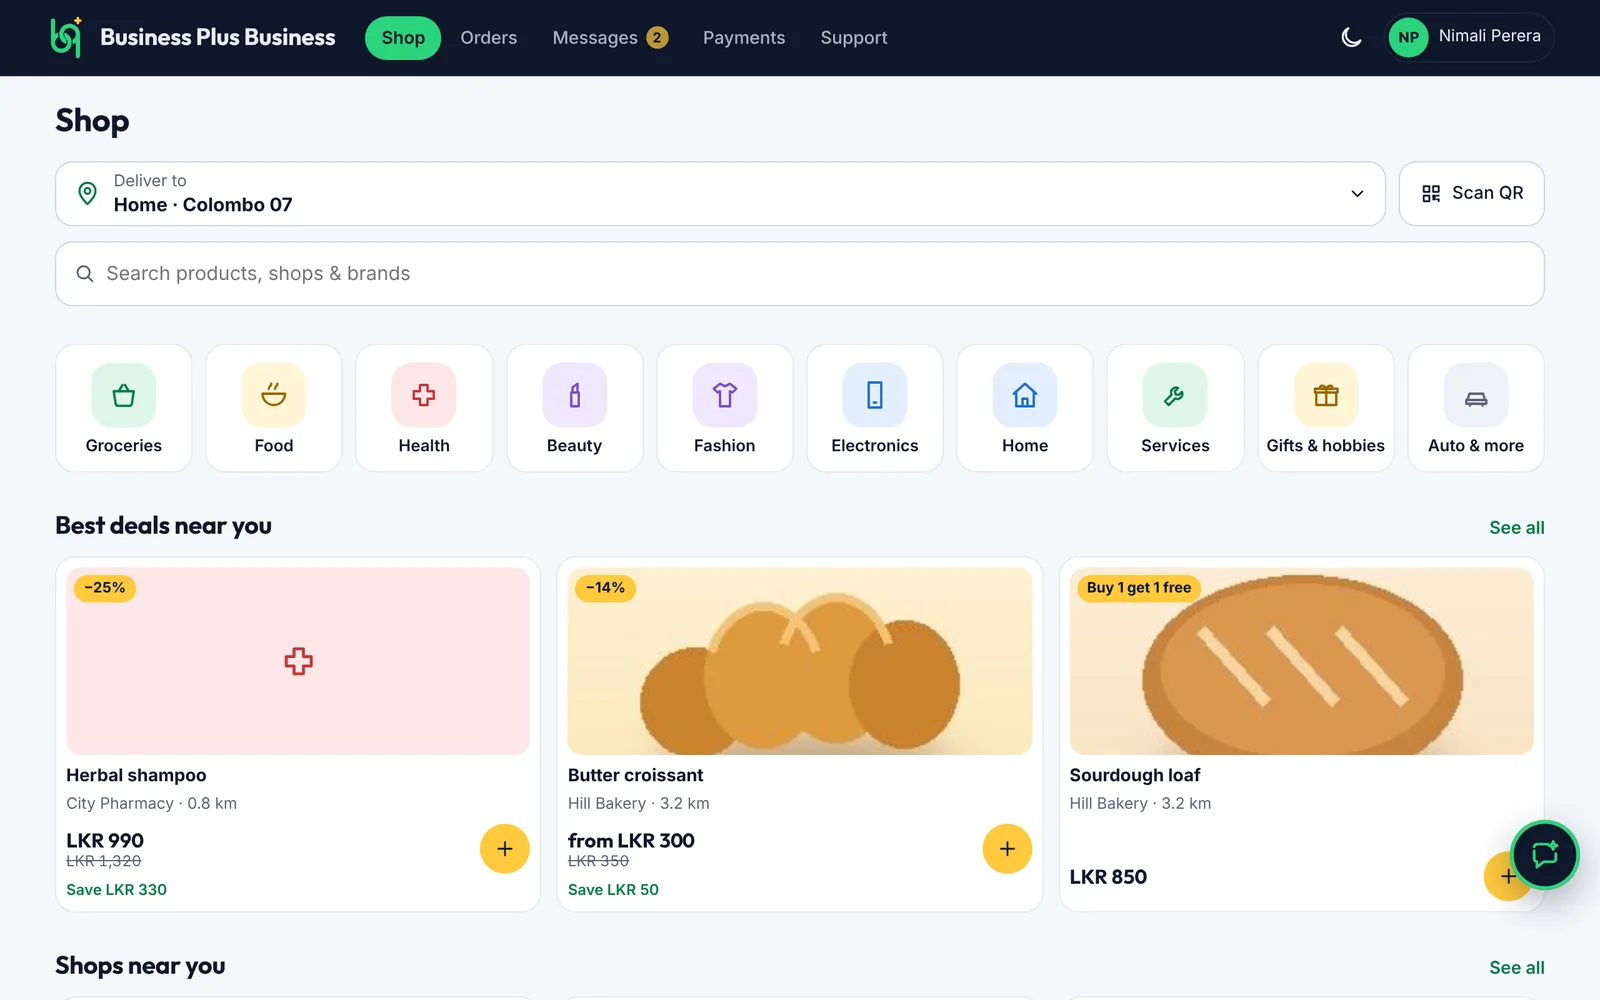
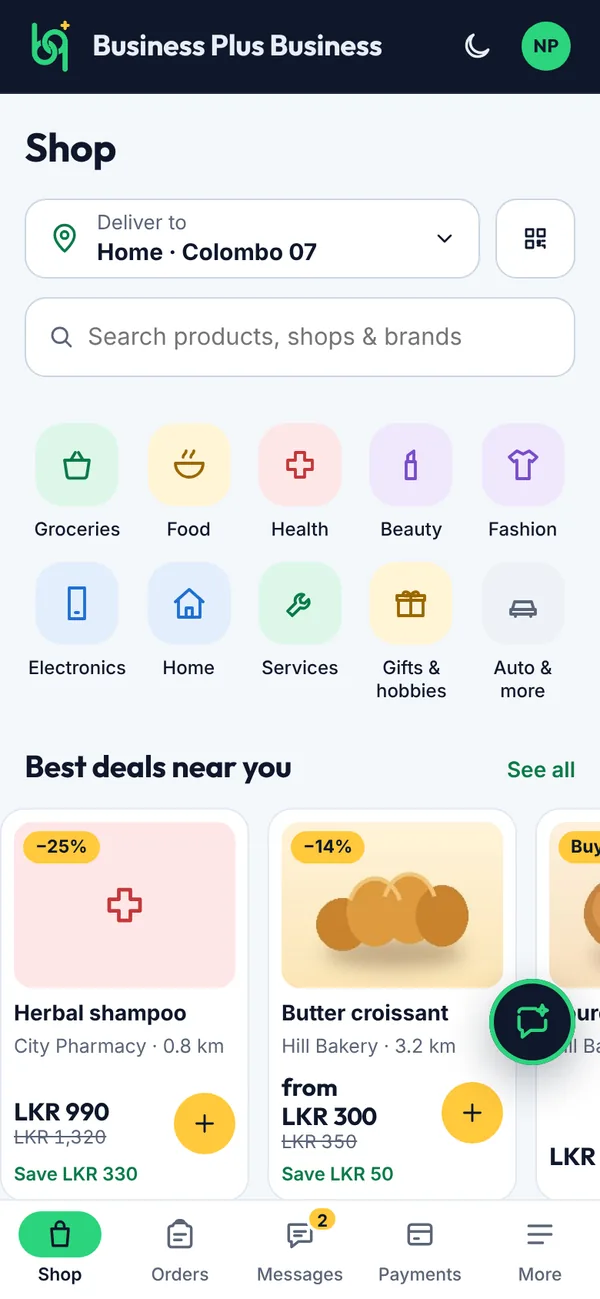
Shop shows what's around you: deals, nearby shops, how fast they can deliver, and what you've bought before. Products and shops are searched together.
Steps
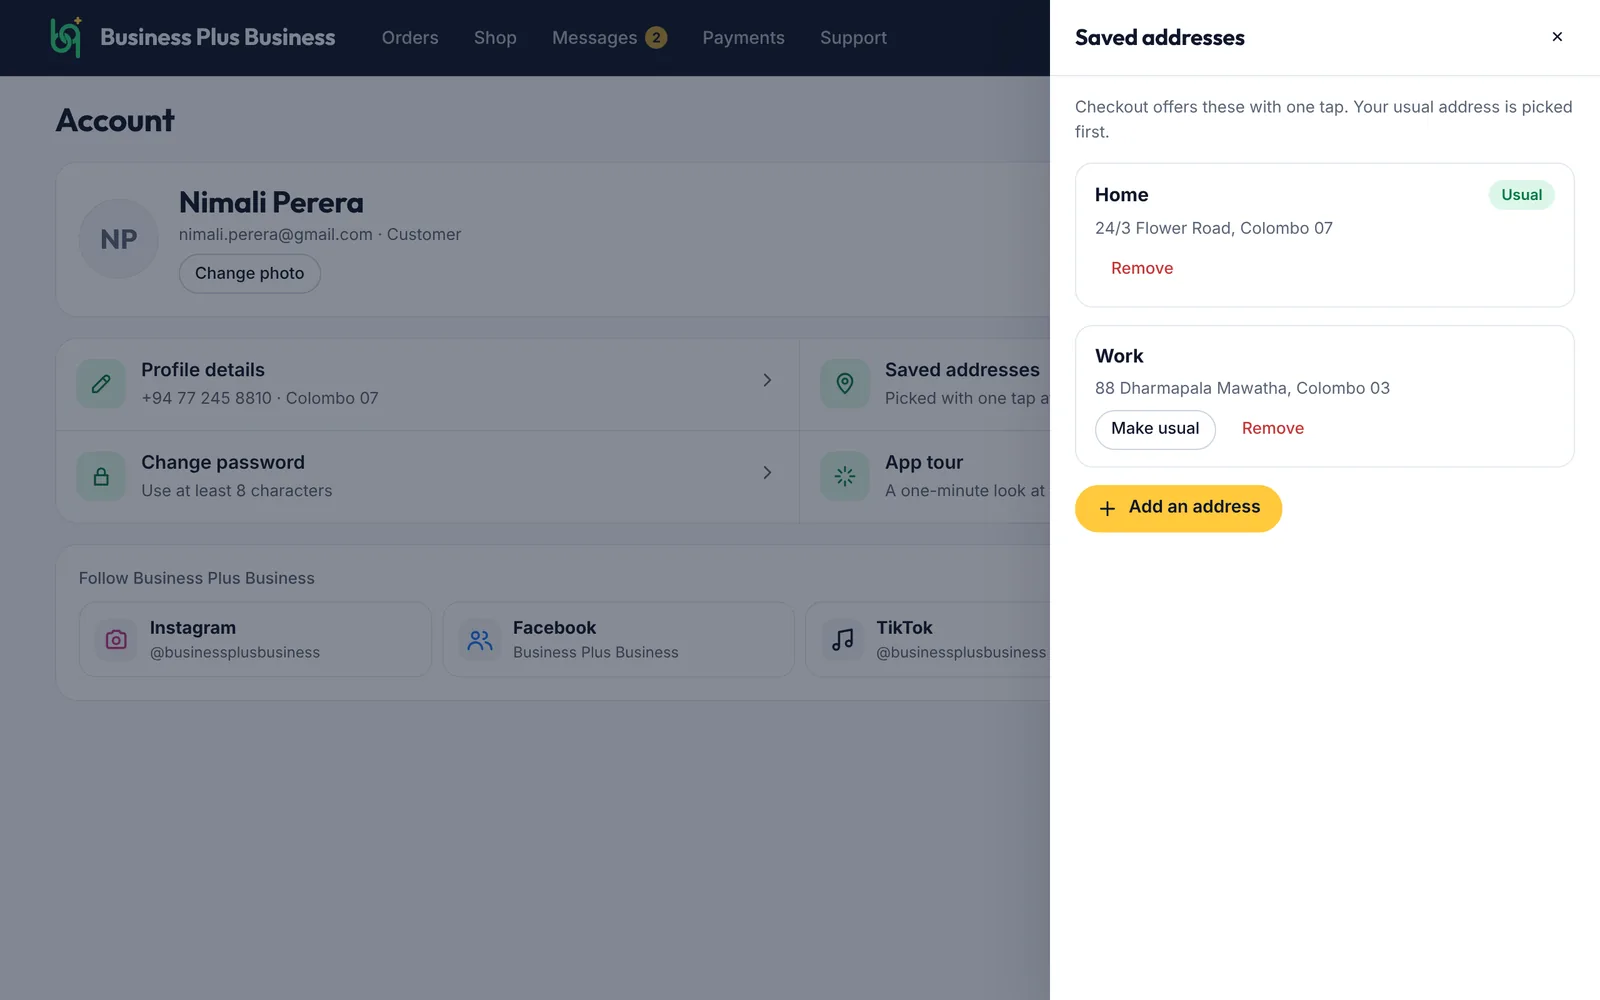
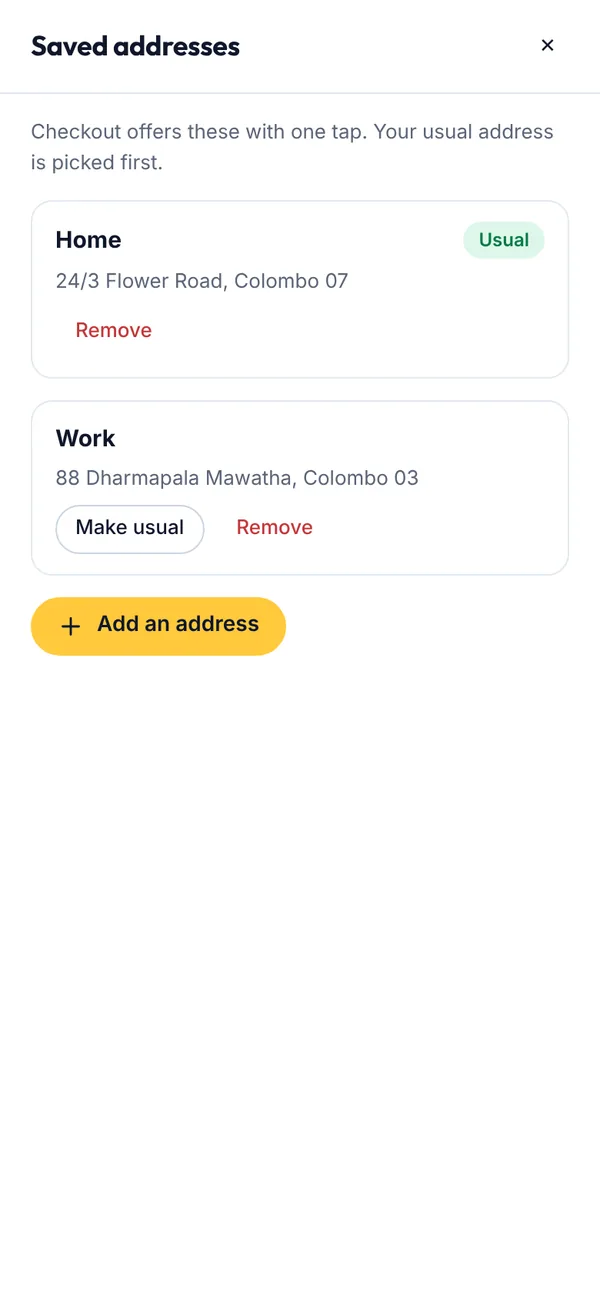
Check Deliver to at the top. Tap it to choose your current location or one of your saved addresses. Shop sorts everything by distance from there.
Or tap a category, such as Groceries, Health or Services.
Have a business's QR code? Tap Scan QR and point your camera at it.
Under Explore all shops, tap Add to keep a business in Your shops.
Figure 3.1Shop: where you are, search and categories
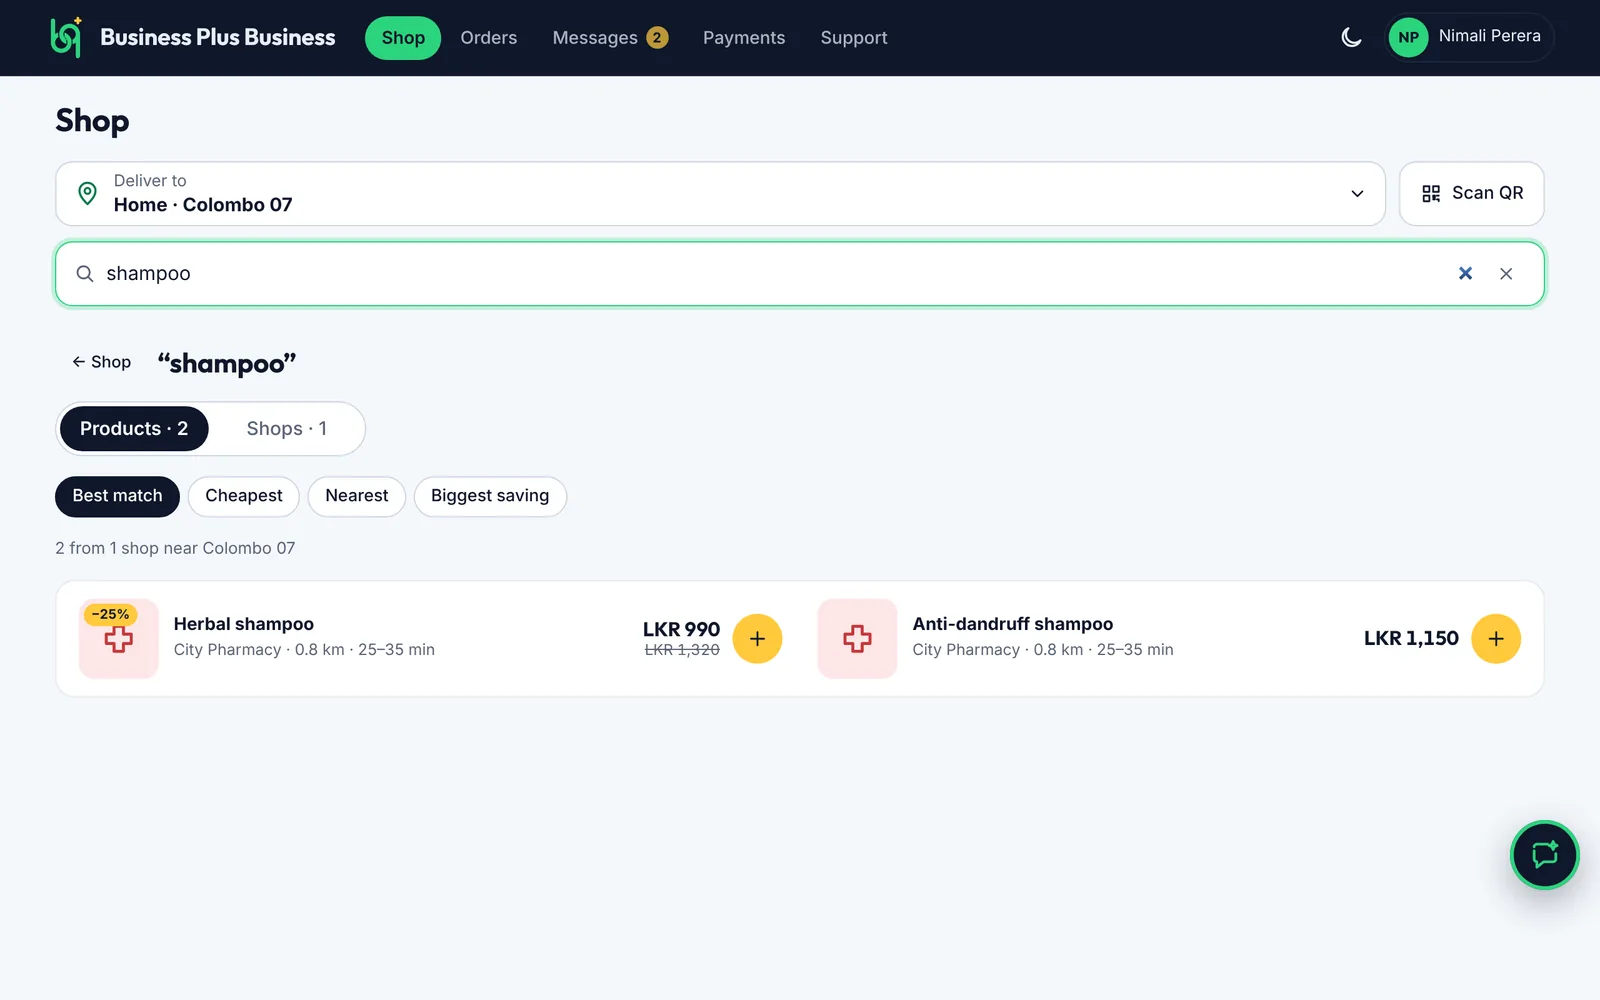
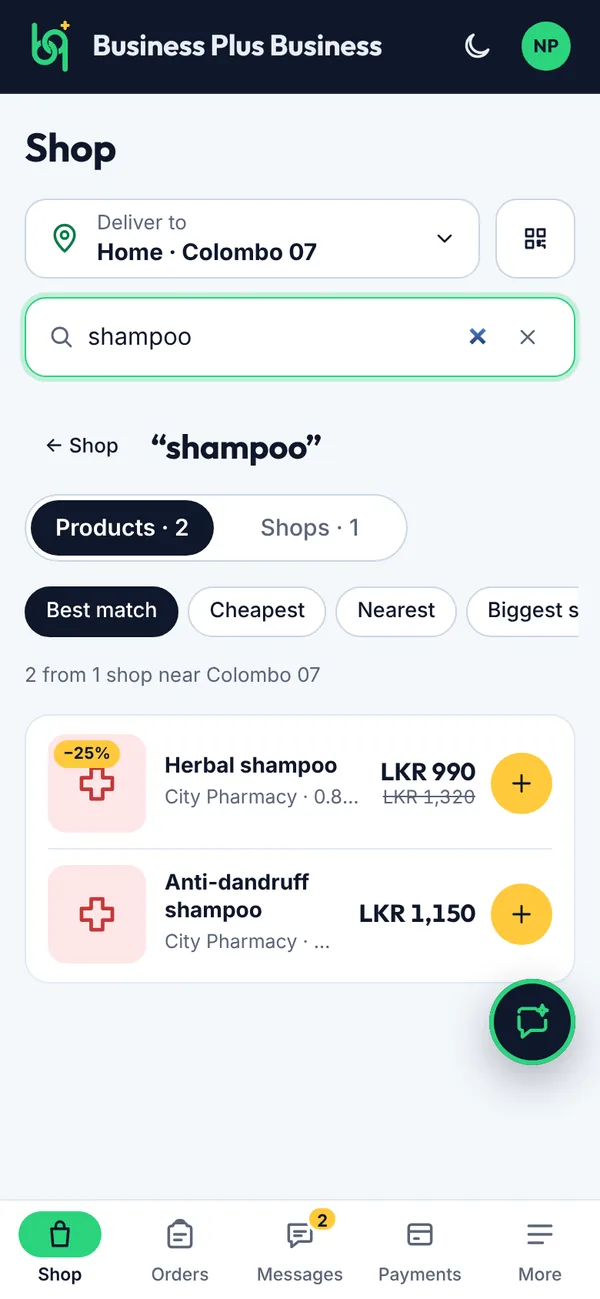
Type what you need in the search box, for example shampoo. You see that product from every shop near you, cheapest and closest first. Tap Shops to see the shops instead.
Tap + on a product to add it to that shop's basket, or tap the shop's name to open the shop.
Figure 3.2Searching for a product across shops
Figure 3.3Best deals and shops near you
Scanned a QR code before you had an account?
Create your account straight from that page. The business is added to Your shops as soon as you sign in for the first time, even if you confirm your email first.
What you’ll see
Further down you'll find Best deals near you, Shops near you, Quick delivery, Buy again, Popular near you, Recommended for you, Offers and discounts and businesses that are New around you. Delivery times are estimates; the business confirms the time.
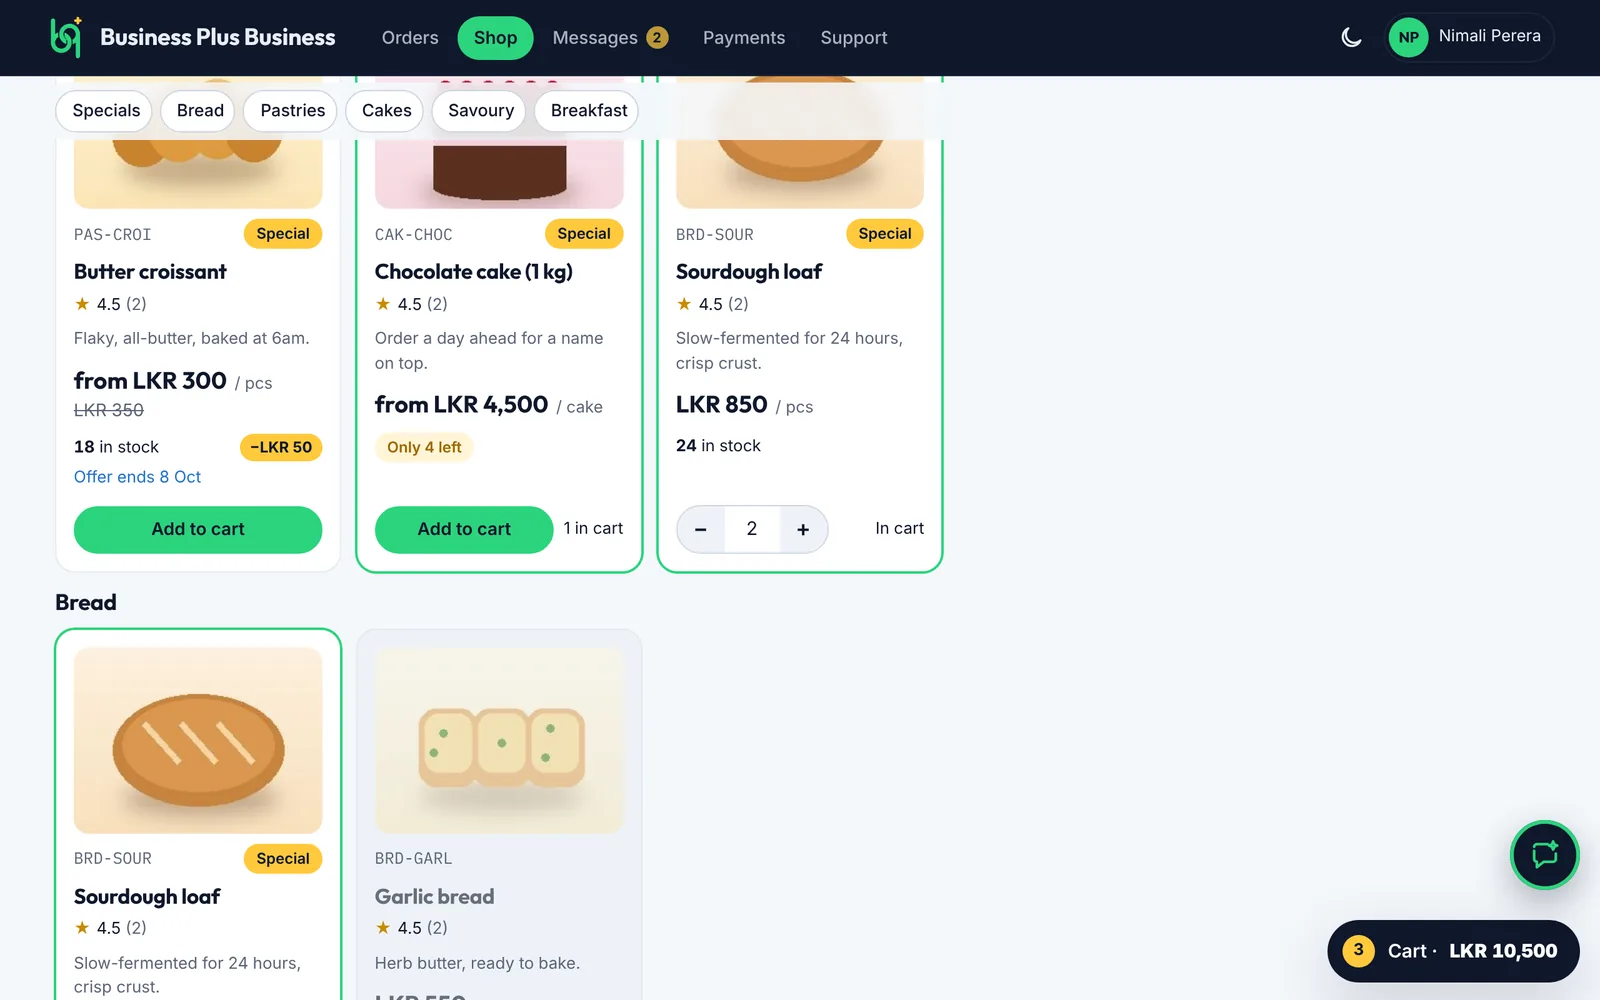
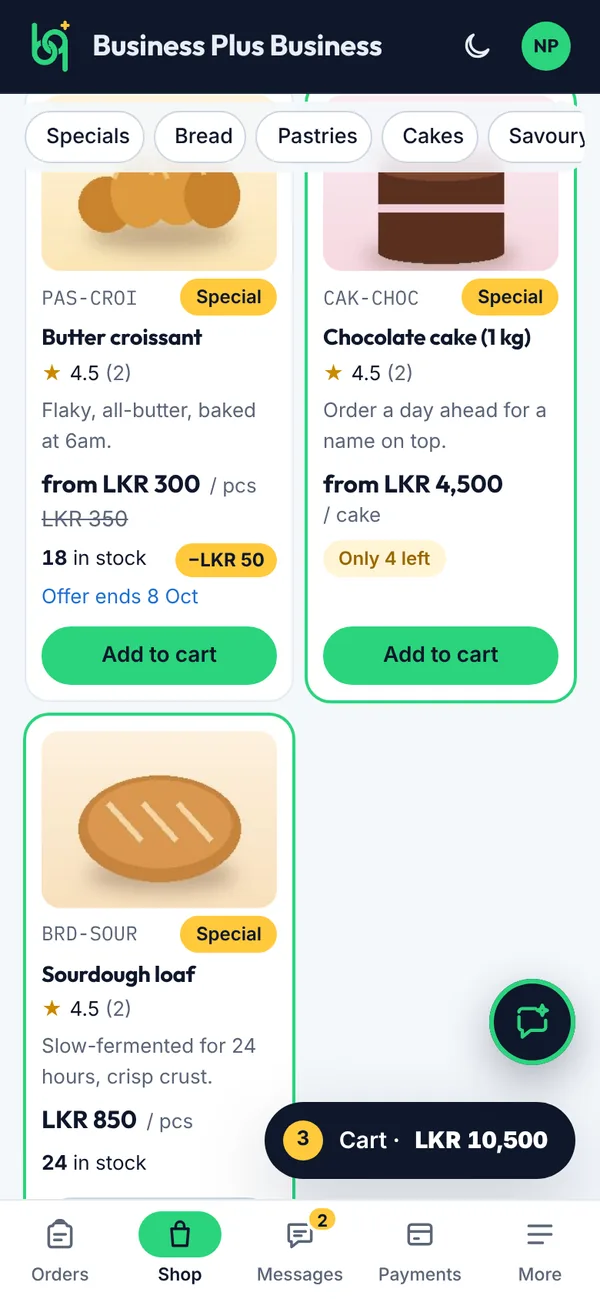
Tap a category, such as Specials or Cakes, to jump to it.
Tap Add to cart on each product you want.
Use − and + to change how many you want.
Figure 3.4A business's products, grouped by category
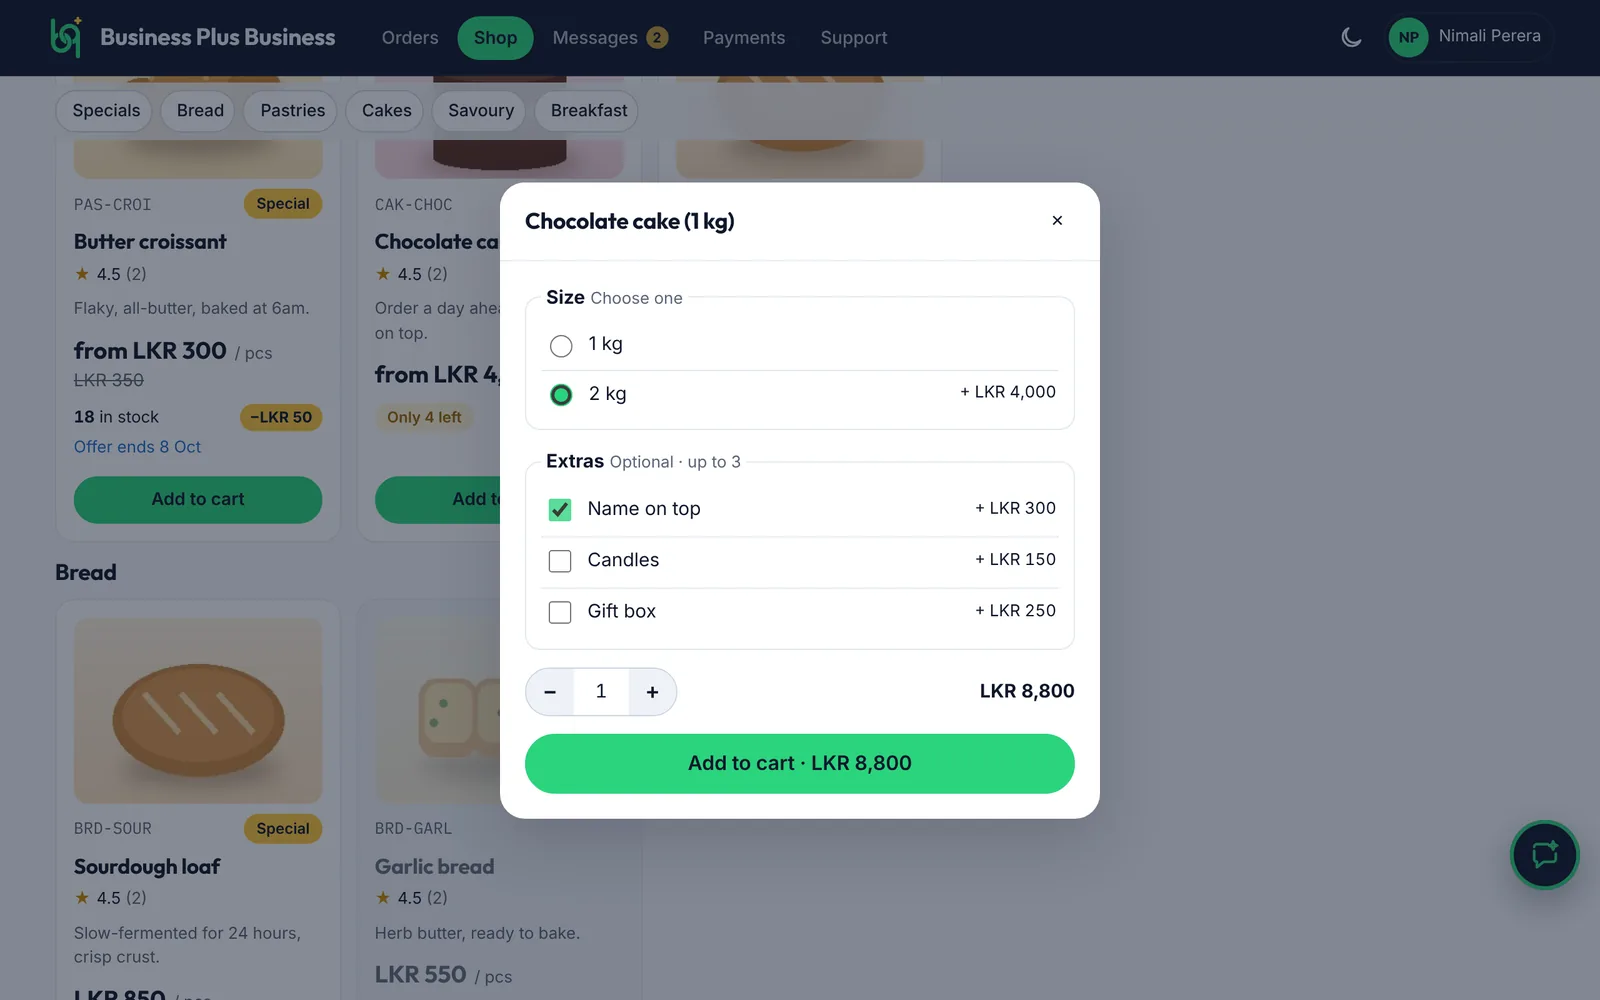
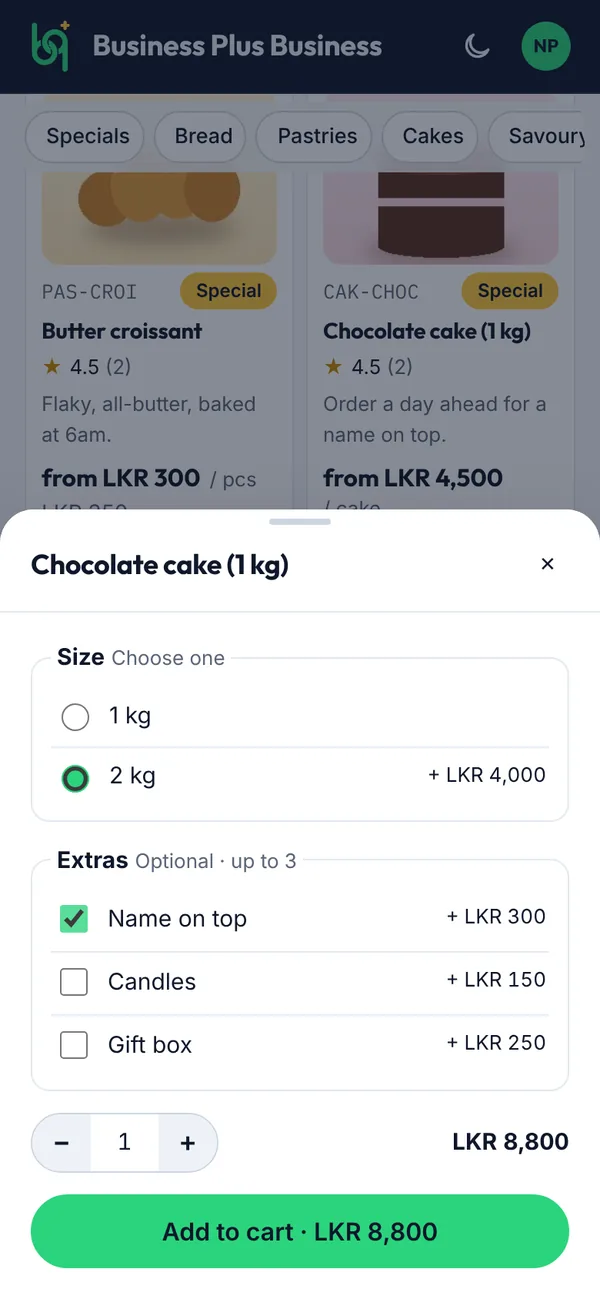
Some products have sizes or extras. Pick the ones you want; the price updates as you choose.
Tap Add to cart at the bottom of the window.
Figure 3.5Choosing a size and extras
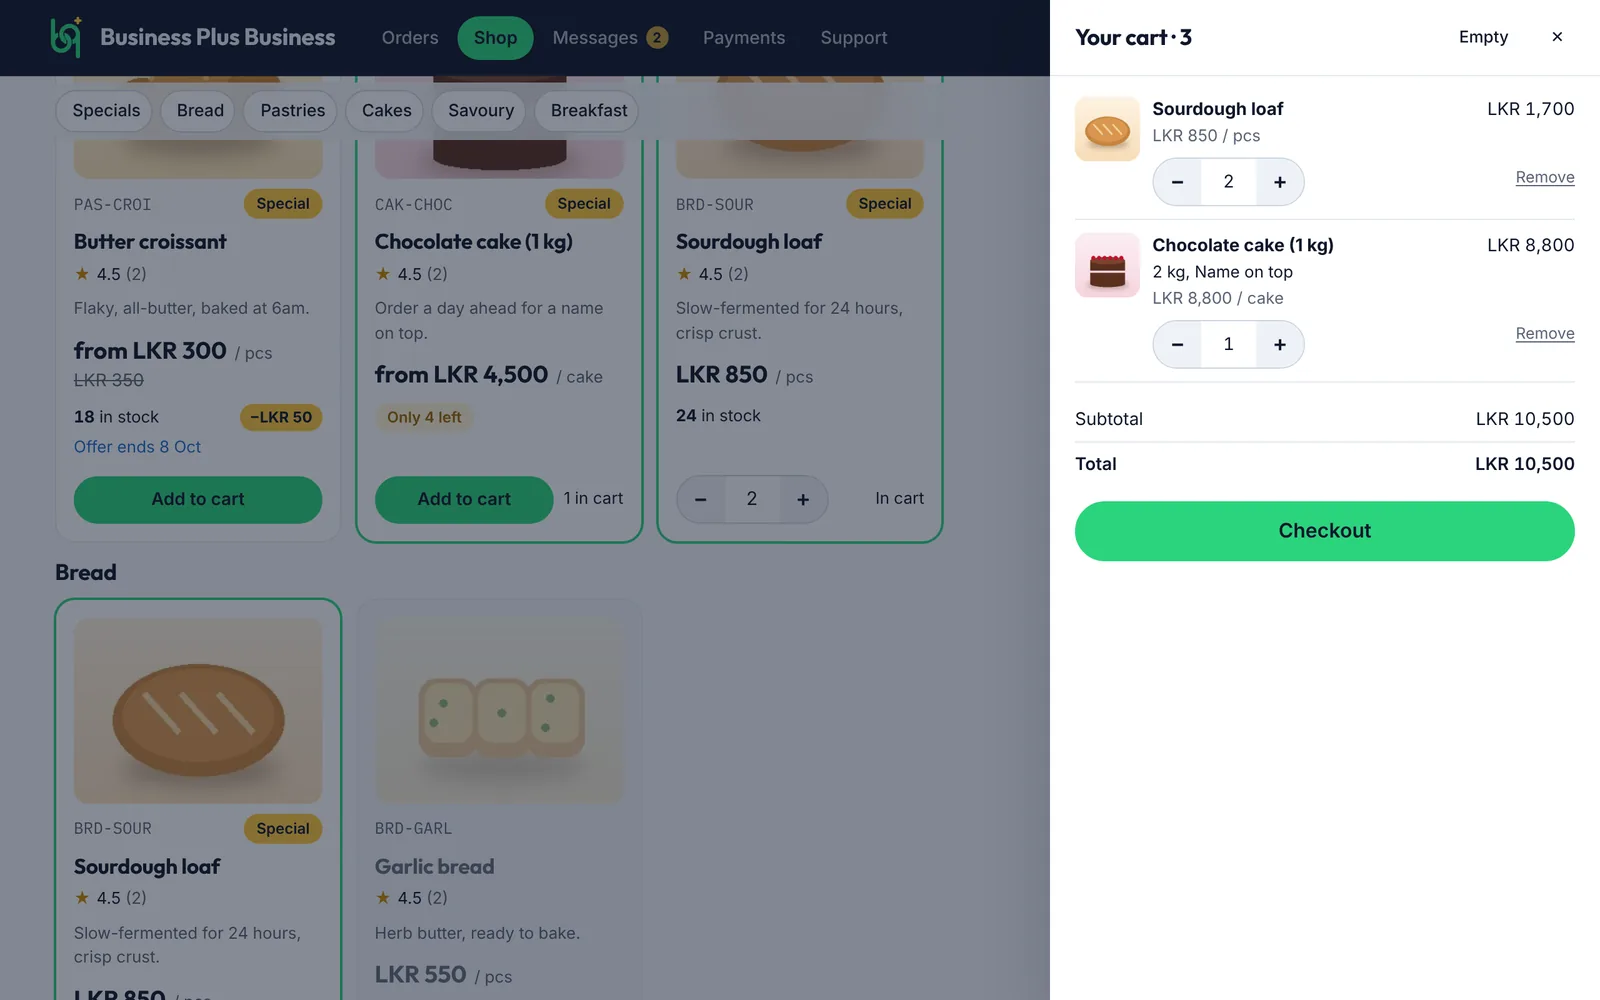
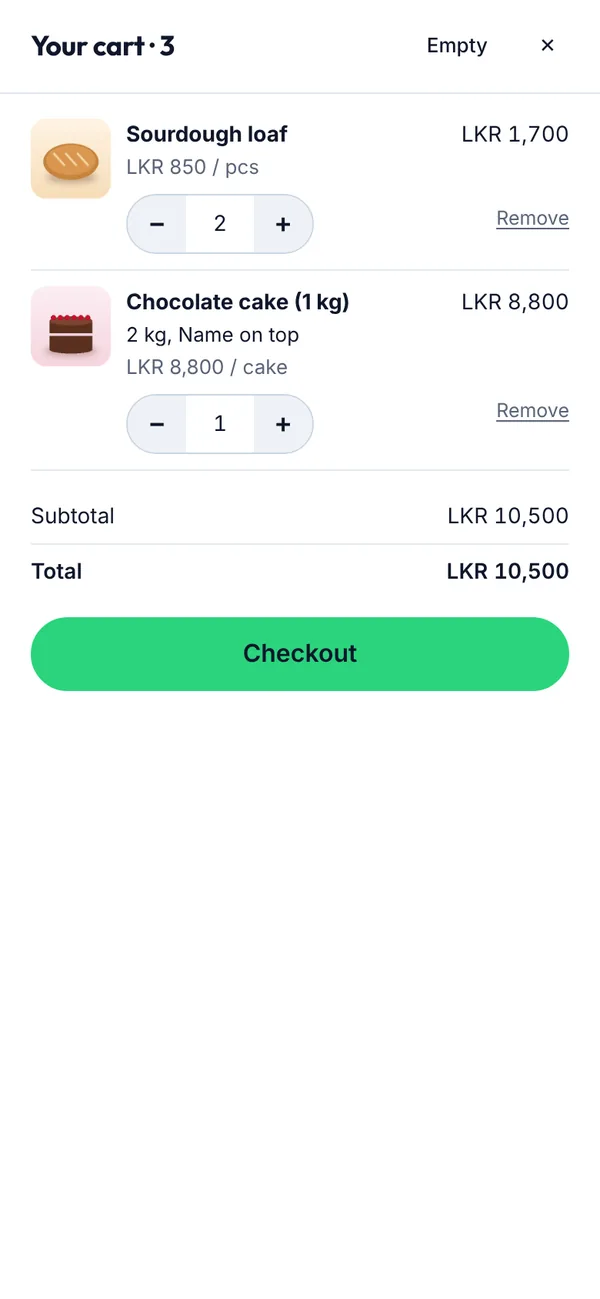
Tap the cart button to review your order, then tap Checkout.
Figure 3.6Your cart
Labels on products
Only 3 left means stock is running low. Not available and Not available today mean you can't add it right now; check back later. If something sells out while it's in your cart, it's marked and left out of your order.
What you’ll see
Your cart shows each item with your choices, what you save and the total. Change amounts or tap Remove, then tap Checkout.
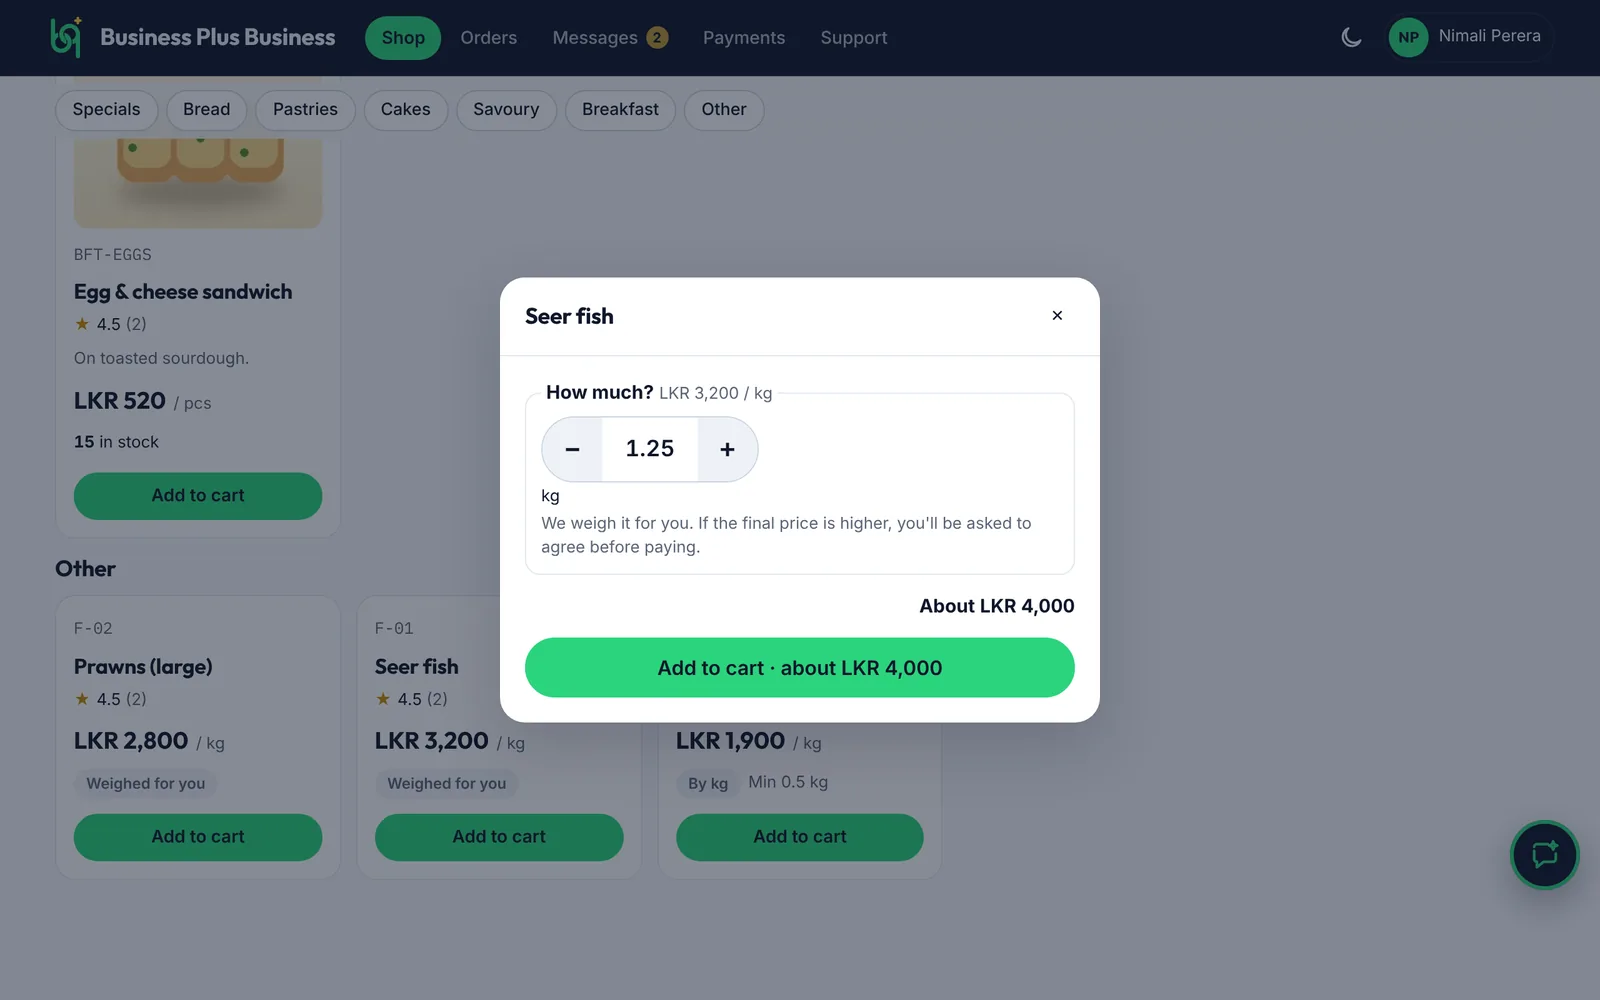
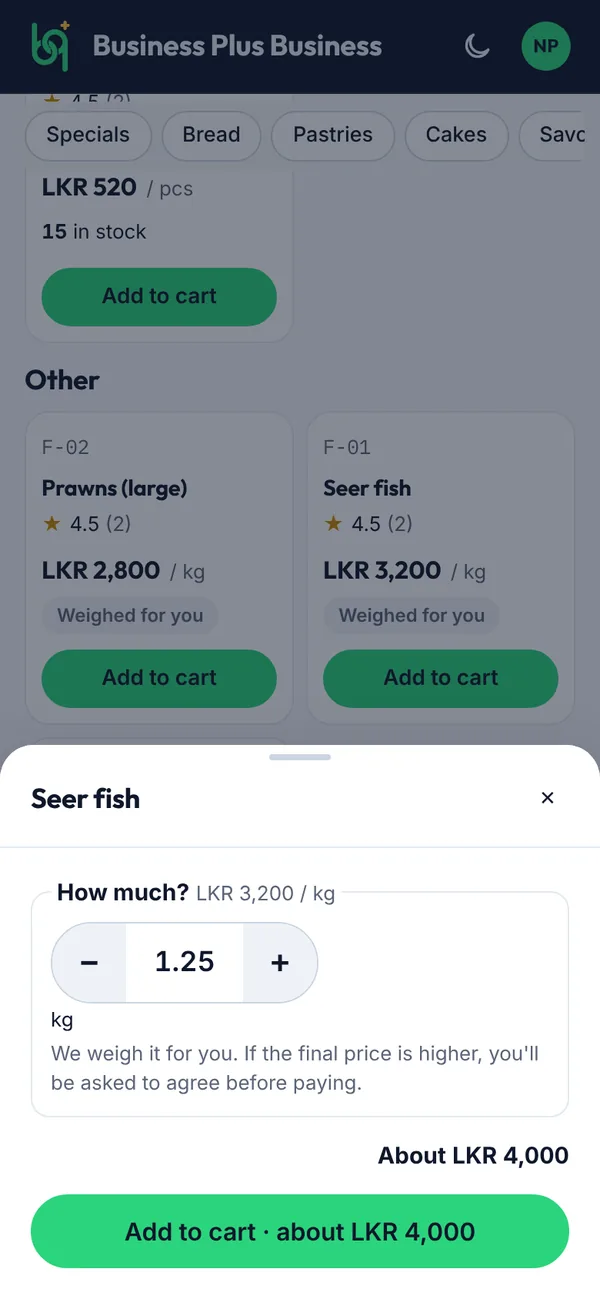
Some things are sold by the kg, metre or sq ft: fish, rice, fabric, sand, banners. You say how much you want, and you see the price before you add it.
Steps
Tap Add to cart on the product. Use − and + to choose how much, or type it. For things sold by size, type the width and height.
Weighed for you means the shop weighs it for your order. You see an estimate now, and the shop sends the final price.
Tap Add to cart. The button shows the price, or about the price for weighed items.
Figure 3.7Choosing how much fish you want
Paying for weighed items
Pay cash, or by card once the final price is agreed: Needs you on Home shows a Pay button. Bank transfer isn't offered for weighed items because it needs the exact amount up front.
What you’ll see
Your cart shows the amount, for example About 1.5 kg. If the final price is higher than the estimate, the shop must ask you first (see 3.4). A lower price is applied straight away.
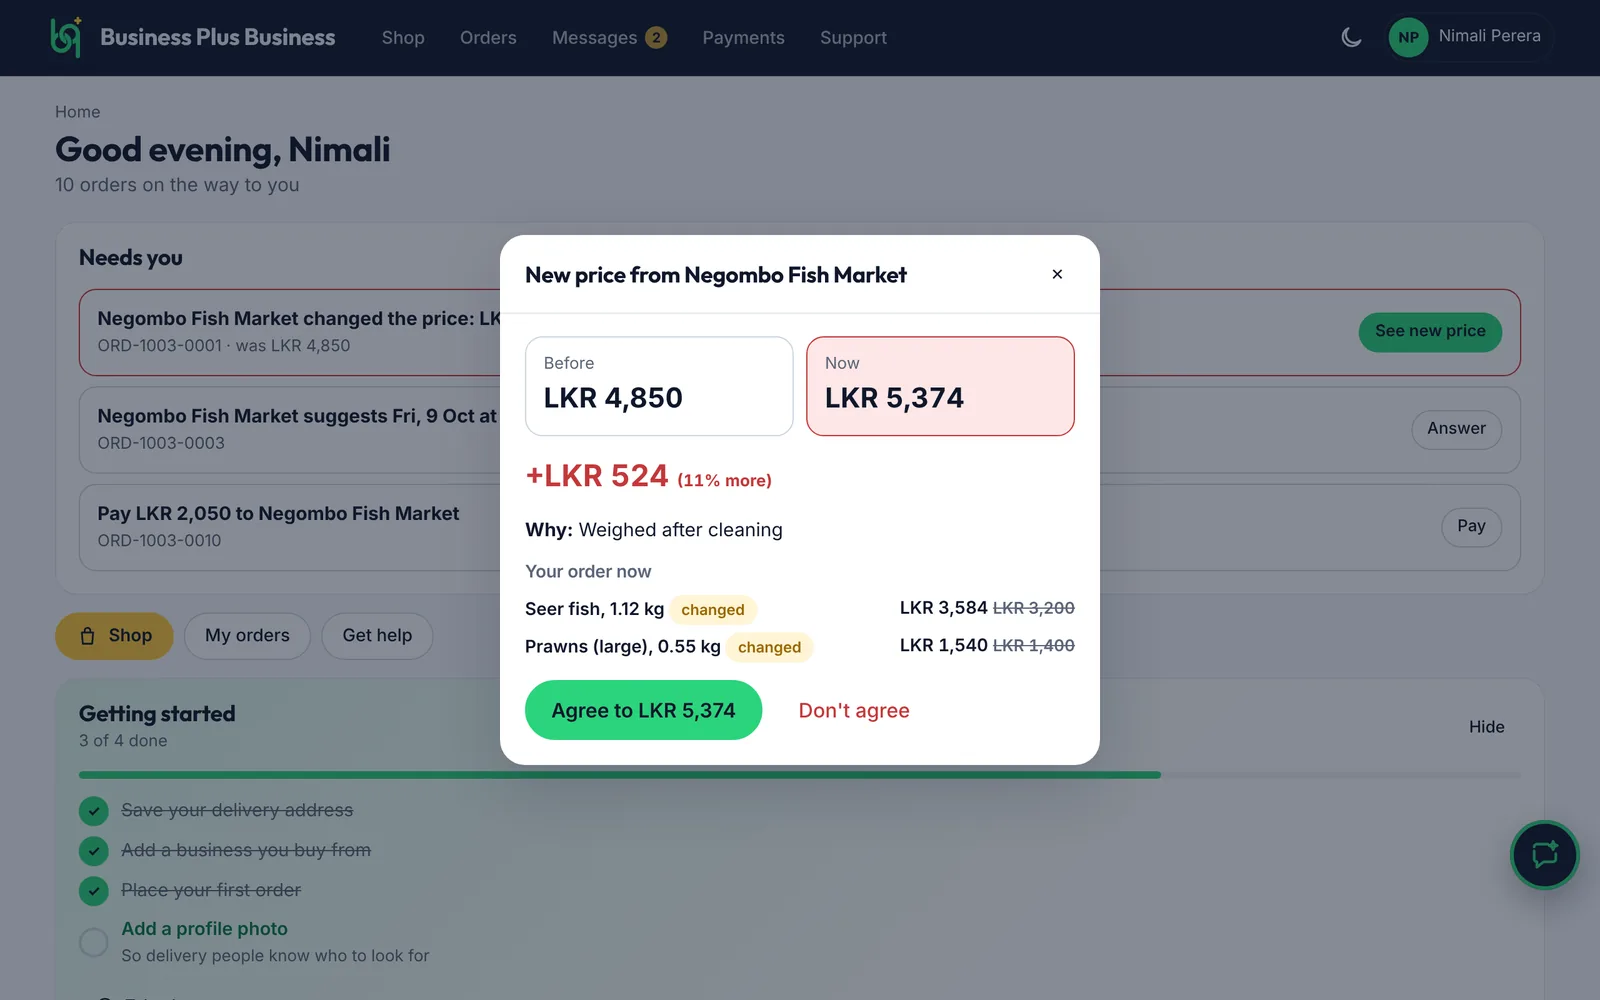
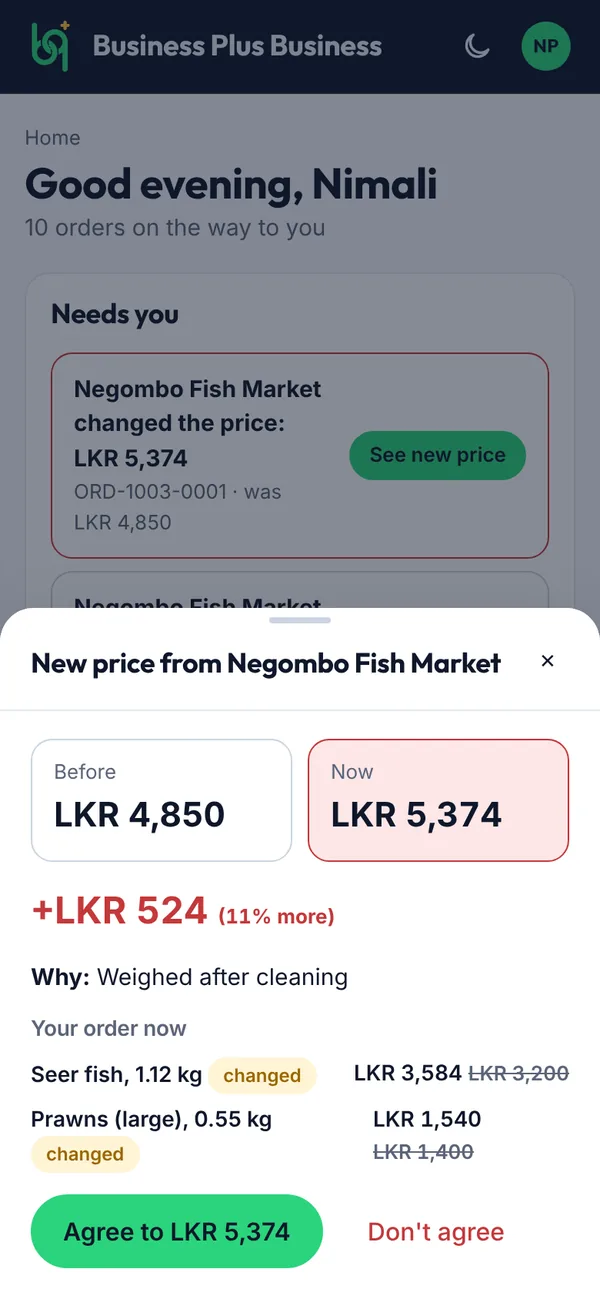
If a shop's final price is higher than what you ordered, for example after weighing, nothing changes until you agree. You see the old and new price side by side.
Steps
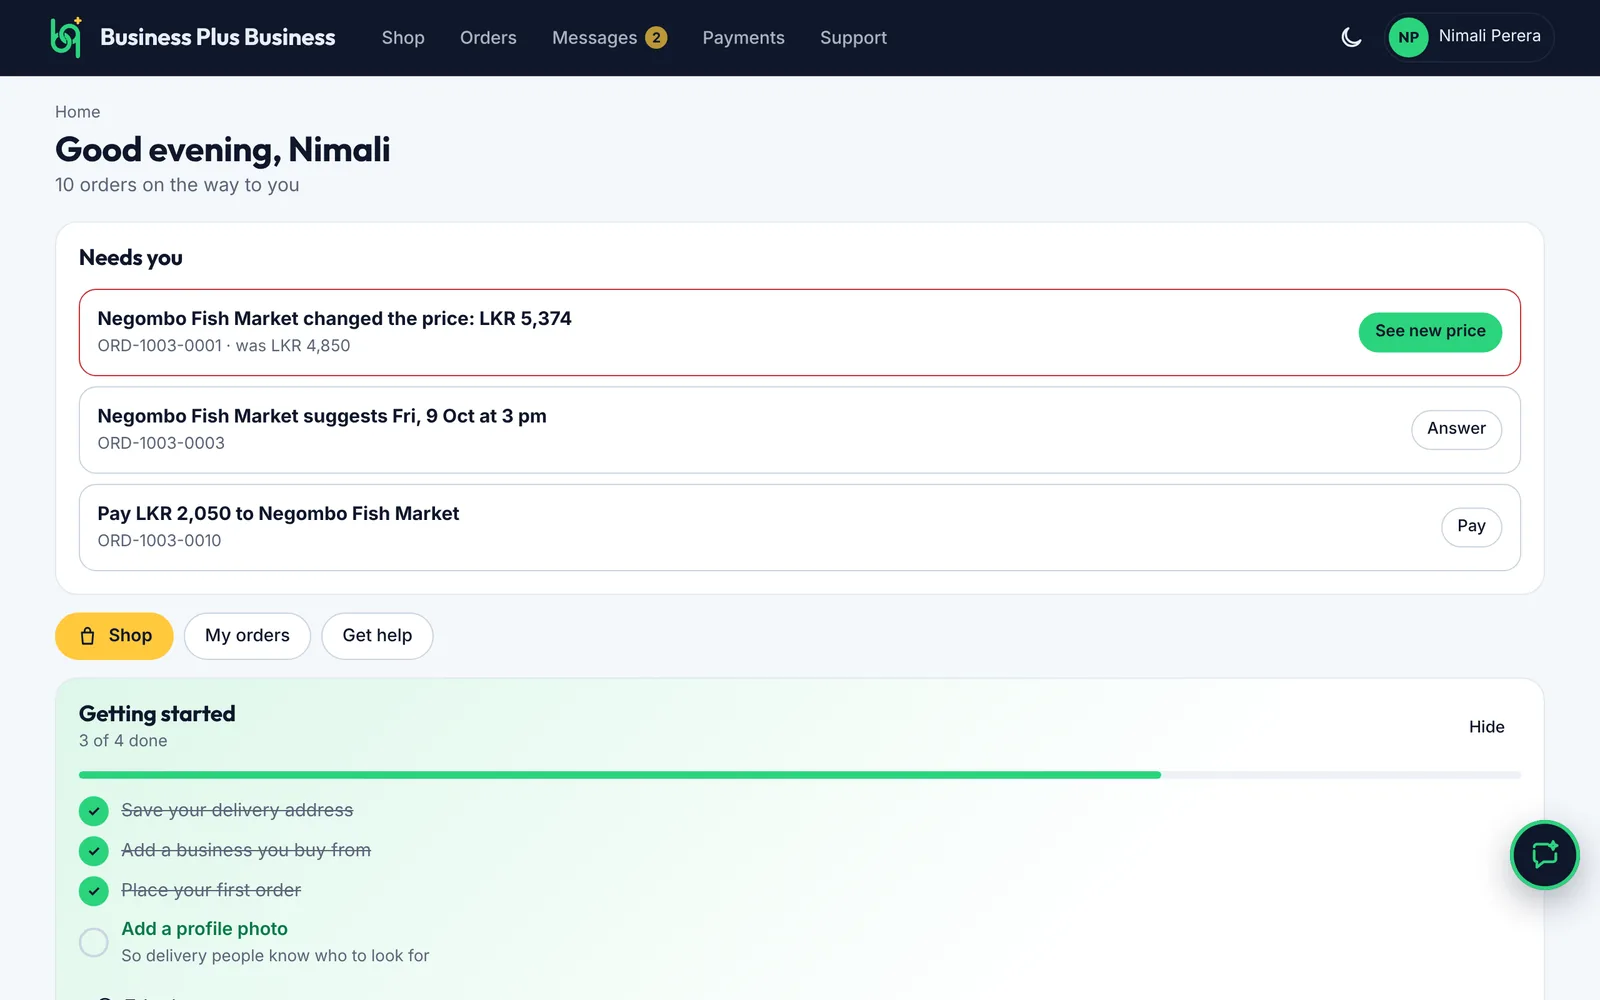
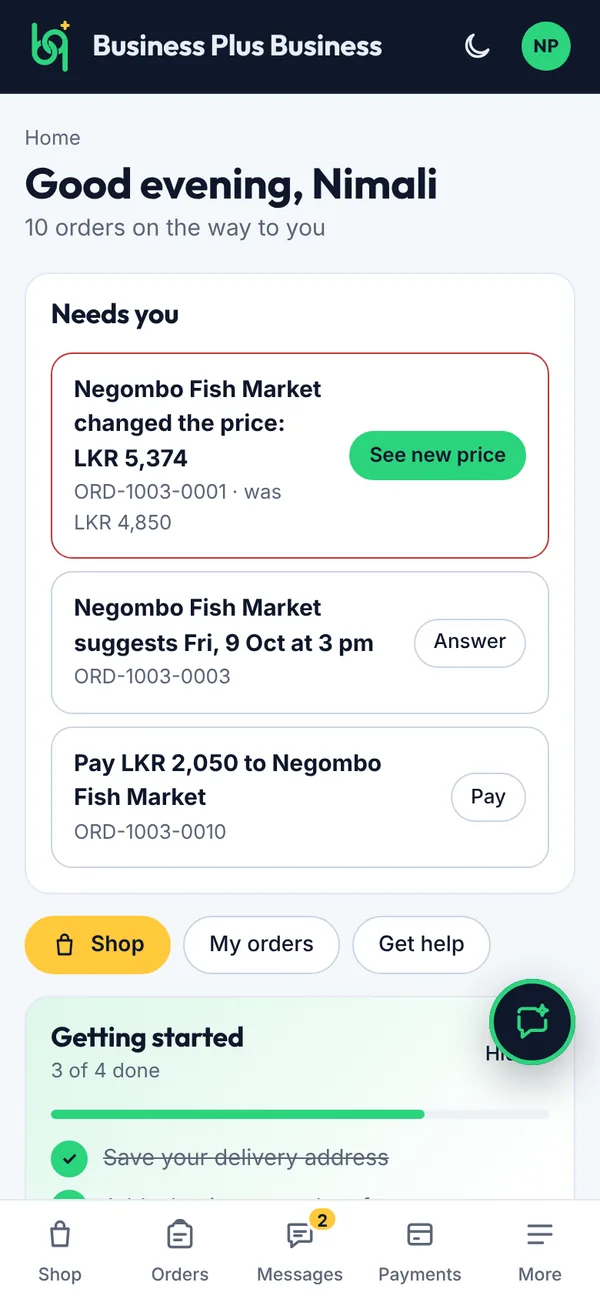
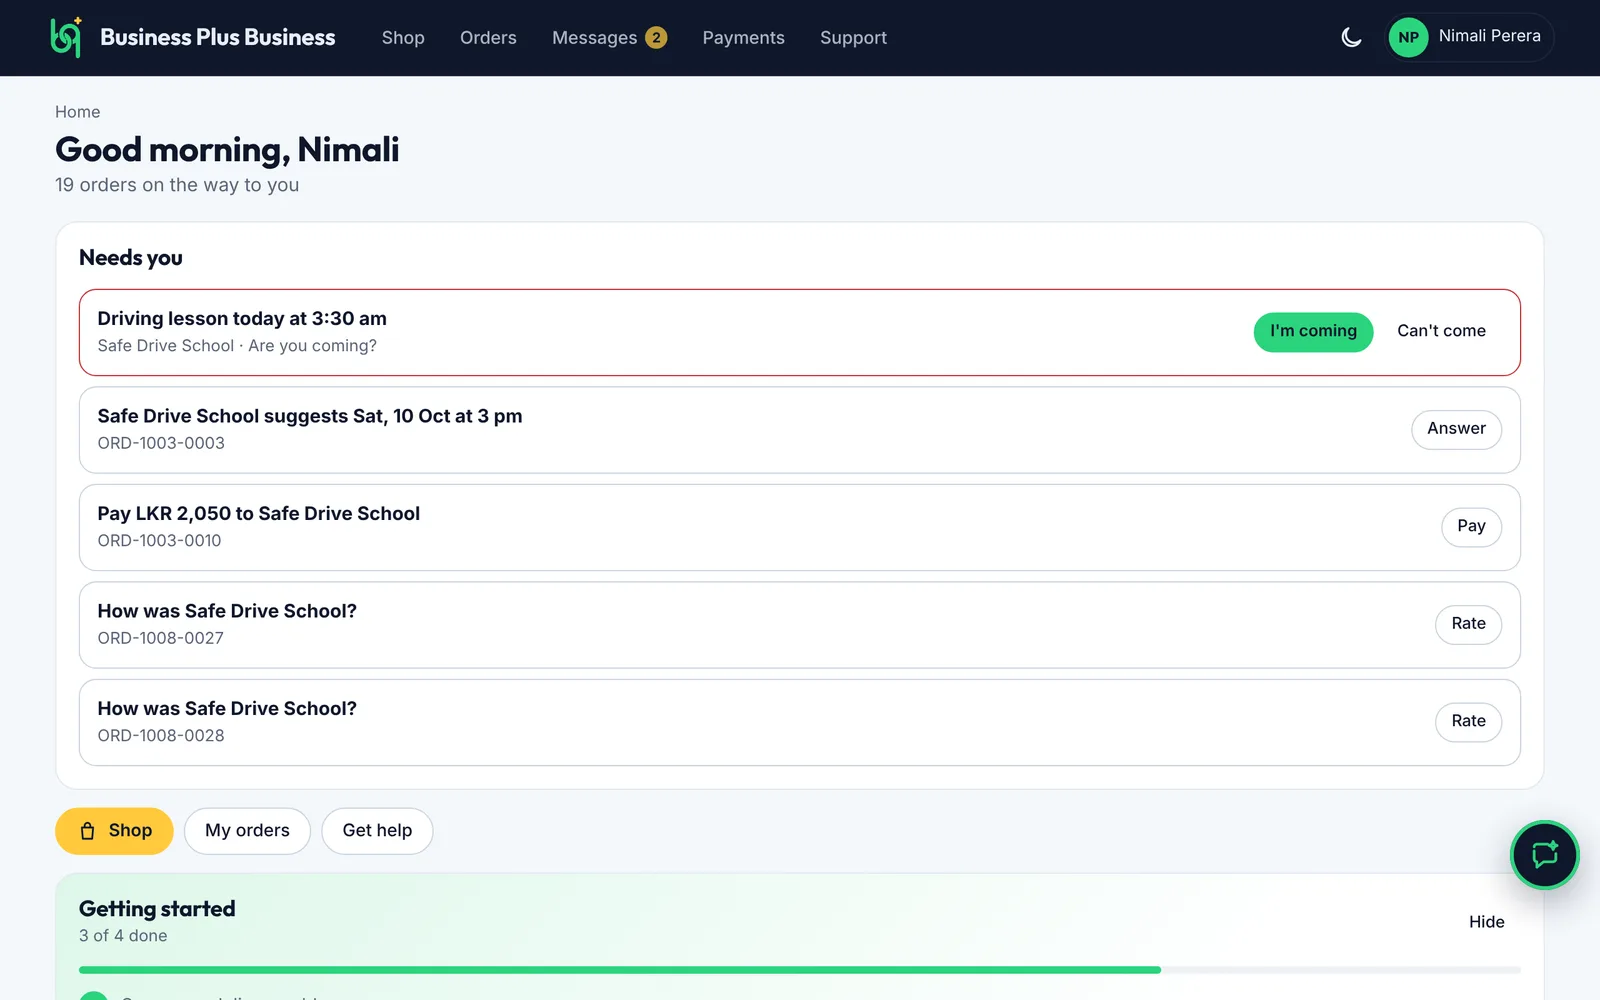
Needs you at the top of Home lists everything waiting for you. A new price is outlined in red.
Tap See new price.
Figure 3.8Needs you on Home
Compare Before and Now.
The difference is shown in red, with why it changed. Changed lines are marked.
Tap Agree to … to accept, or
tap Don't agree. The shop can keep the old price, call you, or cancel.
Figure 3.9Before and after, side by side
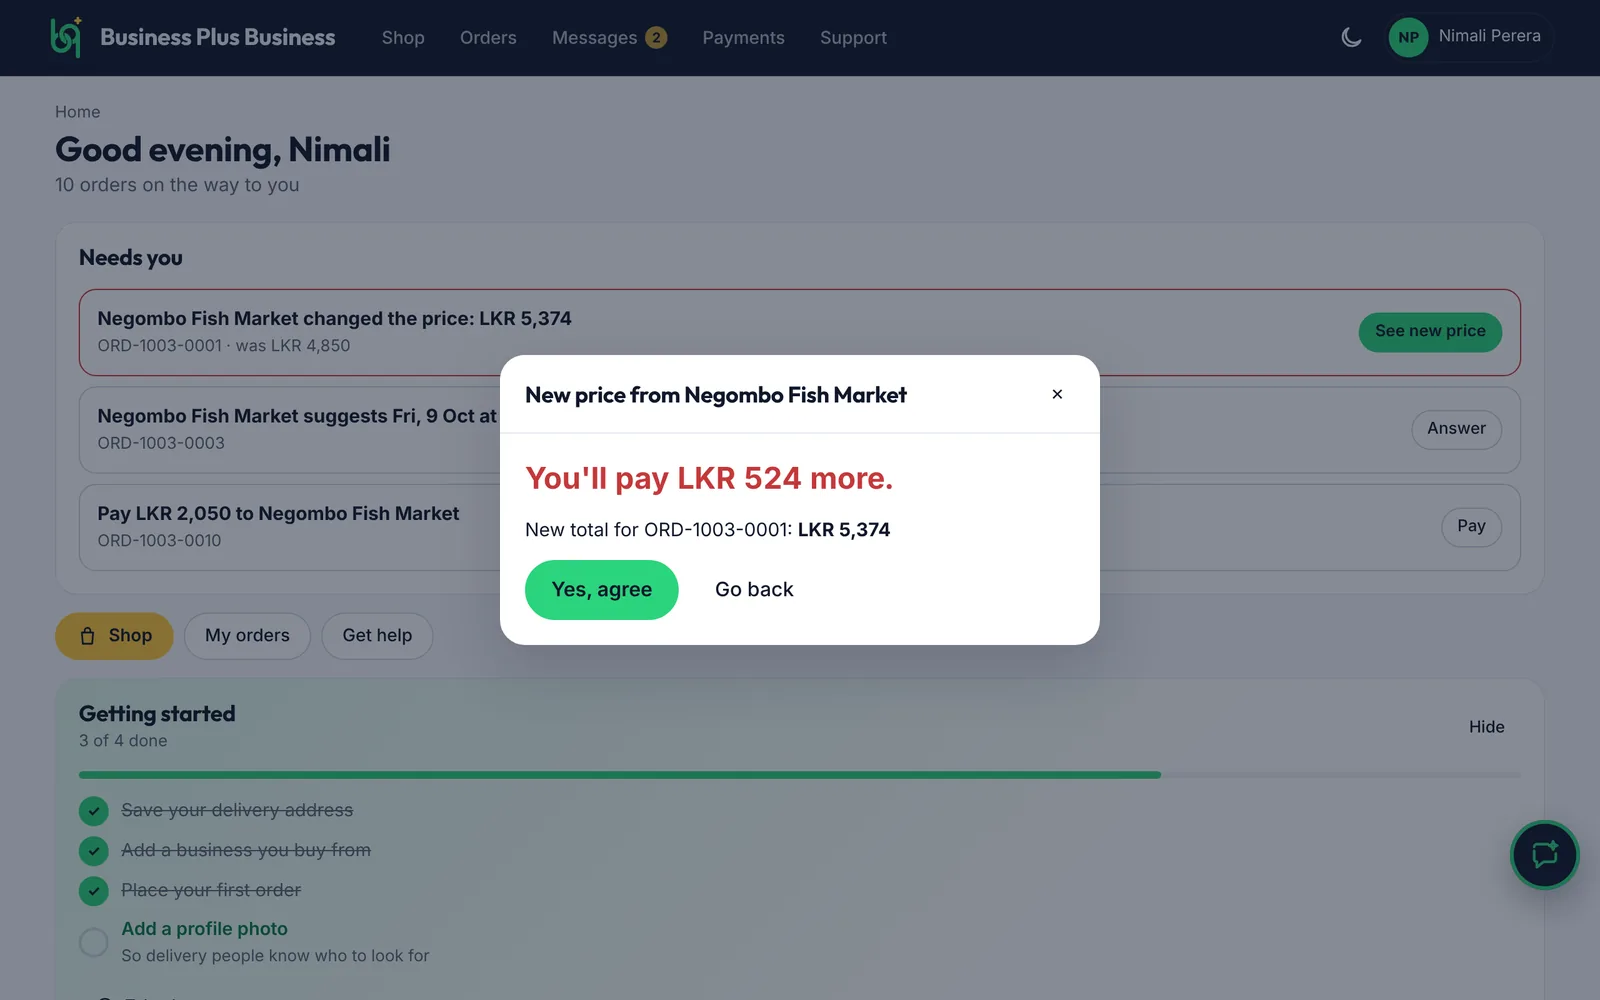
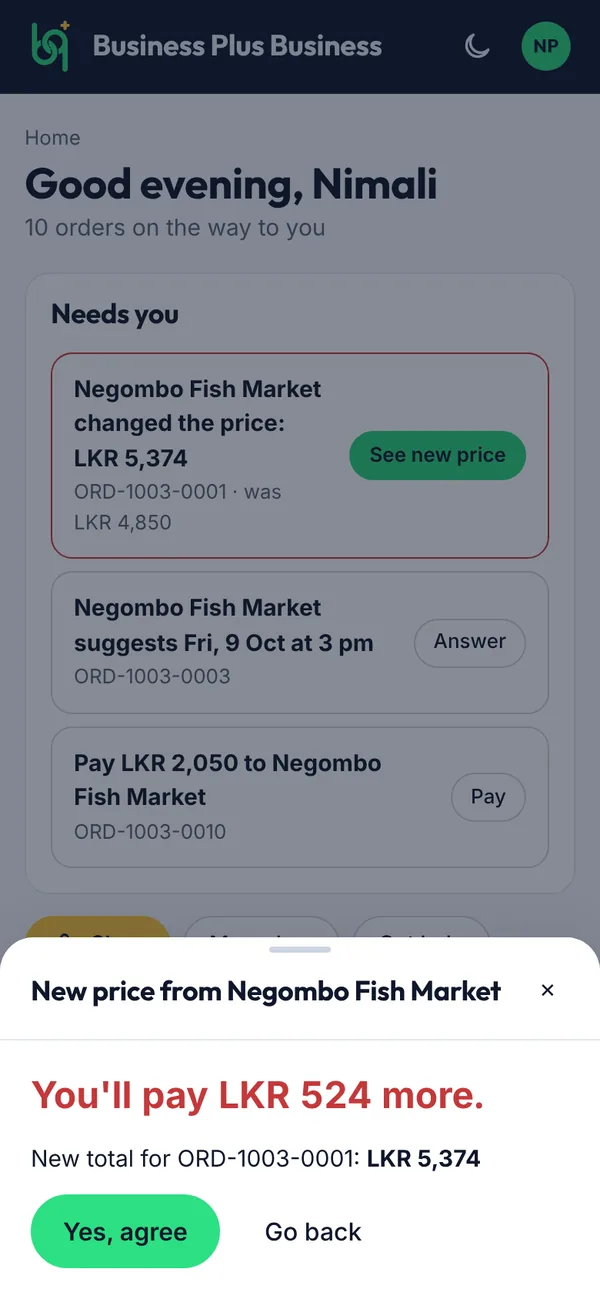
If you agree, the app asks once more: You'll pay … more. Tap Yes, agree.
Figure 3.10The second tap to agree
What you’ll see
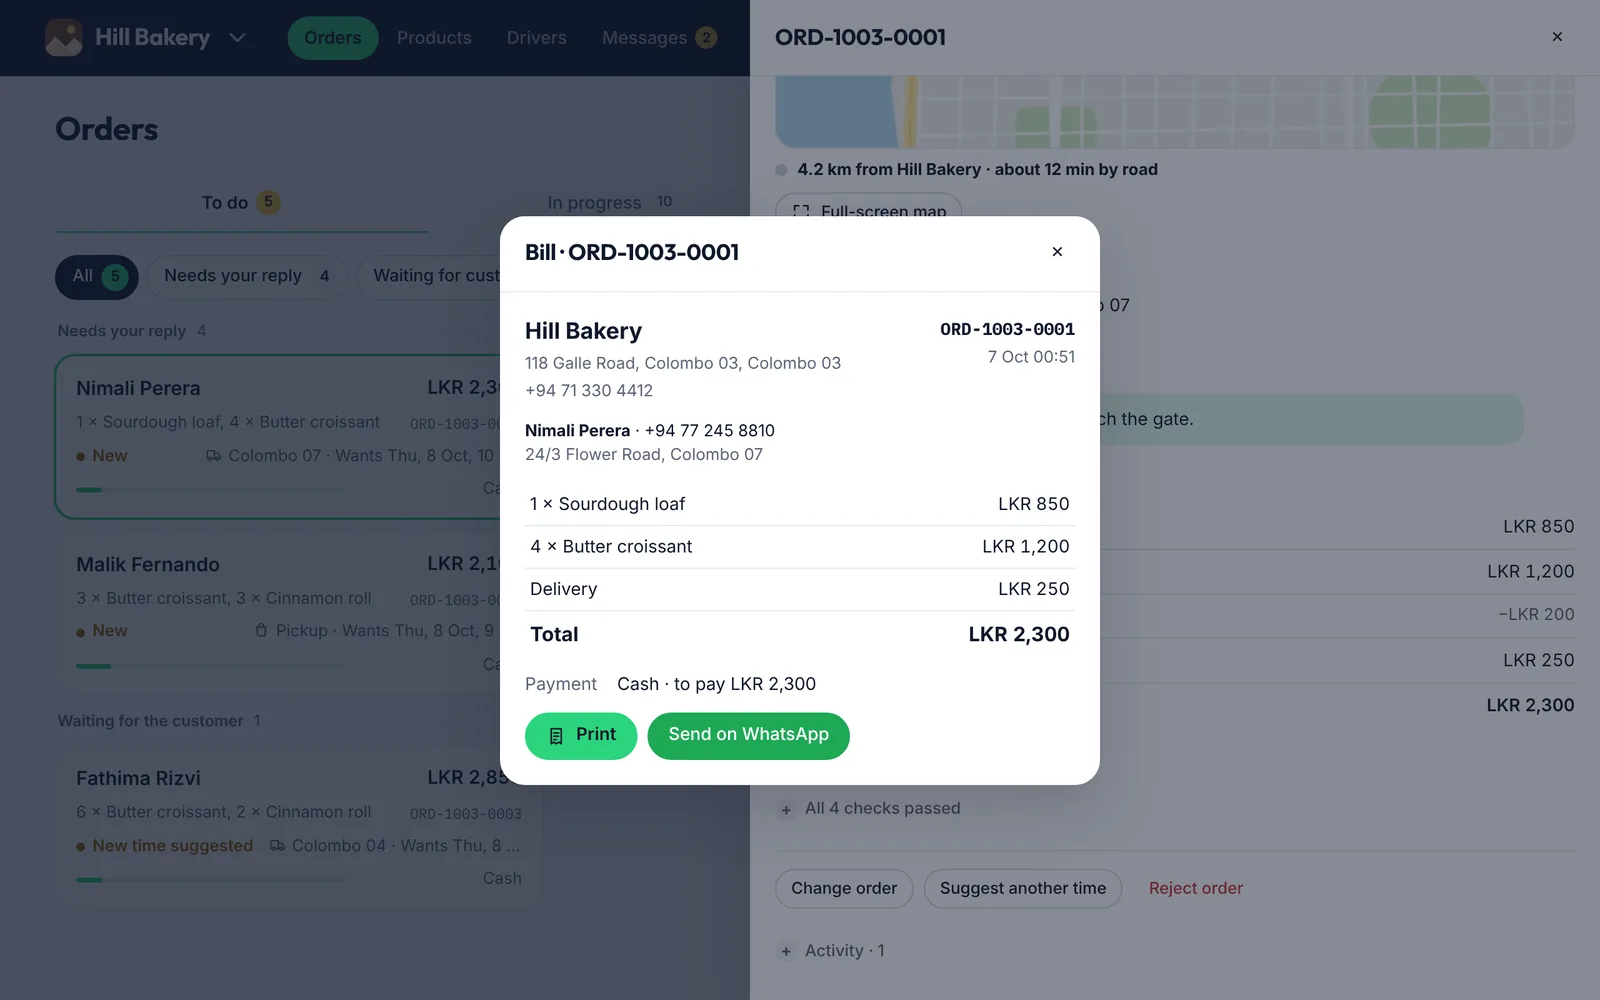
The order changes to the new price and the shop can send it. Every price change is listed on the order's bill.
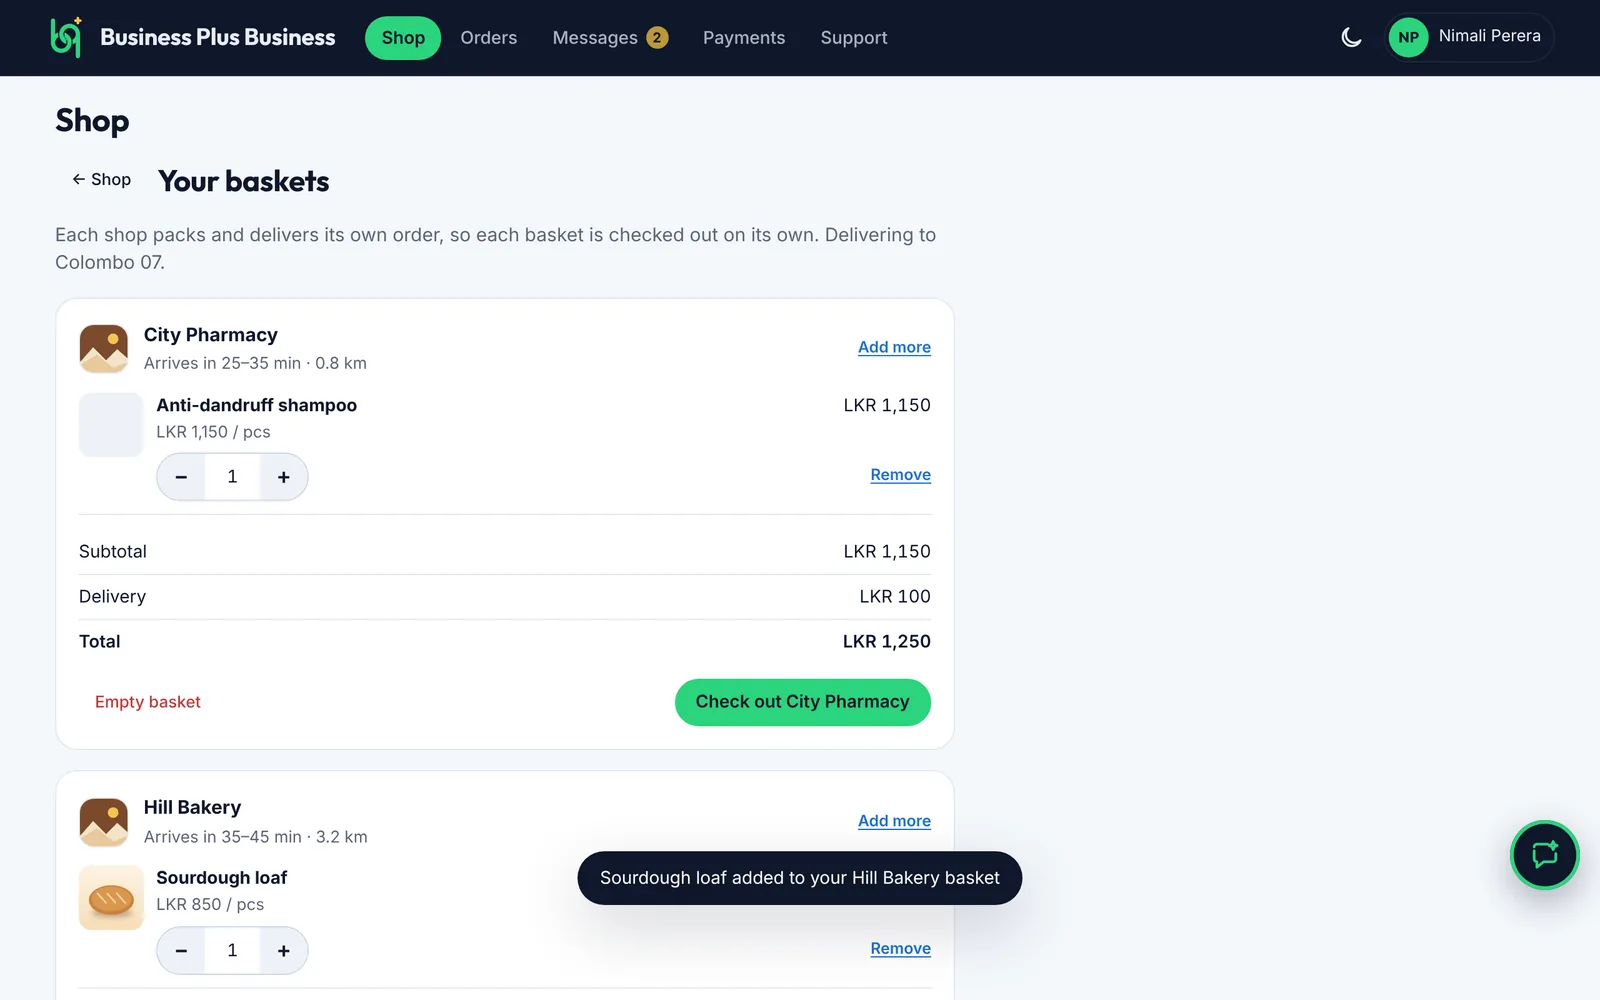
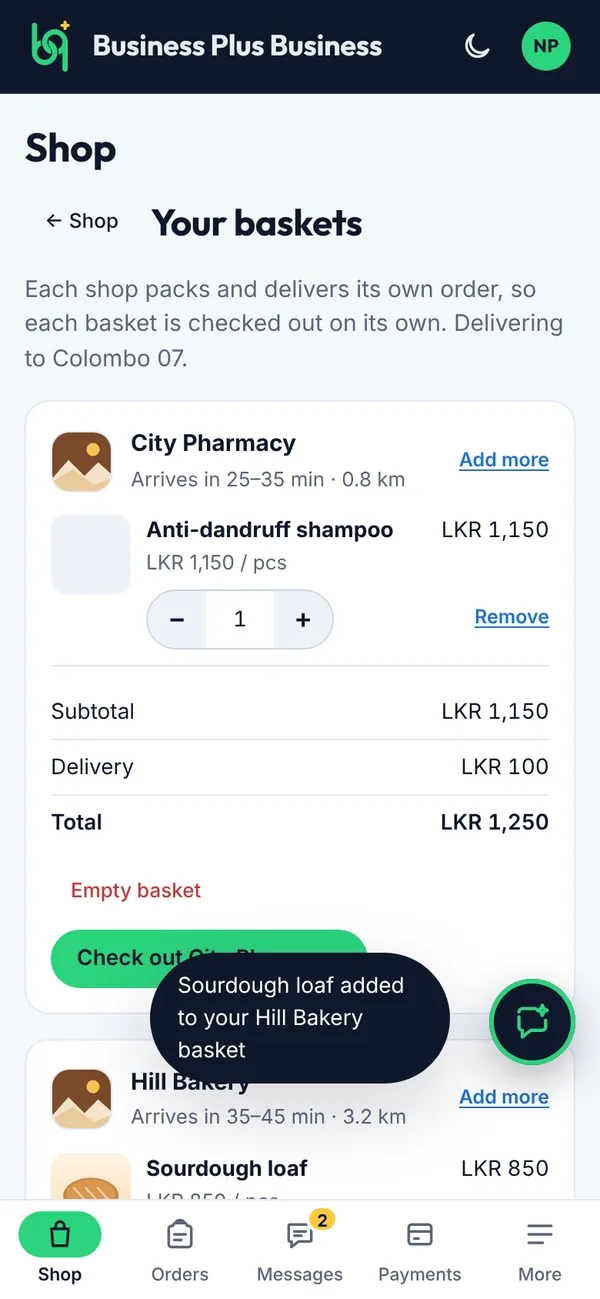
You can fill baskets at several shops. They're kept while you shop around, and on your phone or computer for 7 days. Each shop packs and delivers its own order, so each basket is checked out on its own.
Steps
Tap + on products from any shop. Each shop's items go in its own basket.
Tap the basket bar at the bottom of Shop (on a computer, the basket button at the top).
Your baskets shows each shop with its items, offers, delivery fee and total. Change amounts with − and +.
Tap Check out under a shop to place that order (see 3.7).
Figure 3.11Your baskets, one for each shop
"Isn't one of the shop's usual delivery areas"
Some shops list the areas they usually deliver to. If you're outside them you see a small note, but you can still order. The shop confirms in the app, or suggests pickup.
What you’ll see
Your other baskets stay as they are, ready for later.
Shops run offers such as Buy 1 get 1 free, a % off, Spend and save, a free item or free delivery. You don't need a code: the best offer for you is used automatically.
Steps
Look for the yellow labels on products, and the Offers and discounts tiles in Shop.
For Buy 1 get 1 free, add two. Your basket says Add 1 more and it's free when you're one short.
Your basket also tells you when spending a little more gets you a saving, a free item or free delivery.
At checkout, each offer shows as its own line, and You save adds them up.
Figure 3.12Offers show first in Shop
What you’ll see
The price you see at checkout is what you pay. Some offers are only for your first order with that shop.
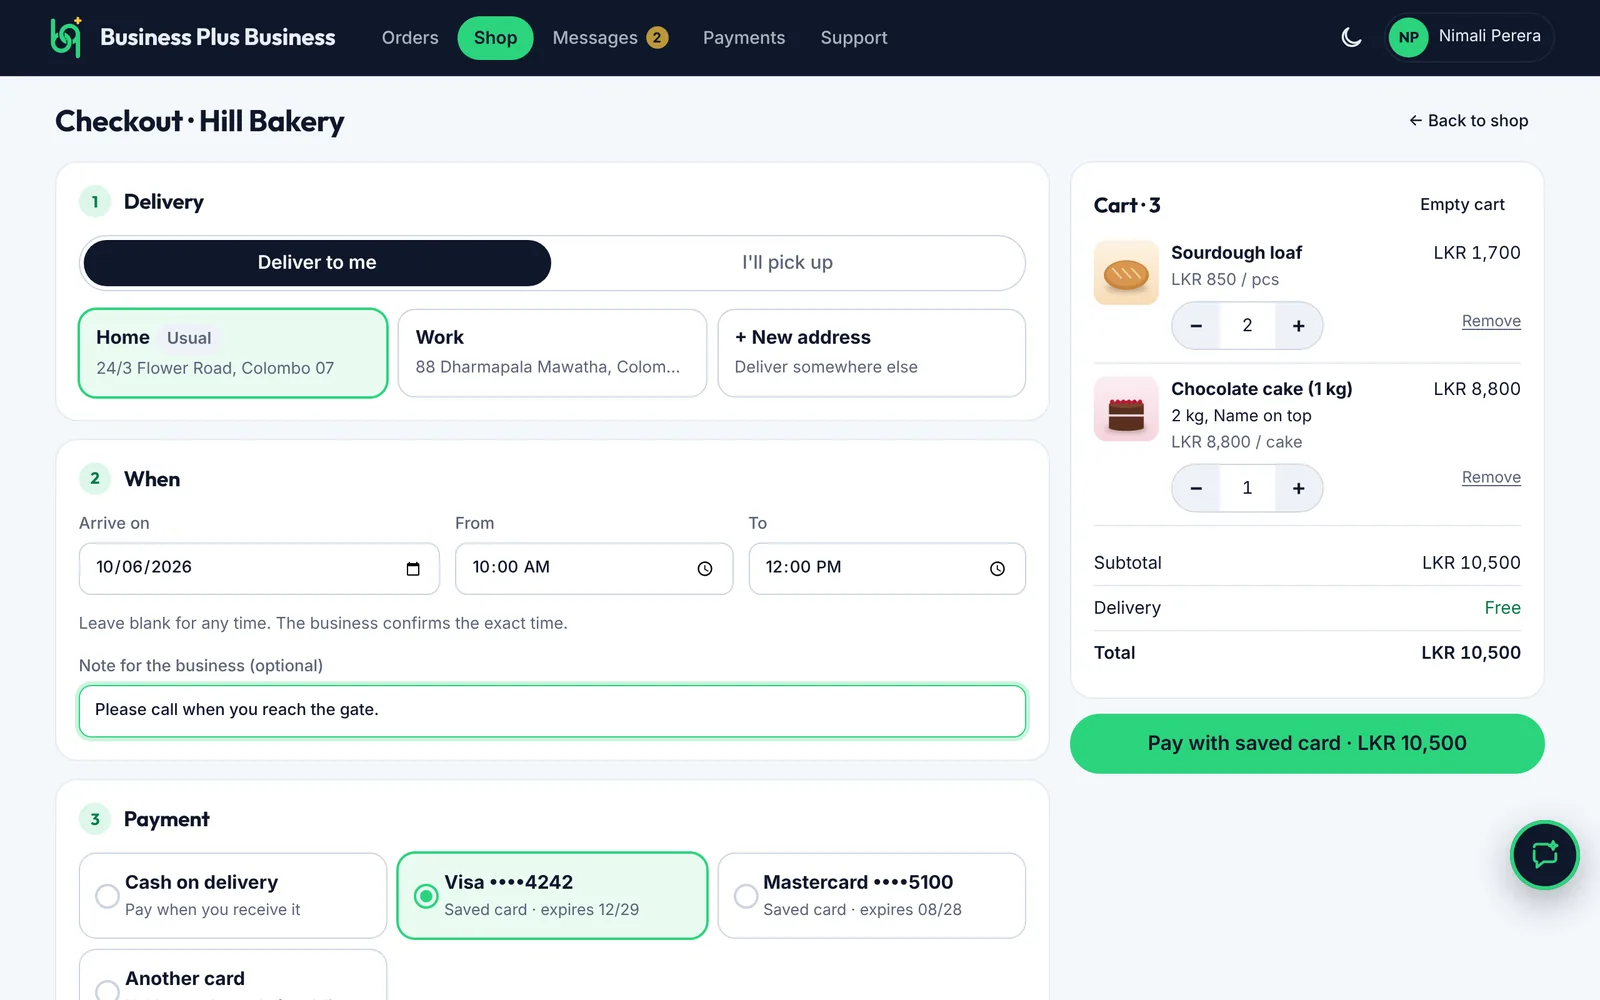
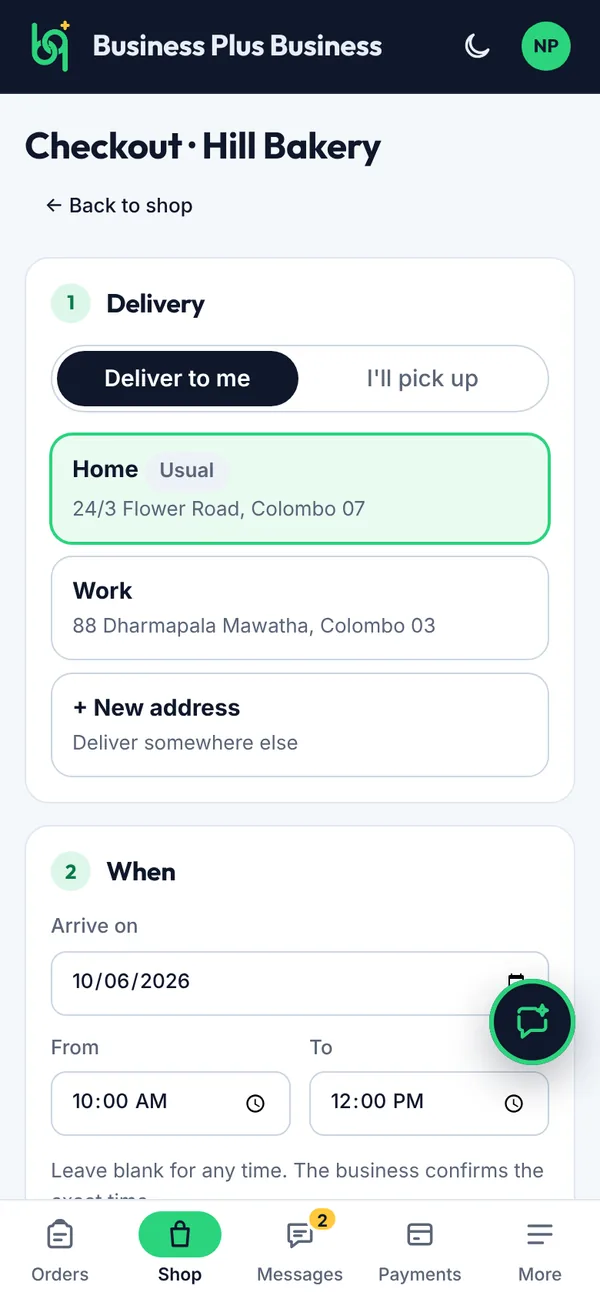
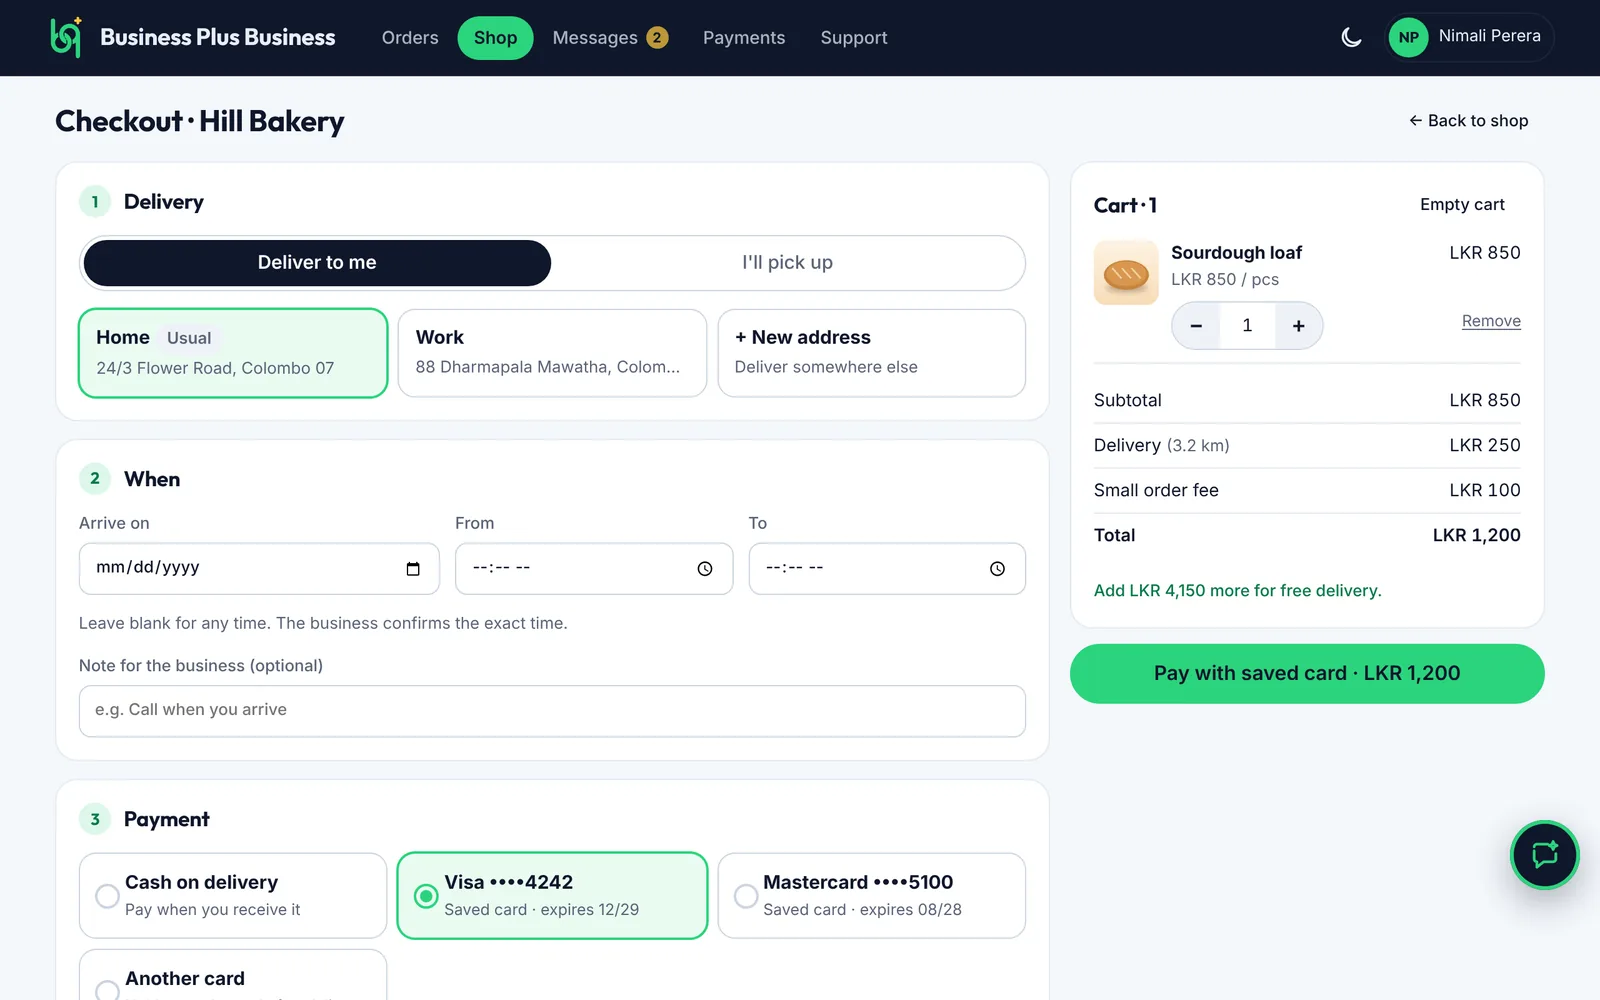
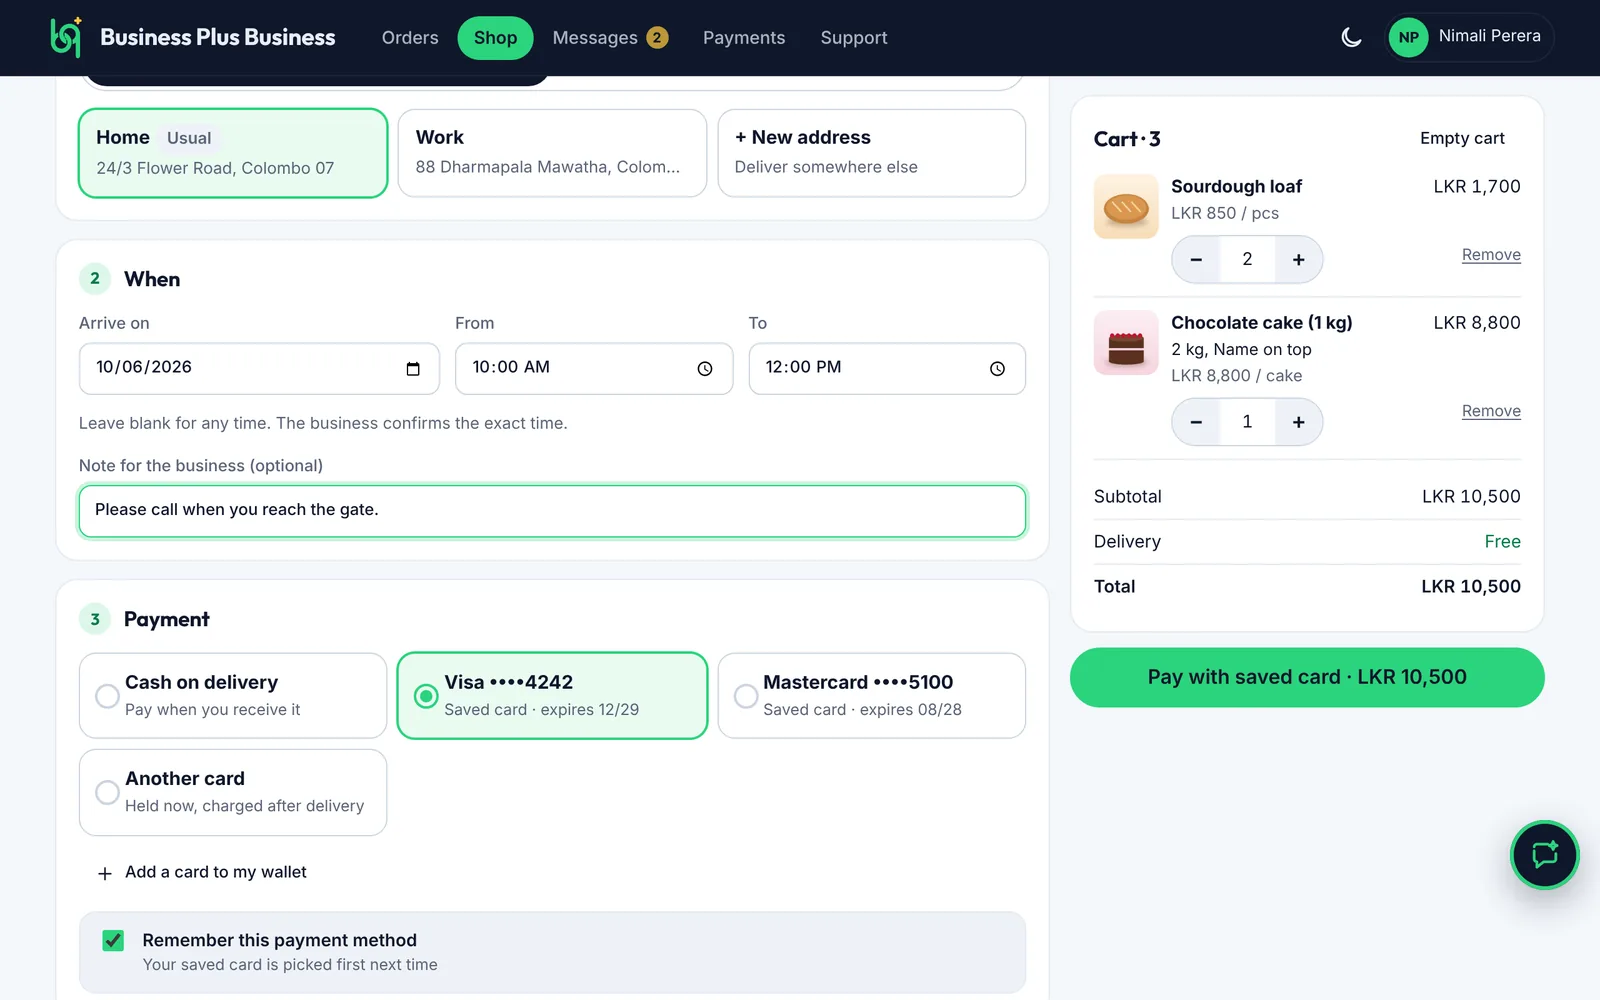
Tap a saved address, or + New address to deliver somewhere else.
Pick a day and a time window. Leave them blank if any time suits you.
Add a note for the business if you need to.
Choose how to pay (see 3.8, or 3.22 for bank transfer), then tap the green button to place your order. You only see the ways to pay that the business accepts.
Figure 3.13Checkout: delivery, time and note
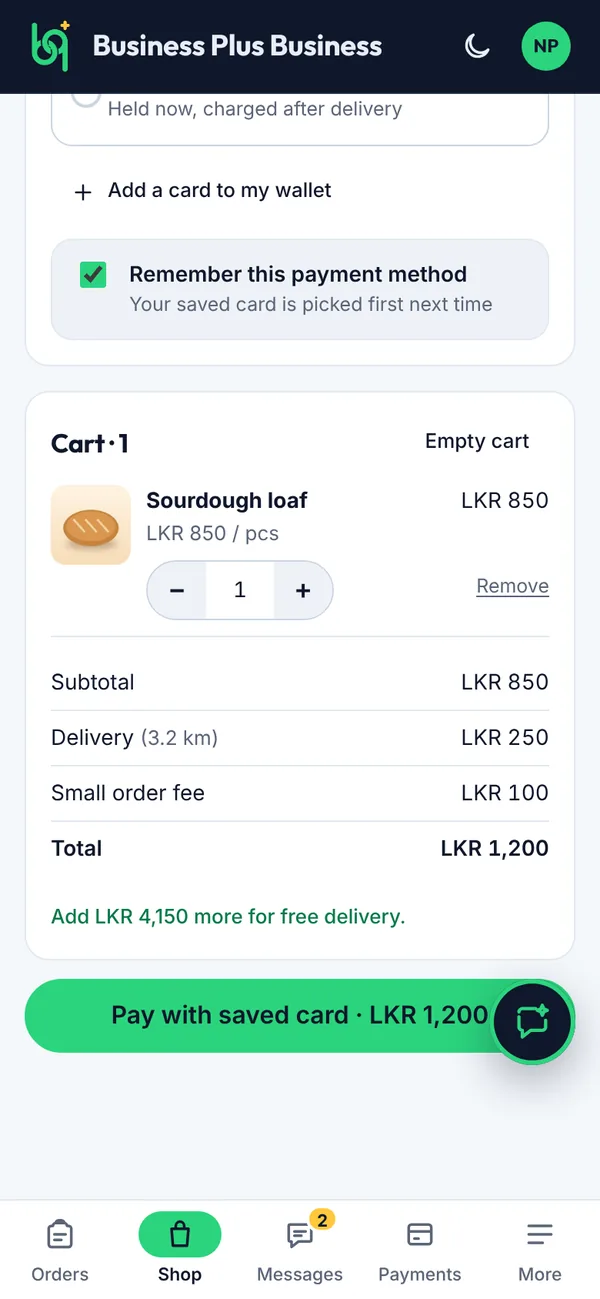
Check the delivery fee in your cart before you pay. It can depend on how far you are, and a small order fee may apply.
Figure 3.14Delivery fee, small order fee and the free delivery amount
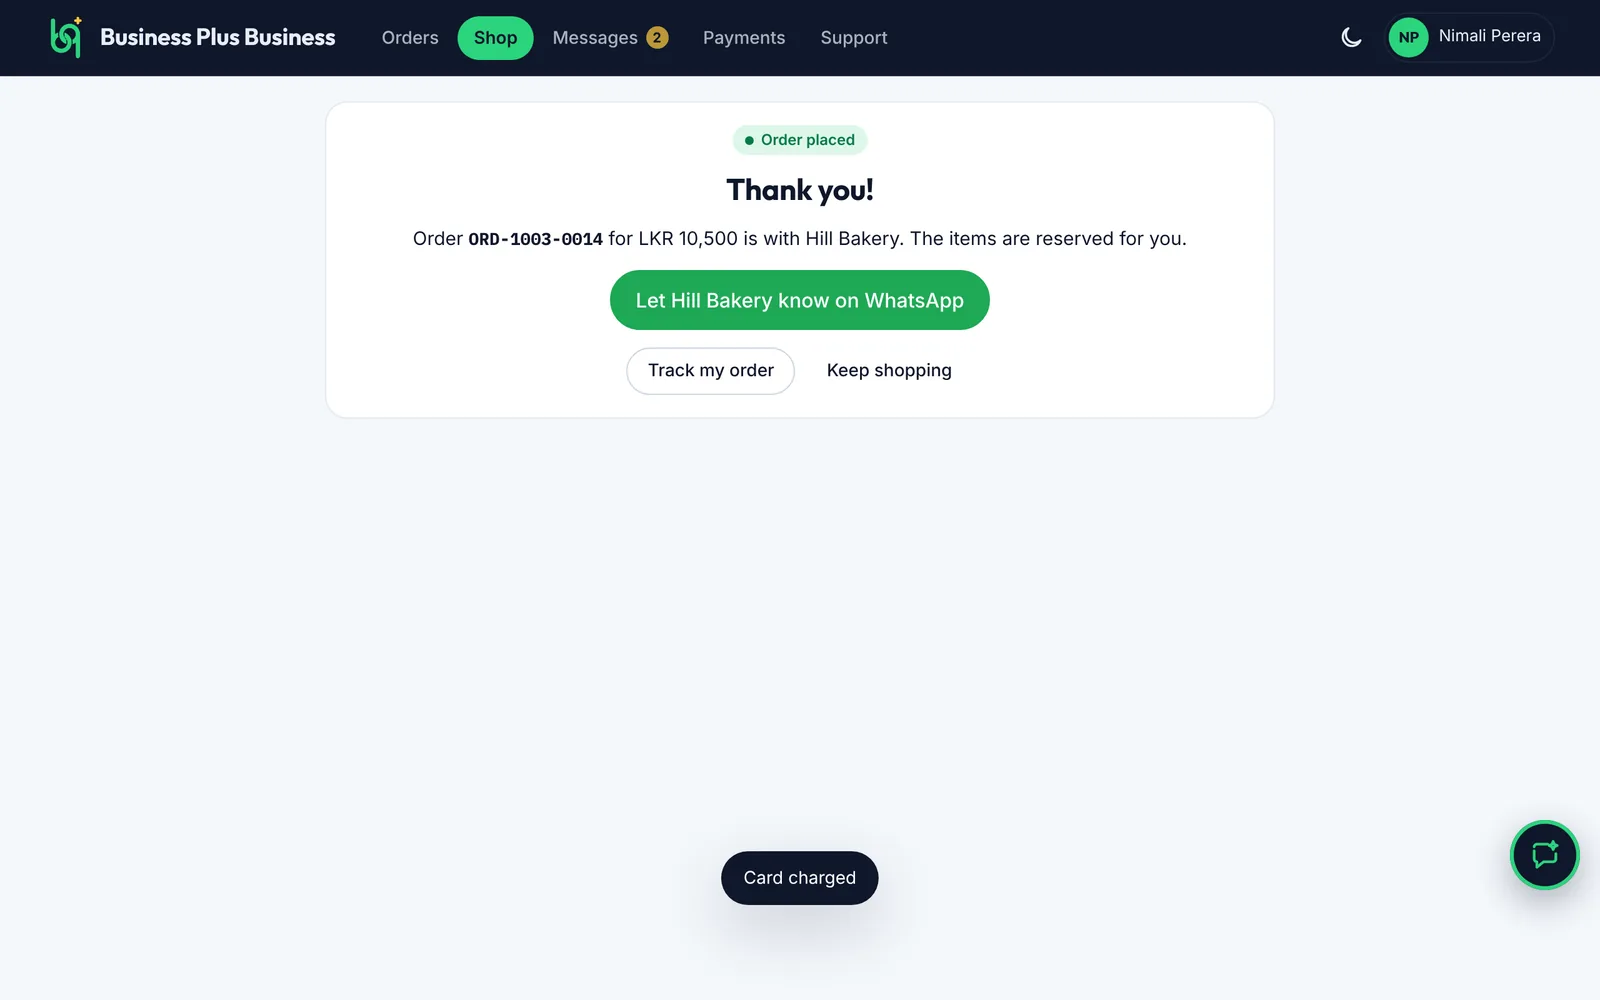
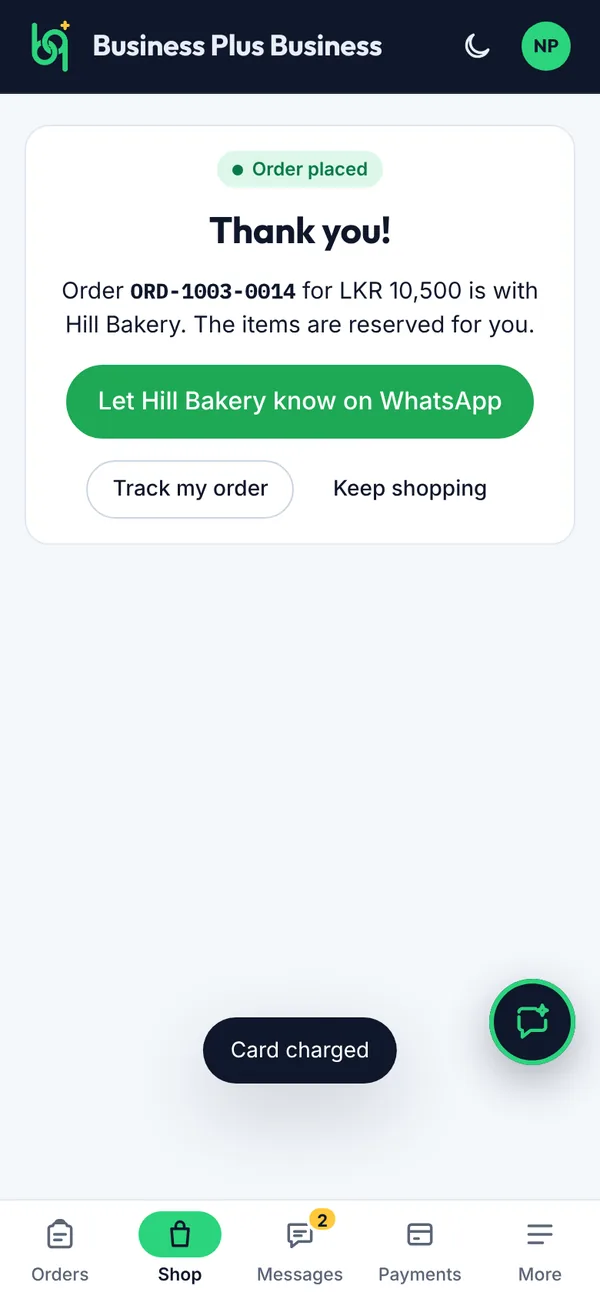
Figure 3.15Your order is placed
About delivery fees
Each business sets its own: free, the same fee for every order, or a fee by distance (shown with the distance, for example “Delivery (3.2 km)”). Some businesses deliver free over a certain amount, and the cart tells you how much more to add. Orders under a set amount may have a small order fee. If your address is further than the business delivers, choose I'll pick up or another address.
What you’ll see
You see Thank you! with your order number. Your items are reserved. Tap Let the business know on WhatsApp if you'd like to, or Track my order.
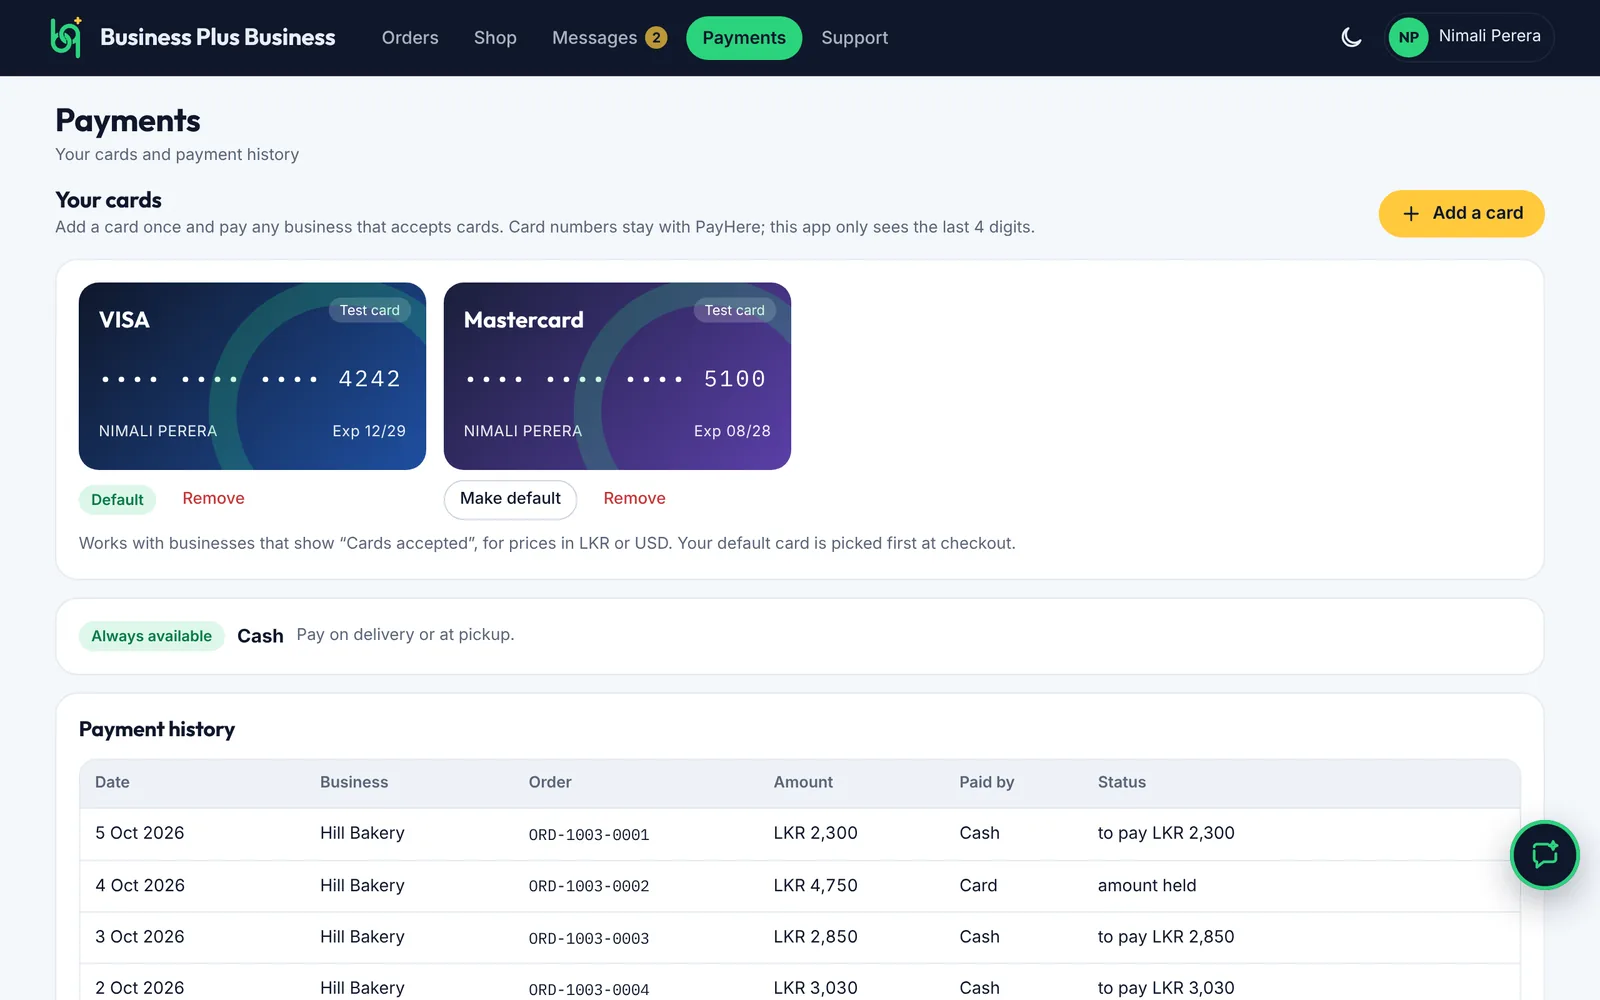
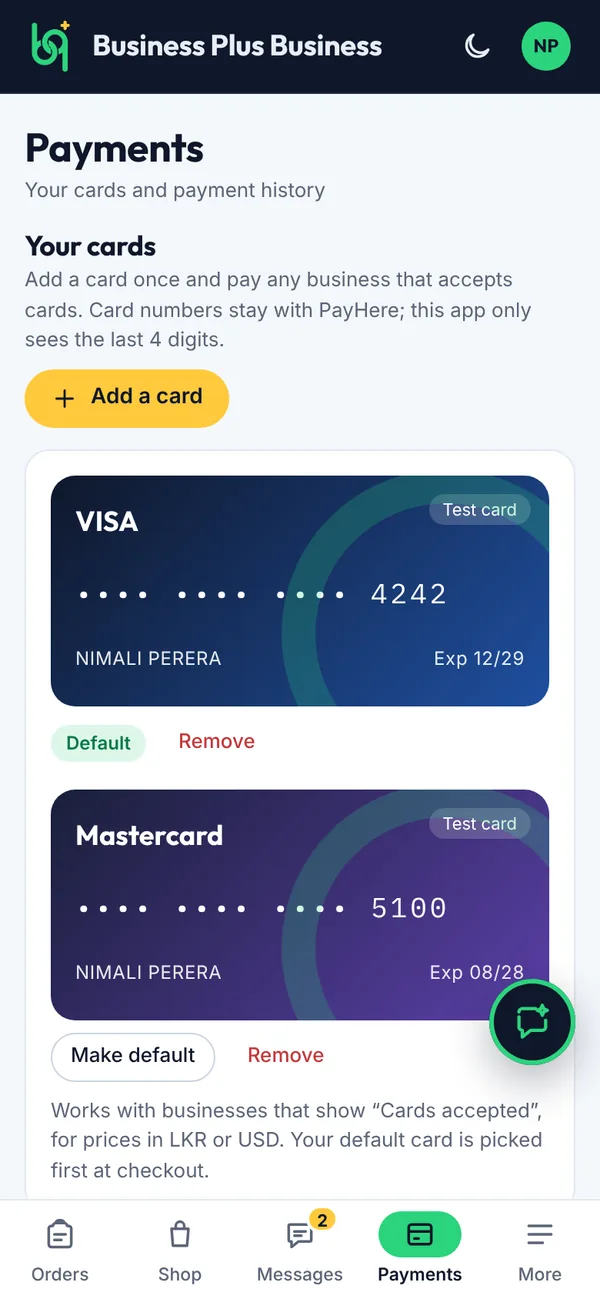
You can pay cash when you receive your order, or by card. Card payments are held when you order and only charged once your order is delivered.
Before you start
The business must show Cards accepted to pay by card.
Steps
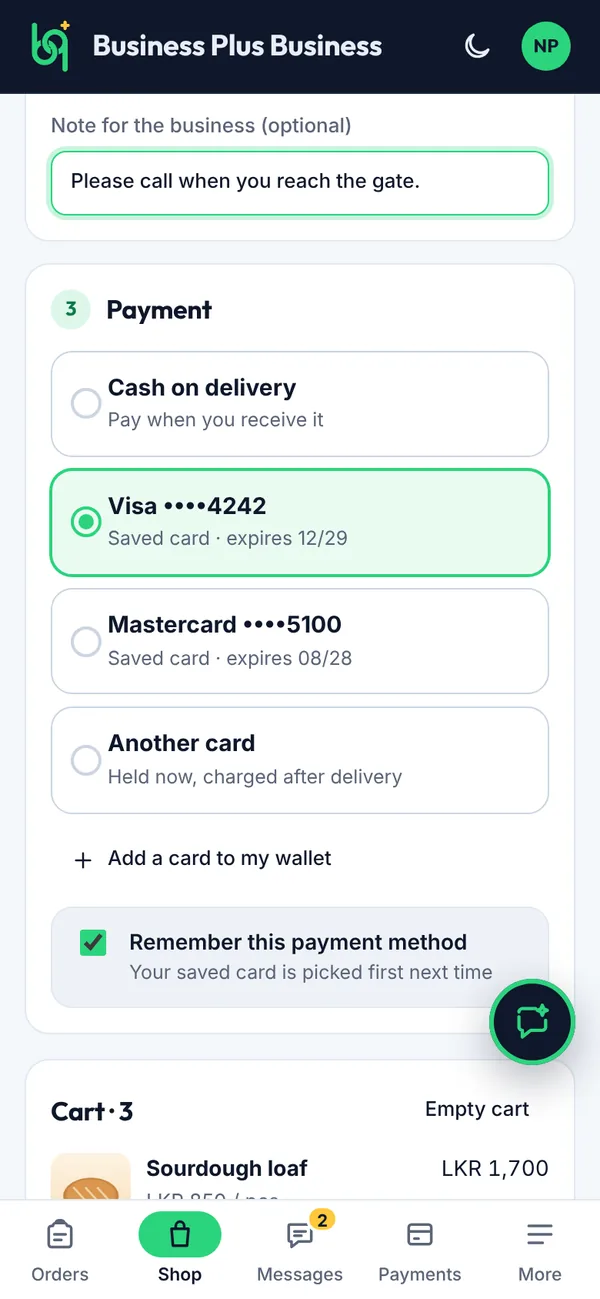
Cash on delivery (or at pickup): pay when you receive it.
A saved card: pay in one tap.
Another card: PayHere's secure window opens for you to enter a card.
Tap Add a card to my wallet to save a card for next time.
Keep Remember this payment method ticked so it's picked first next time.
Figure 3.16Payment choices at checkout
What you’ll see
If the business declines the order or you cancel it, the hold on your card is released. Card numbers stay with PayHere; the app only sees the last four digits.
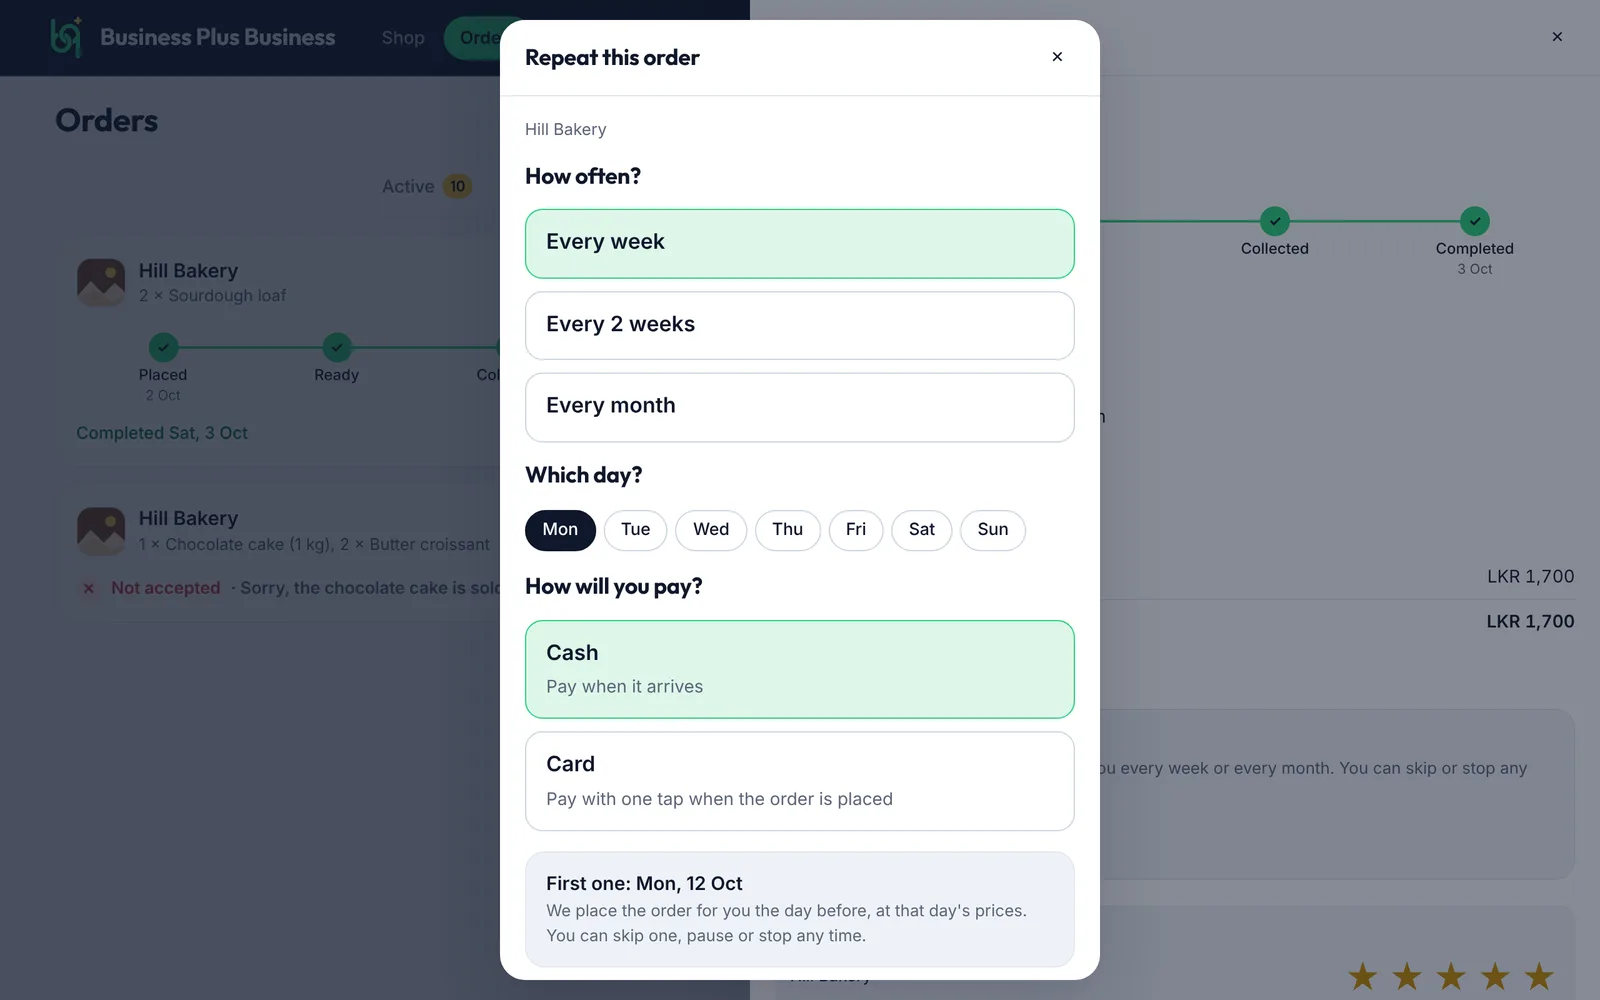
Water cans every Monday, gas every month, milk every week: B+B can place the same order for you, so you don't have to remember. You see Repeat this order on orders from businesses that offer it.
Before you start
Open Orders, then open an order you'd like again (it can be a past one).
Steps
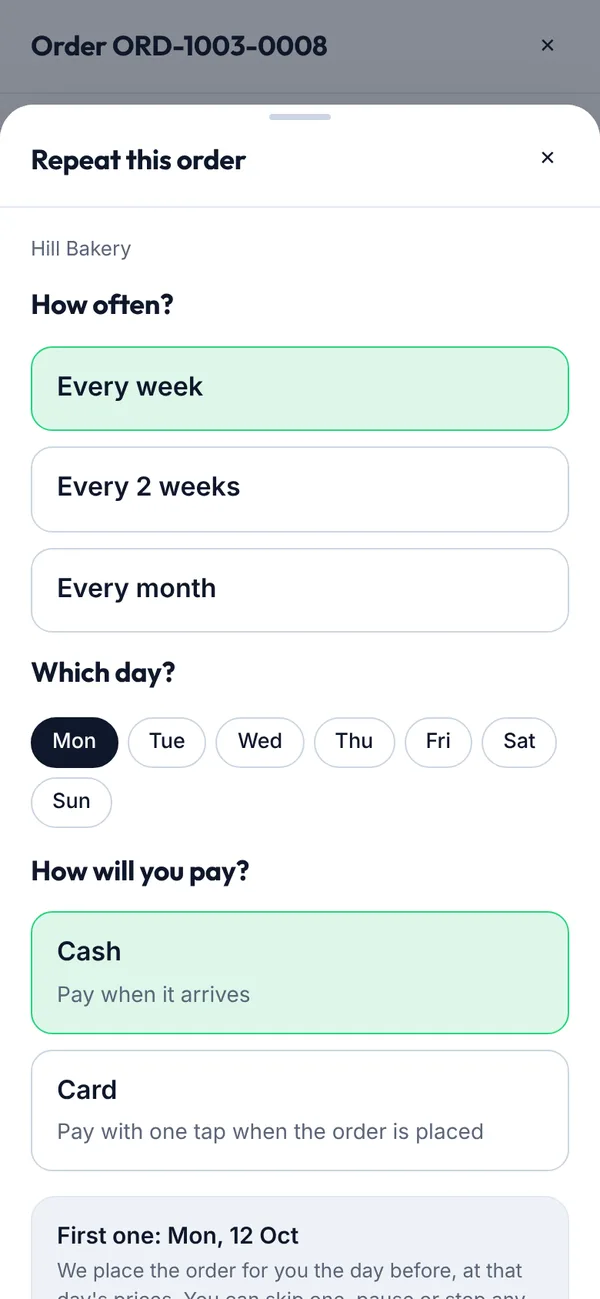
Tap Repeat this order. Choose how often: every week, every 2 weeks or every month.
Choose the day.
Choose how you'll pay: cash when it arrives, or card with one tap when it's placed.
Check the date of the first one, then tap Start repeat order.
Figure 3.19Repeating an order
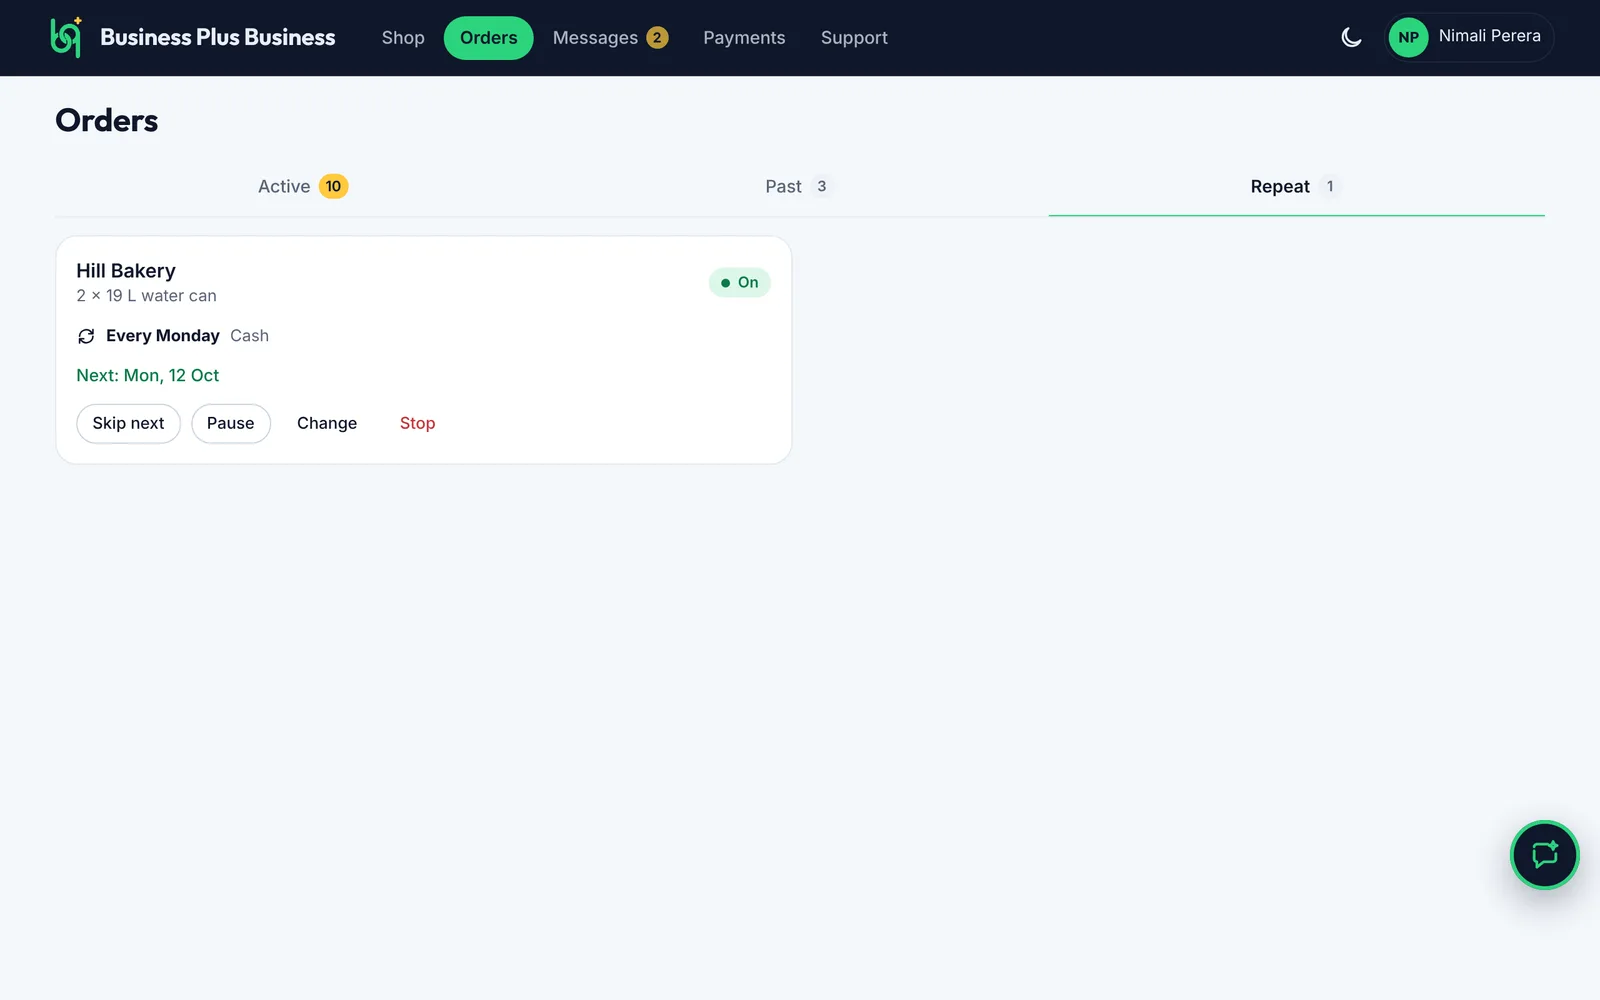
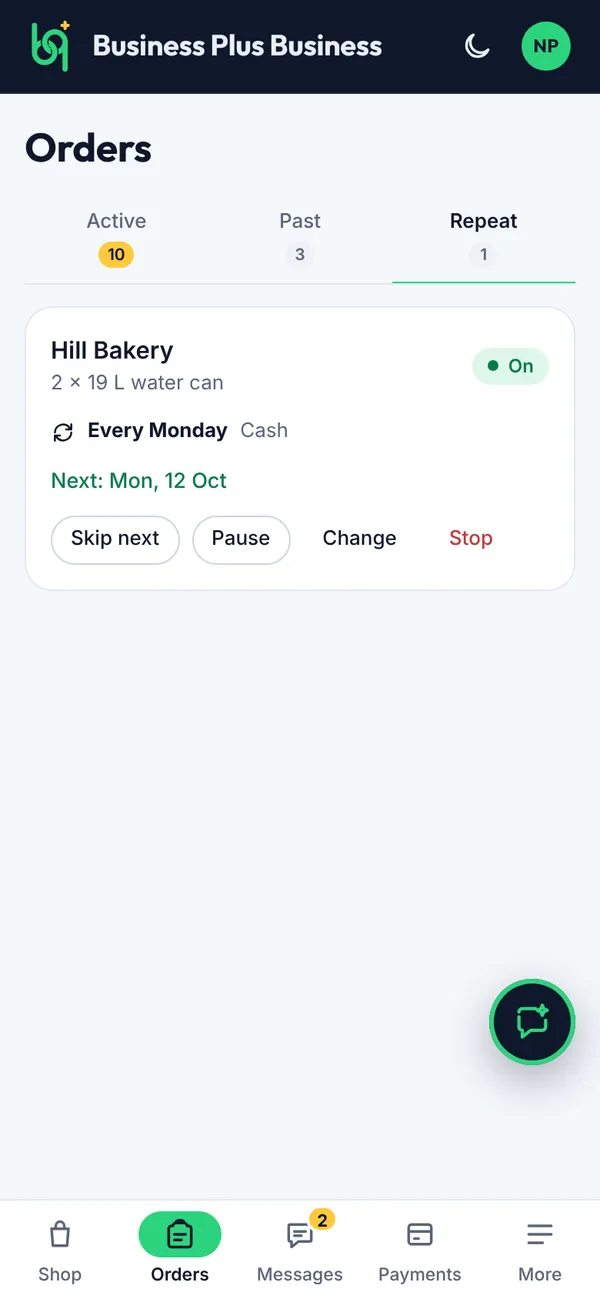
Your plans are under Orders → Repeat.
Going away? Tap Skip next to skip just the next one.
Tap Pause to stop for a while, and Resume when you're back.
Tap Change for a different day or how often, or Stop to end it.
Figure 3.20Your repeat orders
What you’ll see
The day before each date, B+B places the order for you at that day's prices and sends you a message. It then shows in Active like any other order. If something is out of stock, you're told, and the next one still goes ahead.
Salons, clinics, garages and classes that say how long each service takes show you their free times, so you can pick one that suits you.
Before you start
Open the business in Shop, tap Book on a service, then Continue to booking.
Steps
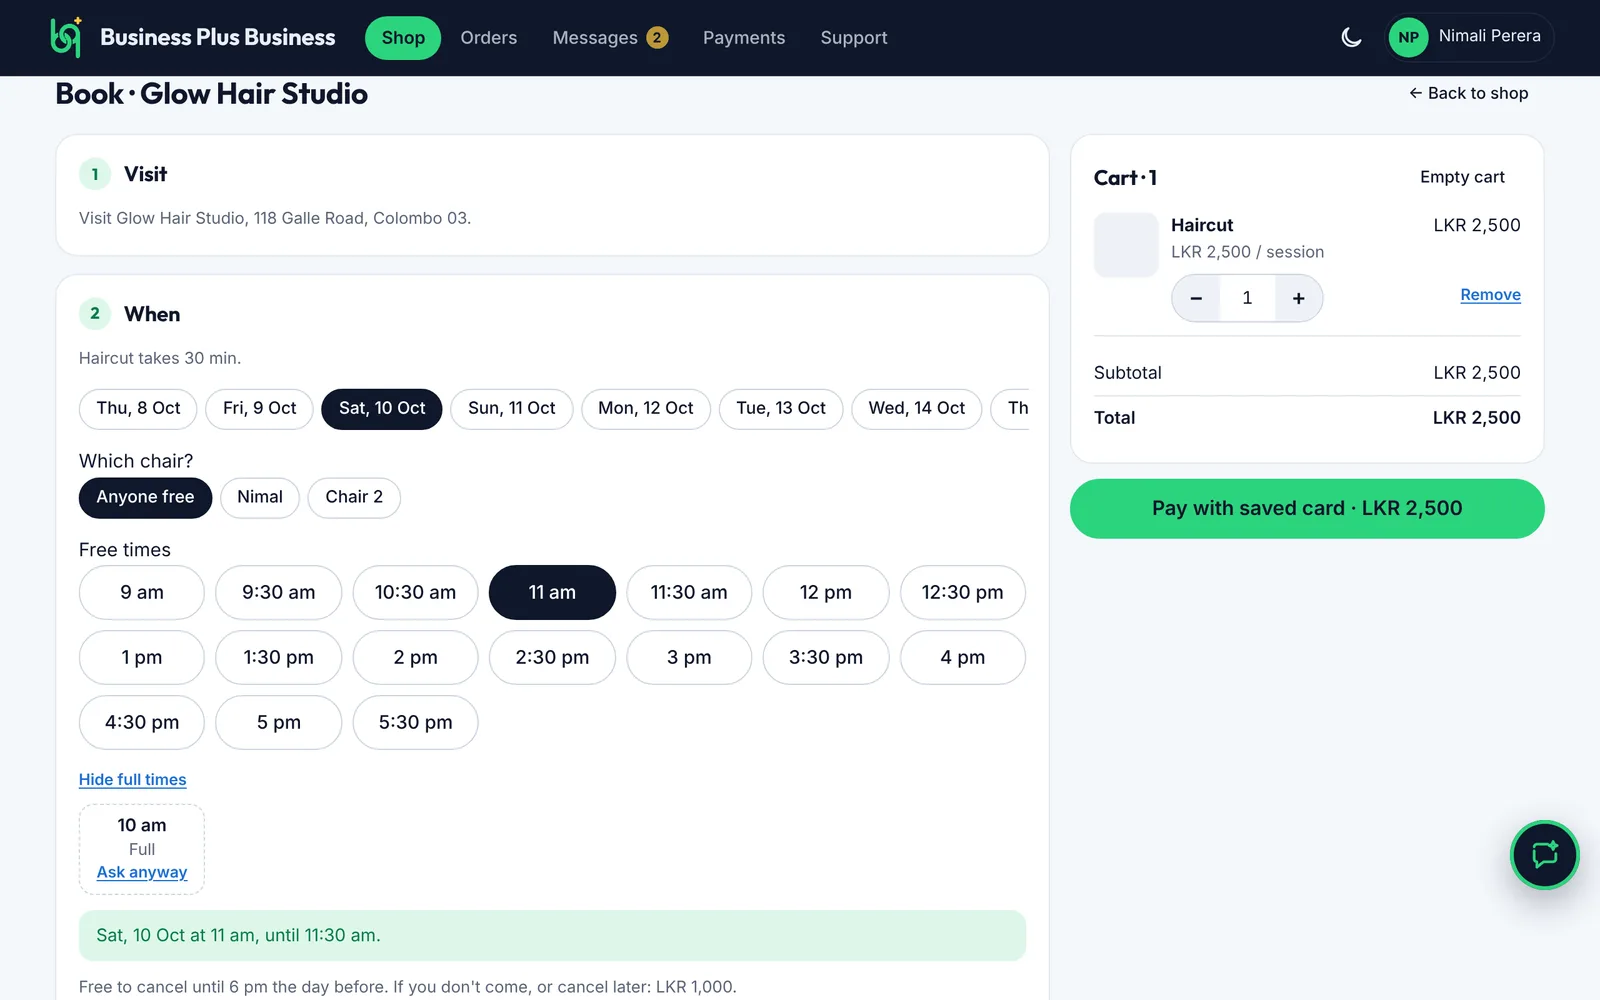
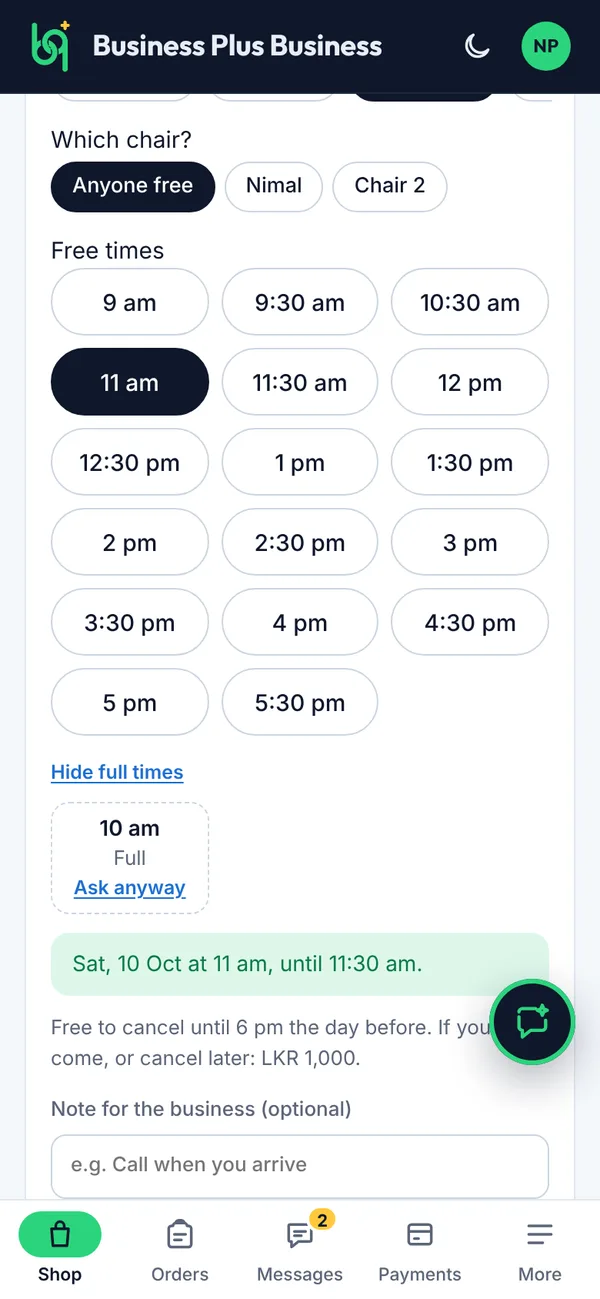
Under When, choose the day.
If the business has names for its chairs, staff or vehicles, choose one, or leave Anyone free.
Tap a free time. You see when it starts and ends.
A time that's full says Full. If you really need it, tap Ask anyway: the business decides, and nothing is booked until they say yes.
Check when you can cancel for free and any charge for not coming, choose how to pay, and tap Book now.
If the business also comes to you, choose Come to me or I'll come in. A visit at your place adds the business's visit charge, shown on the bill before you book.
Figure 3.21Choosing a free time
What you’ll see
Some businesses confirm your time straight away; others confirm it in the app. Your bookings are in Orders, the next one first. On a past booking, tap Book again to book the same.
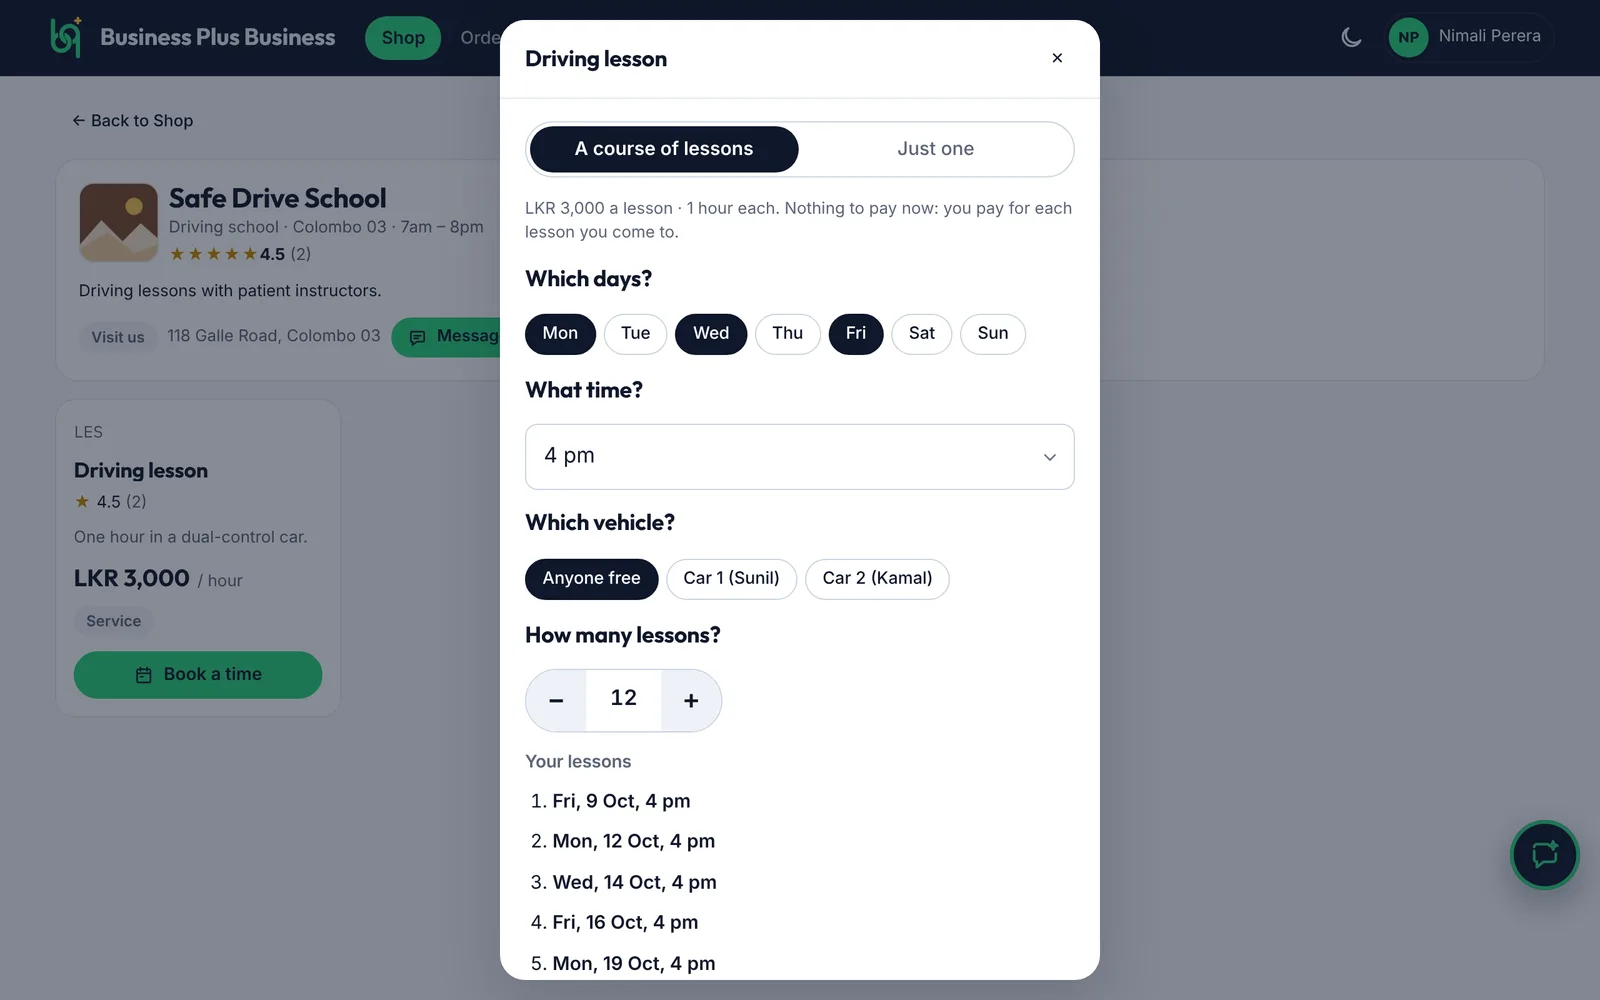
Driving schools and classes can let you book a whole course at once, for example 12 lessons on Monday, Wednesday and Friday at 4 pm. Each lesson is its own booking, and you pay for each lesson you come to.
Before you start
Open the business in Shop and tap Book a time on the lesson.
Steps
Choose the days of the week.
Choose the time.
Choose how many lessons.
Check the dates. If a day is full at your time, the nearest free time that day is shown instead. Then tap Book. Nothing to pay yet.
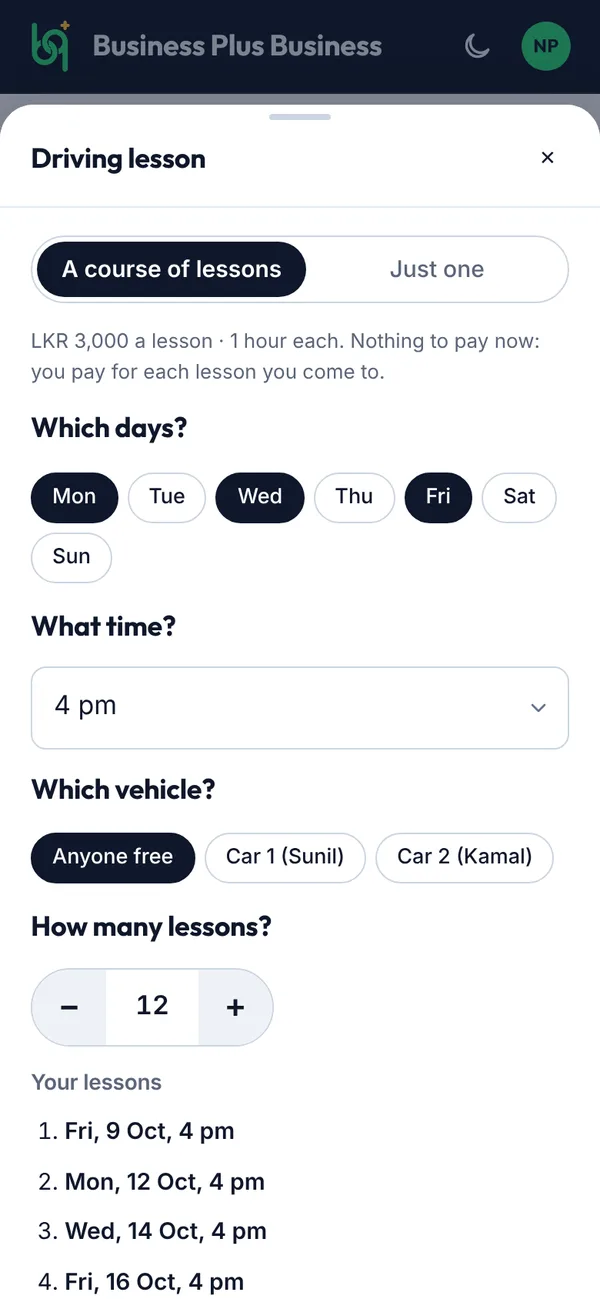
Figure 3.22Booking a course of lessons
The evening before each lesson (from 6 pm), Needs you on Home asks if you're coming. Tap I'm coming and choose cash at the lesson or card now,
or tap Can't come. The time is freed, and the app offers the next free times so you can book another lesson.
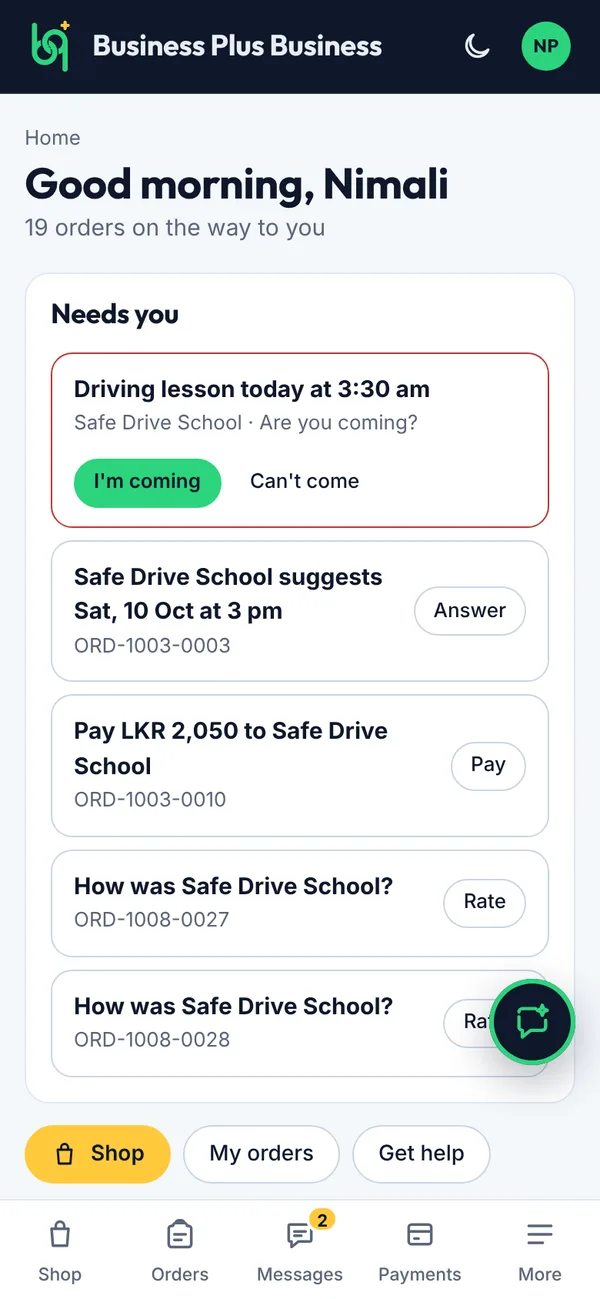
Figure 3.23Are you coming?
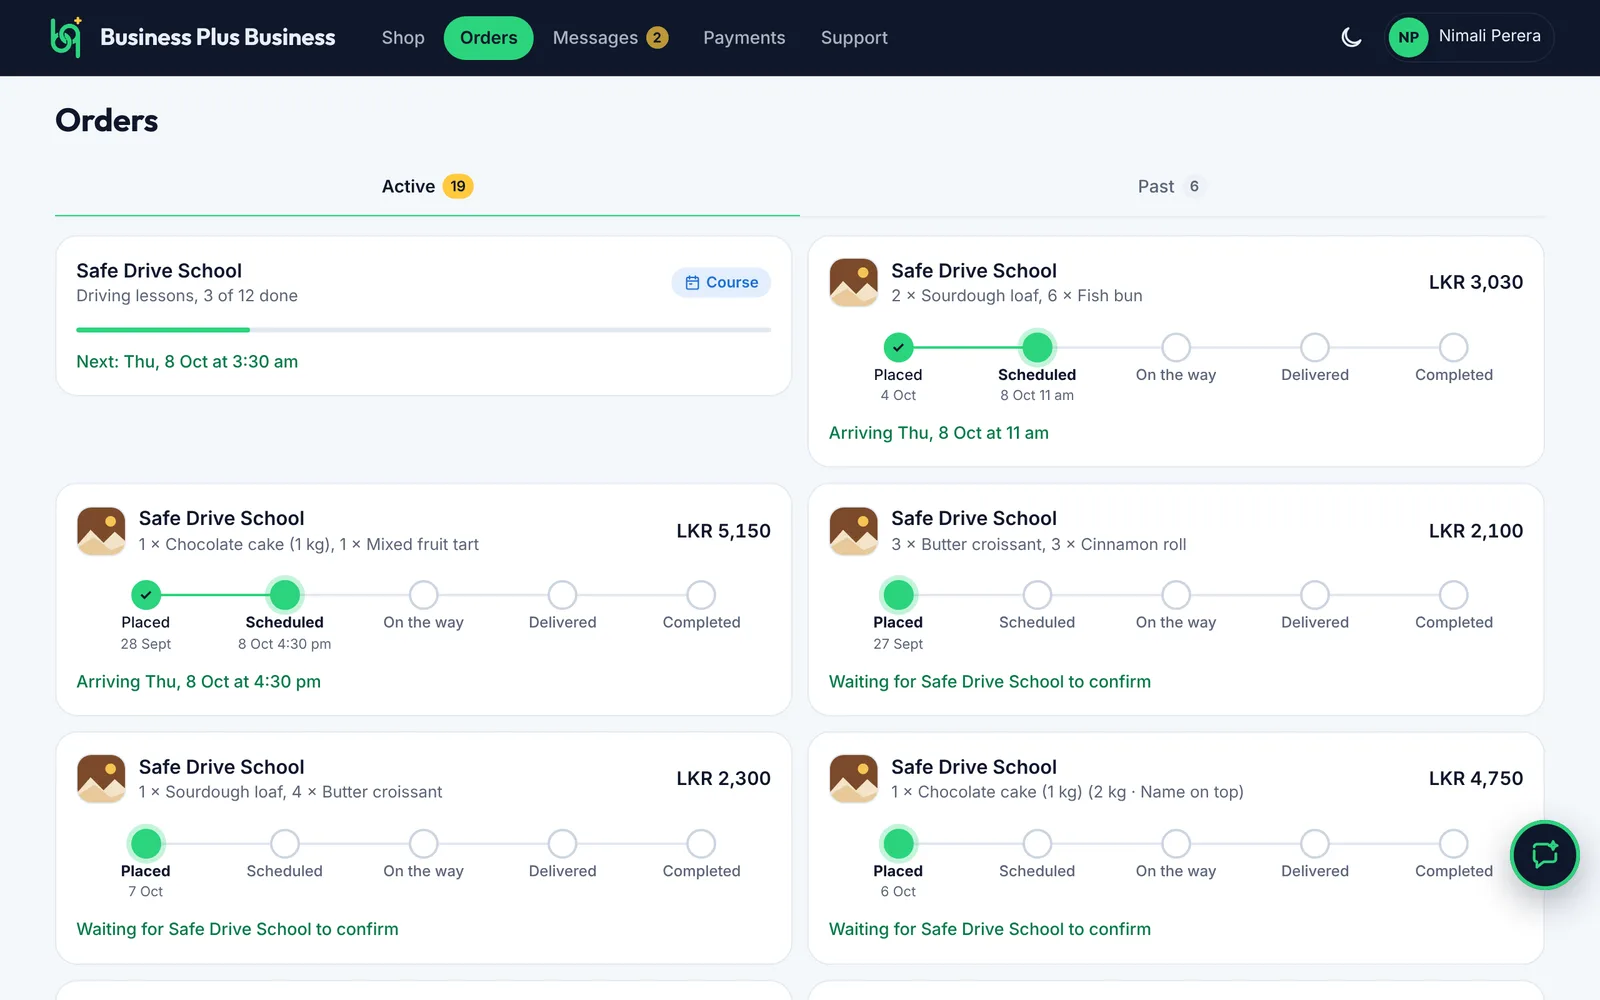
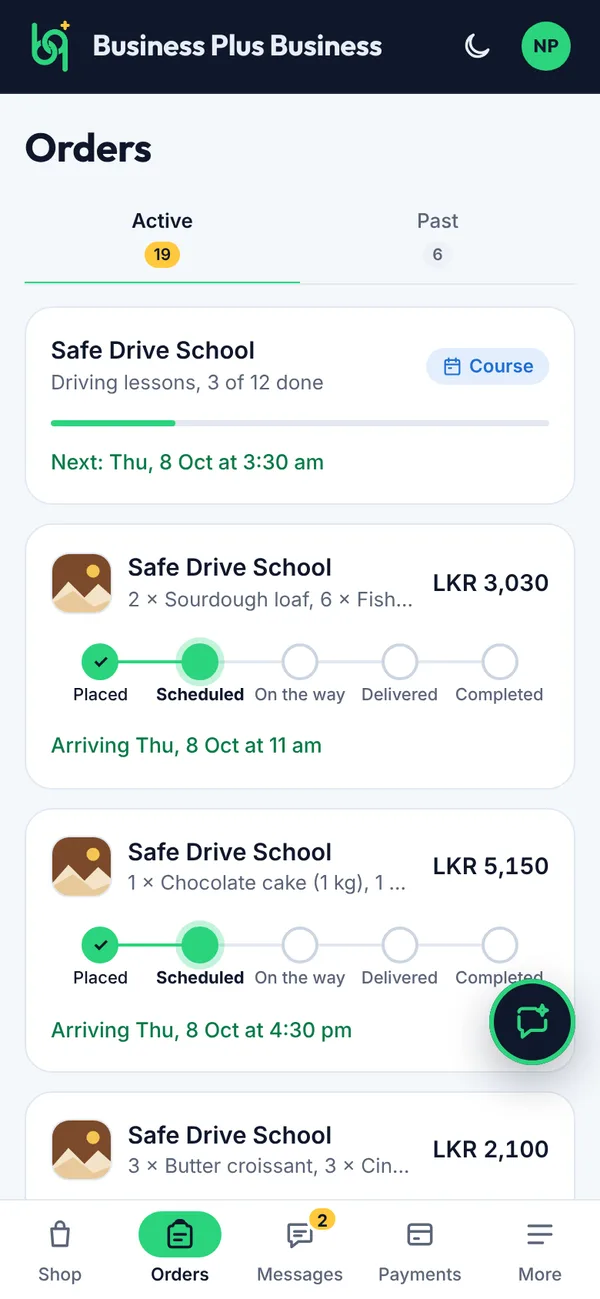
In Orders the course is one line, for example “Driving lessons, 5 of 12 done”. Tap it to see every lesson.
The next lesson is shown under it.
Figure 3.24Your course in Orders
What you’ll see
Cancelling after the free time (shown before you book), or not coming, may be charged. After your last lesson, Home offers Book 6 more.
Some shops let you offer your own price, for example for furniture, vehicles or electronics. You see open to offers under the price, or Make an offer where the price would be.
Before you start
Open the shop and find the item.
Steps
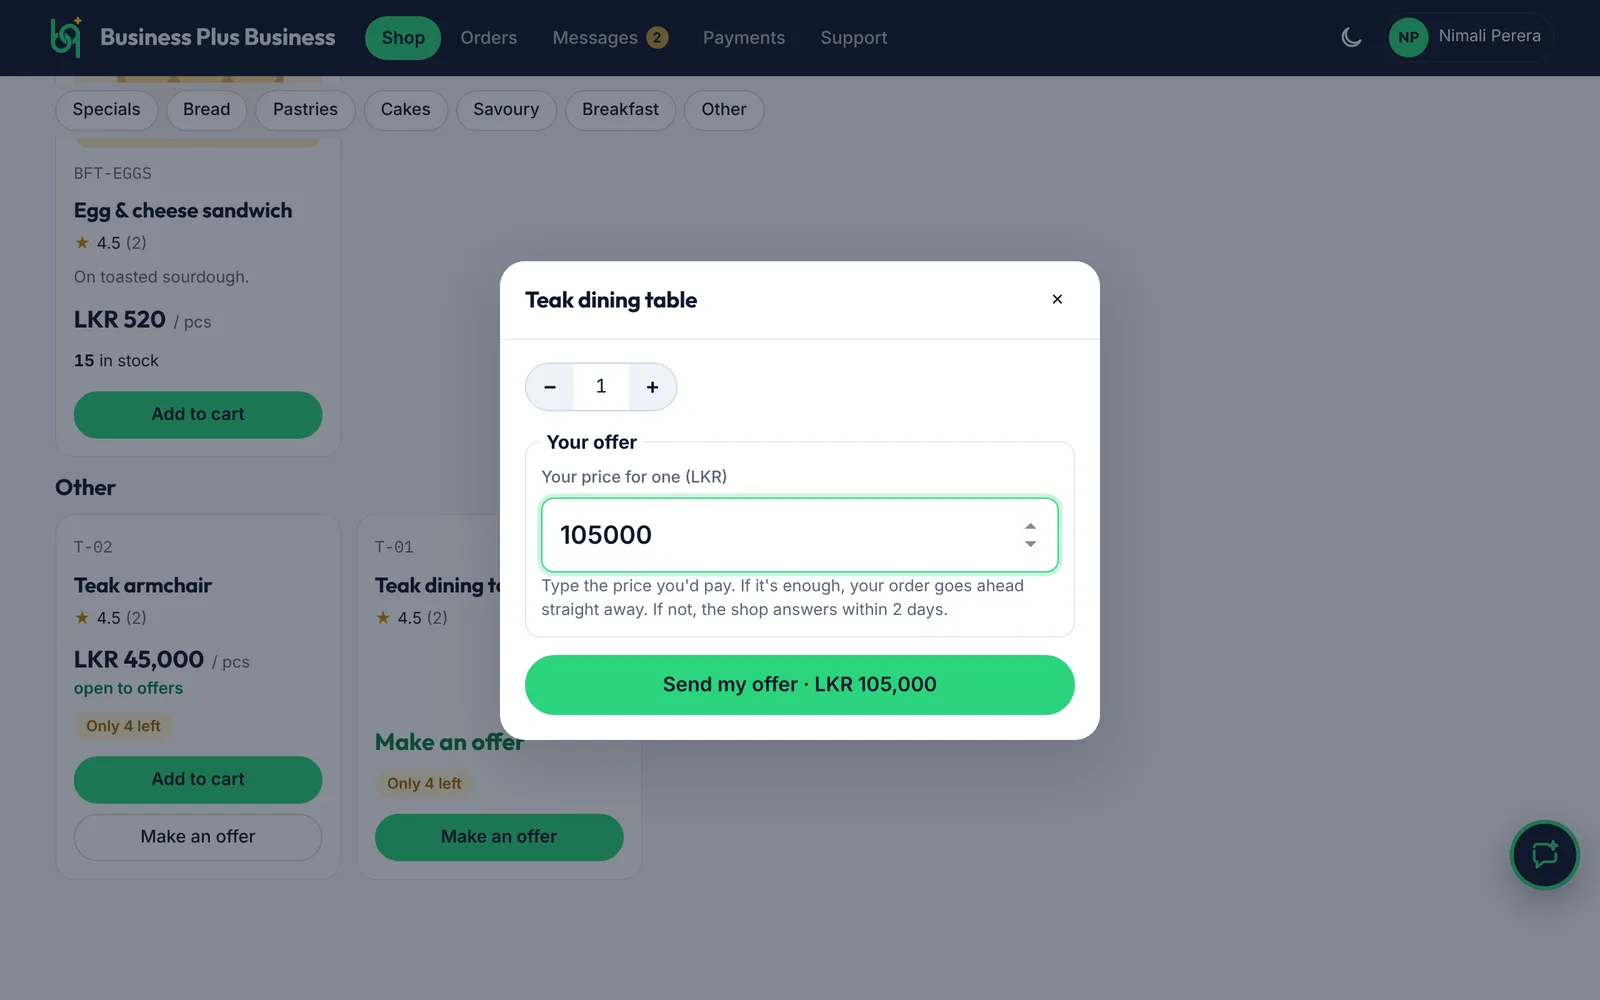
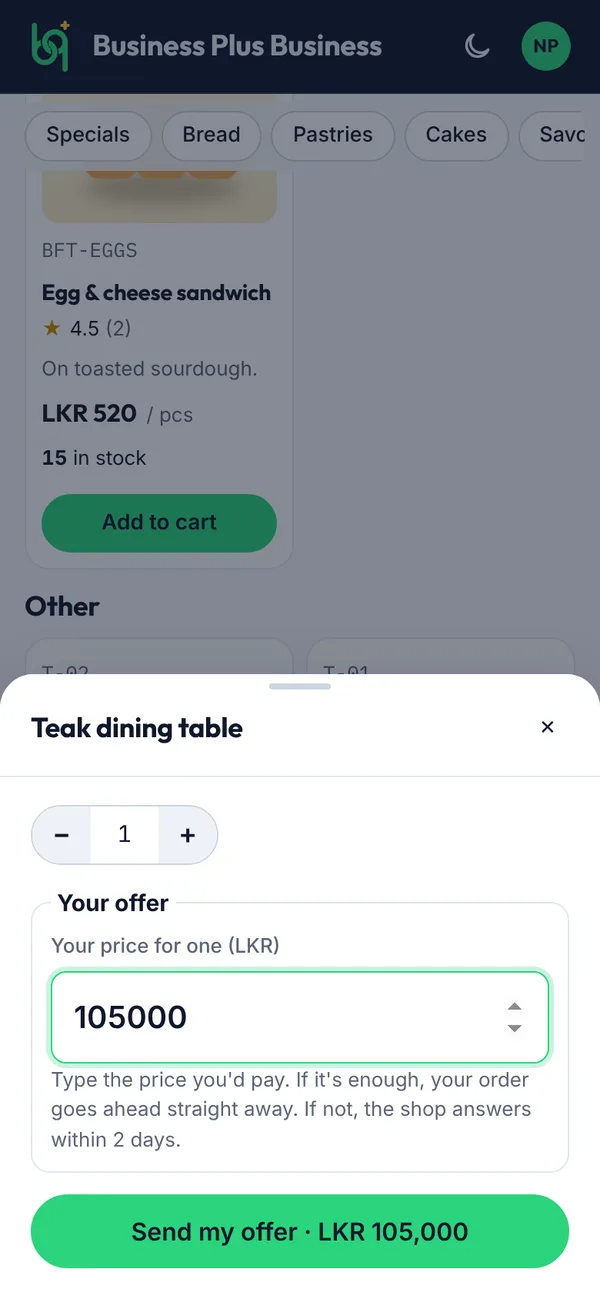
Tap Make an offer and type the price you'd pay for one.
Read what happens next. If your offer is enough, your order goes ahead straight away. If not, the shop answers within 2 days.
Tap Send my offer, then check out as usual. Your cart shows Your offer on that line.
Figure 3.25Making an offer
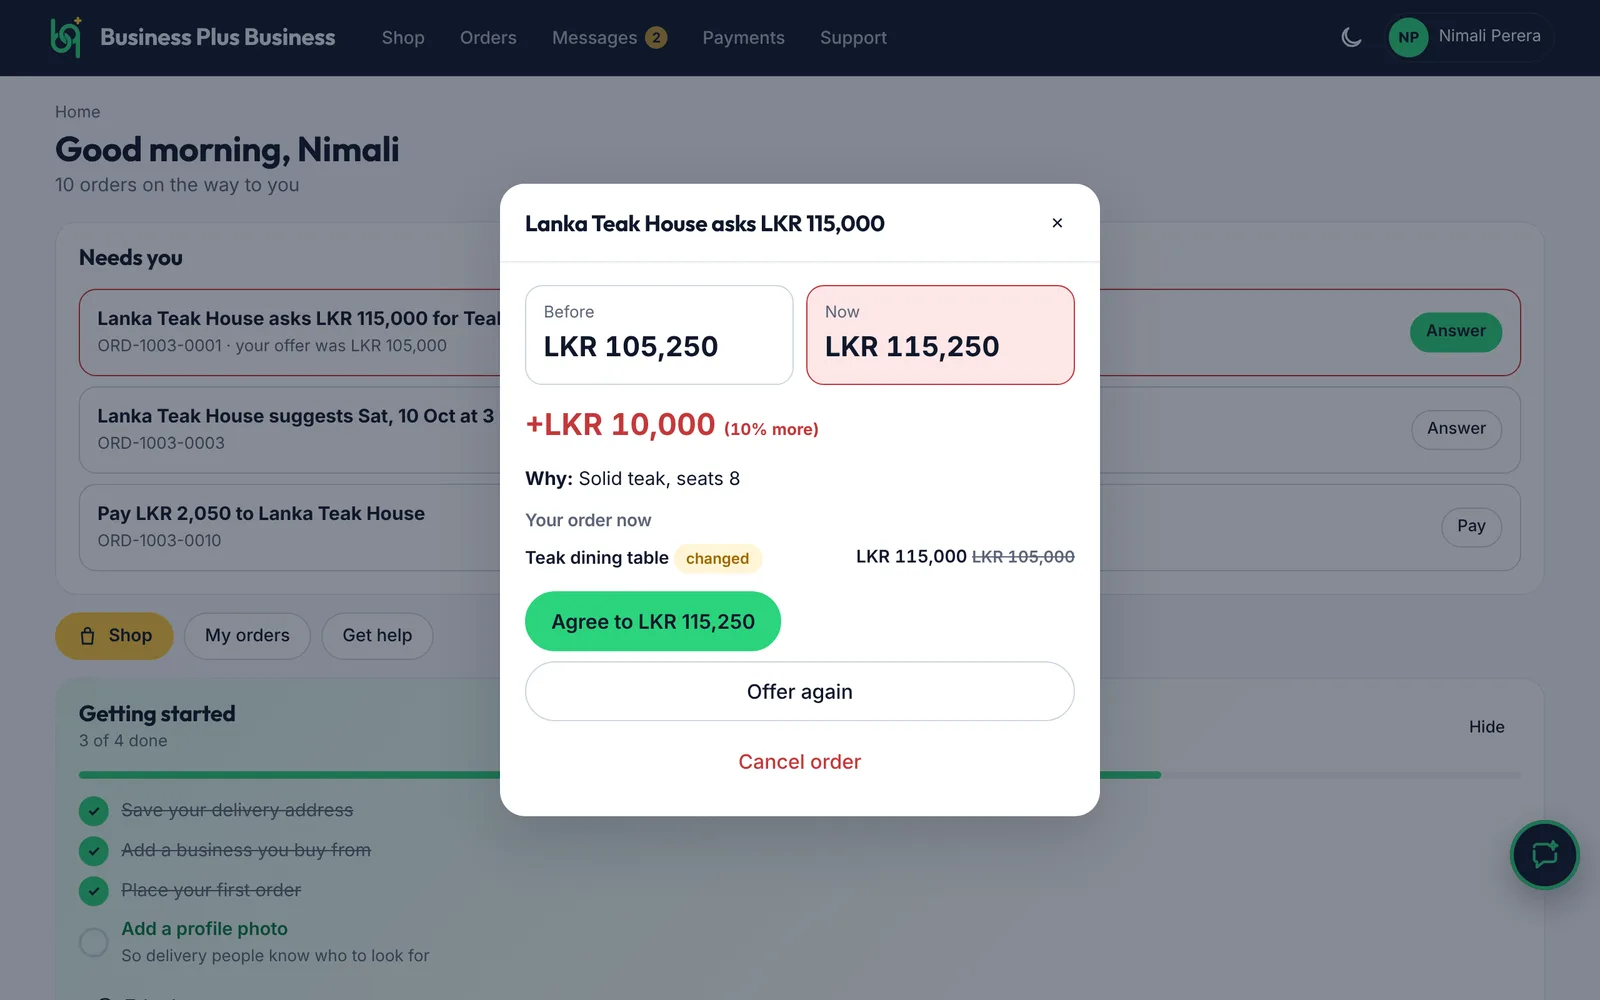
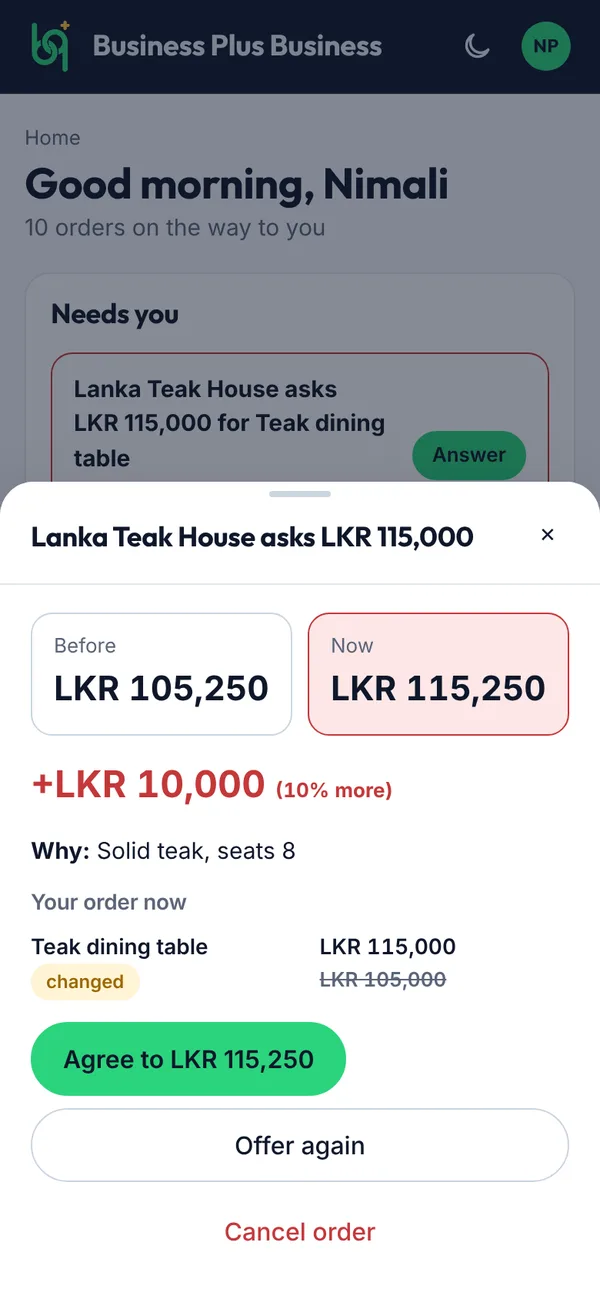
If the shop asks for another price, you see … asks LKR … under Needs you on Home and on the order. Tap Answer: their price is shown next to yours.
Tap Agree to …, then Yes, agree to go ahead at their price,
or Offer again with a new price (up to 3 offers for each item),
or Cancel order.
Figure 3.26The shop asks for another price
What you’ll see
You get a message at each step. If the shop says no, or doesn't answer within 2 days, the order is cancelled and nothing is charged. Pay cash as usual, or by card once the price is agreed. Bank transfer is offered only after the price is agreed. After 3 offers, settle it with the shop by message or call.
Some stores sell only to their members. They aren't in the Shop: you find them under Exclusive. You can see the store, but not its products, until the owner adds you.
Steps
Tap Exclusive in the menu (on a phone it's in the bar at the bottom, or under More).
Tap Request to join, add a message if you like (for example how you know the shop), and tap Send request. The owner sees your name and your message, not your phone number or address.
We tell you when the owner adds you. The store then shows Member: tap Open the store to see the products and order as usual.
Good to know
If the store declines, you can ask again after 30 days. Business owners can shop from other exclusive stores the same way.
Some businesses take bank transfers. You transfer the money from your banking app before you order, and upload the receipt. The business checks its account and confirms.
Before you start
Have your items in the cart and open checkout (see 3.7).
Steps
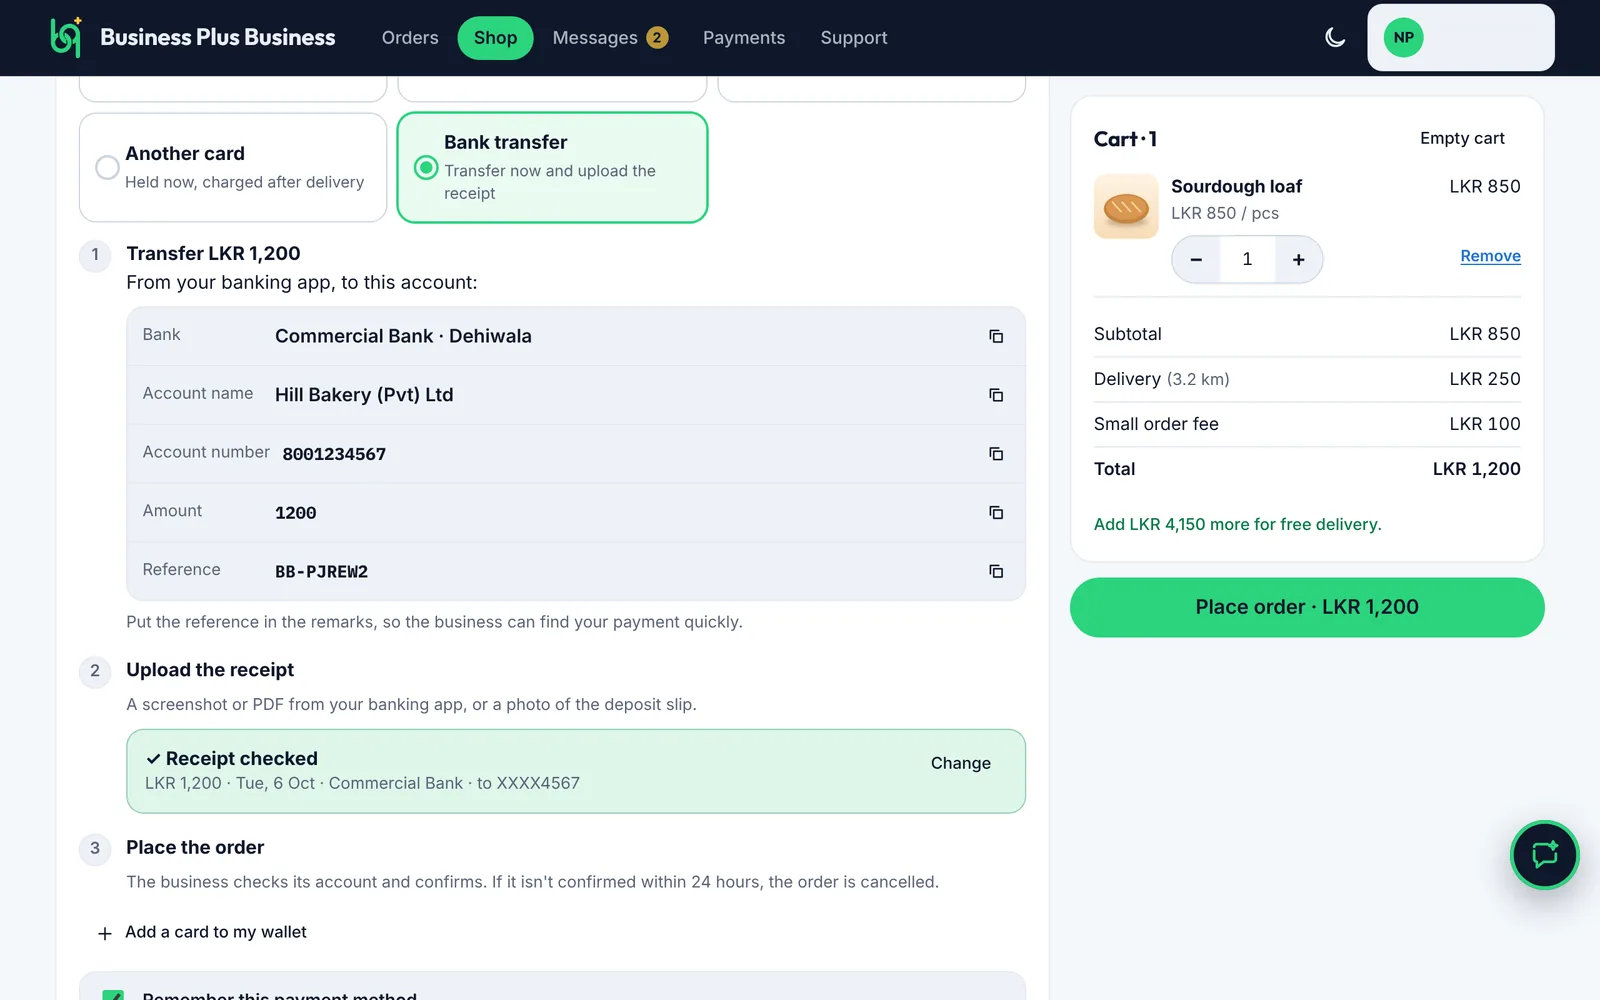
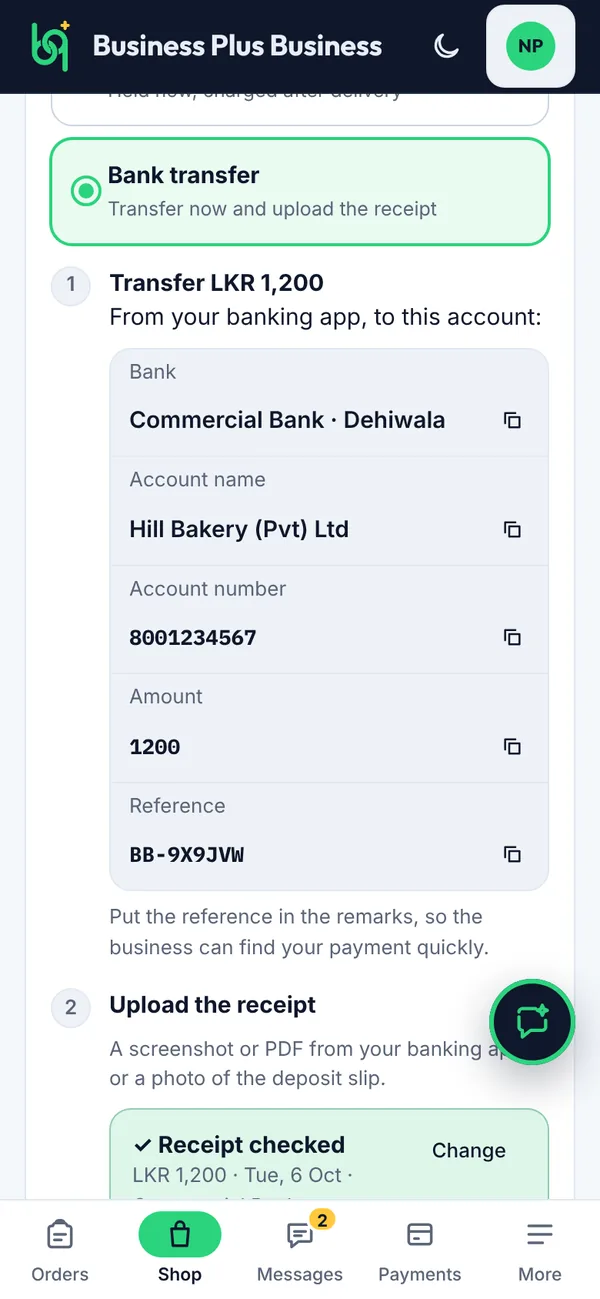
Under Payment, tap Bank transfer. If the business has more than one account, pick the one you'll pay into.
Transfer the exact amount to the account shown. Tap the copy buttons to copy the account number, the amount and the reference (for example BB-7K3Q9X), and put the reference in the remarks of your transfer.
Tap Upload receipt and choose a screenshot or PDF from your banking app, or a photo of the deposit slip (up to 10 MB). The app checks it in a few seconds.
Tap the green button to place your order.
Figure 3.35Paying by bank transfer at checkout
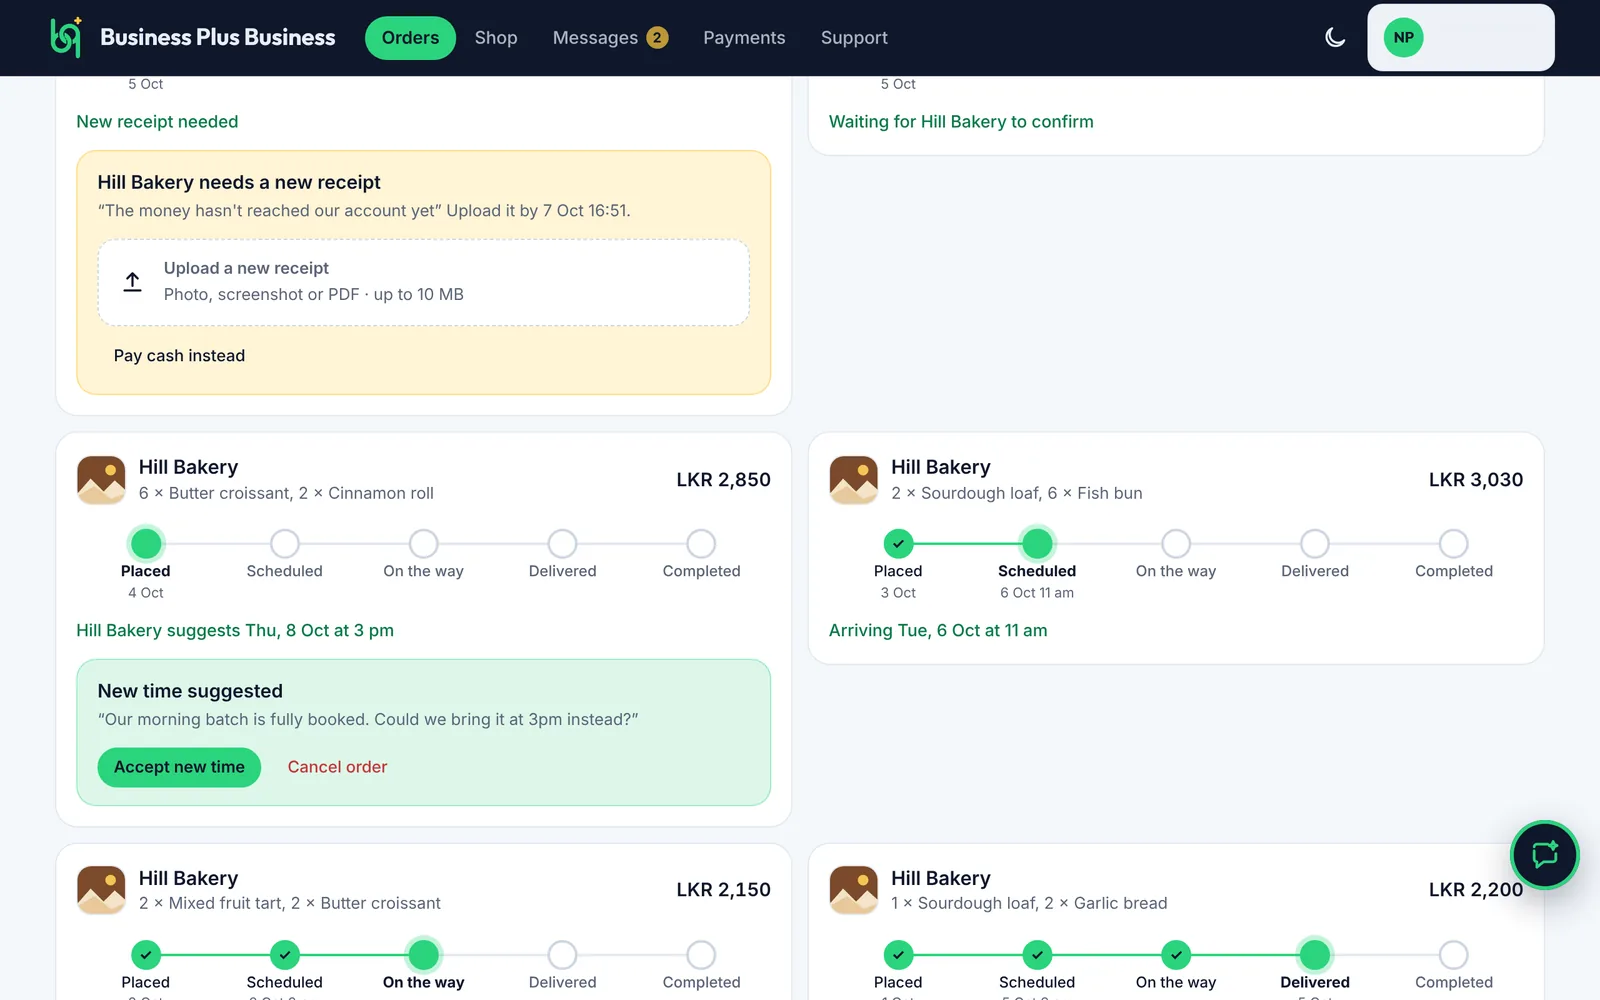
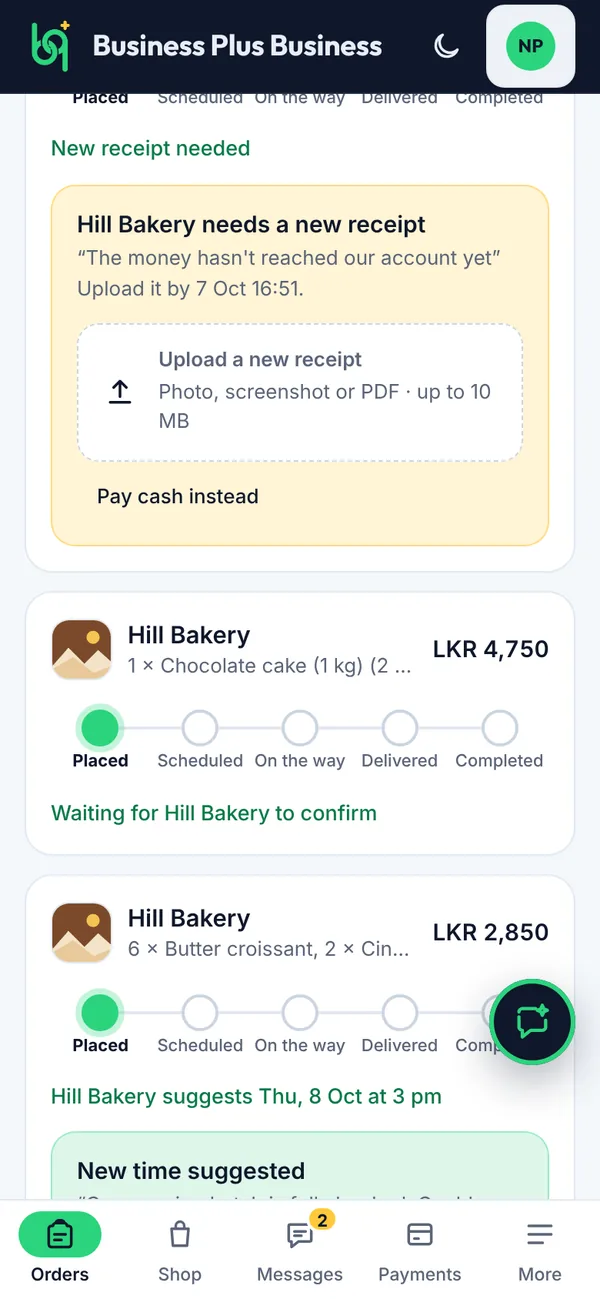
Figure 3.36When the business asks for a new receipt
About the receipt check
Files that aren't a transfer receipt (a photo of something else, for example) are refused, so you can't place the order with them. If the amount, account or date on the receipt looks different, you see a warning: you can still order, but the business may ask you for a new receipt. A receipt can only be used for one order.
If the business asks for a new receipt
You get a message, and the order shows New receipt needed with the reason. Tap Upload a new receipt, then Send new receipt within 24 hours, or tap Pay cash instead if the business takes cash.
What you’ll see
Your order shows Receipt sent until the business confirms the payment. If it isn't confirmed within 24 hours, the order is cancelled automatically; if you already paid, message the business for a refund. Your receipts stay with the order under Payment receipt.
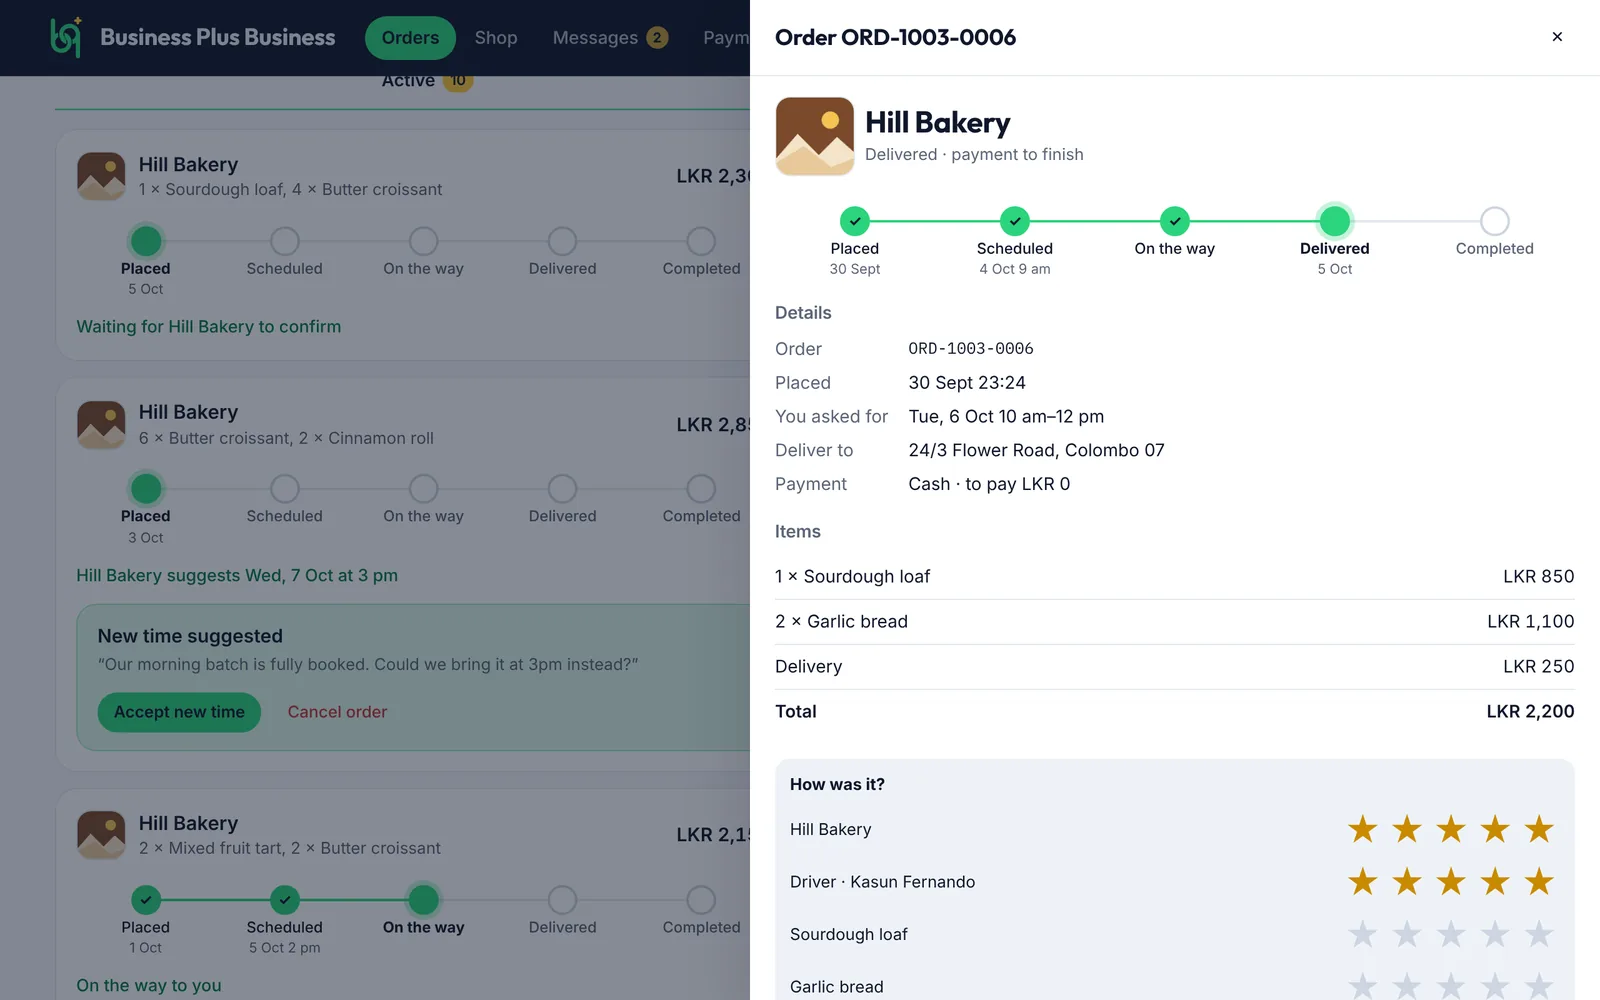
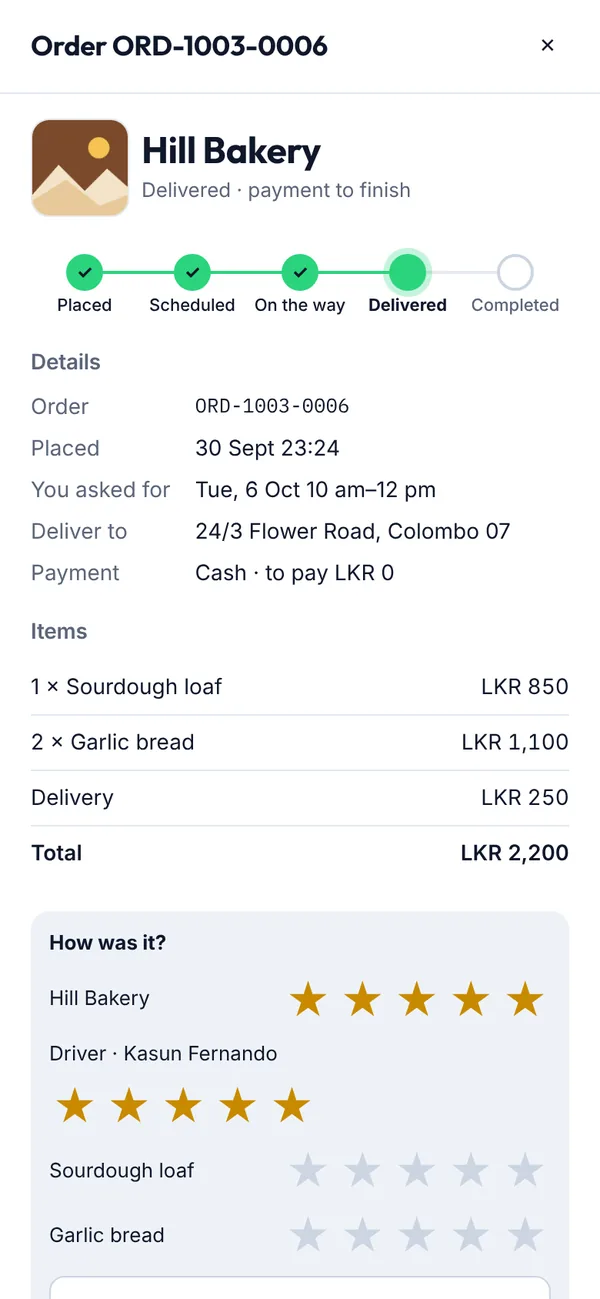
After an order is delivered you can rate the business, your items and the driver. It takes a few seconds, and you can always skip it.
Steps
On Home, under Needs you, tap Rate next to How was …? (or open the order in Orders). Tap Not now if you'd rather not.
Tap 1 to 5 stars for the business. With 4 or 5 stars you can tap what went well (like Fresh); with 3 or fewer, what could be better.
Optionally add a few words, give each item and your driver a thumbs up or down, then tap Send ratings.
What you’ll see
The business sees your review with your first name and the first letter of your last name; your driver only sees an average. Ratings stay hidden until the business rates you too, or 7 days pass. You can change a rating twice within 7 days (open the order and tap Change rating), but not after the business has replied. Businesses and drivers also rate you after each order: see Account → My rating. Your average shows from 5 ratings and never stops you ordering.
Every product, service, store and Feed post has its own link, so friends can open exactly what you saw, even without an account.
Steps
Open the product (tap its photo) and tap Share, or tap the share button under a Feed post.
Choose WhatsApp, Facebook, X or Copy link. For Instagram, the app saves a square picture with a QR code and copies the words, ready to paste.
What you’ll see
WhatsApp and Facebook show the picture, the name and the price. The link opens the product in B+B; people without an account sign up in a minute and come straight back to it.
After you sign up as a business owner, the app asks a few simple questions, one at a time (the steps at the top show where you are, for example Step 3 of 7). It takes about five minutes, and you can change everything later. Stuck? Tap Help me set up on any question to ask for a B+B Store Creator.
Steps
Type your business name, and add a logo if you have one.
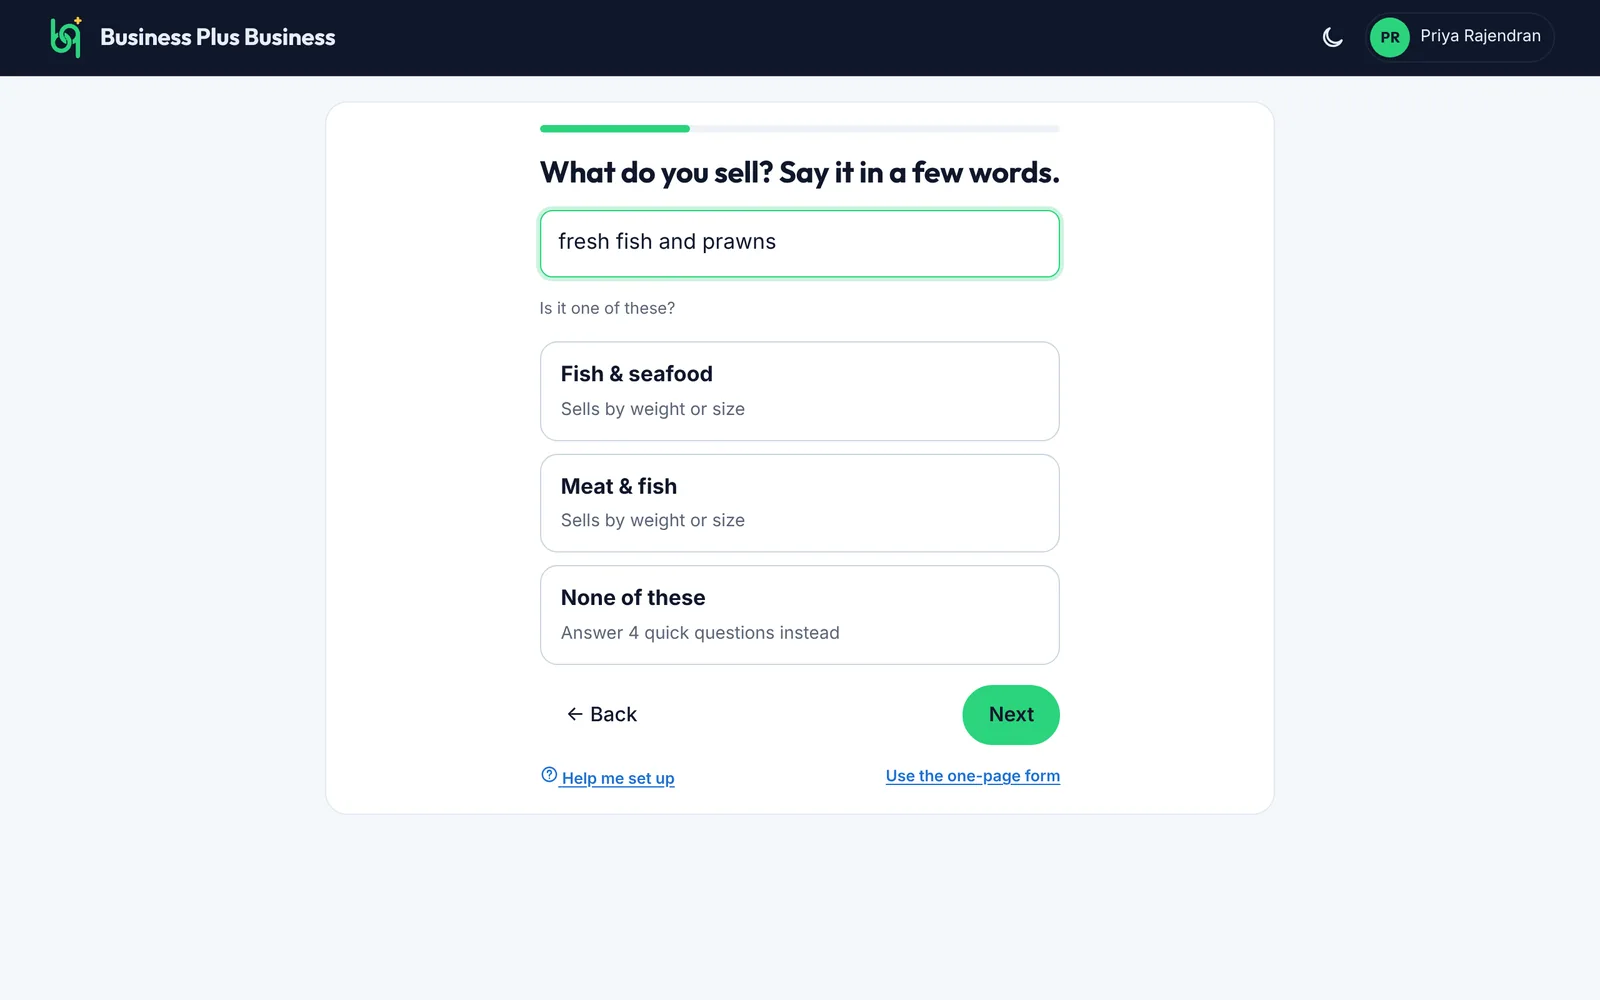
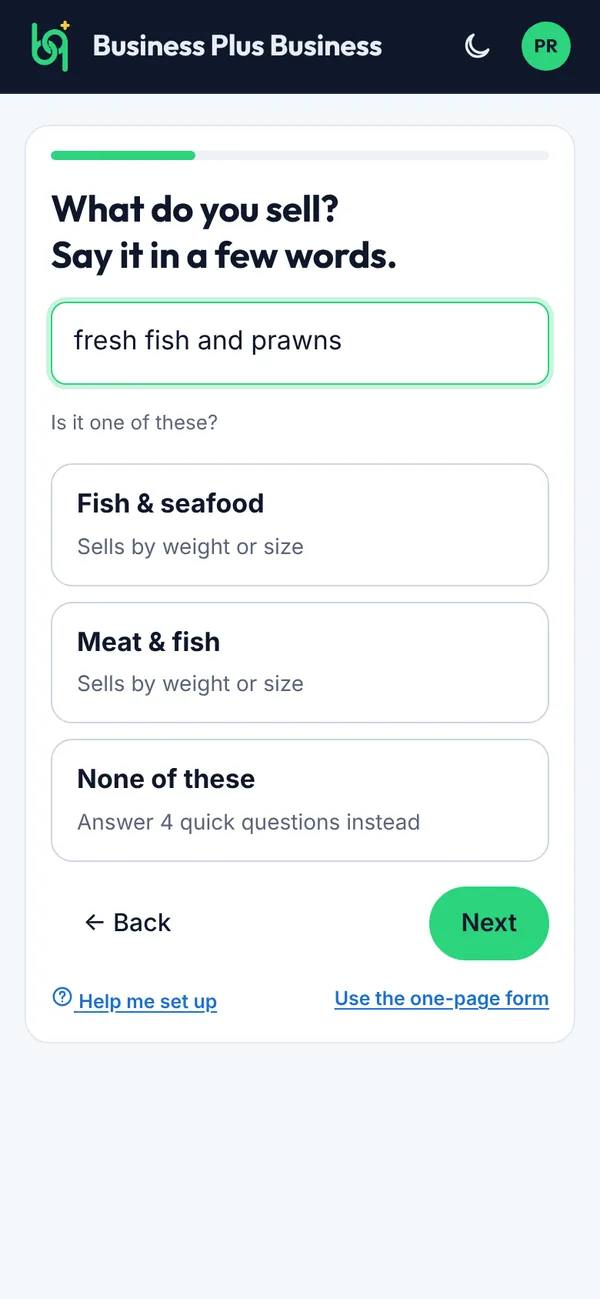
Say what you sell in a few words, for example fresh fish or curtains and blinds.
Tap the type that fits. Not there? Tap None of these and answer four quick questions instead.
Tap Help me set up at any time to ask for a B+B Store Creator to set it up with you.
Choose your address, check your WhatsApp number, say whether you deliver, and tick how customers can pay.
Figure 4.1Say what you sell, and pick your type
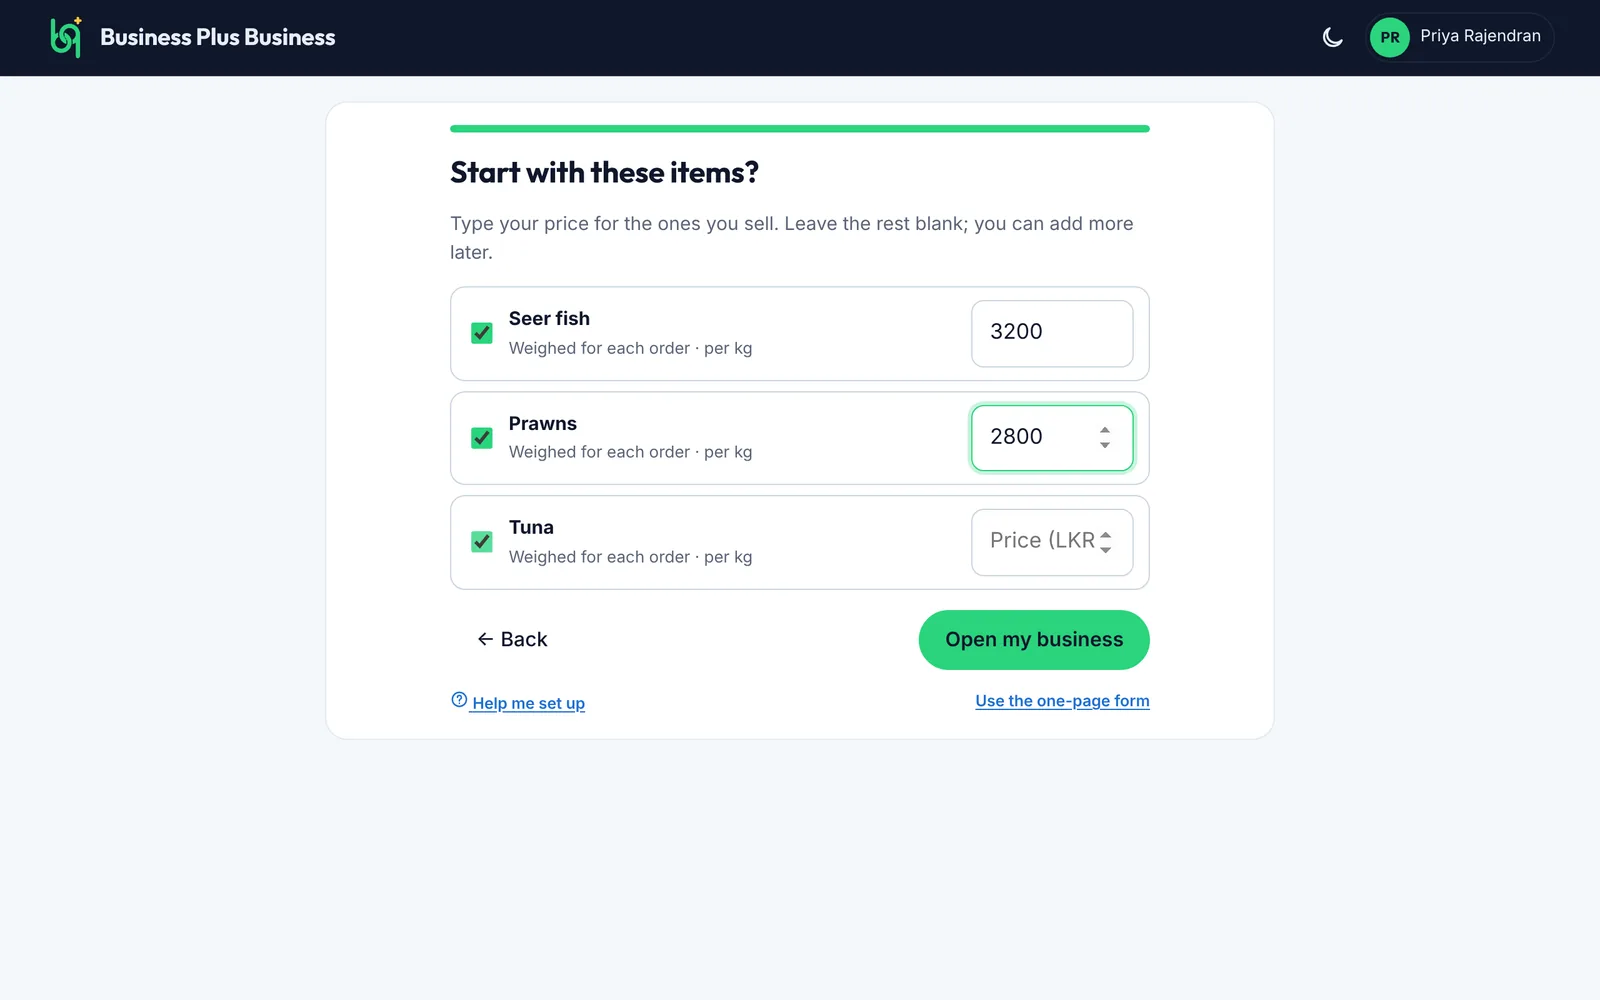
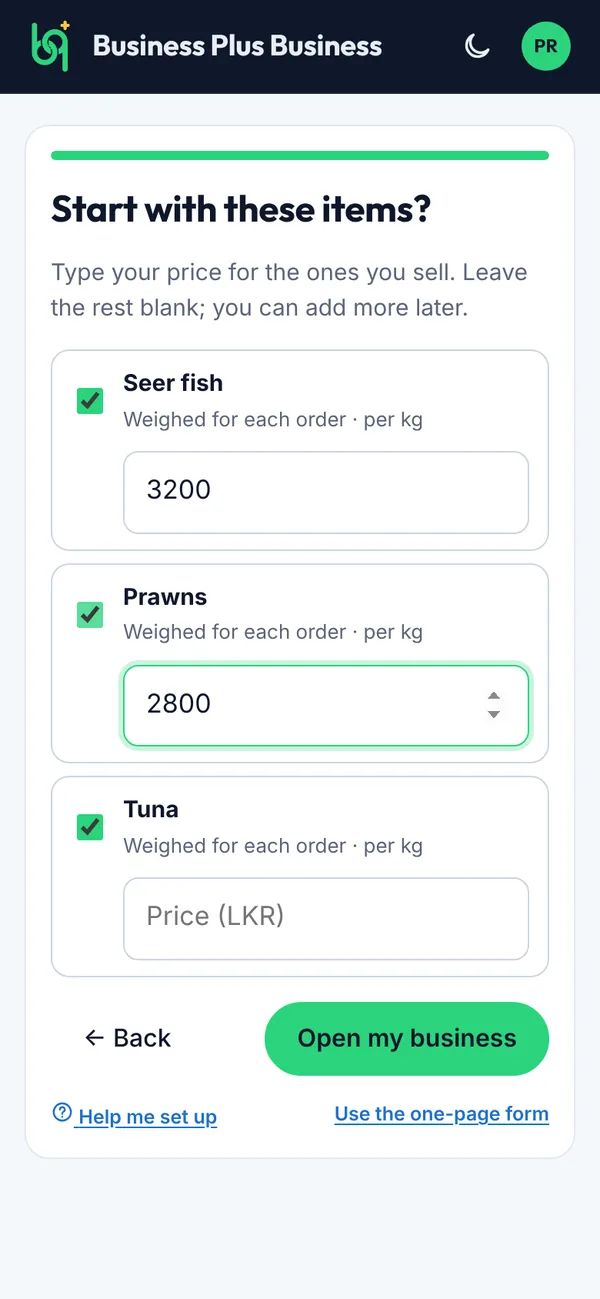
For many types the app suggests a few starter items. Type your price for the ones you sell and leave the rest blank.
Tap Open my business.
Prefer one page? Tap Use the one-page form at the bottom of any question.
Figure 4.2Starter items with your prices
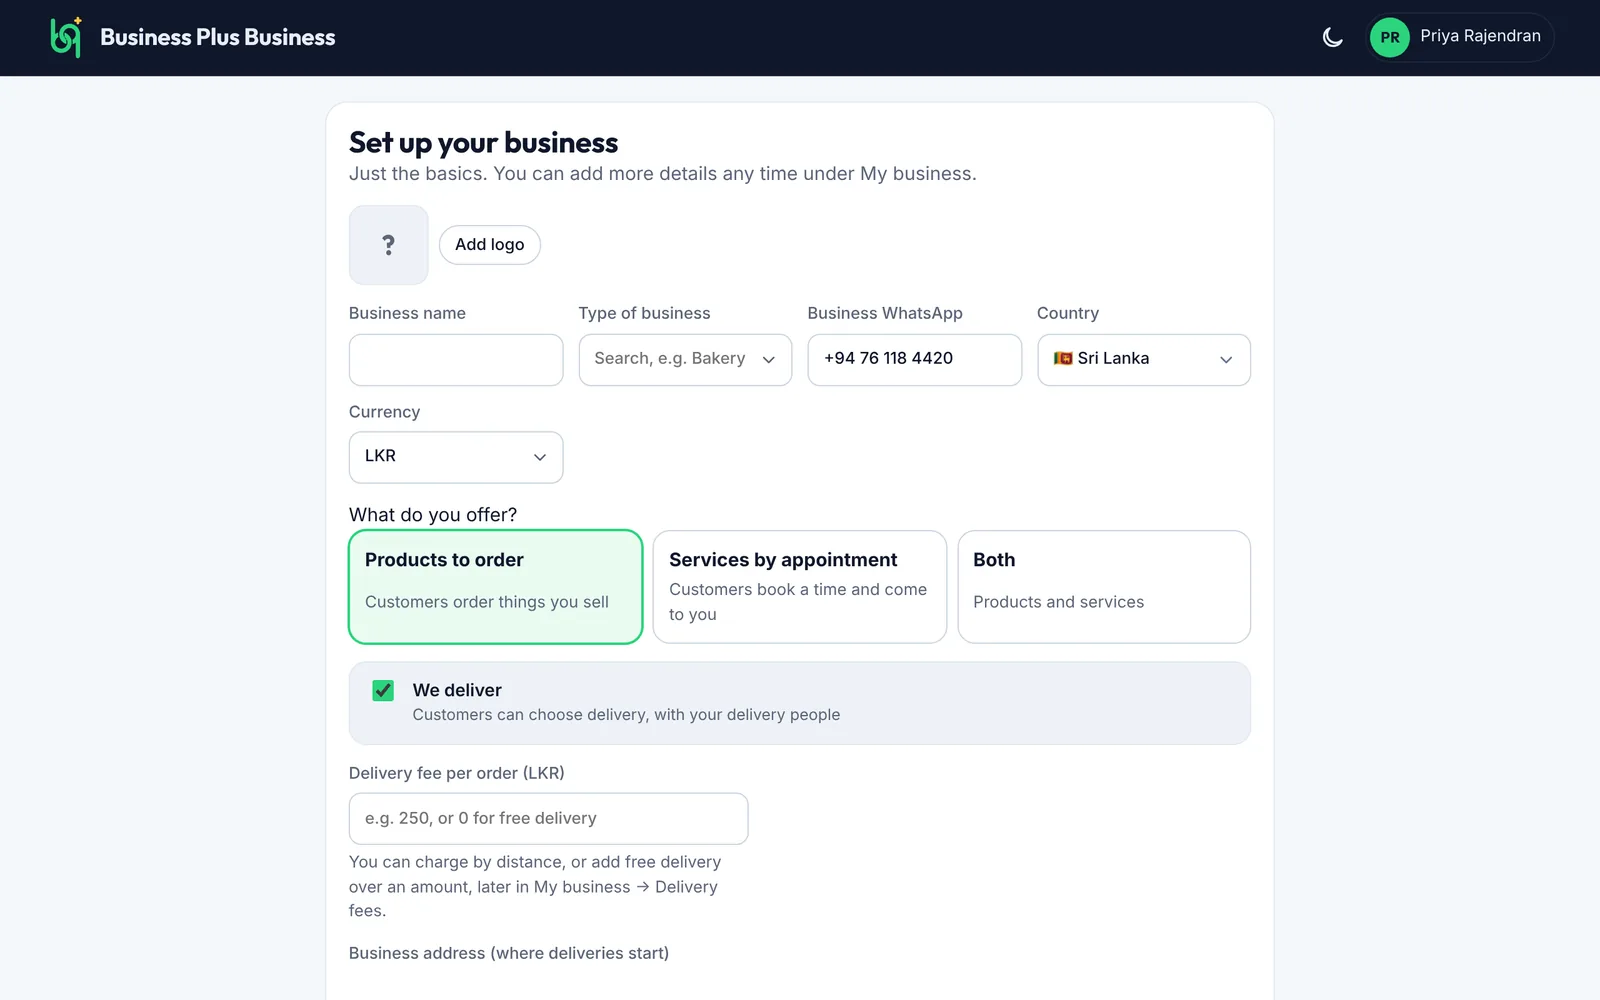
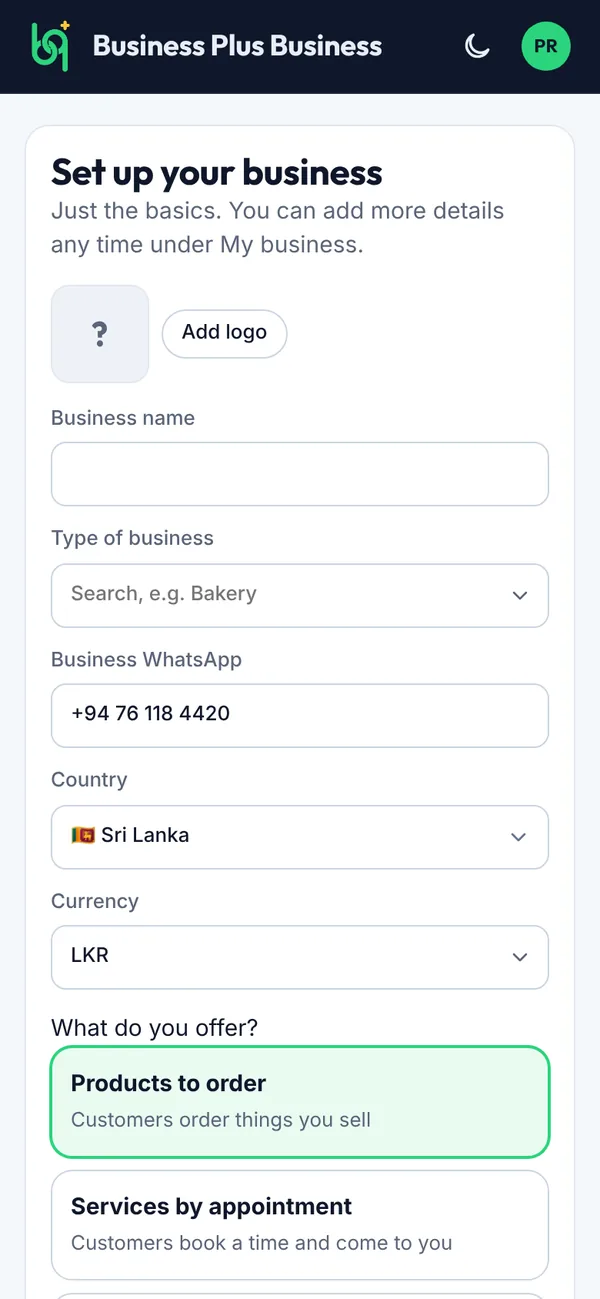
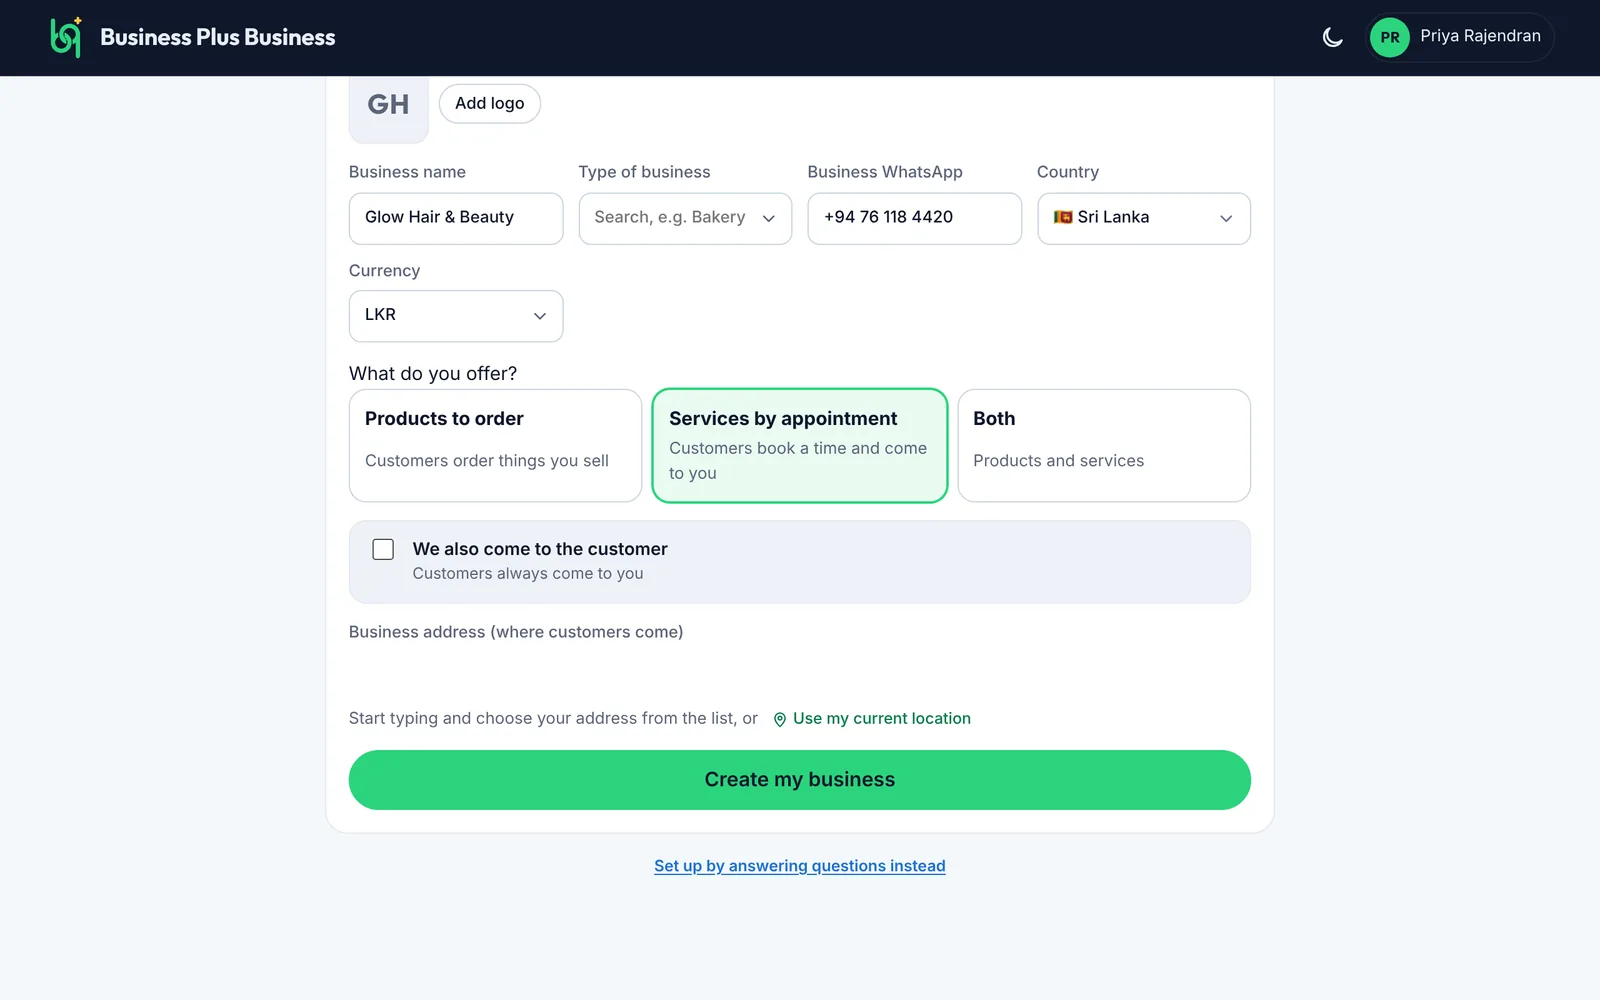
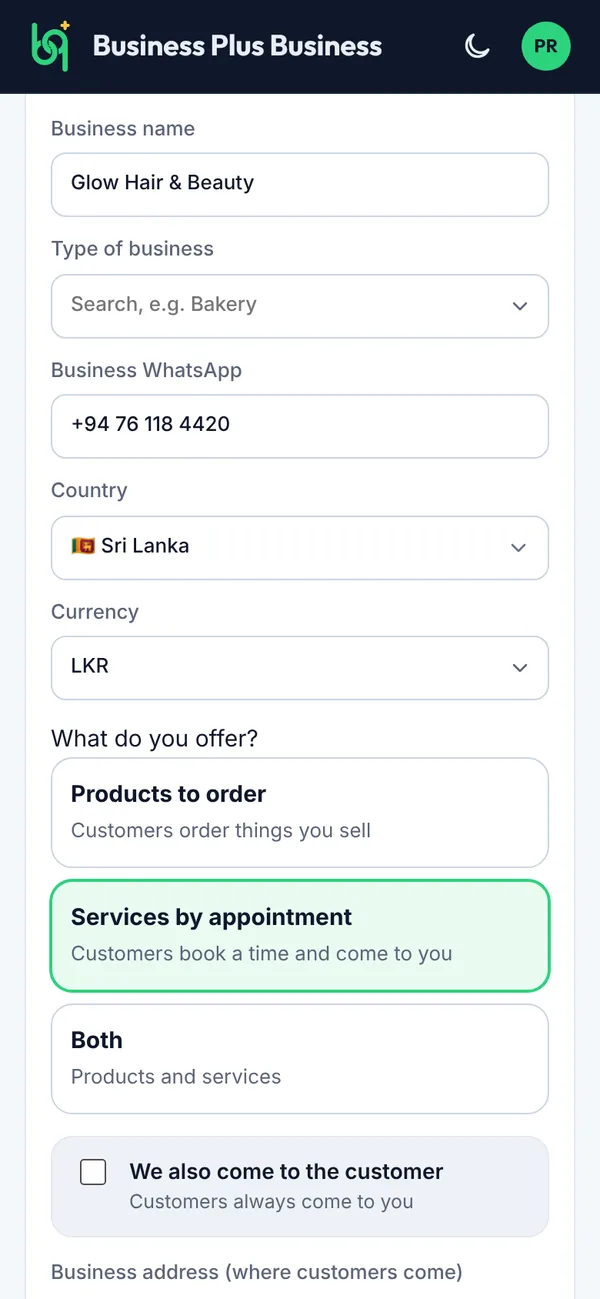
On the one-page form, tap Add logo to upload your logo.
Enter your business name and choose its type, such as Bakery, Restaurant or Hair salon.
Enter the WhatsApp number customers should use. Check the country and currency.
Under What do you offer? choose products, services by appointment, or both. Tick We deliver if you deliver to customers, and enter your delivery fee per order (0 for free delivery).
Enter your address and tap Create my business.
Figure 4.3The one-page form
What you’ll see
Your Home page opens with a Getting started list: add products, share your QR code, add delivery people and get your first order. Suggested categories for your type of business are added for you, such as Specials, Mains and Drinks for a restaurant. Your store isn't shown to customers yet: add at least one product and tap Go live (see the next article).
Every new store is checked by B+B before customers can see it, so the Shop only shows stores with real products.
Steps
Add at least one product (Products → Add product).
On Home, the card Your store isn't live yet shows a Go live button. Tap it.
The card says B+B is checking your store. You can keep adding products in the meantime.
If B+B asks for changes, the card shows their comment and we email you. Make the changes and tap Go live again.
Good to know
If a B+B Store Creator is building your store, Go live needs the first six steps of their build guide first: business details (description, WhatsApp, address), a logo, opening hours, at least 5 products with prices and photos, delivery options and a way to pay. After B+B approves it, you pay your Store Creator and the store goes live.
What you’ll see
We email you when your store is live. Share your QR code so customers can find you.
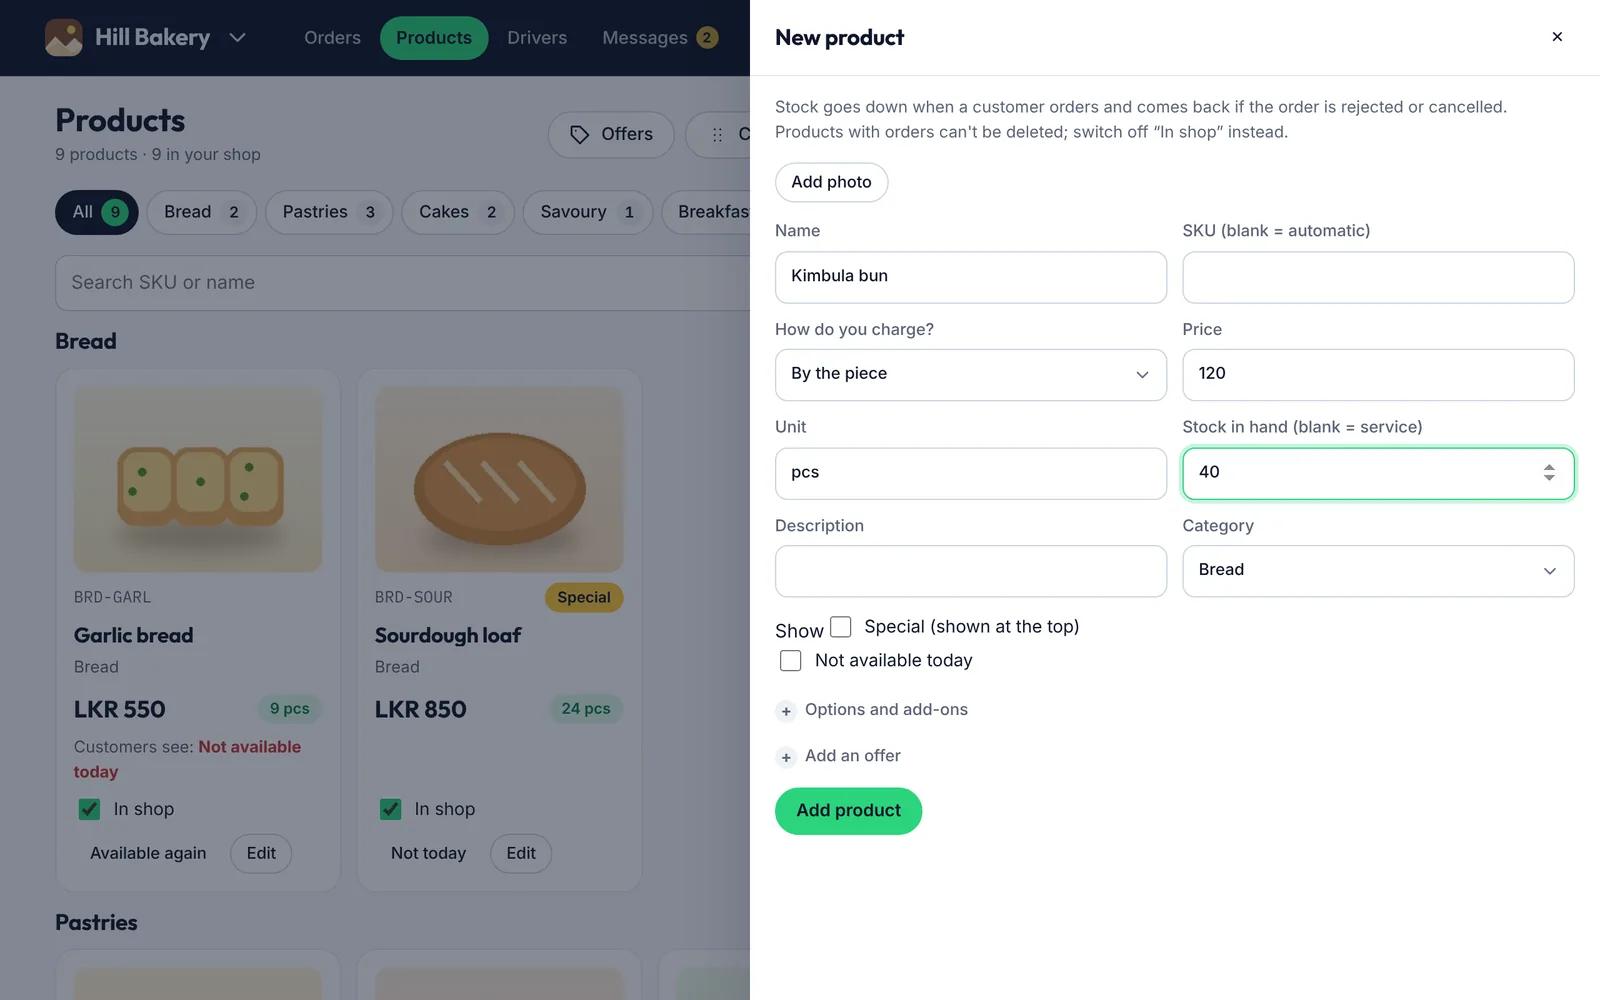
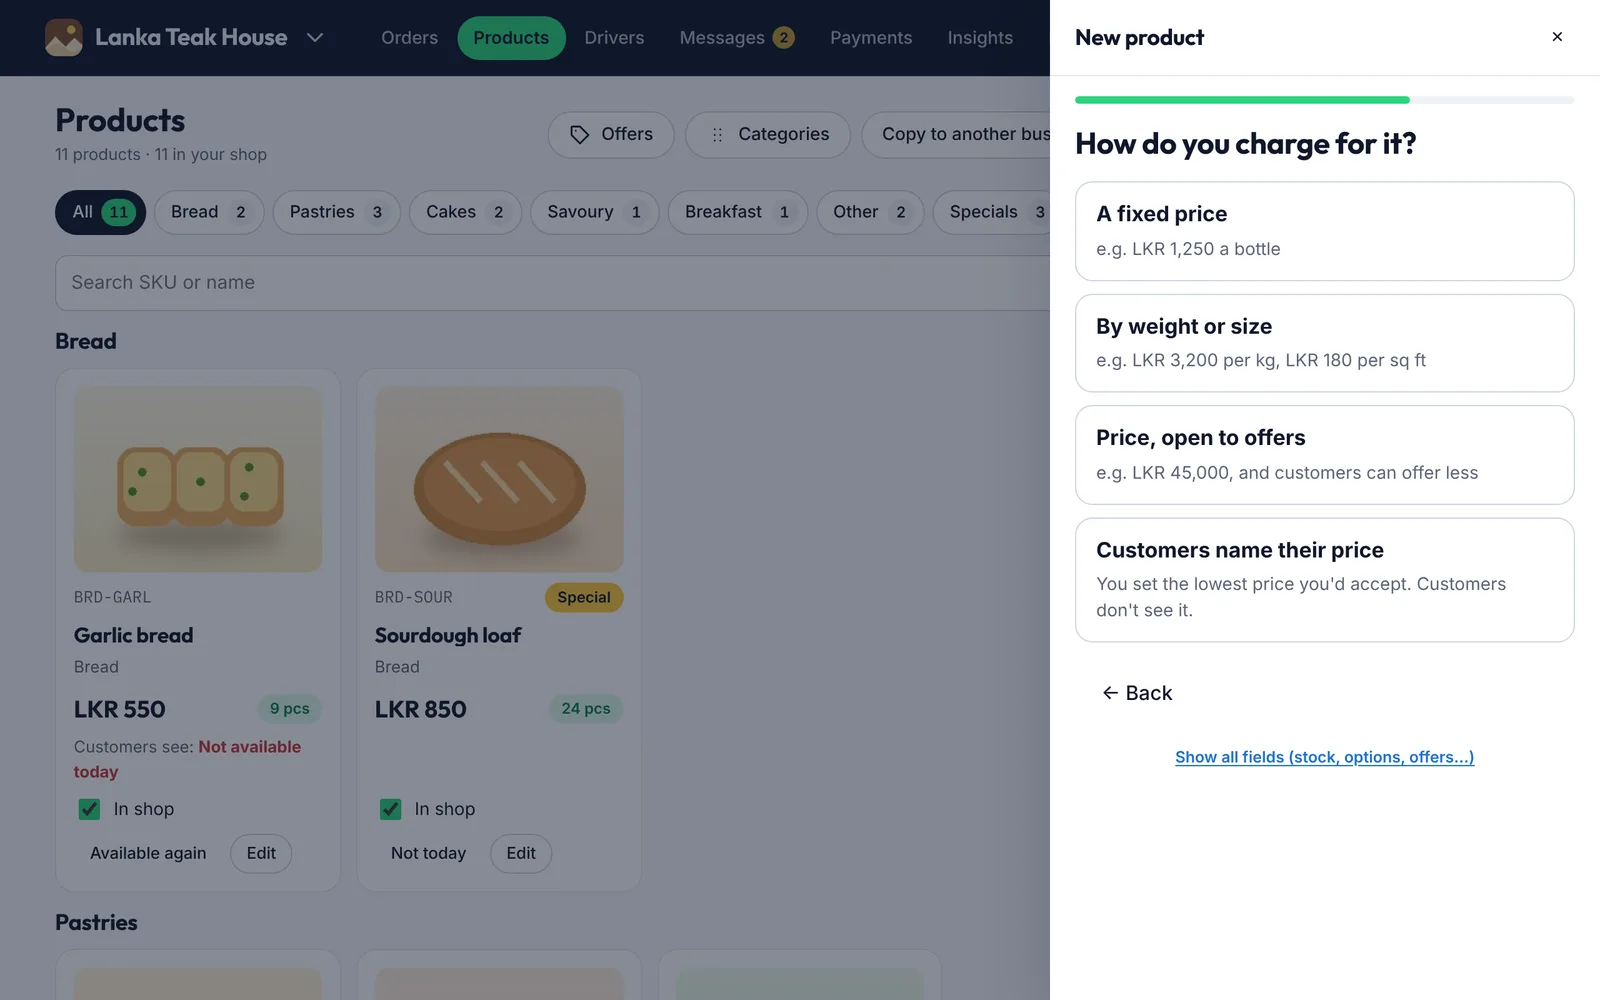
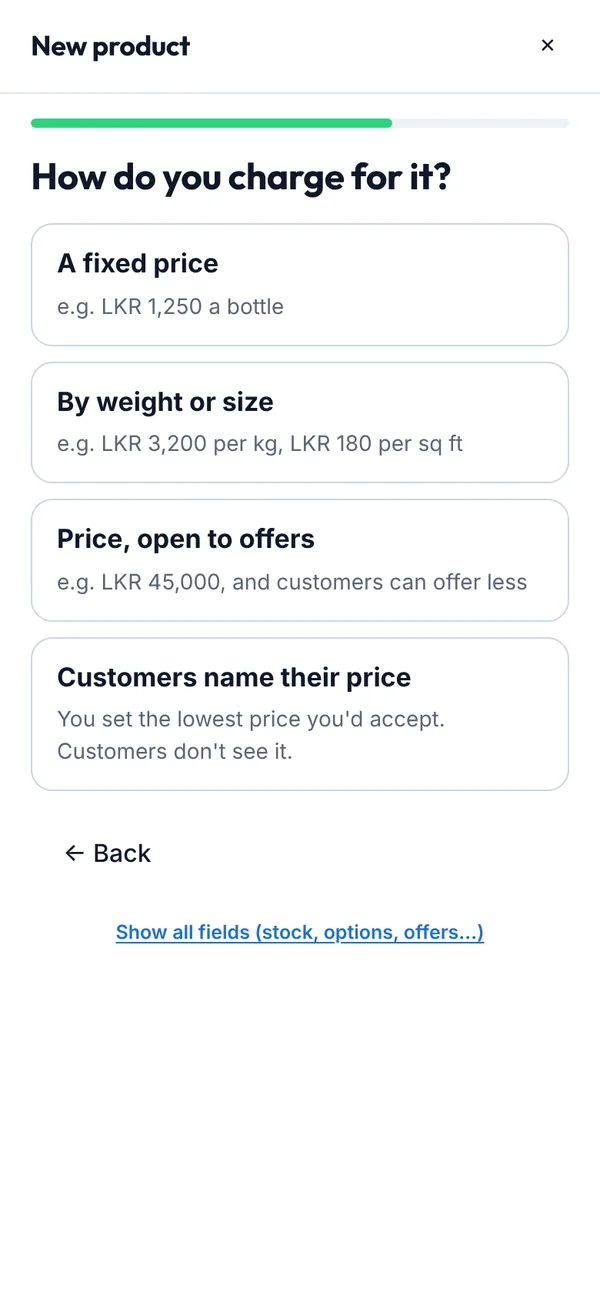
Add a product by answering three questions: what it is, how you charge for it, and the price. Need stock, options or an offer? Tap Show all fields.
Before you start
Open Products and tap Add product.
Steps
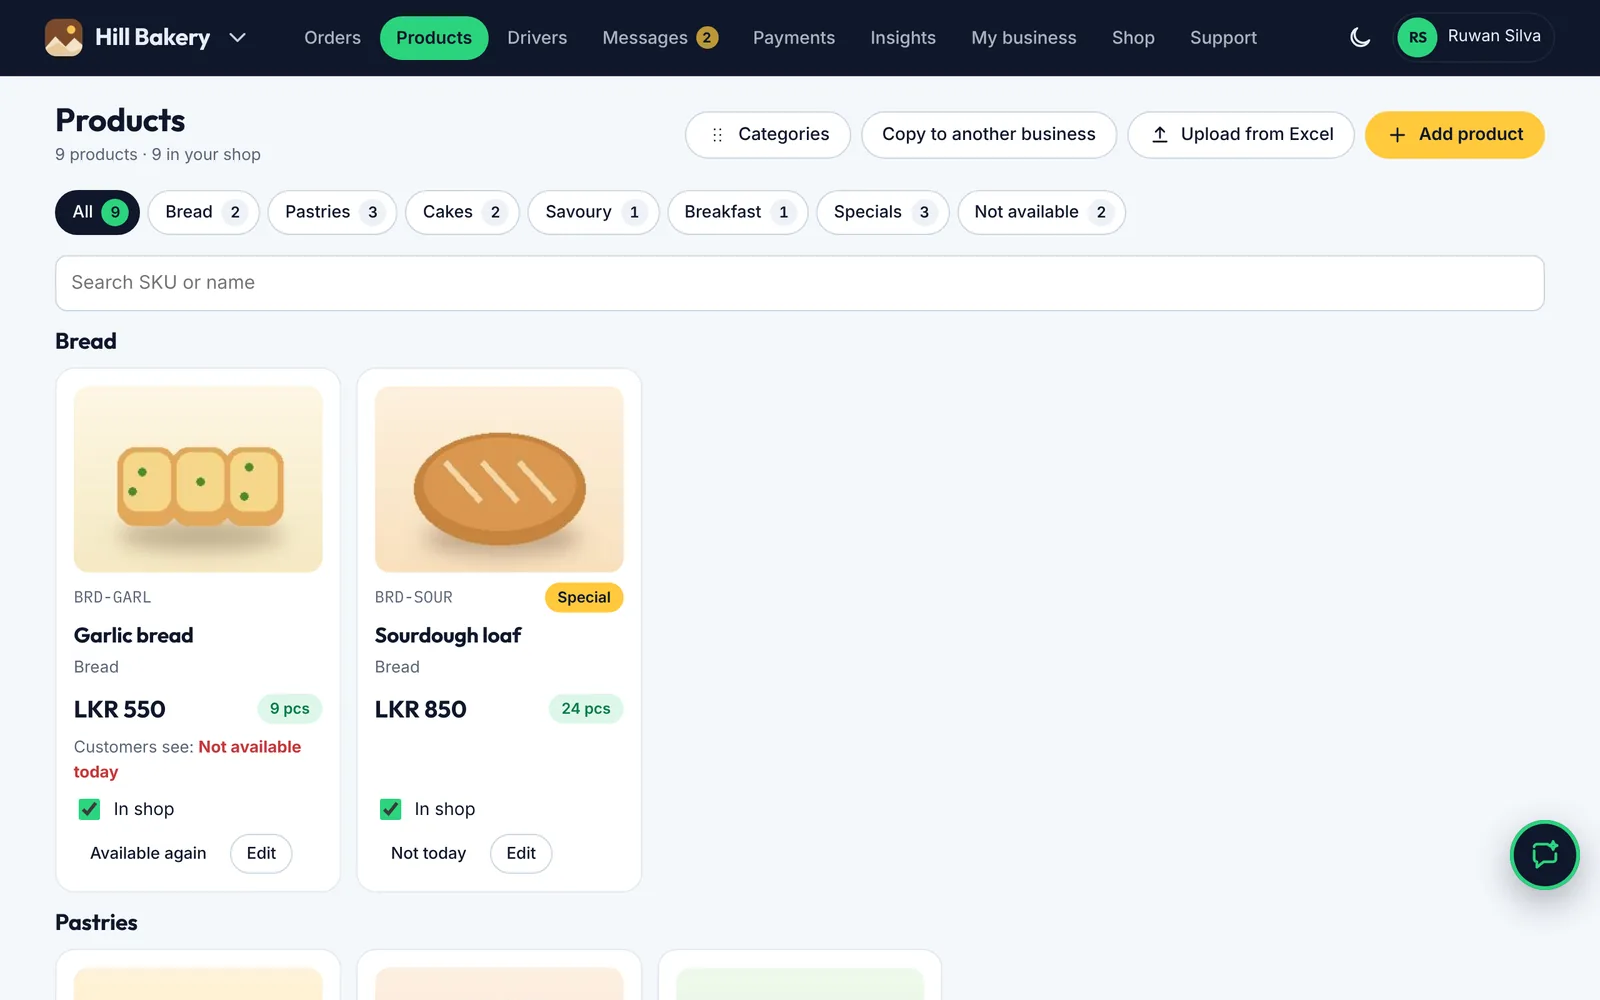
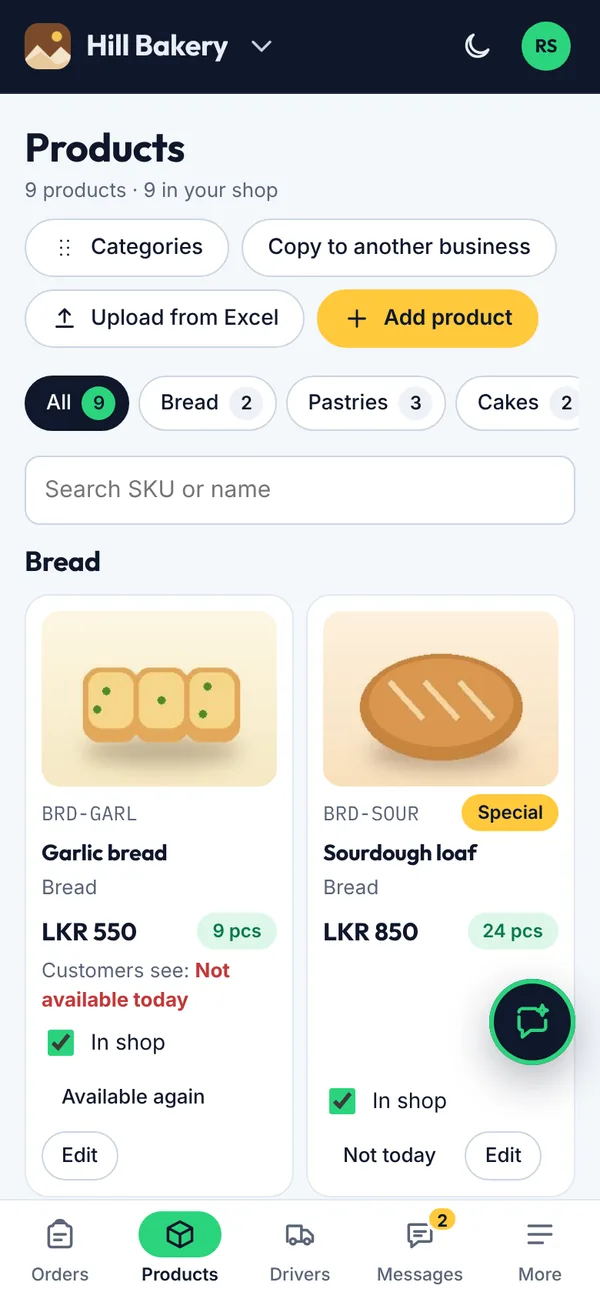
Figure 4.6Products
Type the name and add a photo, then tap Next.
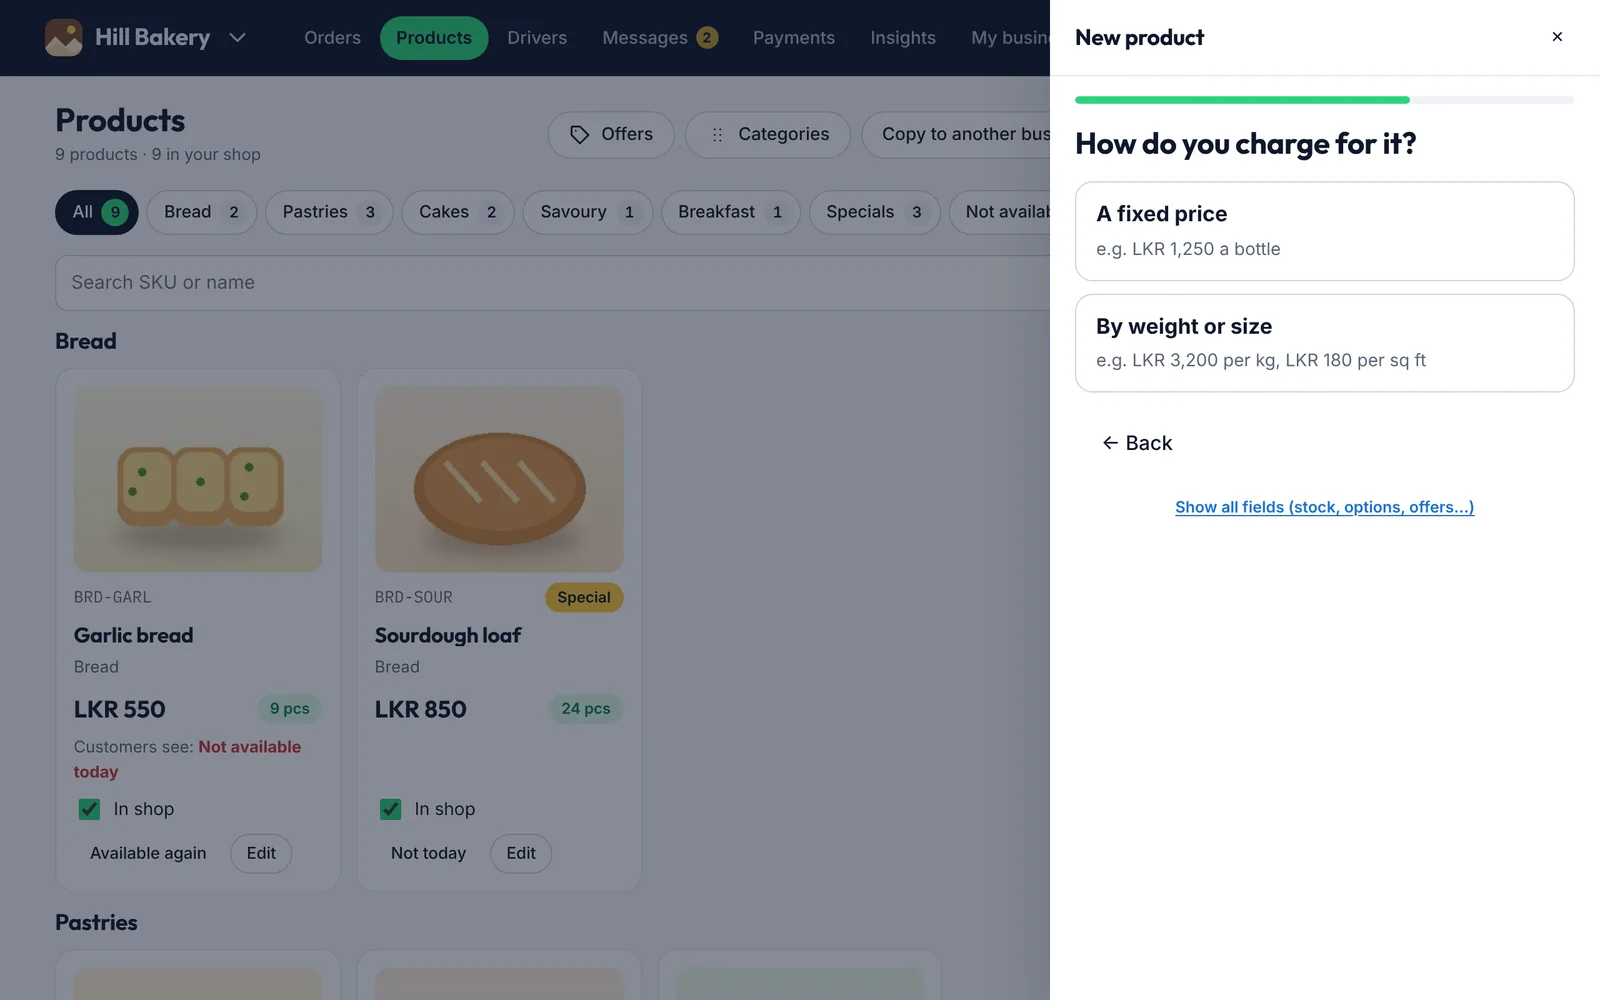
Choose A fixed price for things sold by the piece,
or By weight or size for things sold by the kg, metre or sq ft (see 4.6).
Enter the price and tap Add it.
Tap Show all fields (stock, options, offers…) for the full form.
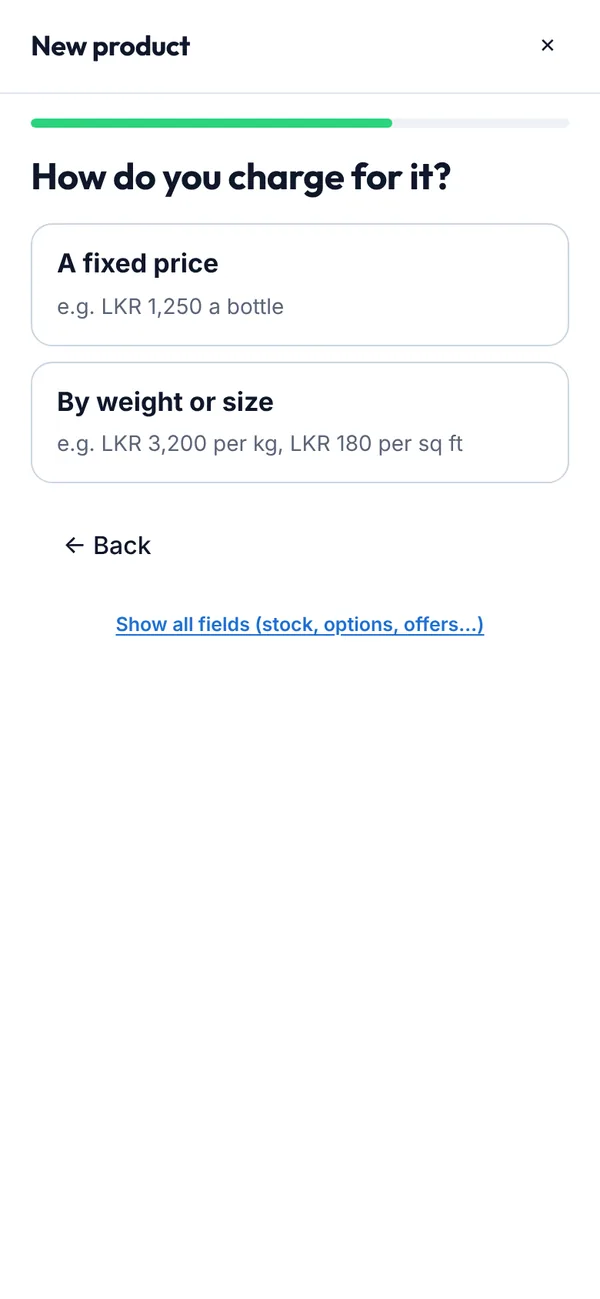
Figure 4.7How do you charge for it?
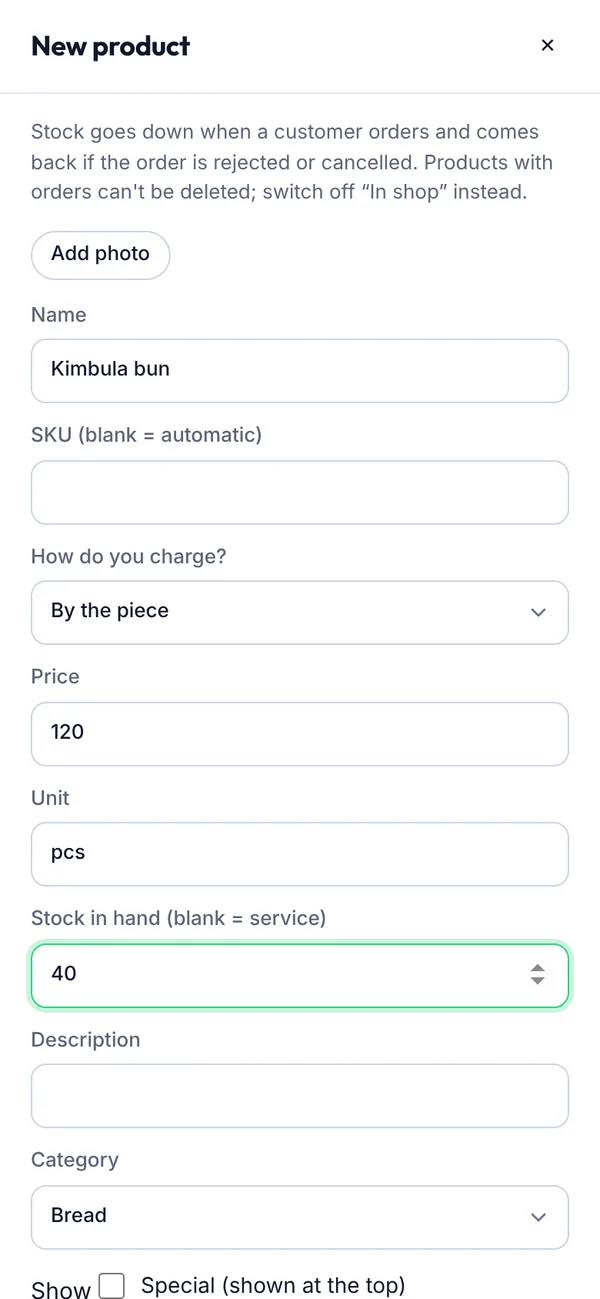
On the full form, tap Add photo.
Enter the name. Leave SKU blank and the app makes one.
Enter the price and unit.
Enter the stock you have. Leave it blank if you don't count stock.
Tap Add an offer for an amount or percentage off, with start and end dates.
Choose its Category, and tick Special to show it at the top of your shop too (see 4.29).
Tap Add product.
Figure 4.8The full product form
What you’ll see
The product appears in your shop. Untick In shop to hide it, or tap Edit to change it. Products with orders can't be deleted; hide them instead. Each card shows what customers see, such as Only 3 left or Not available.
4.5How to add products and services (a business that sells both)
If your business sells both, for example a salon that also sells hair products, each item is either a product or a service. They're added differently and customers see them in two tabs.
Steps
Open Products & services. Use All, Services and Products at the top to see one kind.
Tap Add product for something you hand over or deliver: three questions (name, how you charge, price, and stock if you count it).
Tap Add service for work you do: four questions (name, how long and how you charge, price, where).
Added something as the wrong kind? Tap Edit and switch This is a between Product and Service.
For Excel, pick the Services template or the Products template (see Upload from Excel).
What you’ll see
Customers see Services and Products tabs on your shop. Services are booked on their own; products go in the cart. A customer can't mix the two in one order: the app offers to finish one first.
Sell fish and meat by the kg, fabric by the metre, sand by the cube, banners and blinds by the sq ft. Customers say how much they want and see the price as they choose.
Before you start
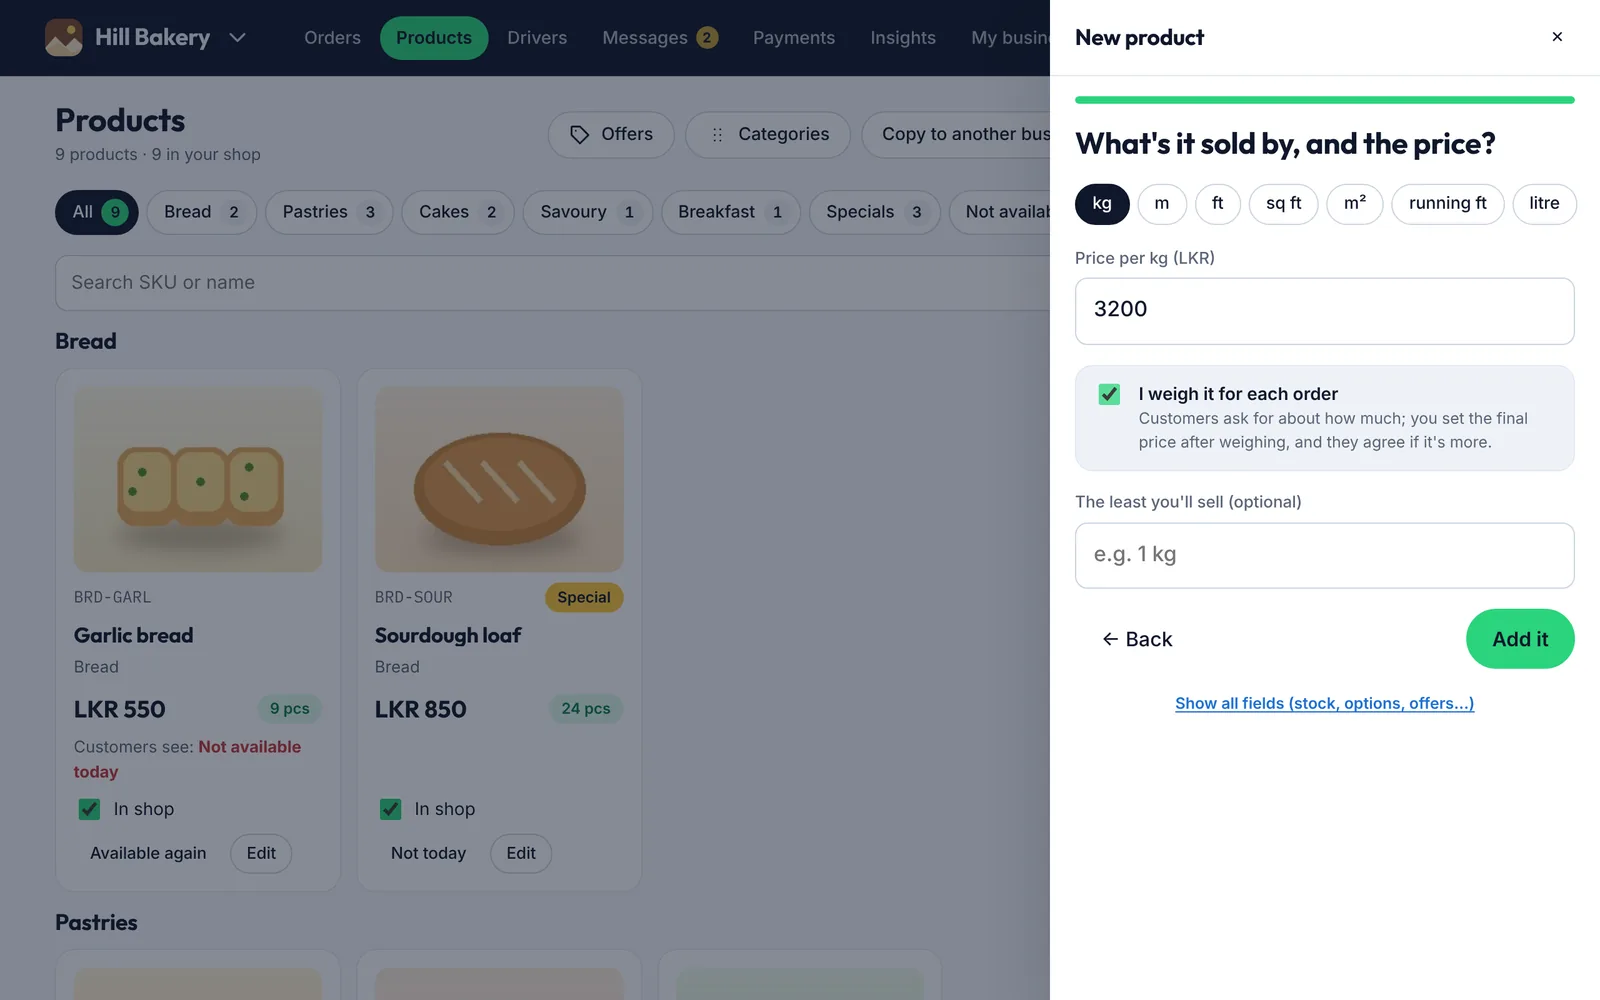
Open Products, tap Add product, type the name and tap Next. Choose By weight or size.
Steps
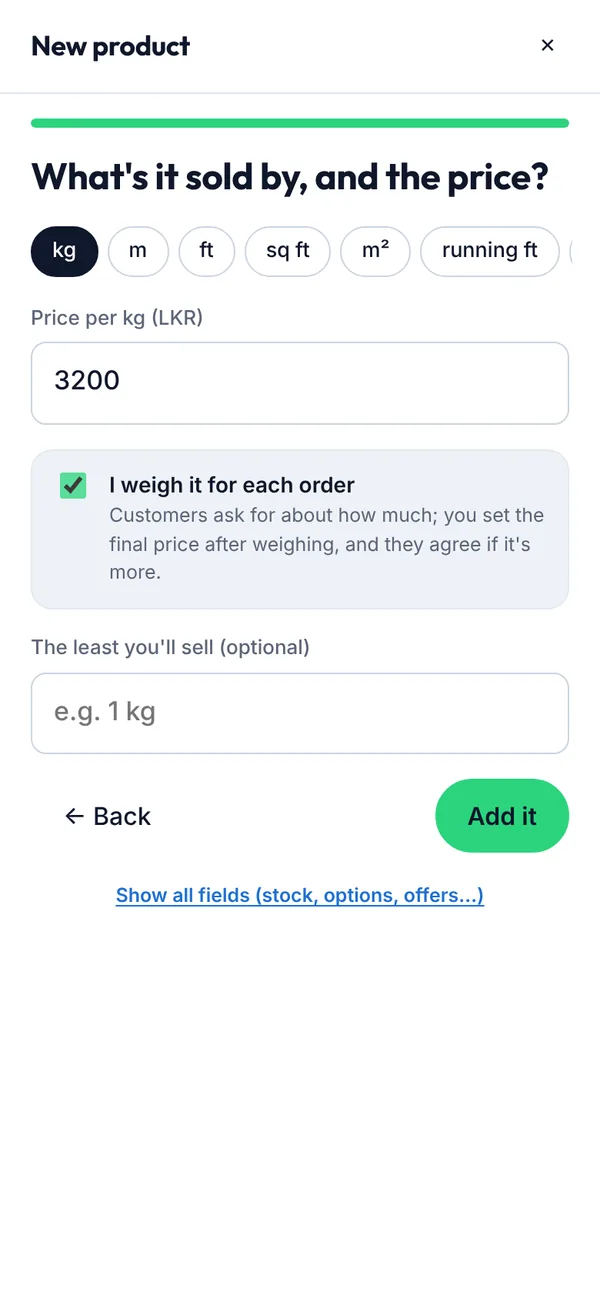
Tap what it's sold by: kg, metre, sq ft, cube and so on.
Enter the price for one kg, metre or sq ft.
Tick I weigh it for each order if the real weight is only known when you pack it, like fish. For sq ft and m², you can tick Customers type width × height instead.
Tap Add it.
Figure 4.9Selling by weight
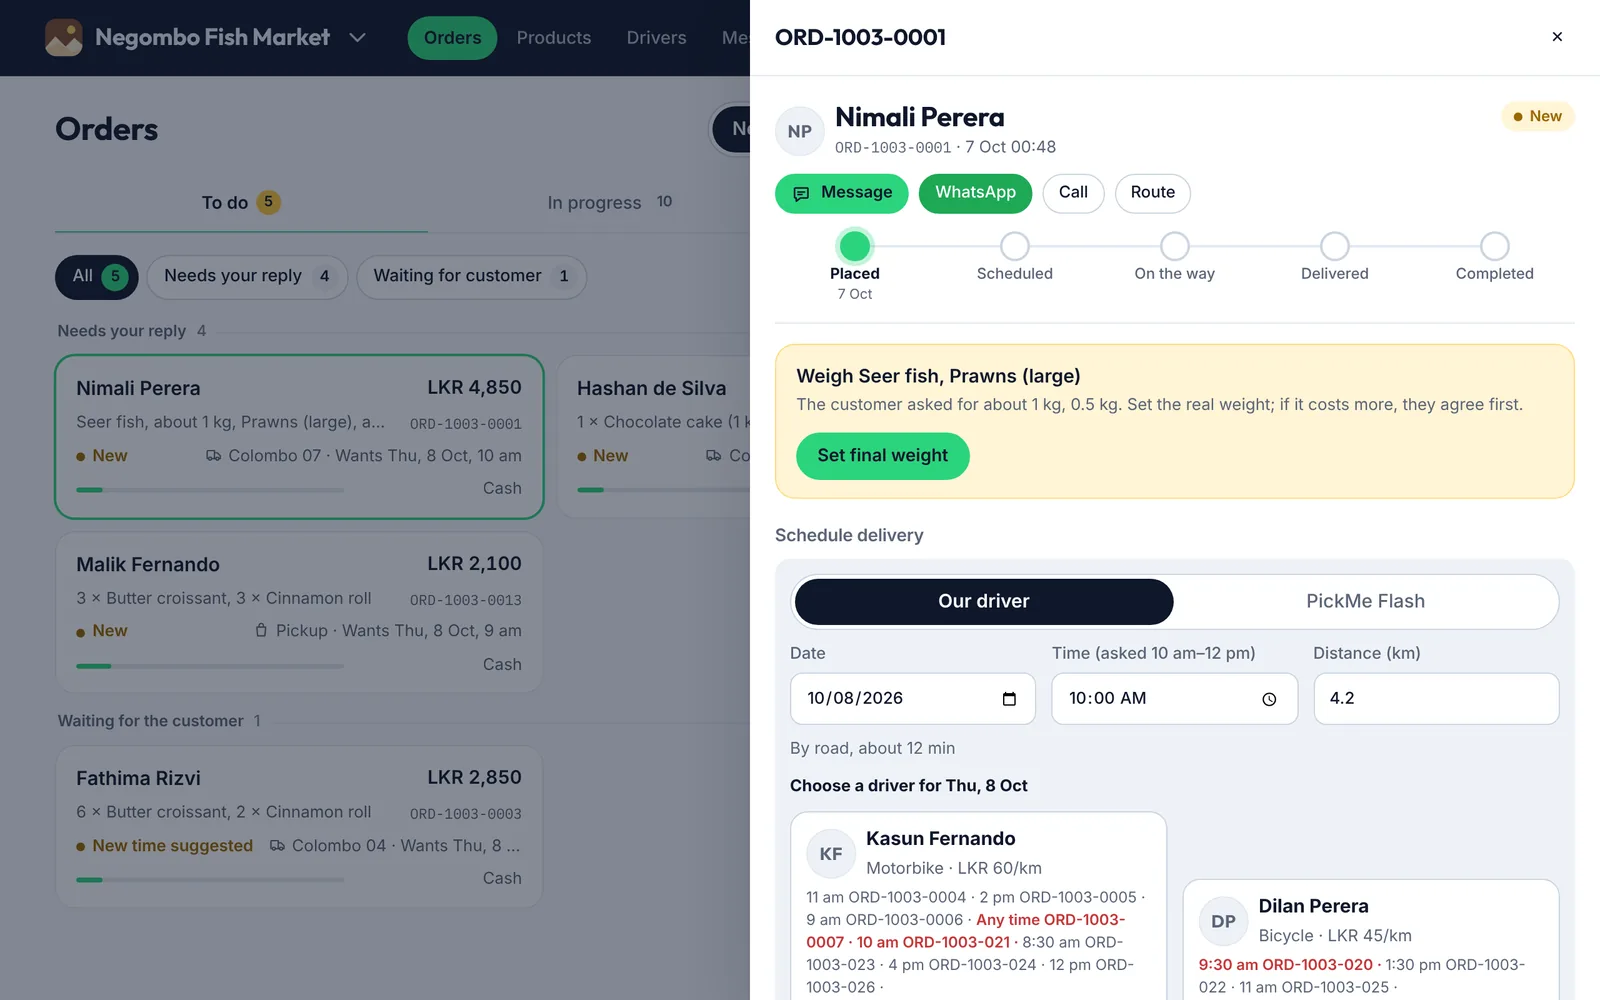
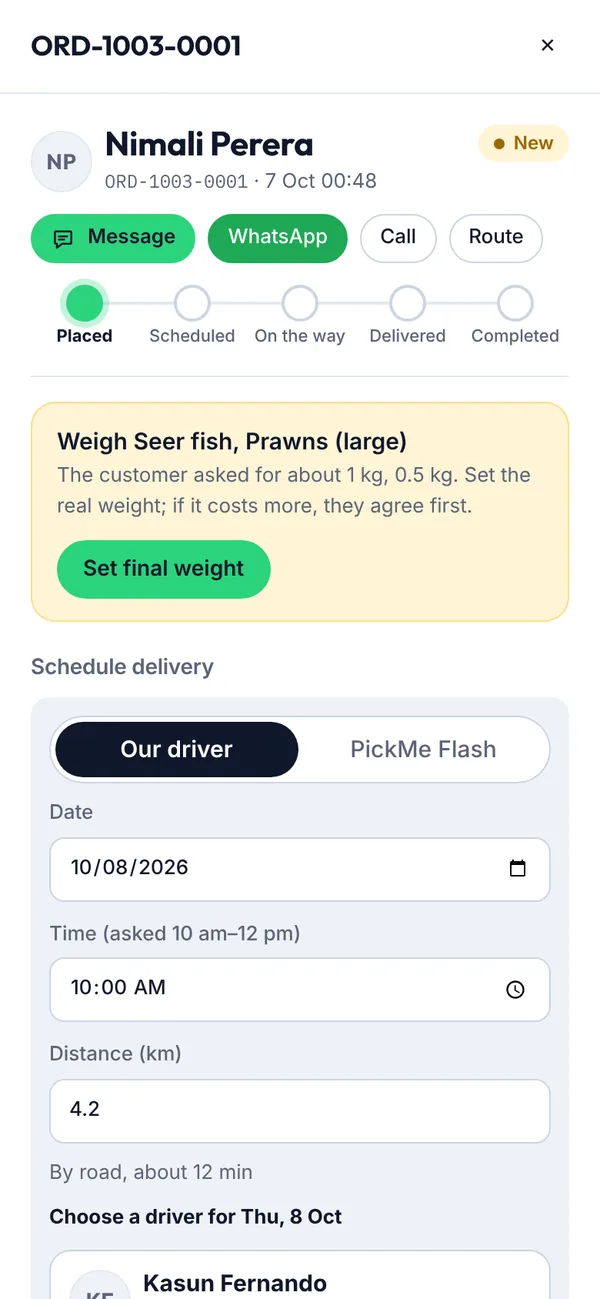
When an order has items to weigh, the order says Weigh …. Tap Set final weight.
Figure 4.10An order waiting to be weighed
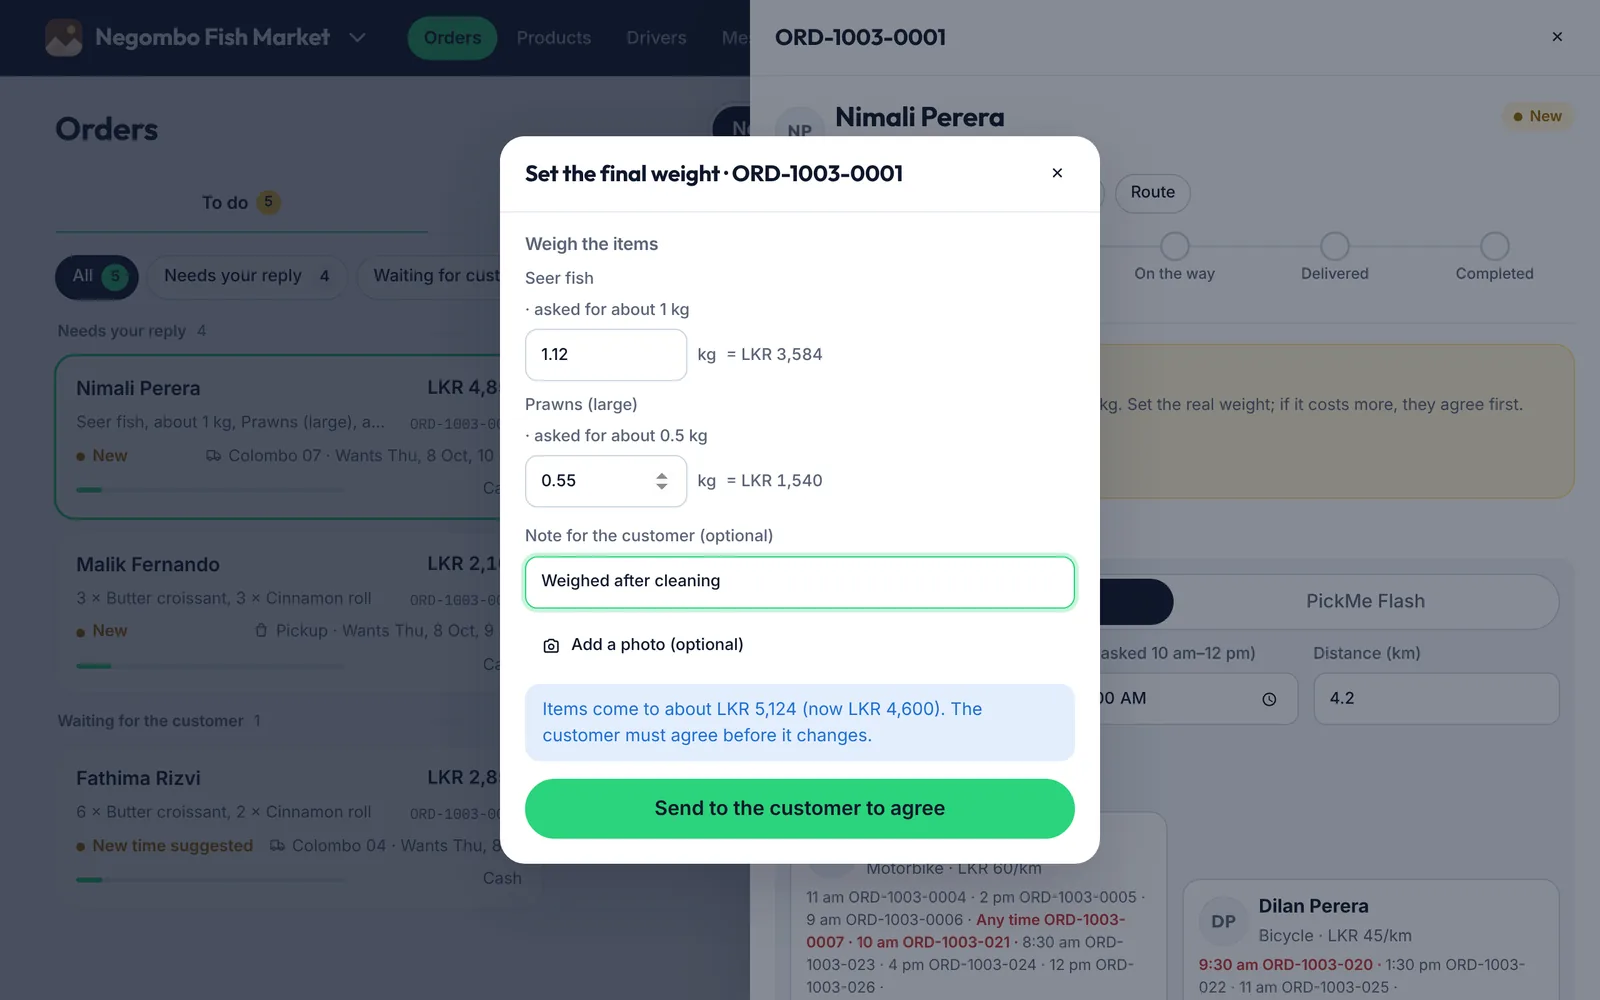
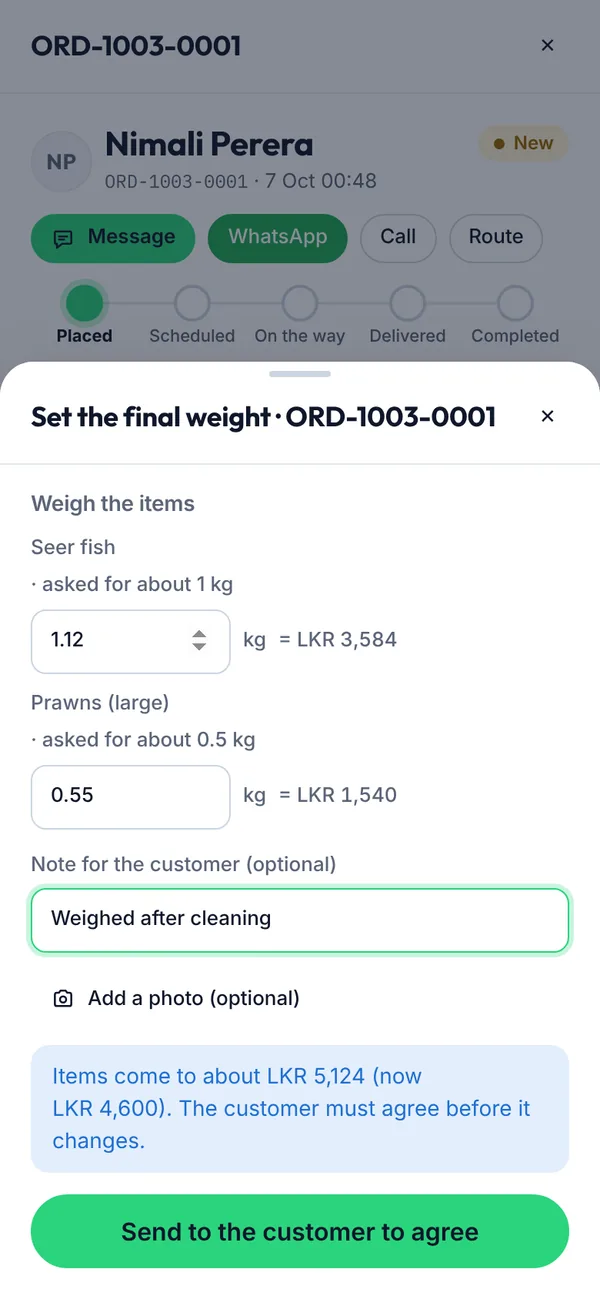
Type the real weight of each item. The price works itself out.
Add a note if it helps, for example Weighed after cleaning. You can add a photo of the scale too.
Check the new total. If it's more than before, the customer must agree first; if it's less, it changes straight away.
Tap the button to send it.
Figure 4.11Setting the final weight
Good to know
Products sold by weight or size don't count stock by the piece. You can set the least you'll sell (for example 1 cube) and steps (for example 0.5 cube) in the full form.
What you’ll see
The customer gets the new price in the app and agrees with two taps. The order can't go out until the price is final. Want to change your mind? Tap Take back while you wait.
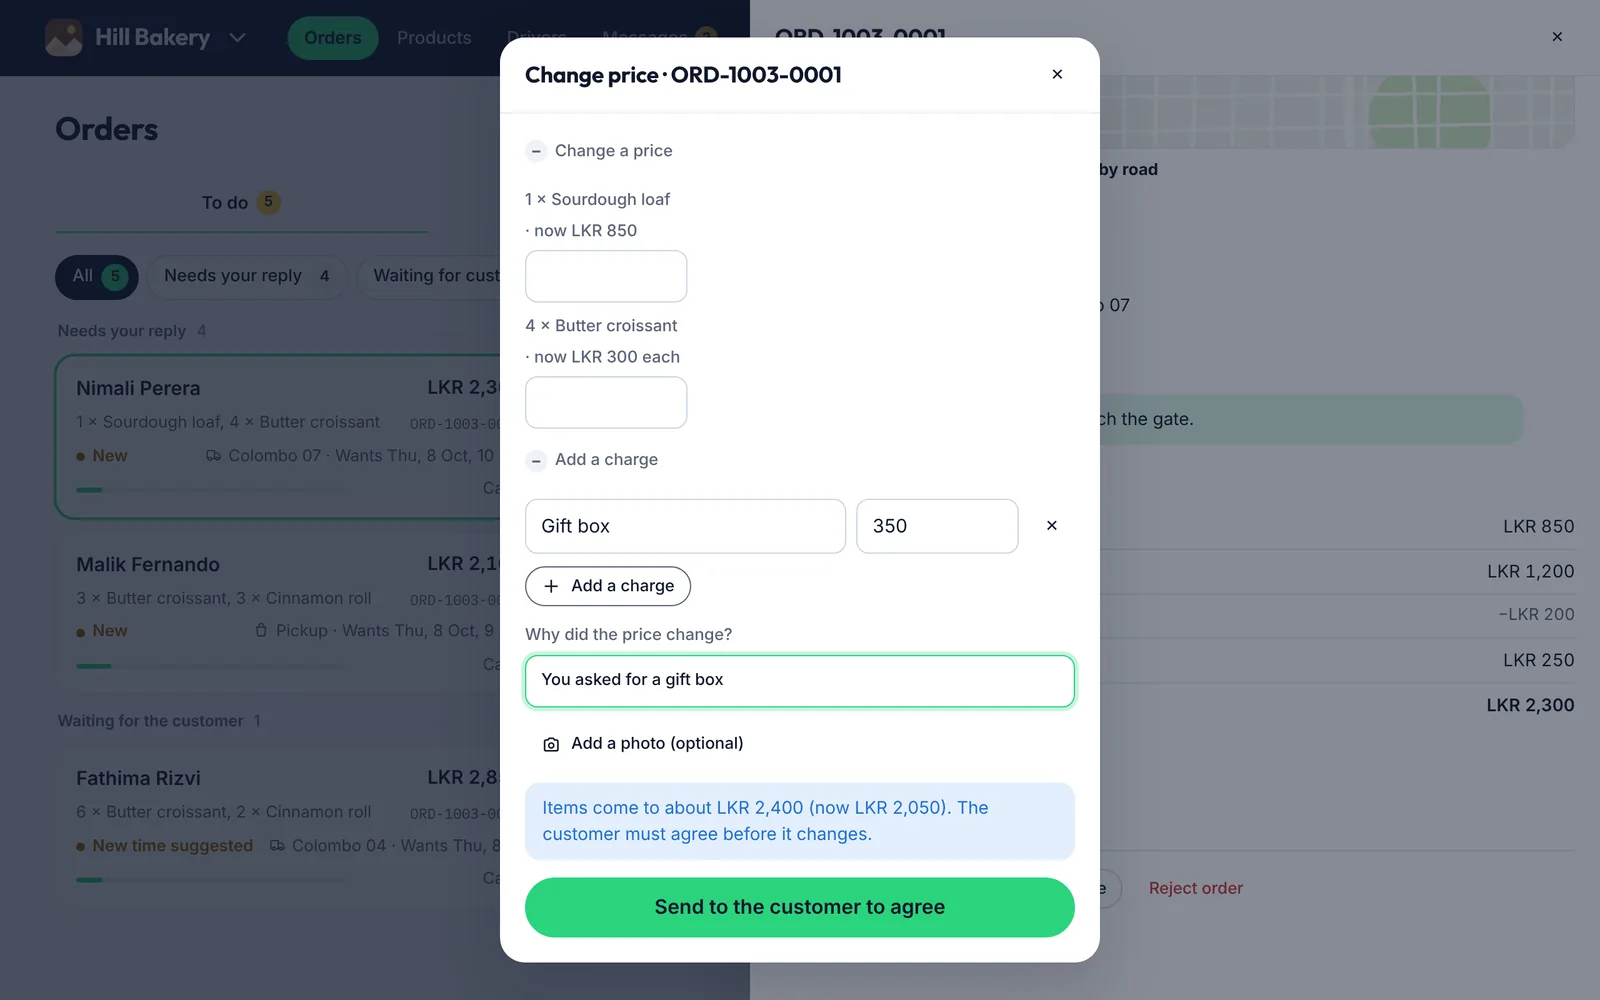
Before an order goes out, you can change a price or add a charge, for example cleaning and cutting, or a gift box. The customer always agrees to a higher price first.
Before you start
Open the order and tap Change price under its items.
Steps
Open Change a price to give an item a new price.
Open Add a charge and type what it's for and how much.
Say why the price changed. The customer sees this.
Tap Send to the customer to agree.
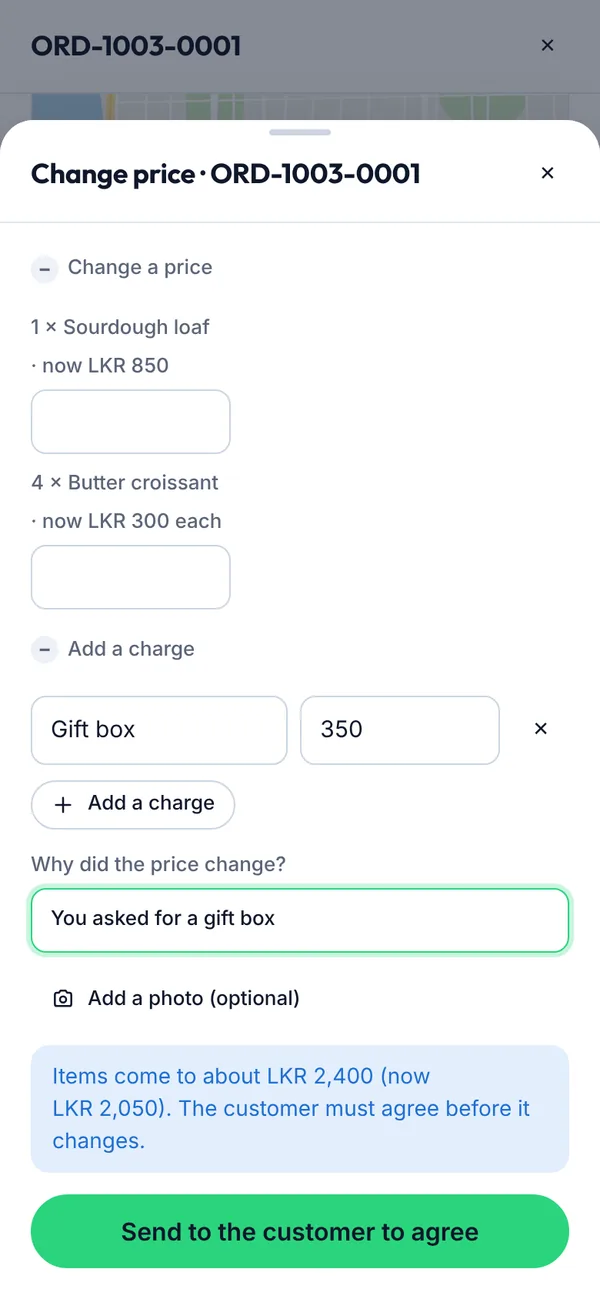
Figure 4.12Adding a charge
What you’ll see
While the customer decides, the order shows Waiting for … to agree with Take back. If they say no, the order keeps its old price; call them, keep that price, or cancel. Orders paid by bank transfer, or already paid or held on a card, can't change price.
4.9How to see the orders you placed with other shops
As a business owner you can also buy from other shops on B+B, for example from your supplier. Those orders are kept apart from the orders your customers place with you.
Steps
Open Shop and tap My orders to other shops at the top. It says how many are on the way.
Use Active and Past as a customer would: follow the order, answer a new time, see the bill, or repeat it.
When one of them needs you (a new time or price, or a payment), it shows on your Home under Your orders to other shops.
What you’ll see
You can also find them under Account → My own orders.
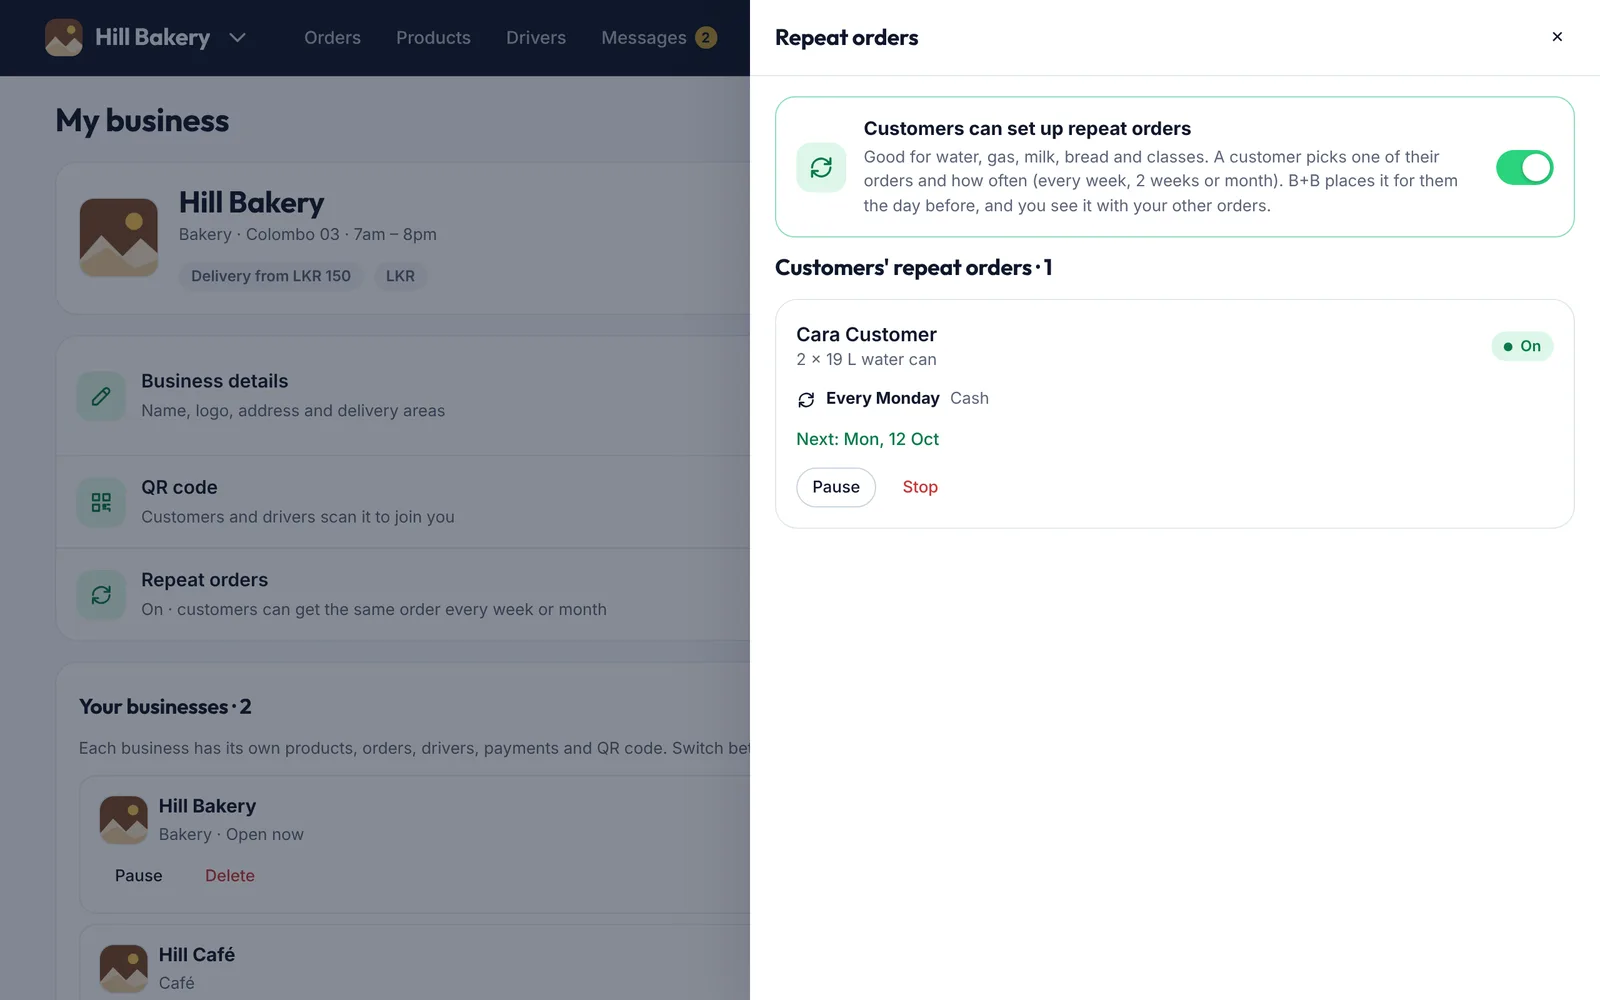
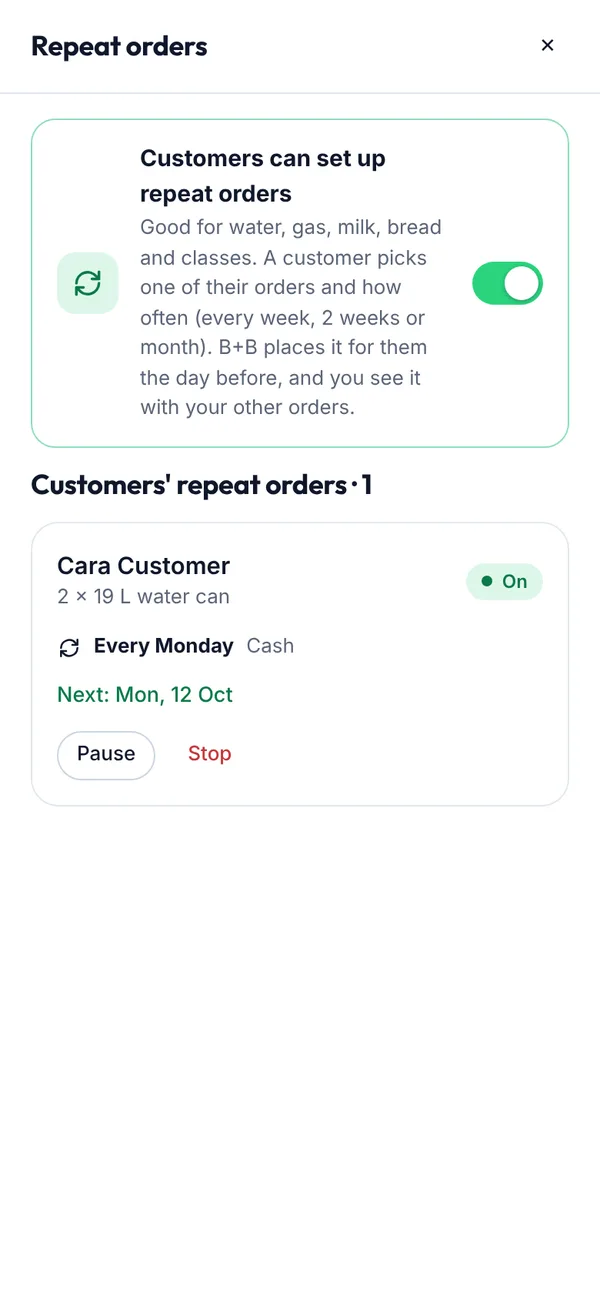
Regular customers can get the same order every week, every 2 weeks or every month. Good for water, gas, milk, bread and classes. B+B places each order for them the day before, so it reaches you like any other order.
Before you start
Open My business and tap Repeat orders.
Steps
Switch on Customers can set up repeat orders. Customers now see Repeat this order on their orders with you.
Each customer's plan is listed below: what they get, which day, and when the next one is.
Tap Pause if you can't take their orders for a while, or Stop to end a plan. The customer is told.
Figure 4.14Repeat orders
What you’ll see
Repeat orders appear in Orders with a Repeat tag, at your current prices. Confirm, schedule and deliver them as usual. Switching it off stops new plans; plans already set up carry on until you or the customer stop them.
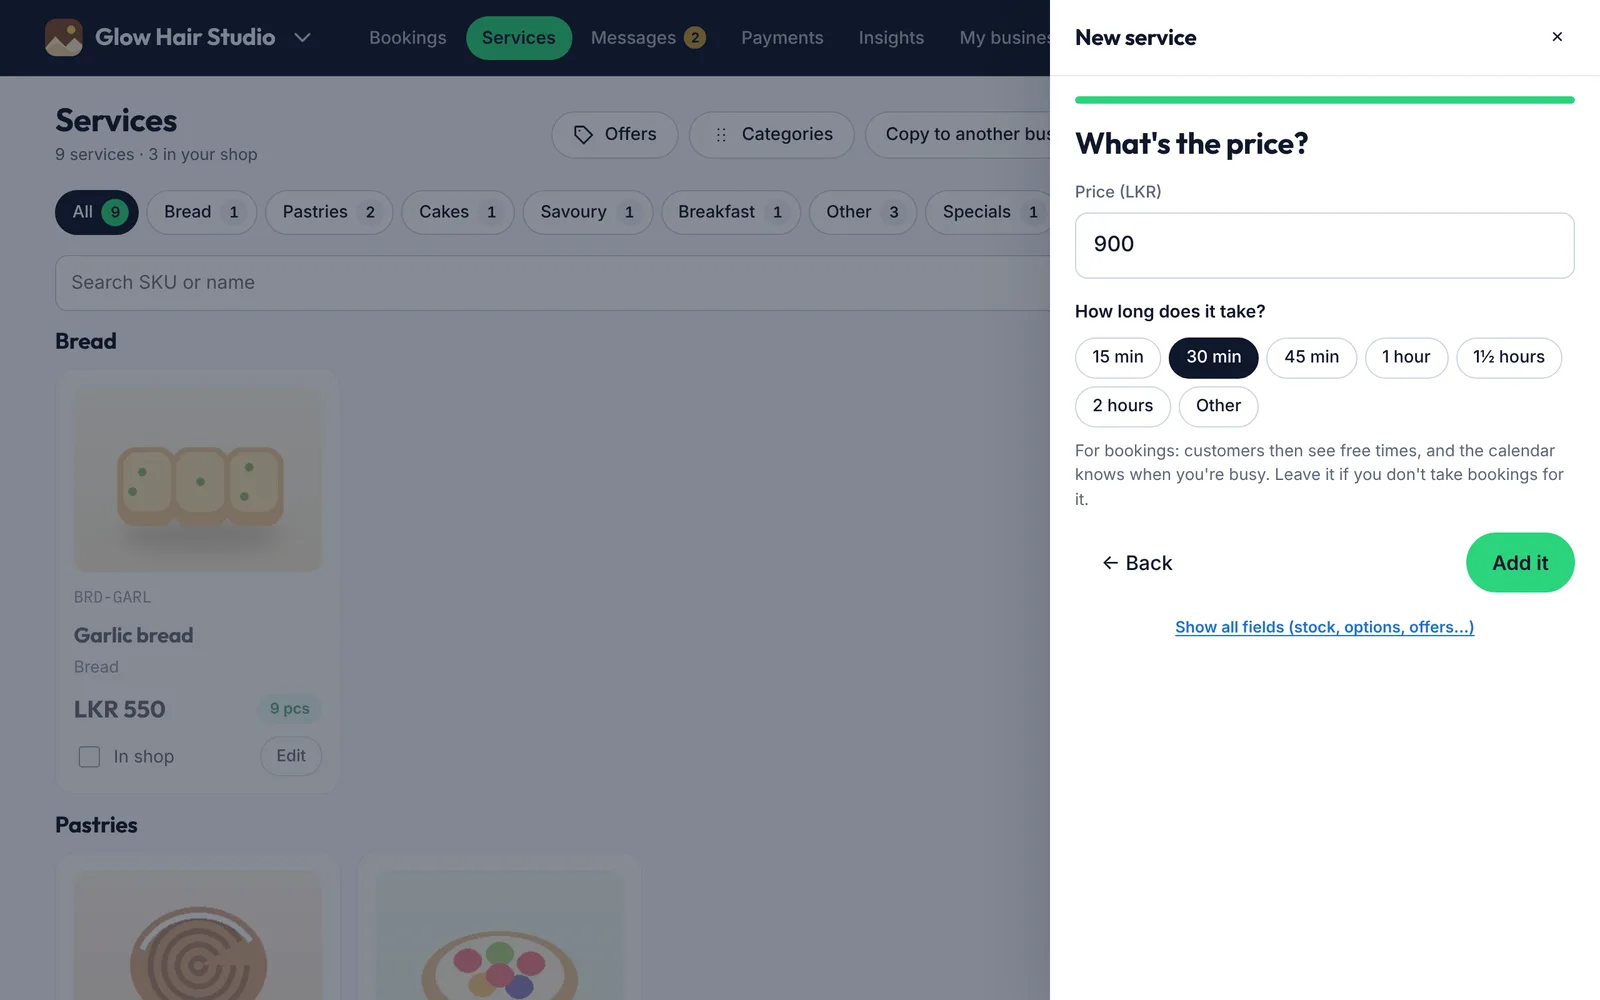
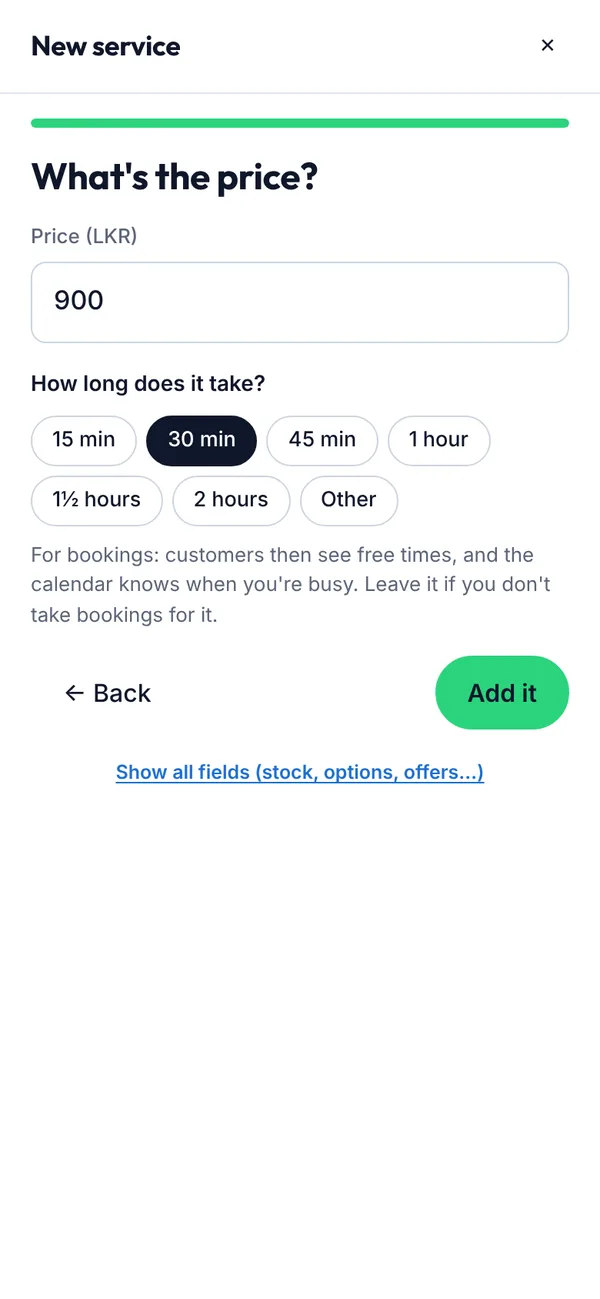
Say how long each service takes and how many customers you can take at once. Customers then see your free times, and you get a calendar. Businesses that don't do this keep working as before.
Before you start
Open Services and tap Add service (or Edit on one you have).
Steps
Enter the price,
then answer How long does it take?, for example 30 minutes for a haircut or 1 hour for a lesson.
Tap Add it. Do this for each service you take bookings for.
Figure 4.15How long a service takes
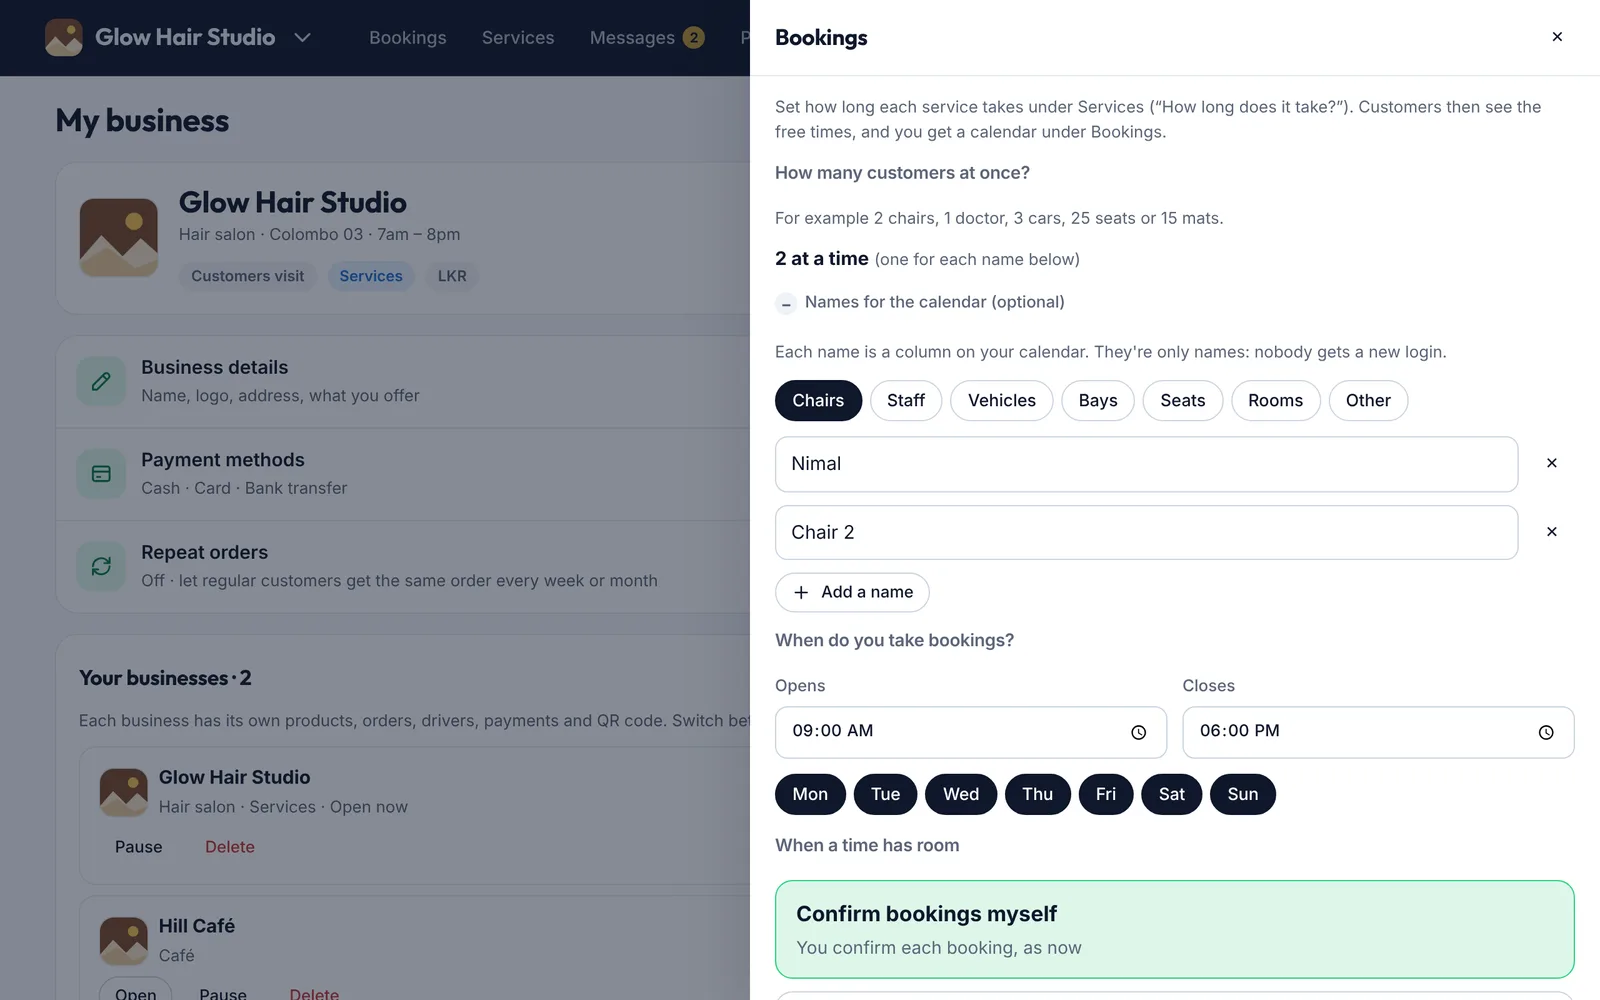
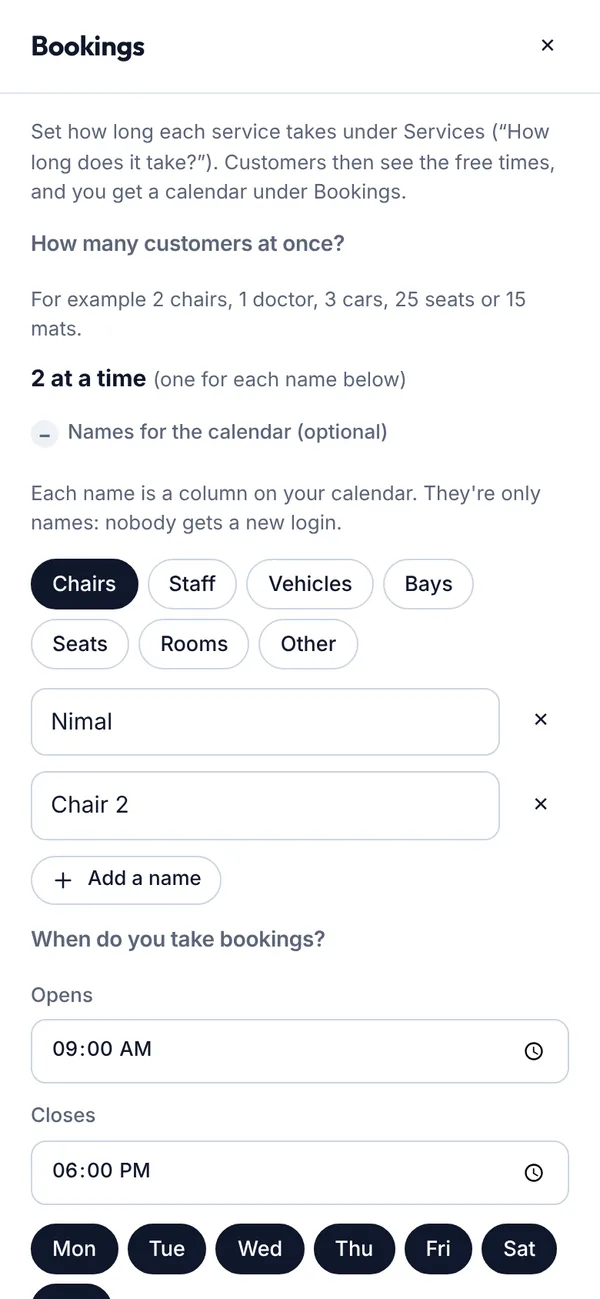
Open My business → Bookings. Set how many customers fit at once (2 chairs, 1 doctor, 3 cars).
Optional: add names for your chairs, staff or vehicles. They are only names on the calendar, not logins.
Set when you open and close, and the days.
Figure 4.16How many at once, and names
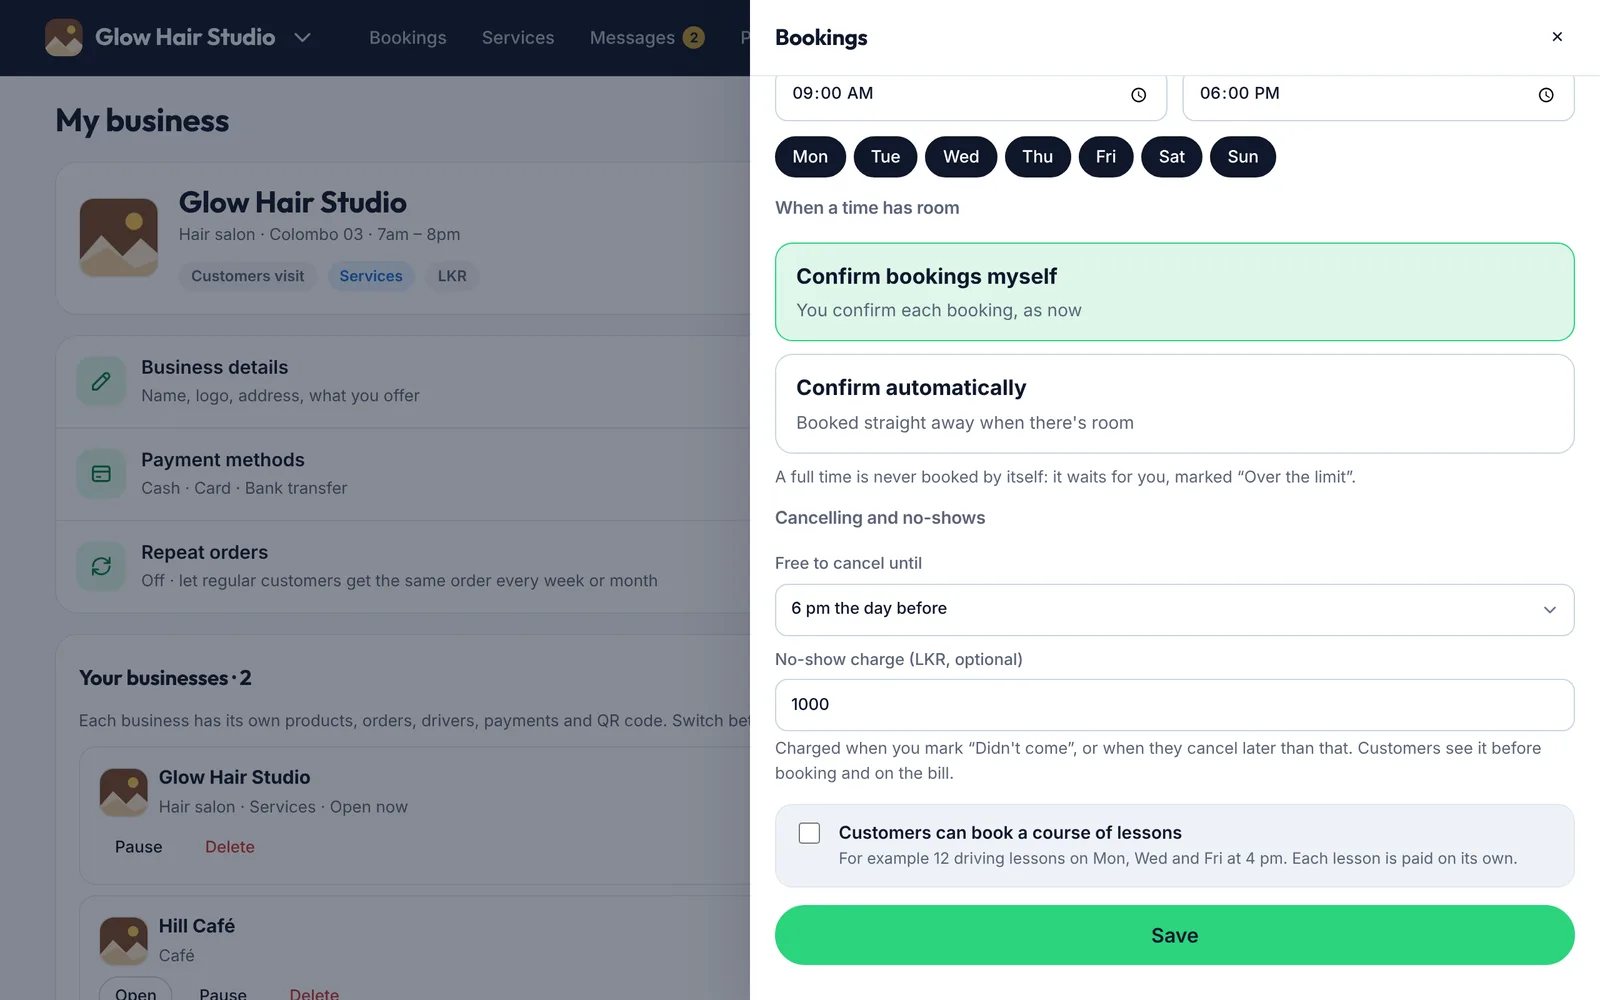
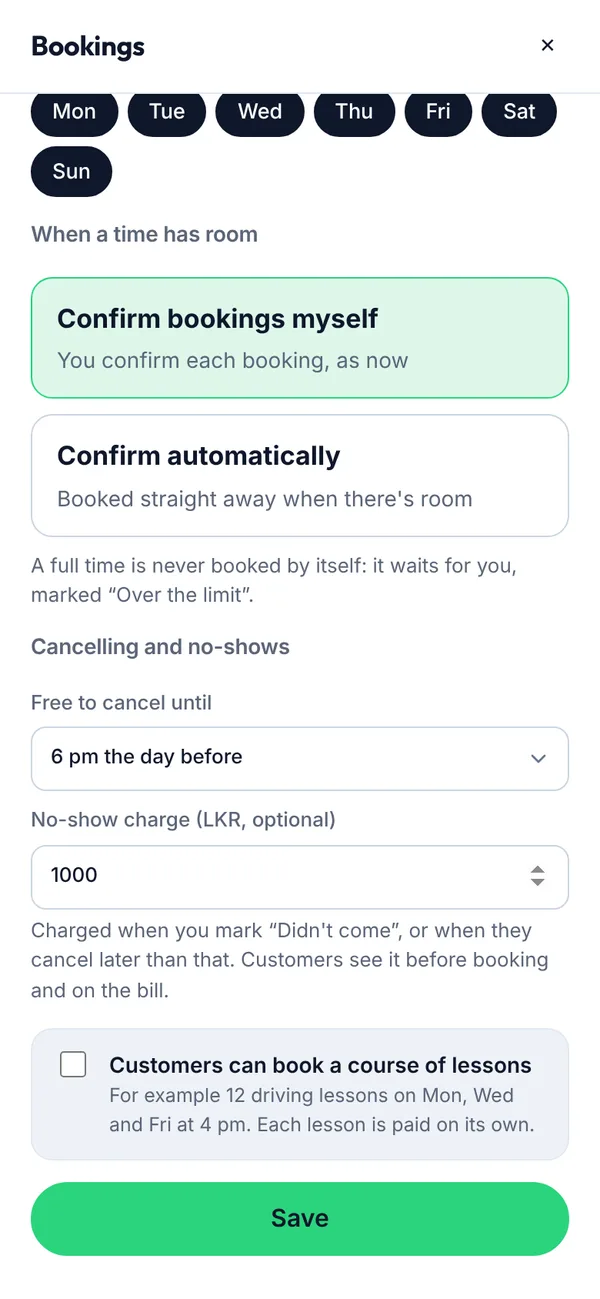
Choose until when customers can cancel for free (6 pm the day before, unless you change it),
and an optional charge for not coming. Customers see both before booking and on the bill.
Driving school or classes? Tick Customers can book a course of lessons.
Tap Save.
Figure 4.17Cancelling, no-shows and courses
What you’ll see
Under When a time has room choose Confirm bookings myself (as before) or Confirm automatically. A booking for a full time never confirms by itself: it waits for you, marked Over the limit.
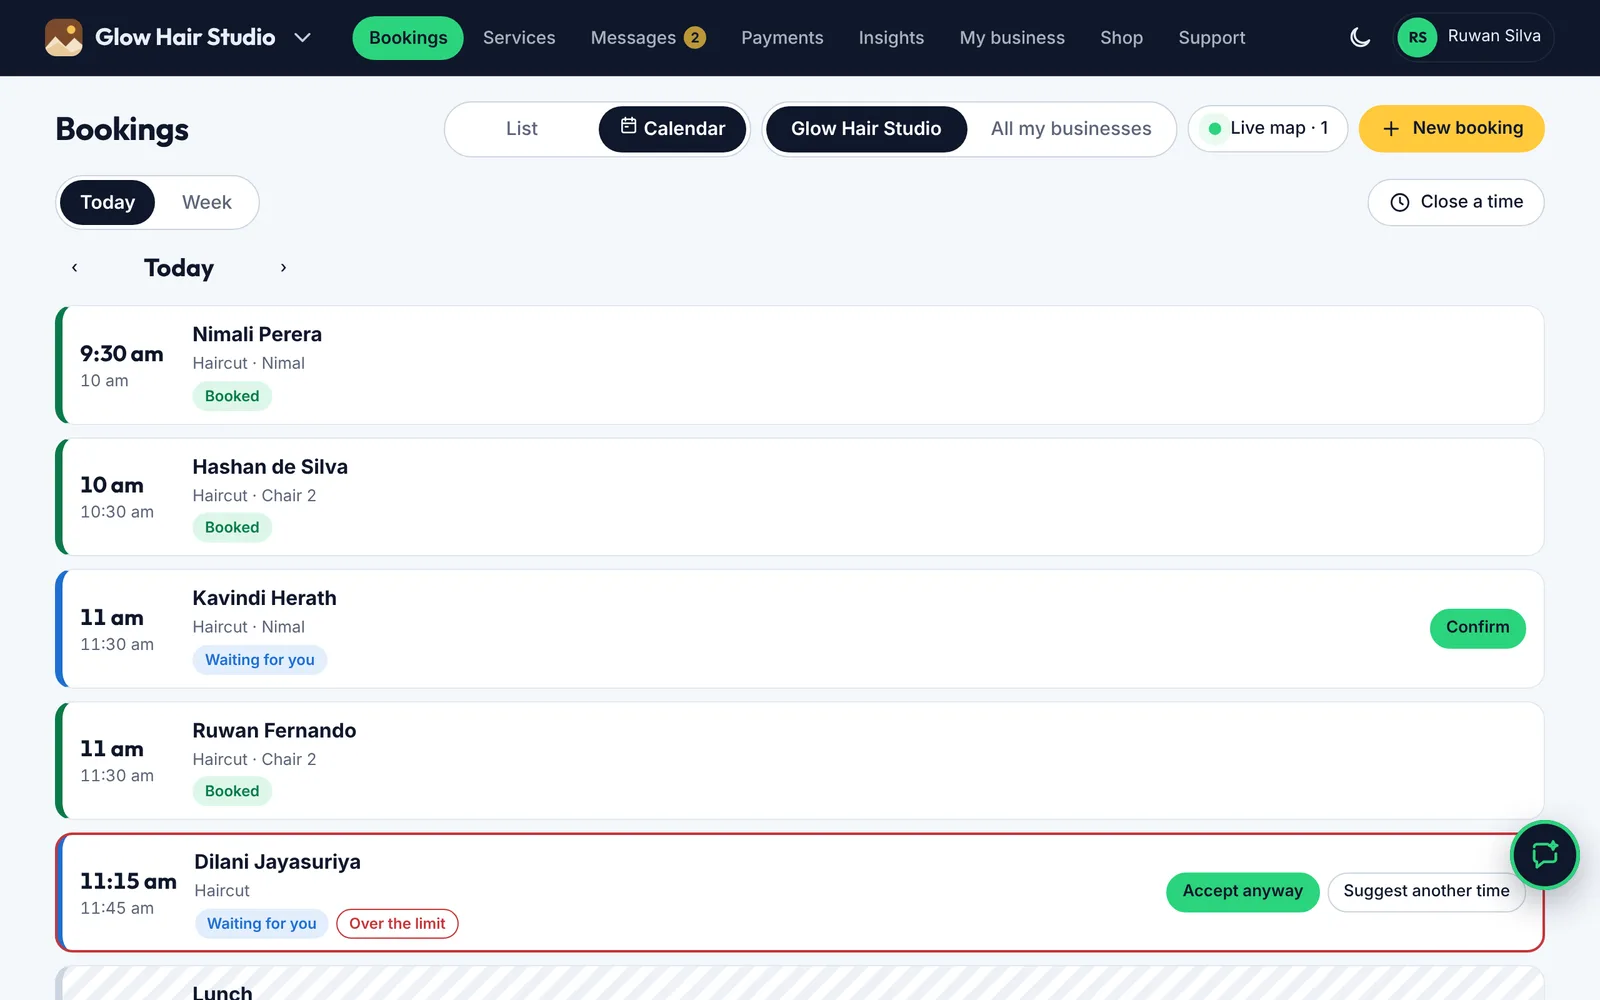
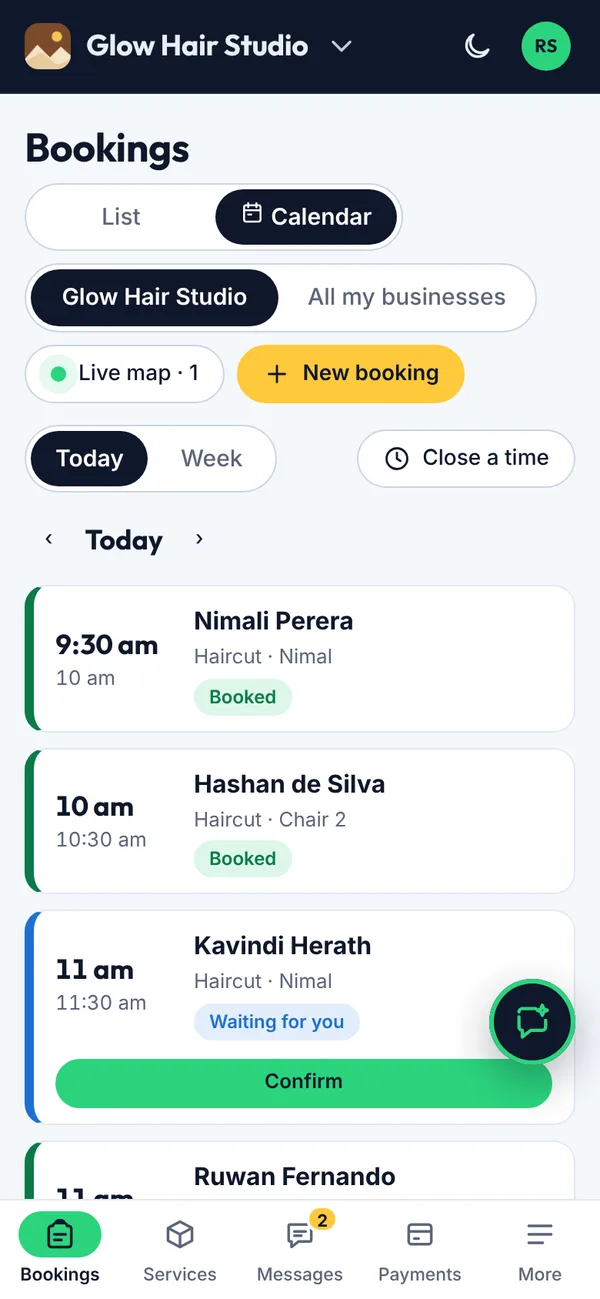
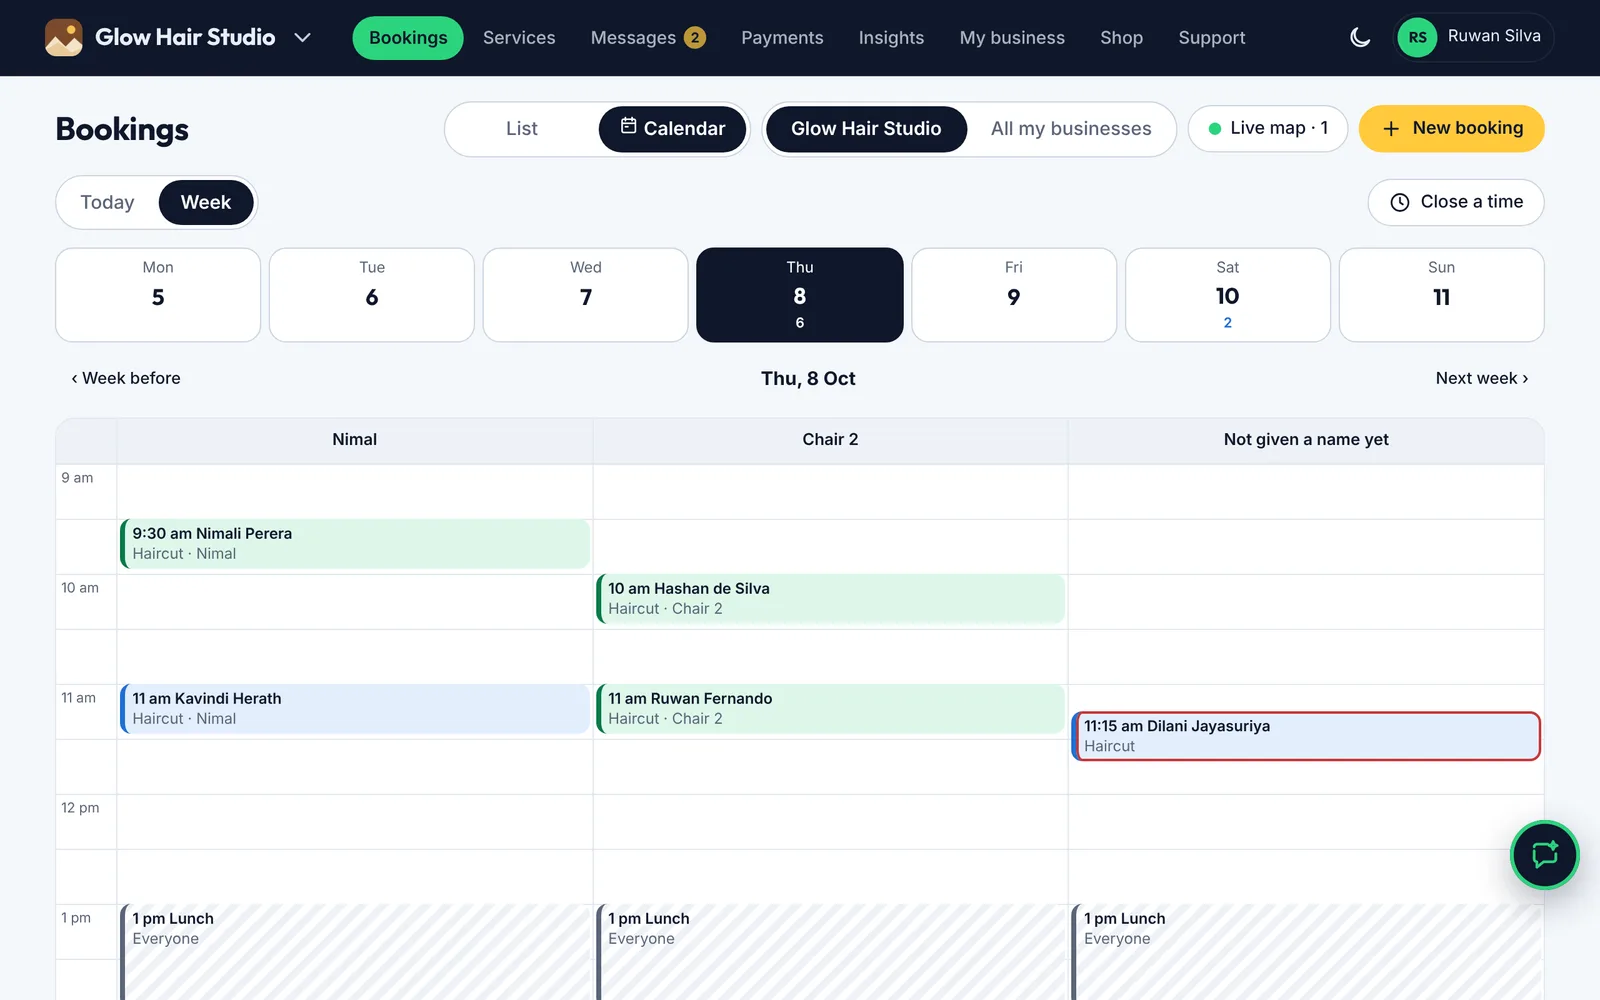
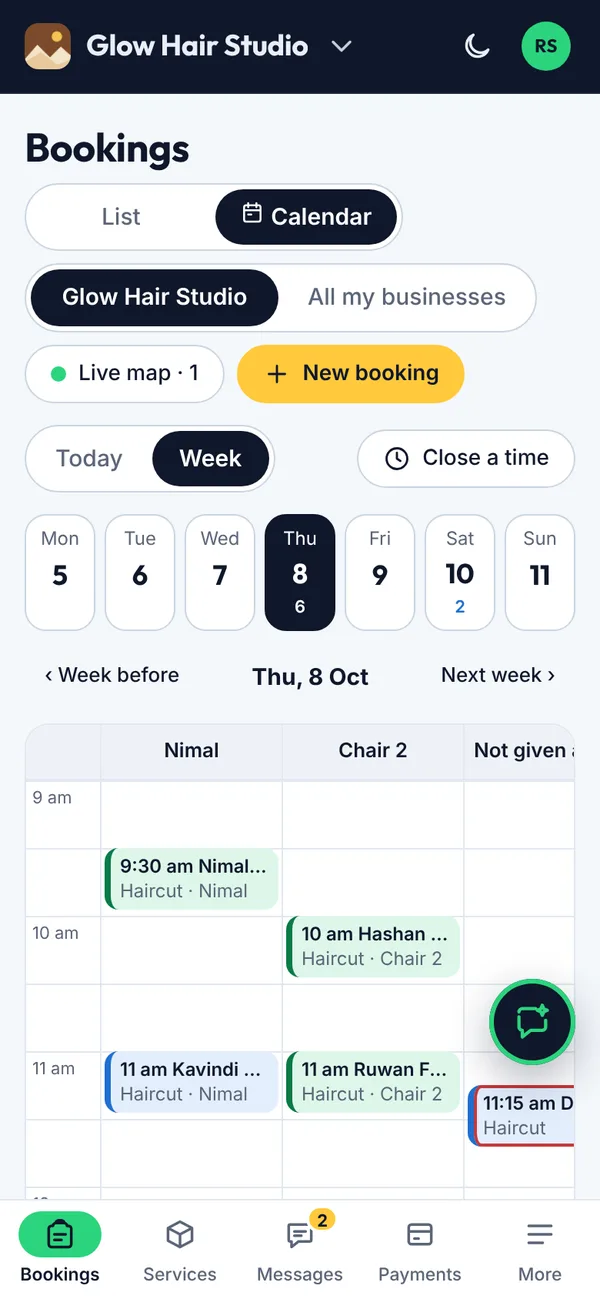
Every booking on one calendar: one day, the whole week, or the month. A services business opens Bookings on the calendar.
Before you start
Open Bookings (Orders) and tap Calendar. List takes you back to the usual list.
Steps
Day lists the day's bookings in time order, with the free times between them. Green is booked, amber is waiting for the customer, blue is waiting for you, pink is a visit at the customer's place, and a red outline means over the limit. Tap a free time to add a booking.
Tap one to open it; Done and Didn't come appear once its time has started.
Tap Close a time for lunch, a Poya day or a car at the garage, for everyone or one name.
Figure 4.18Day
If you named your chairs, staff or vehicles, tap By name for a column each. Tap an empty time to add a phone or walk-in booking.
Week shows the 7 days side by side, with the totals at the top: bookings, free time left, visits, waiting for you and the amount booked. Days you're closed are shaded.
Month shows how many bookings each day has and a bar for how full it is, with your busiest days. Tap a day to open it.
Figure 4.19By name: a column for each chair
What you’ll see
For a course, each lesson shows under the instructor's car: green once the learner says they're coming, amber until then. After a lesson, tap Done or Didn't come (your no-show charge, if you have one, becomes the bill).
Good for furniture, vehicles, electronics, art and second-hand goods: let customers offer their own price, and you decide.
Before you start
Open Products and tap Add product. For an item you already have, tap Edit and use How do you charge?.
Steps
Choose Price, open to offers: customers see your price with open to offers. They can buy at that price, or offer less.
Or choose Customers name their price and type the lowest price you'd accept. Customers never see it. Offers at or above it are accepted straight away.
Figure 4.20Two more ways to charge
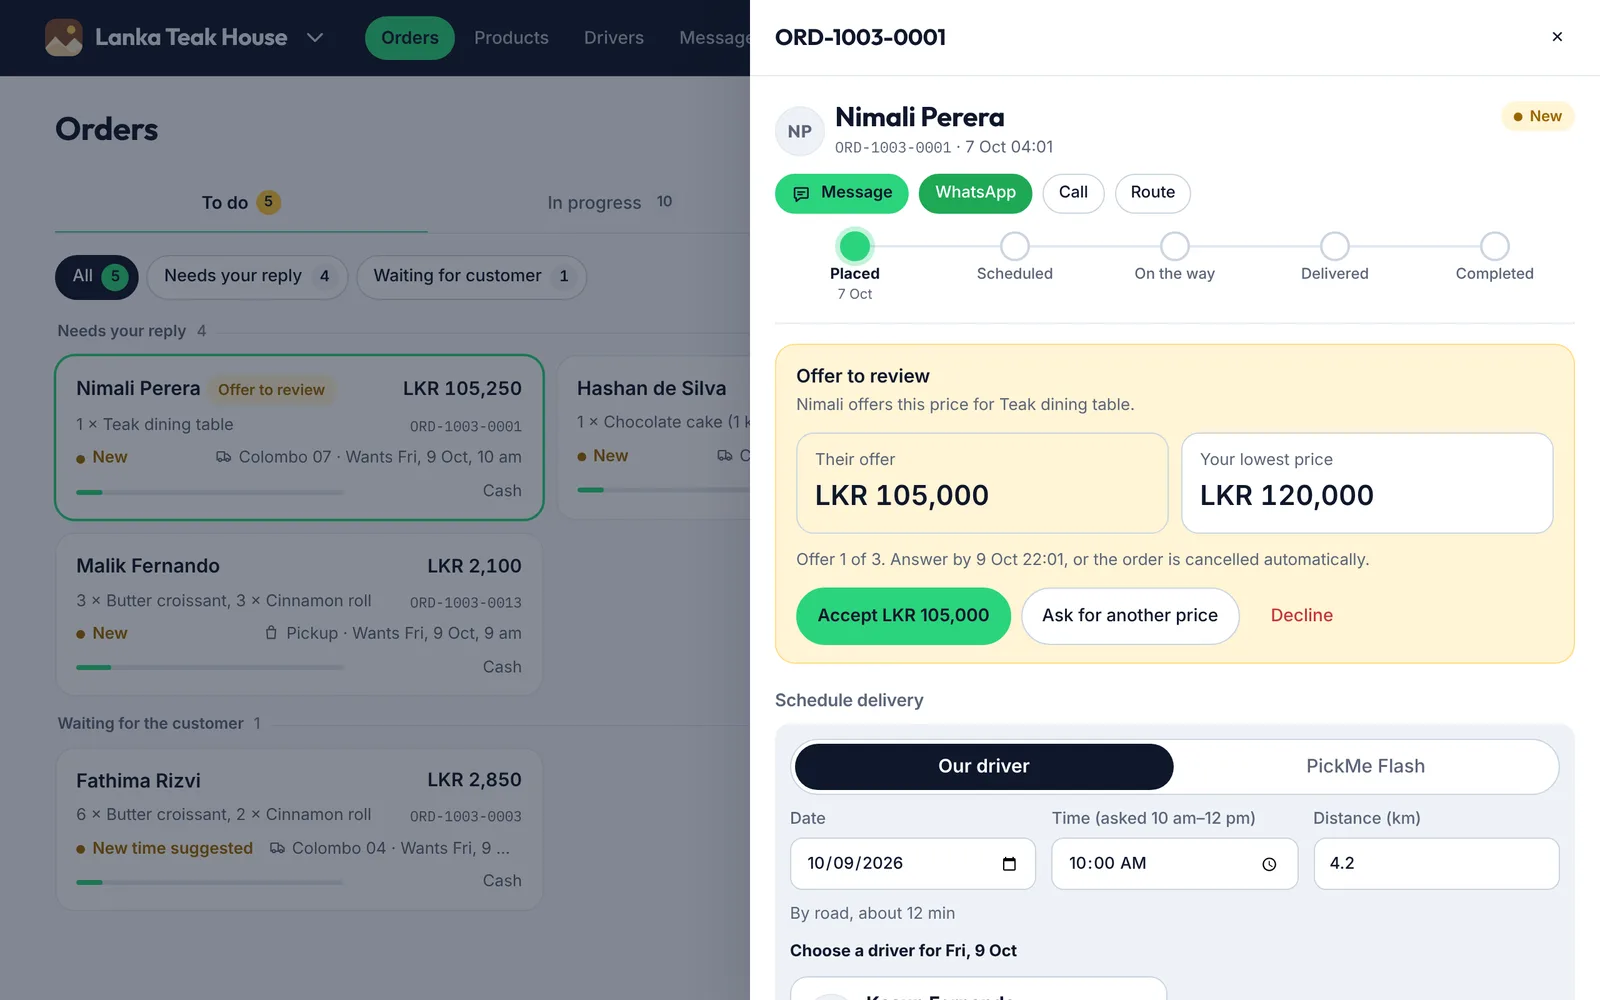
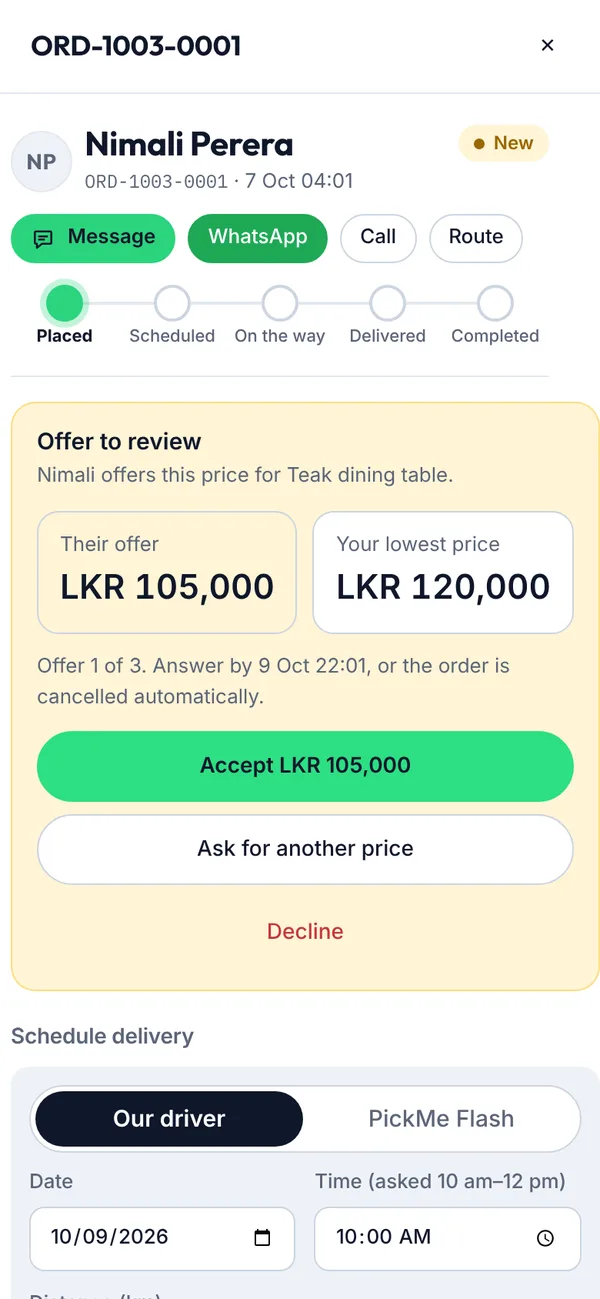
A lower offer shows under Needs you on Home and as Offer to review in Orders. Open the order: you see their offer
next to your price (or your lowest price).
Tap Accept to go ahead at their price,
or Ask for another price: type your price and a short note. The customer agrees, offers again or cancels.
or Decline: the order is cancelled, the stock goes back and the customer is told.
Figure 4.21An offer to review
What you’ll see
Answer within 48 hours: you get a reminder after 24 hours, and after 48 hours the order is cancelled automatically. While an offer waits, you can schedule the order but not hand it over. Each customer can make up to 3 offers for an item; after that, settle it by message or call.
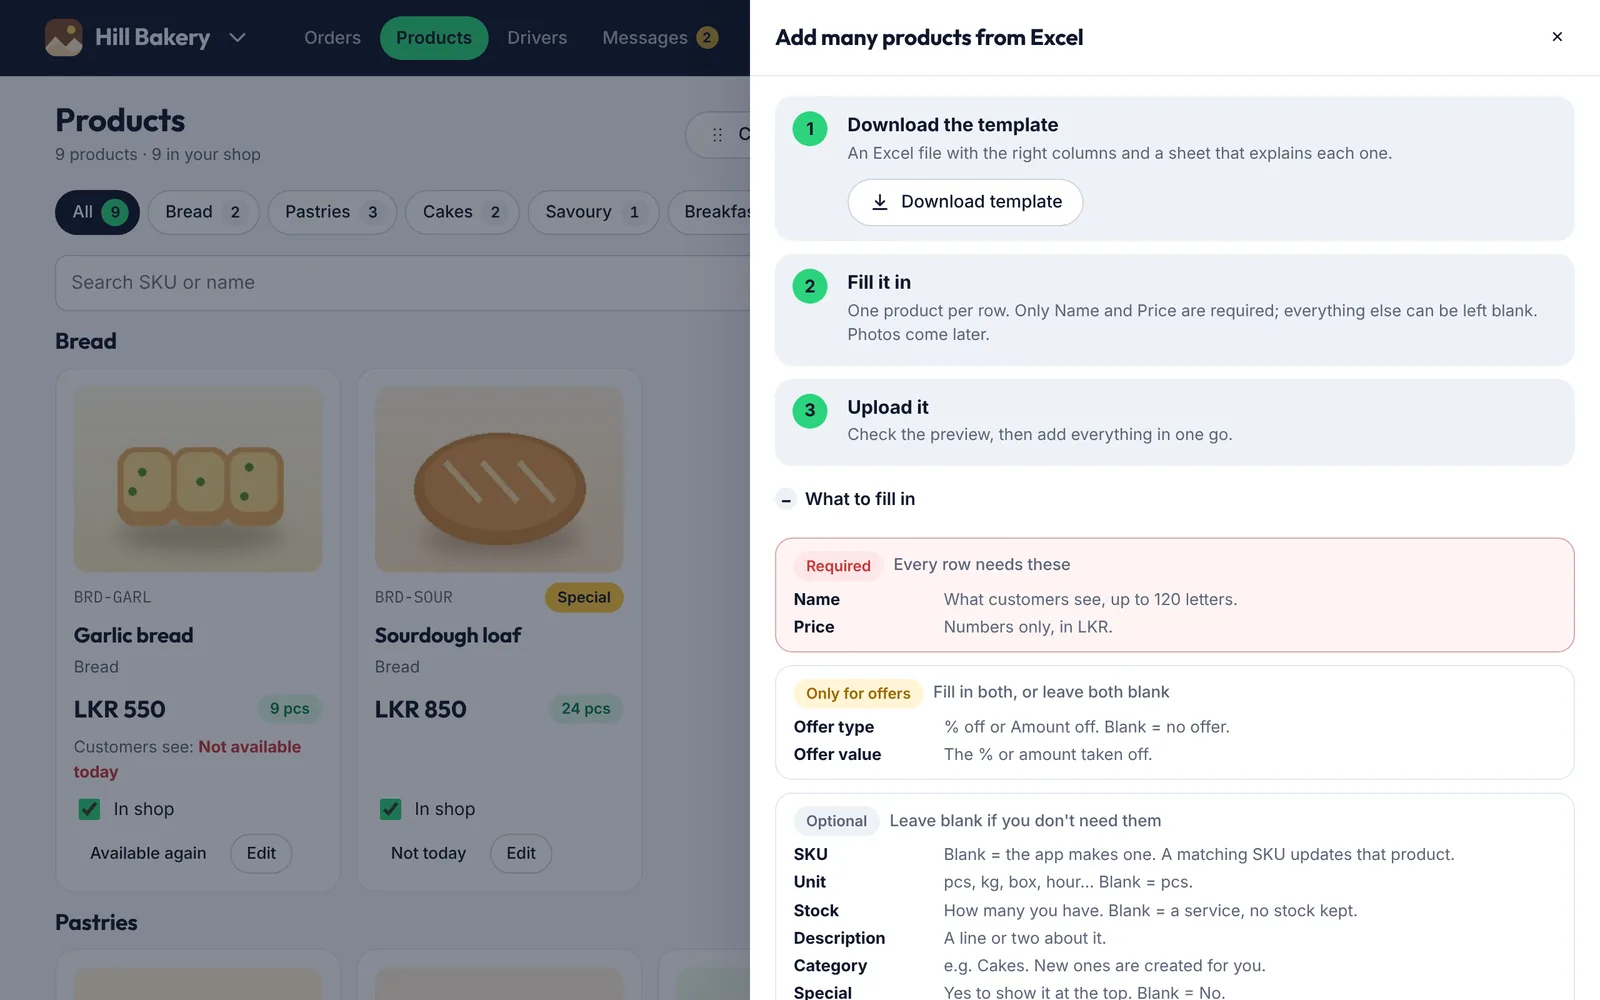
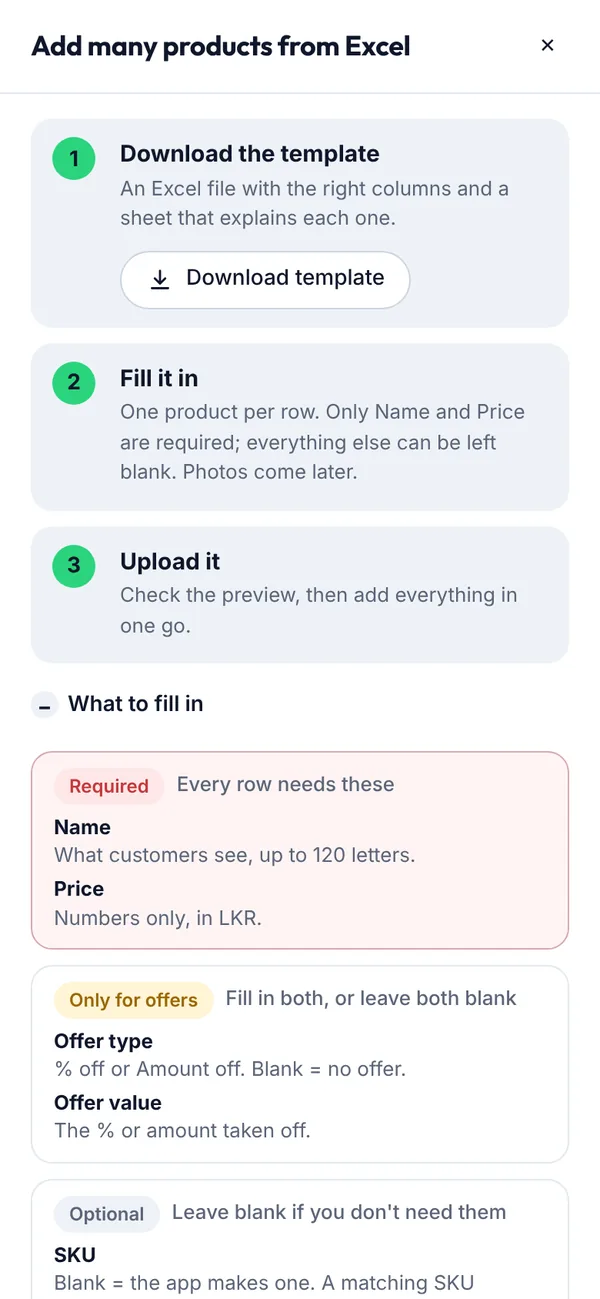
Add many products or services at once with our Excel templates.
Before you start
Open Products (or Services) and tap Upload from Excel.
Steps
Tap Download template. It has a sheet for your items and one that explains each column. A business that sells both picks the Services template or the Products template.
Check What to fill in. Only Name and Price are required. Offer type and Offer value go together: fill in both for an offer, or leave both blank. Everything else is optional.
Fill in one item per row. The services template has How long (30 min, 1 hr, 1½ hr, half day…), Where (My place, Their place or Both) and How you charge (One price, Per hour or Quote) instead of SKU, unit and stock.
Figure 4.22What to fill in: required, offer and optional columns
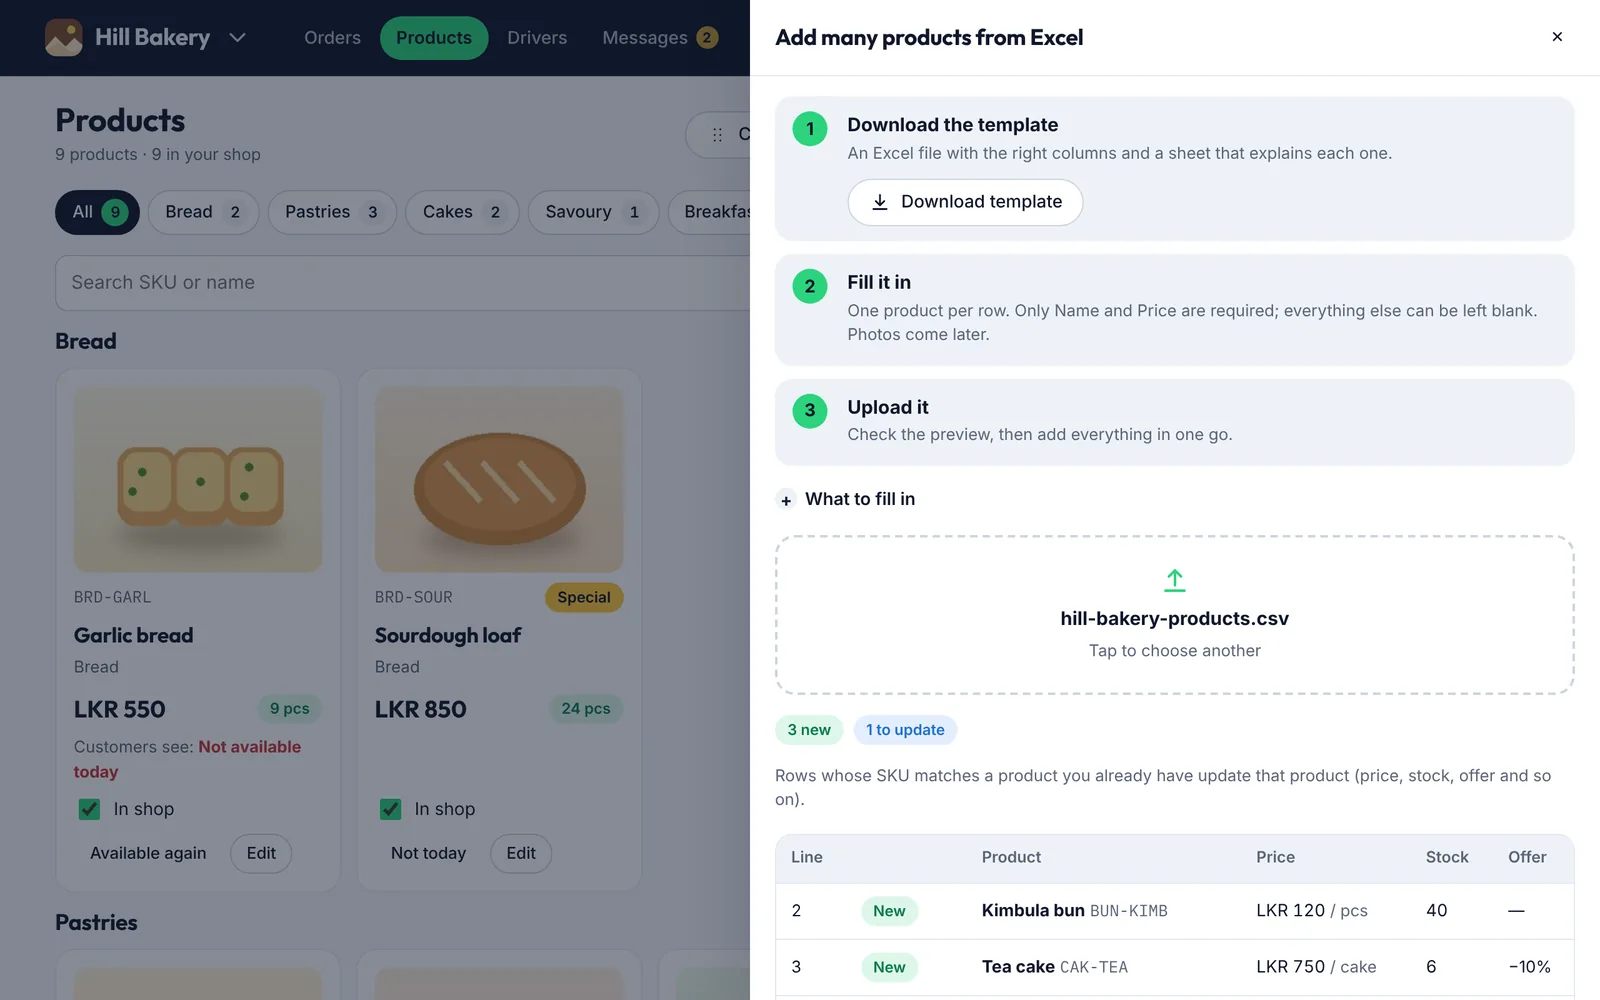
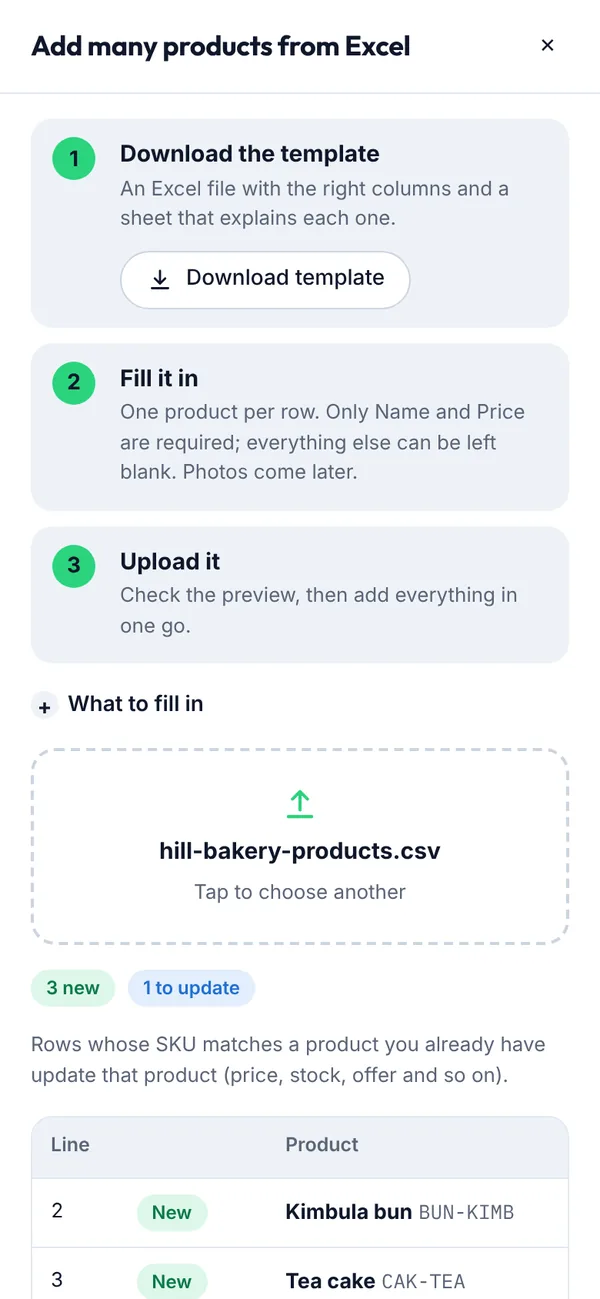
Choose your filled-in file.
Check the preview: new items, updates to items with the same SKU, and any rows with problems.
Figure 4.23Checking the preview before adding products
What you’ll see
Your items are added in one go. Use the Category column to put each one in a category (new ones are created for you) and type Yes under Special for specials. In a mixed file, a row with How long filled in is saved as a service.
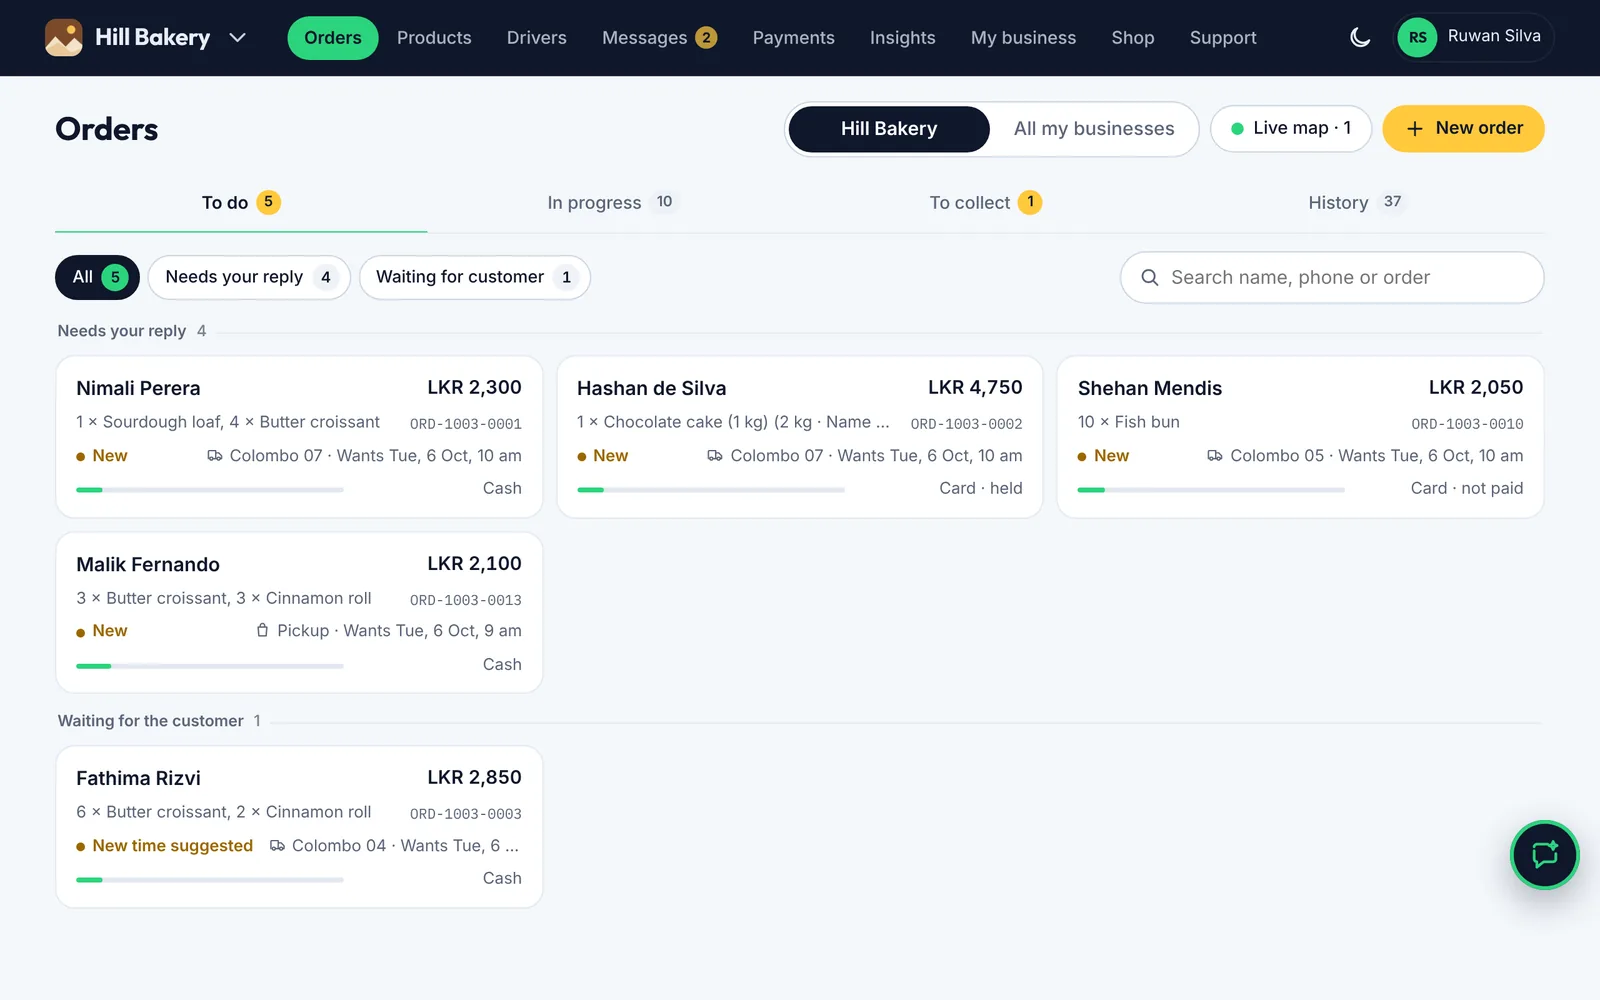
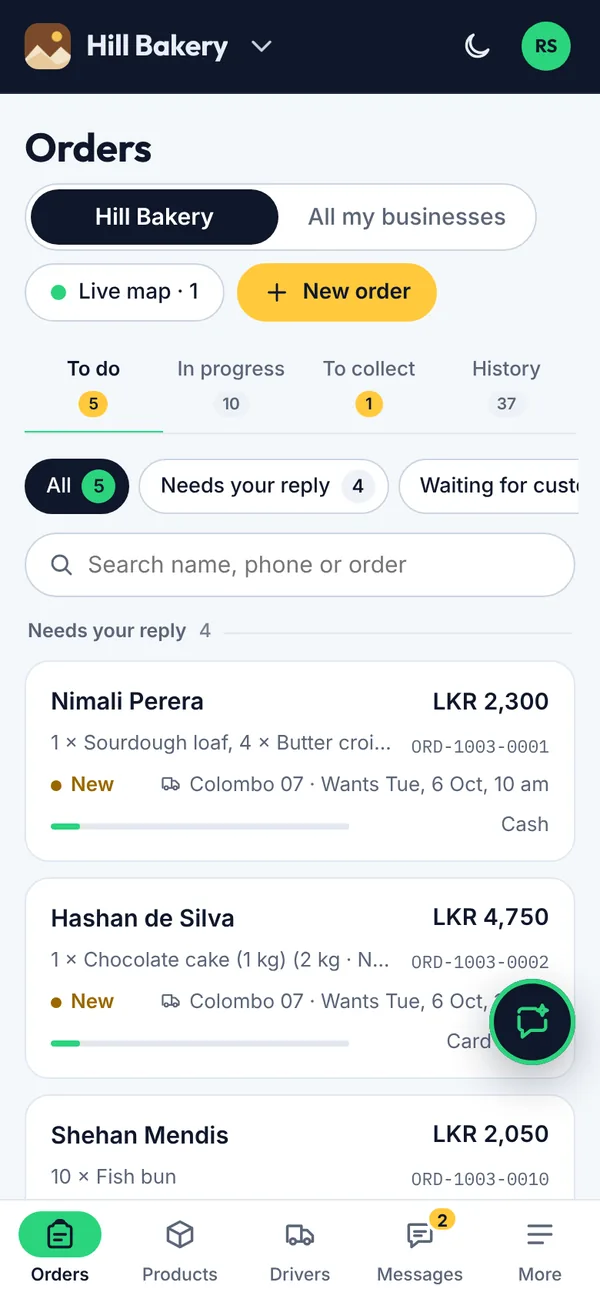
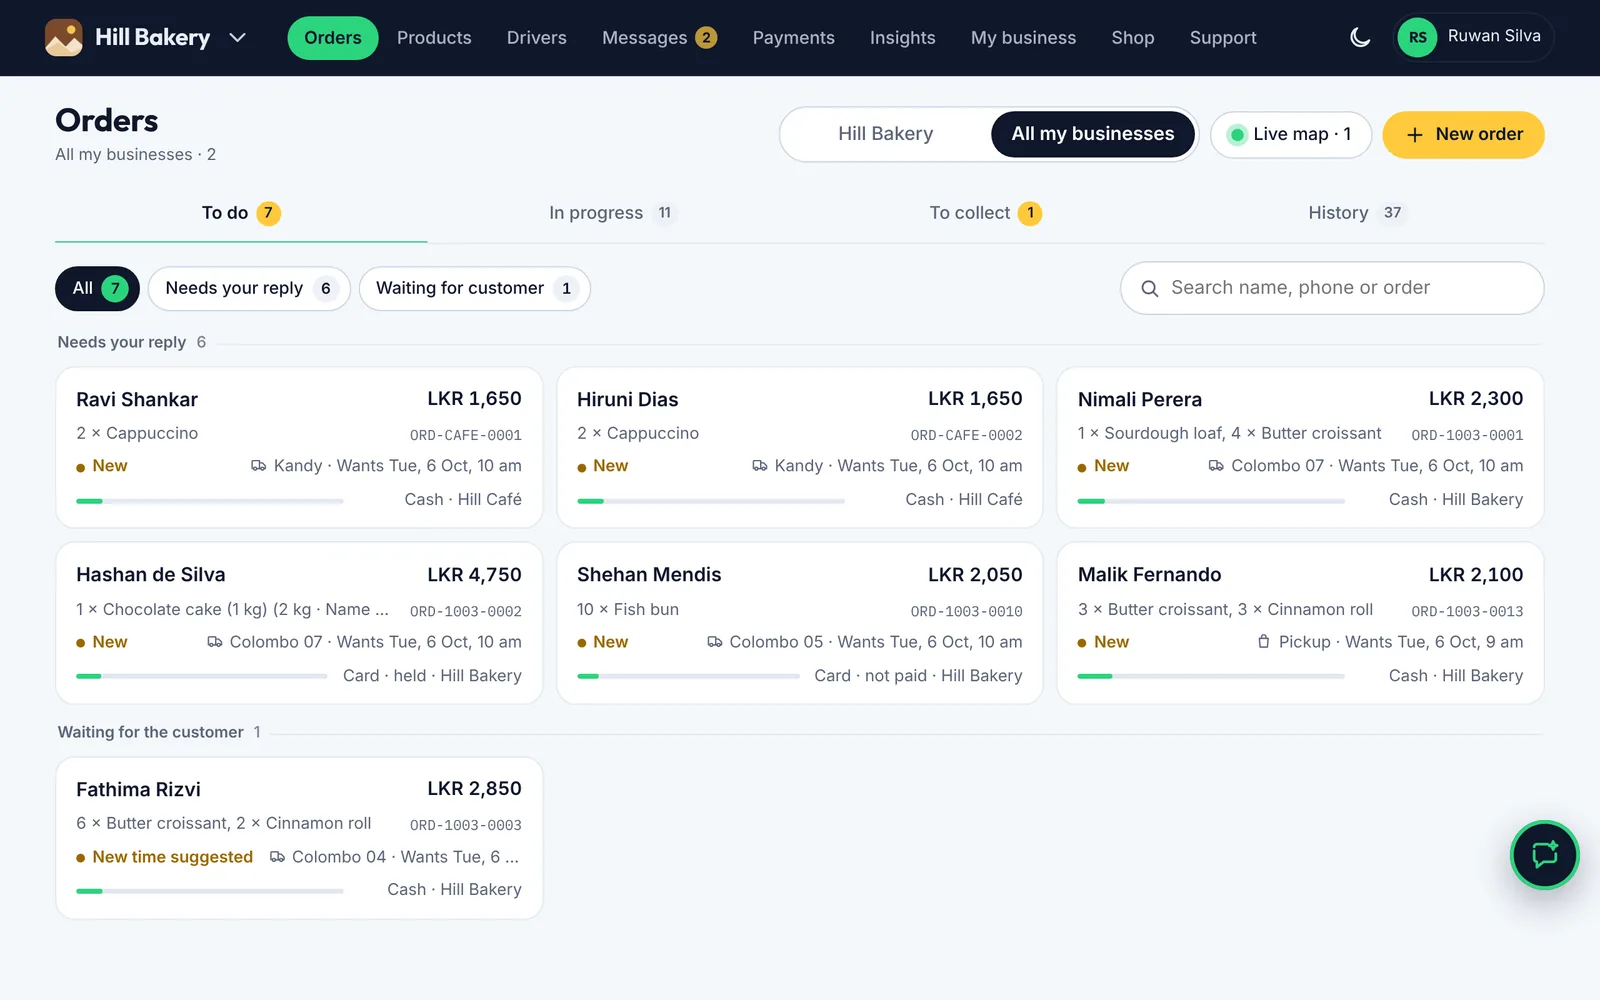
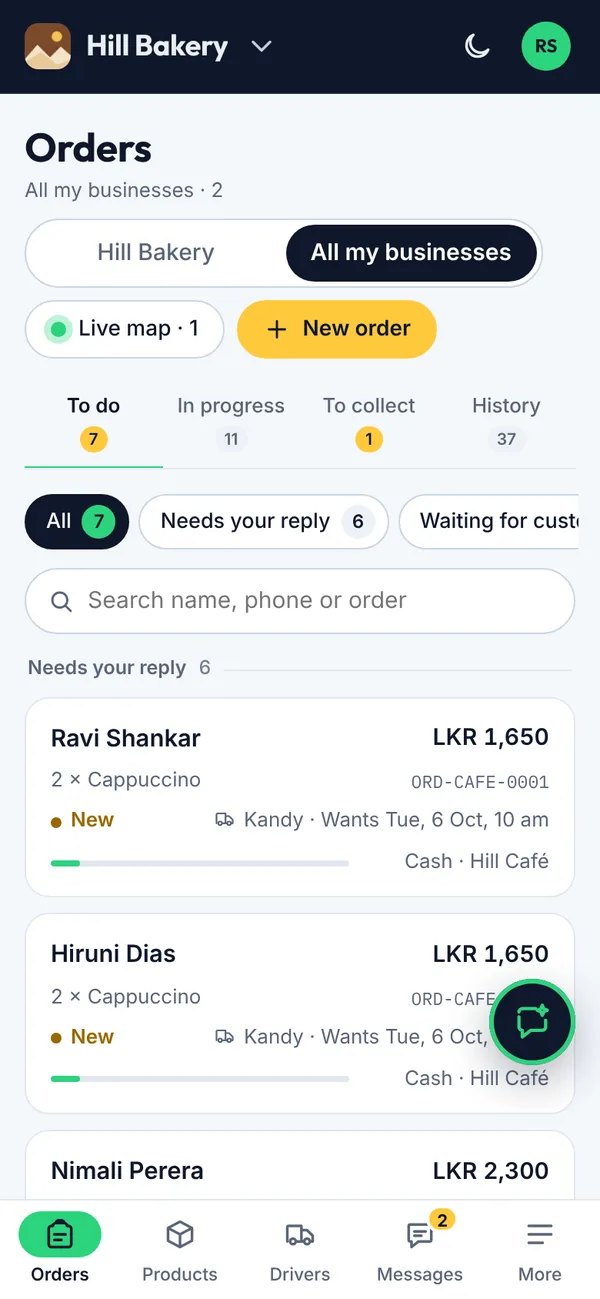
To do: new orders that need a reply, and orders waiting for the customer.
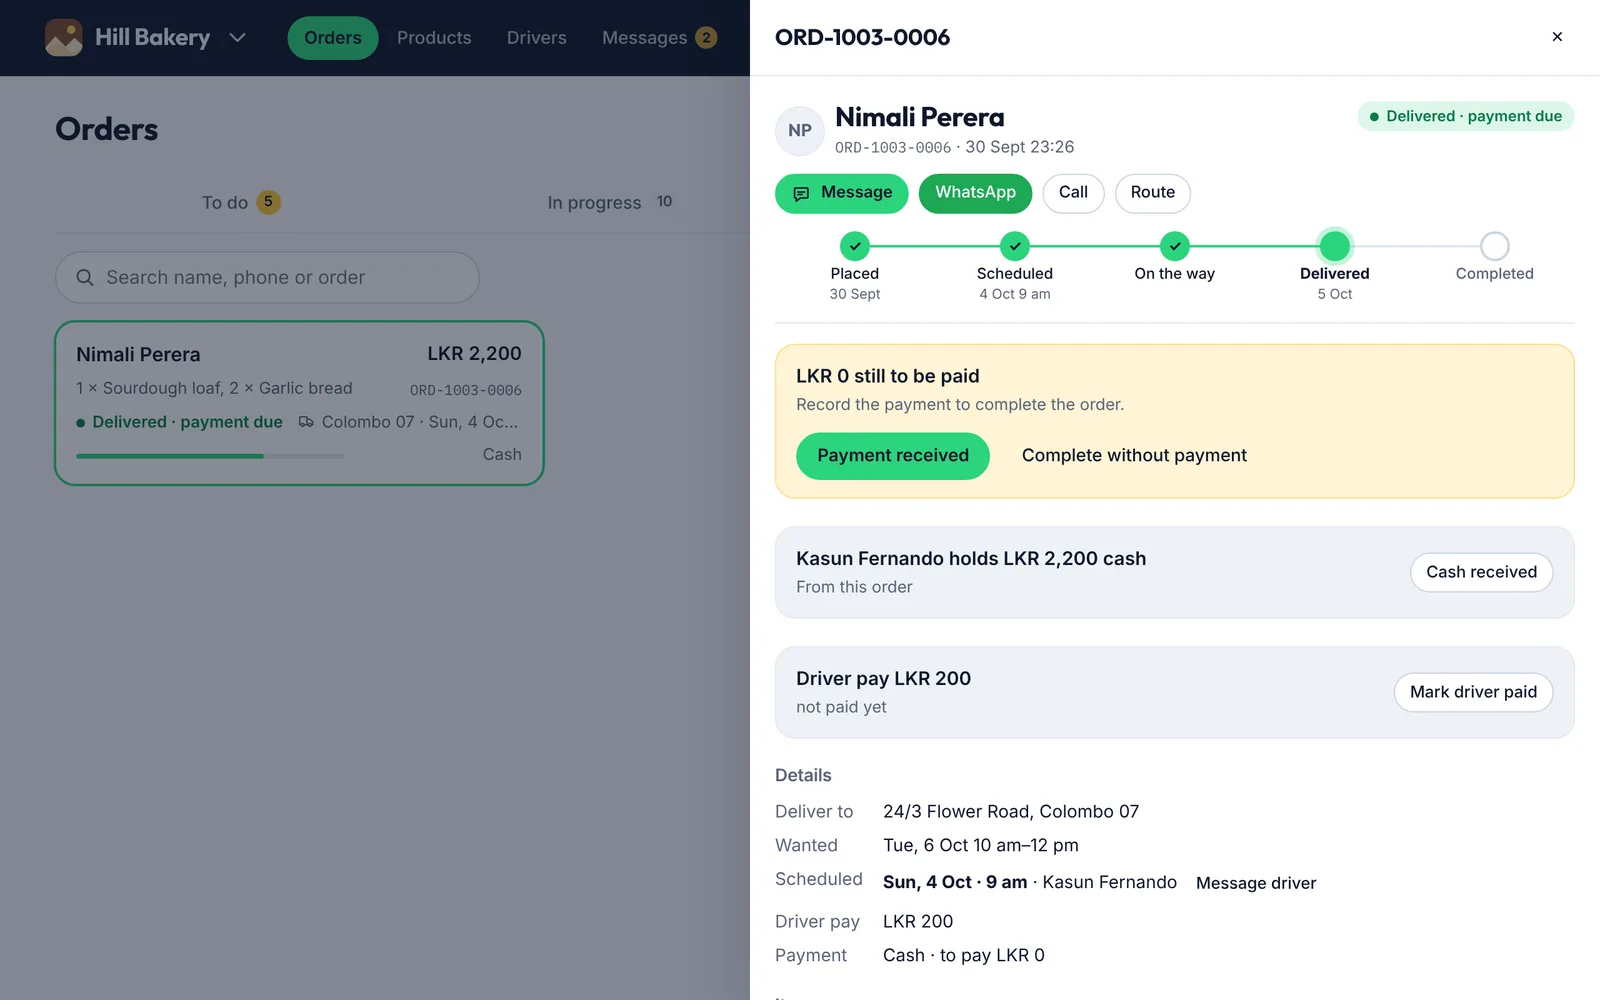
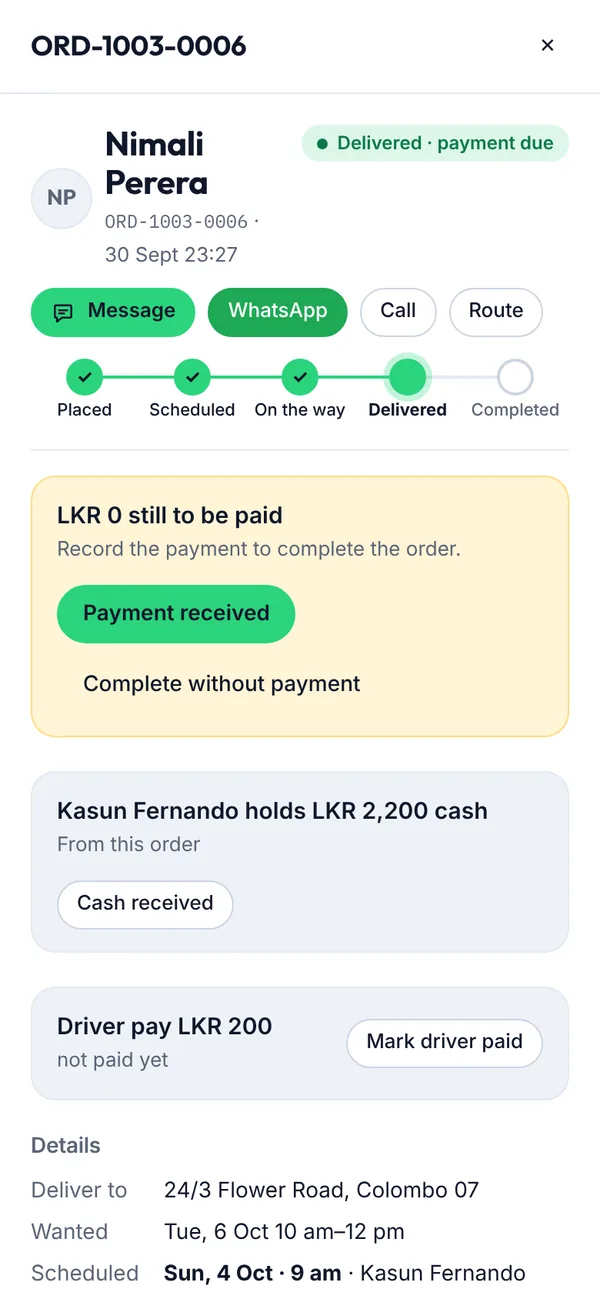
To collect: delivered orders that aren't paid yet. In progress and History hold the rest.
Live map shows your delivery people on the road.
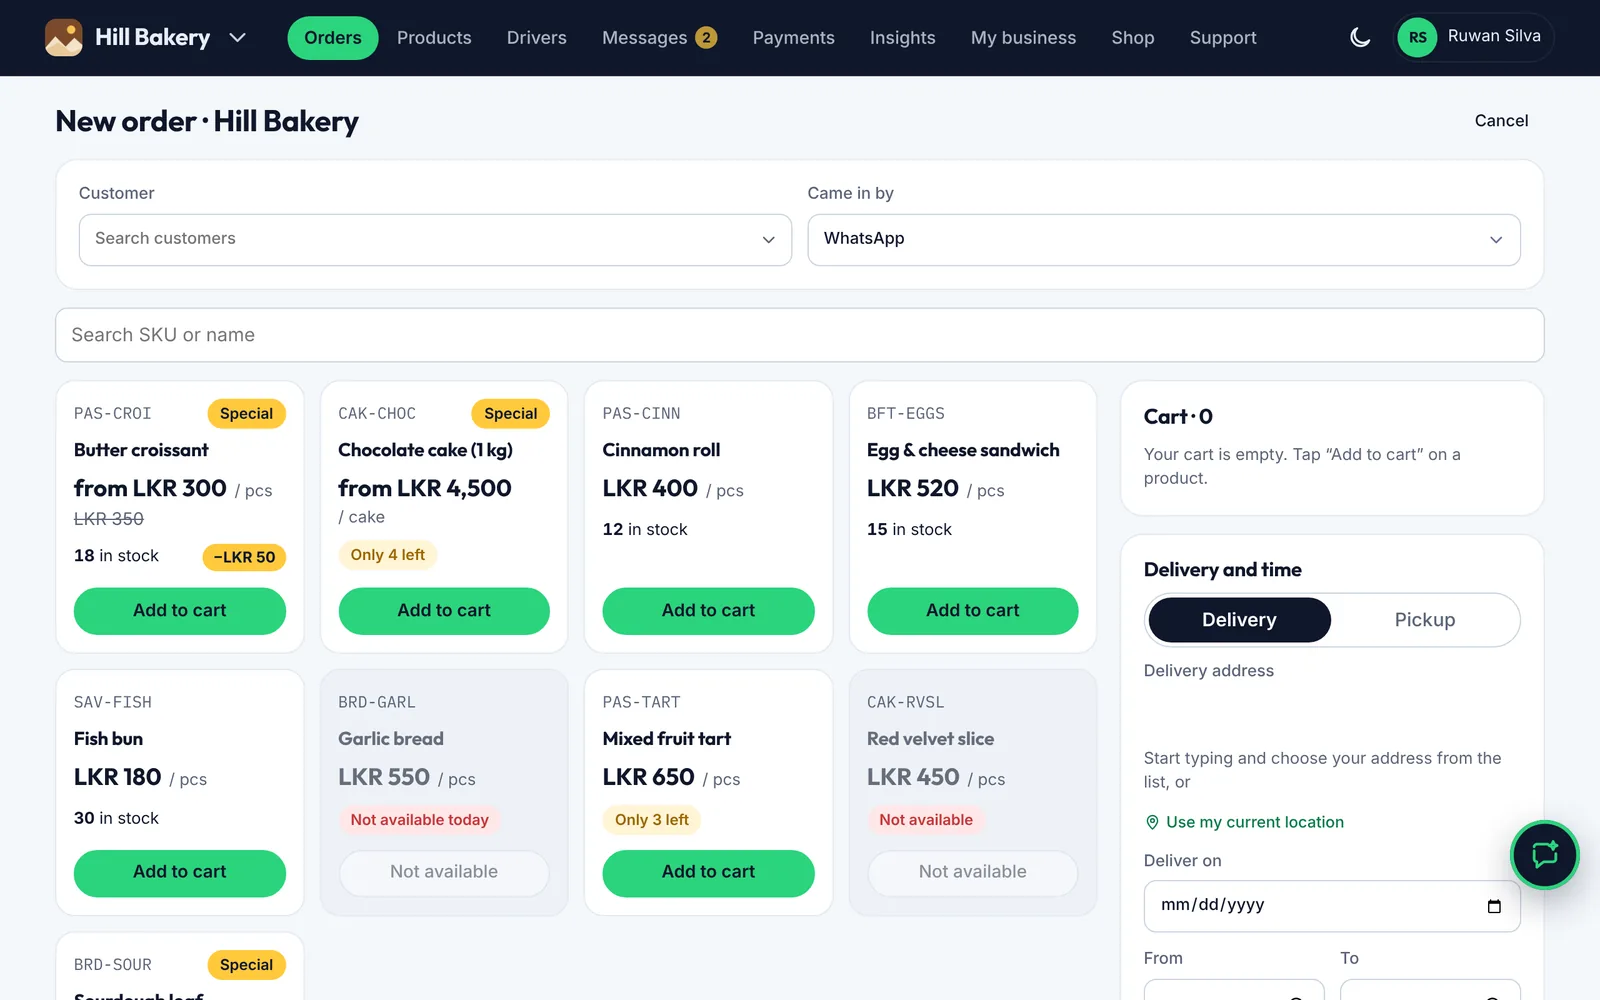
New order lets you enter an order yourself (see 4.19).
Tap an order to open it.
Figure 4.25The orders board
Run more than one business? The board shows the business you have open. Choose All my businesses at the top to see every order together, with the business name on each one. See 4.28.
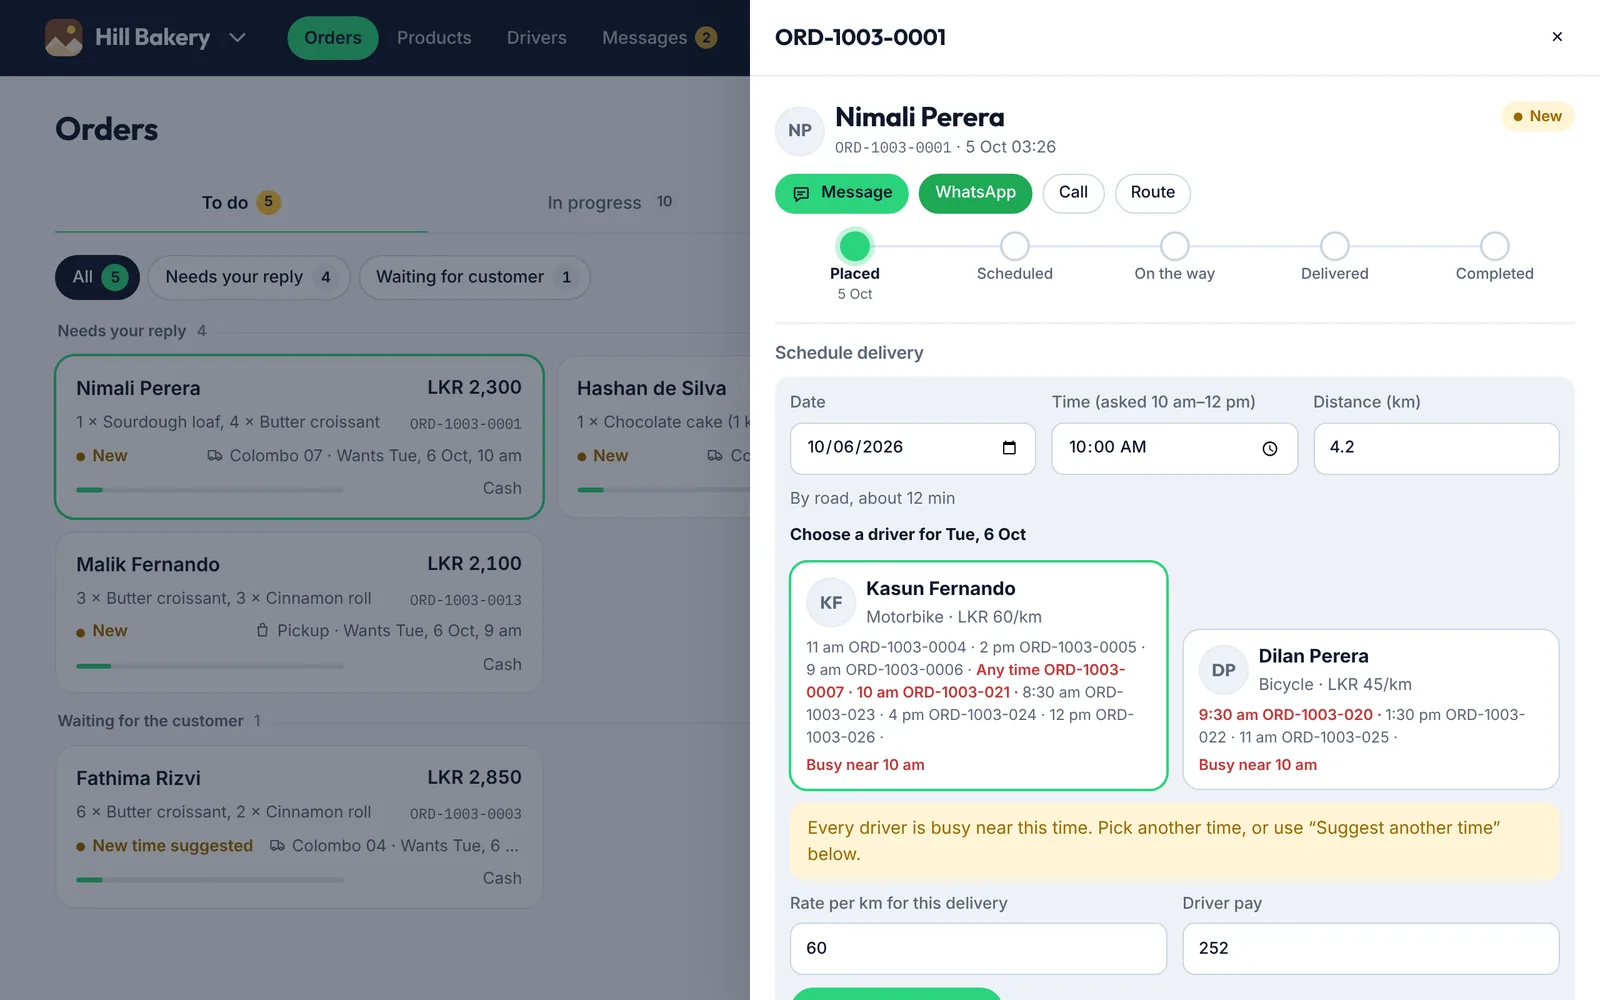
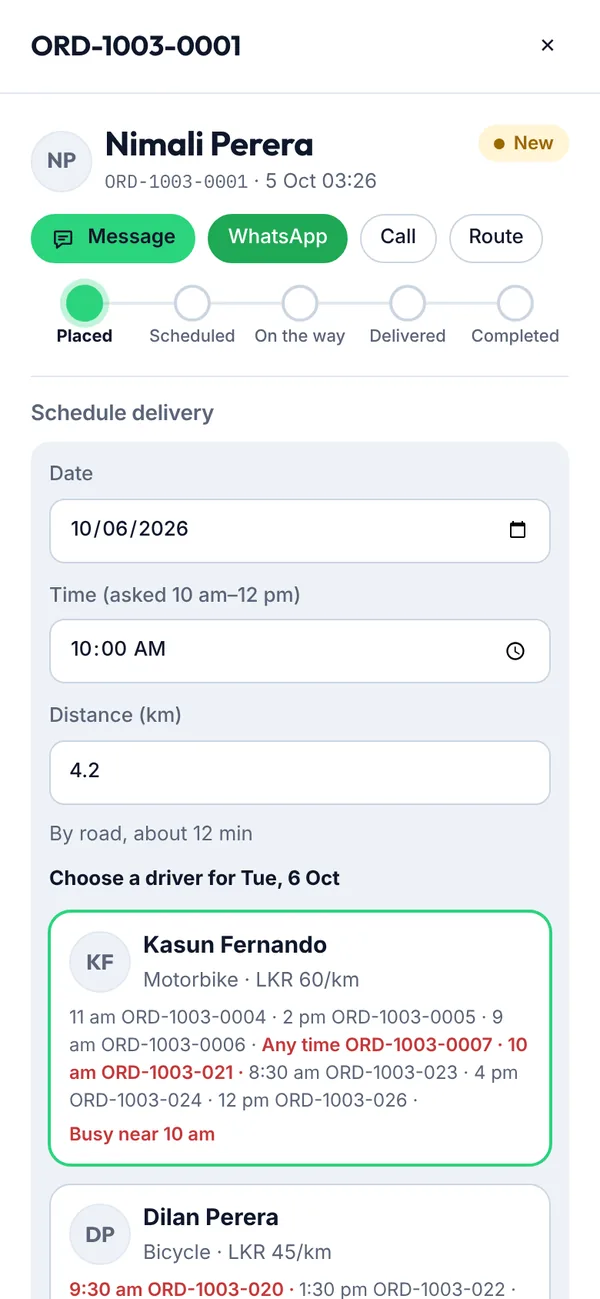
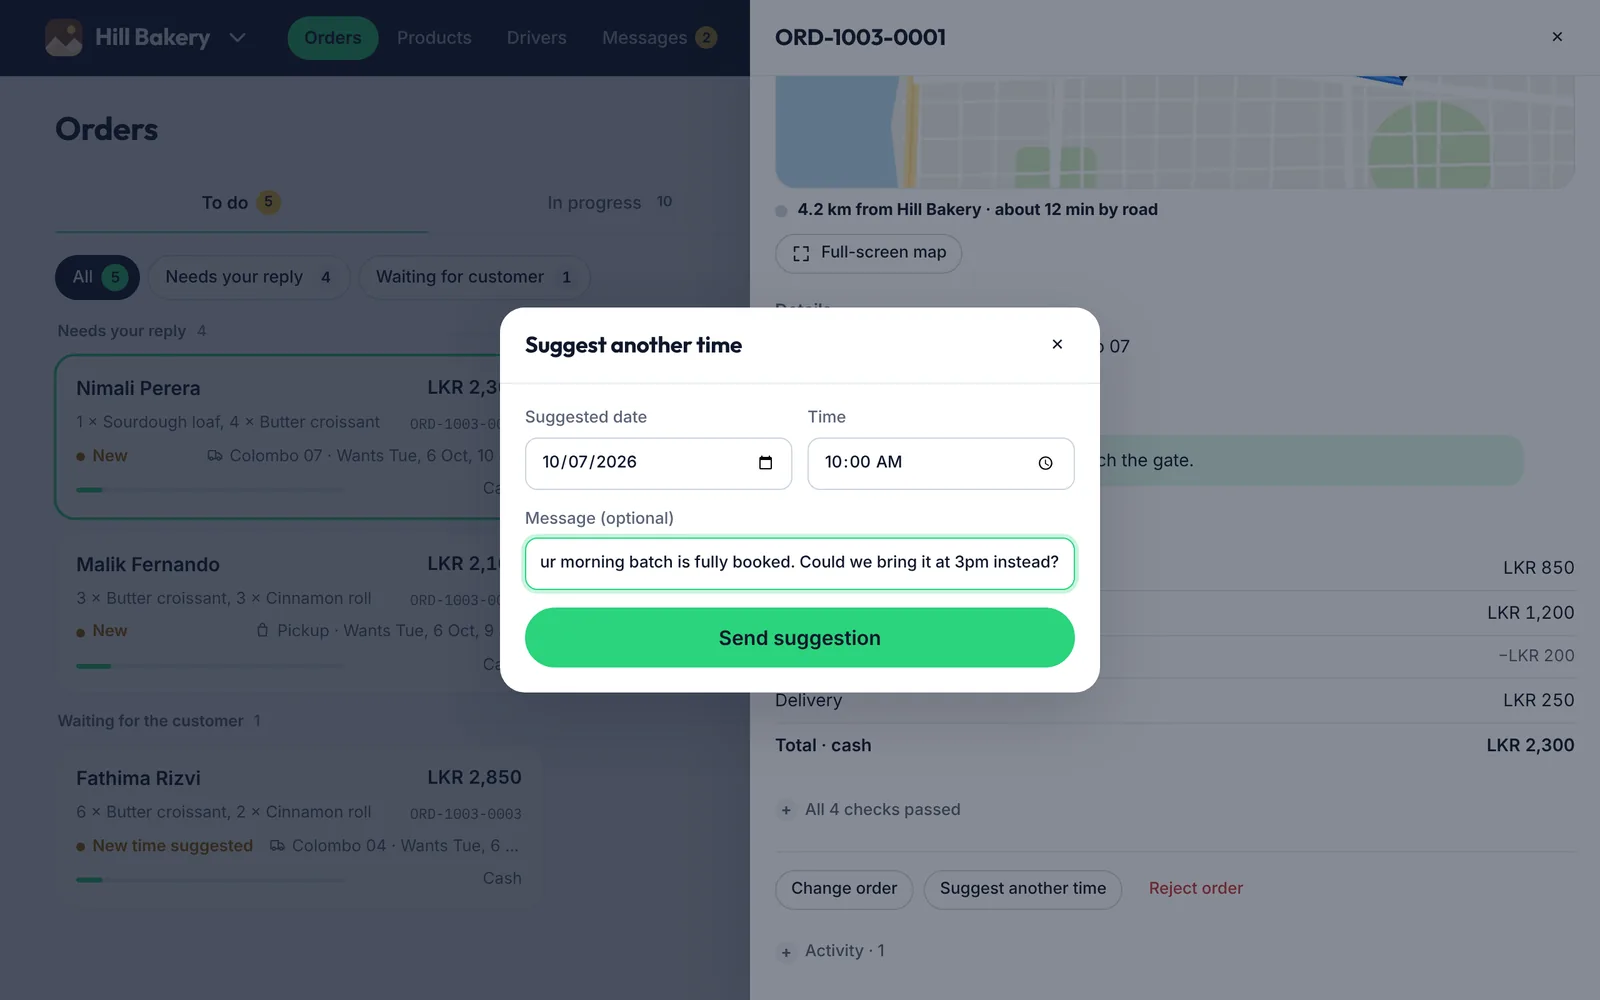
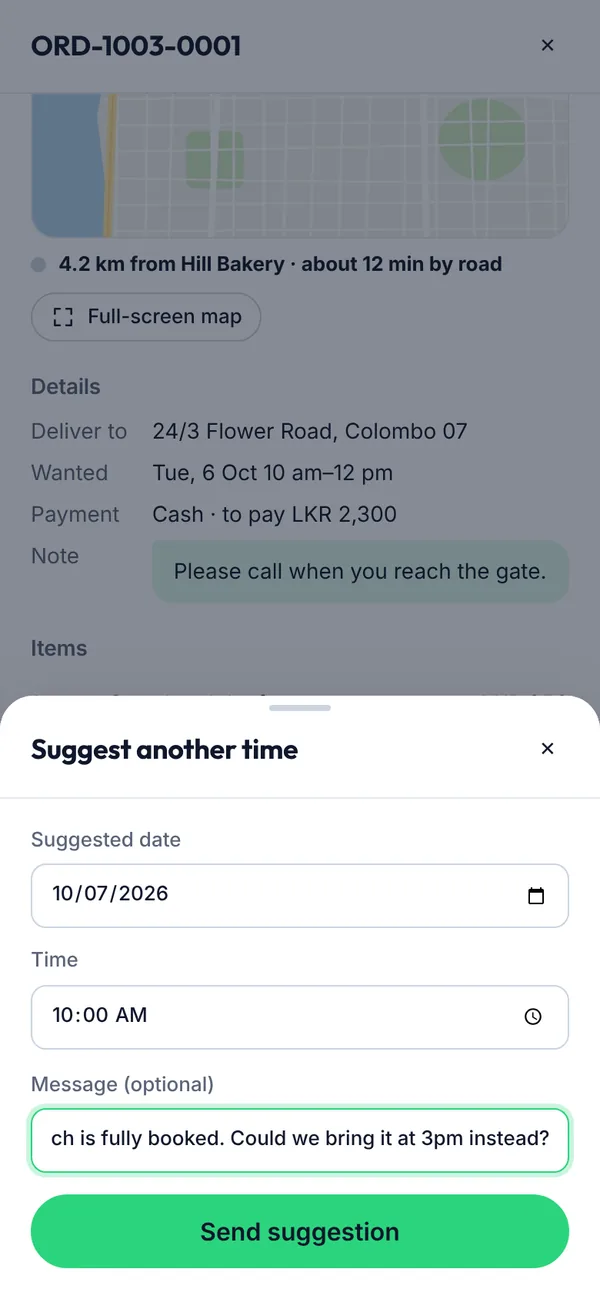
If you can't meet the customer's time, suggest another. If you can't fill the order, decline it with a reason.
Before you start
Open the order and tap Suggest another time.
Steps
Choose a new date and time.
Add a short message explaining why.
Tap Send suggestion.
Figure 4.27Suggesting another time
What you’ll see
The customer accepts or cancels. To decline instead, tap Reject order and give a reason; the items go back into stock and any card hold is released. To change items first, tap Change order.
4.21How to add delivery people and handle requests
Build your own pool of delivery people. They can ask to join you, or you can add them by email.
Steps
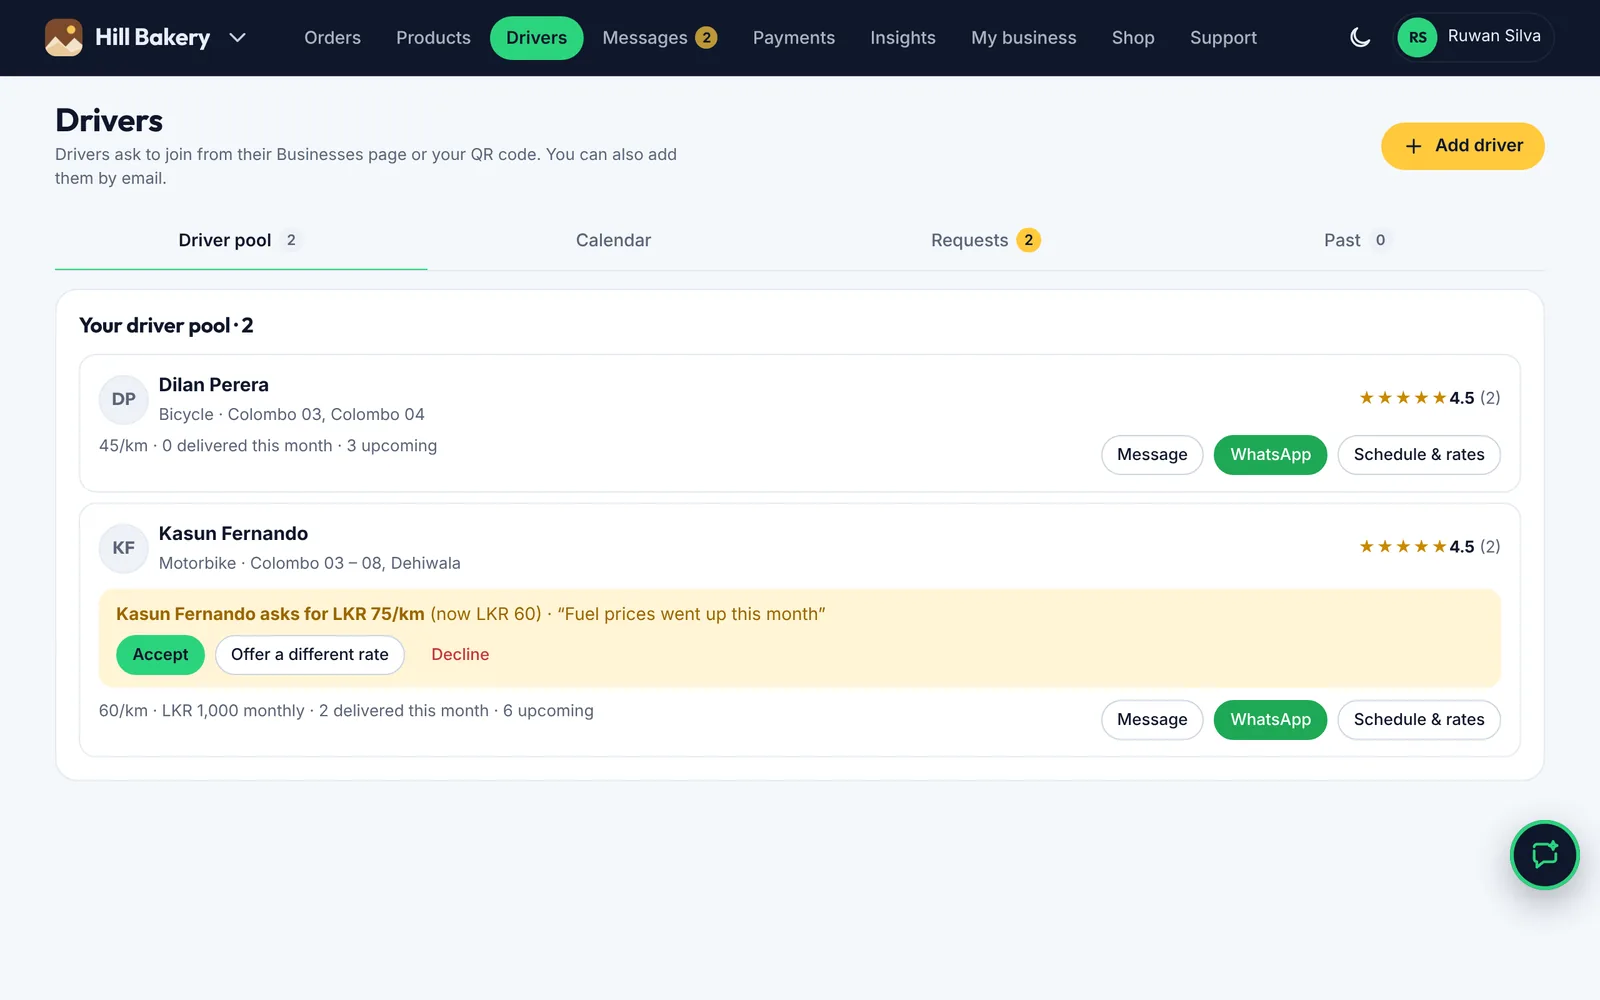
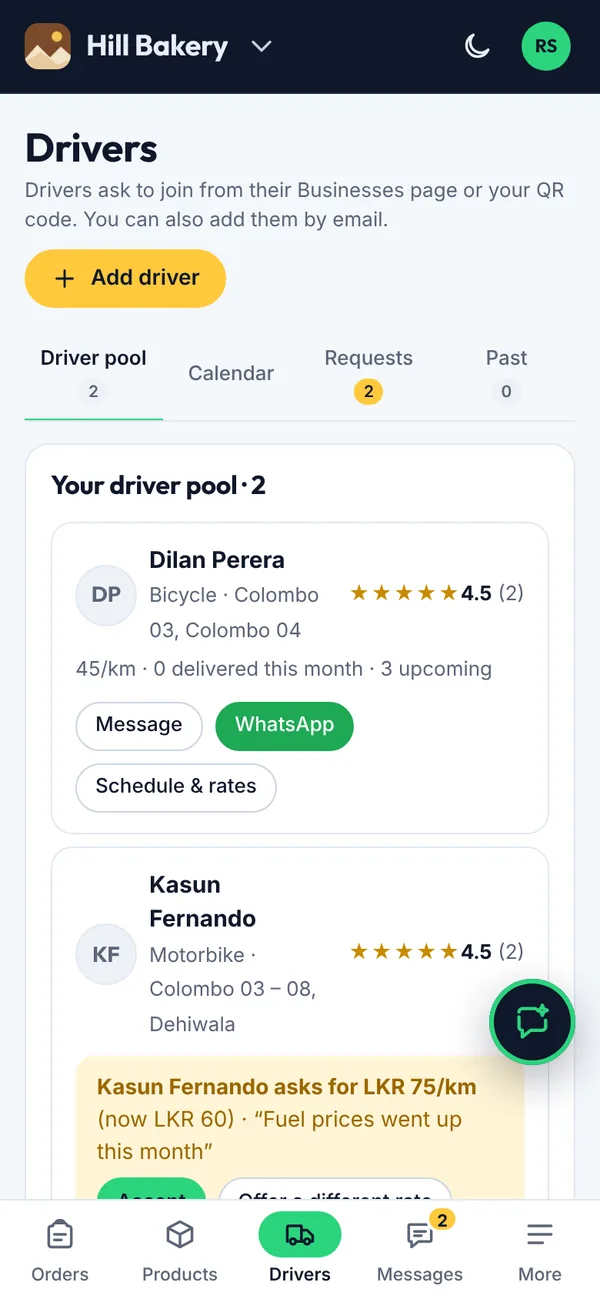
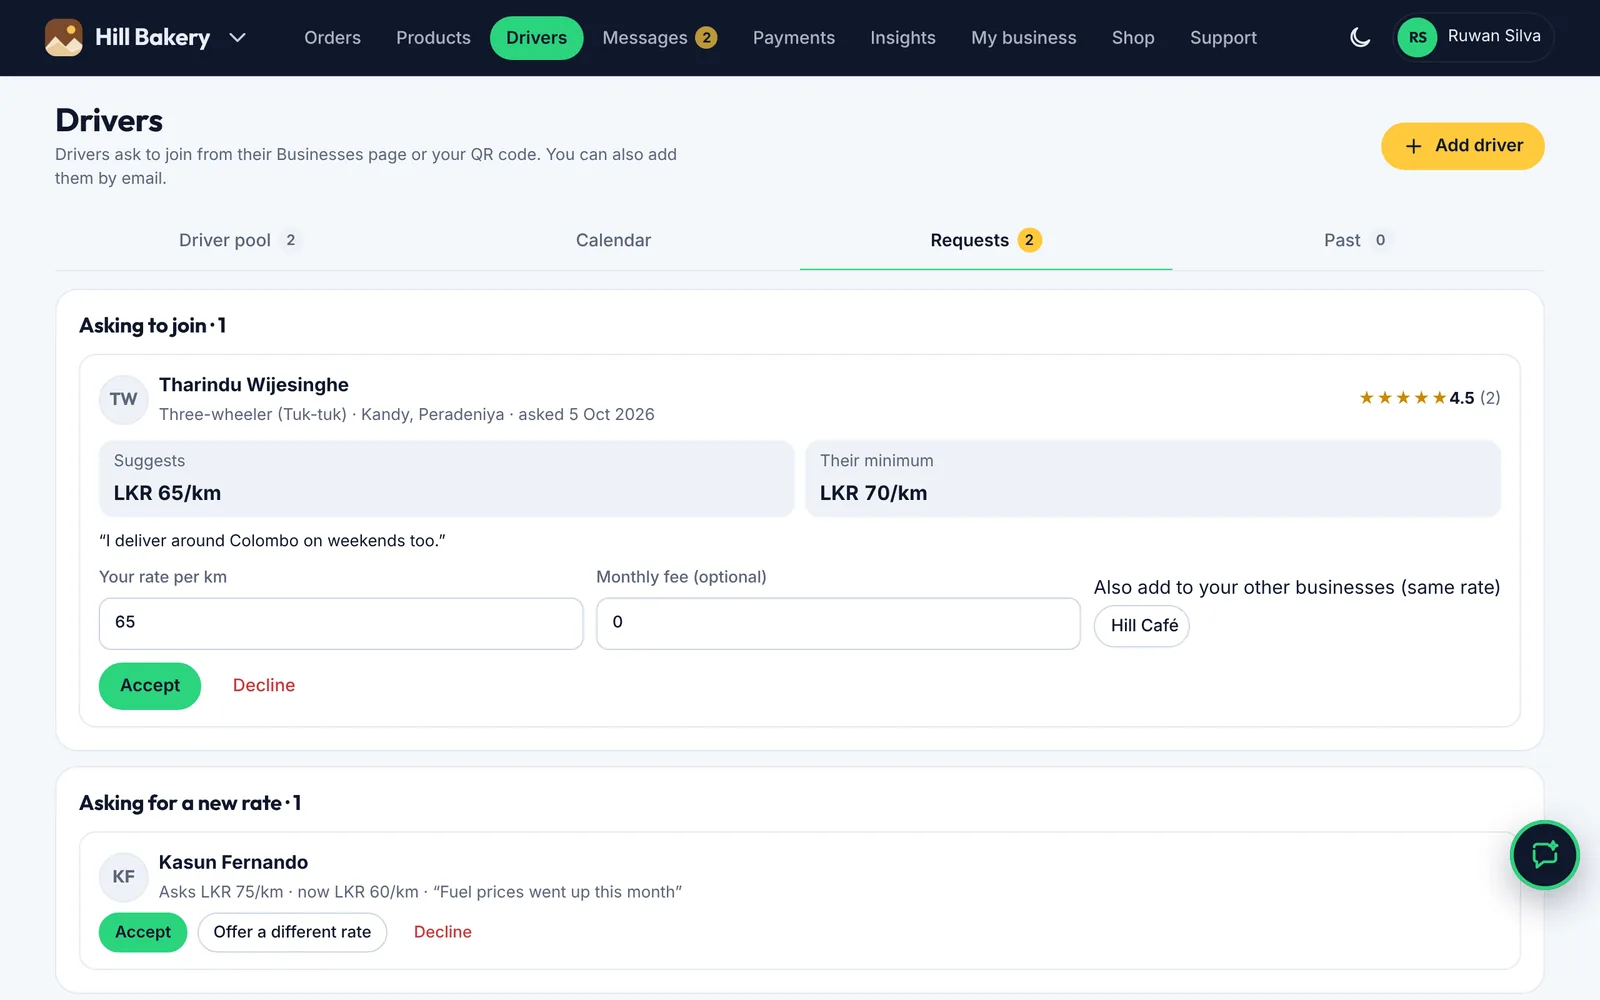
Figure 4.31Your driver pool
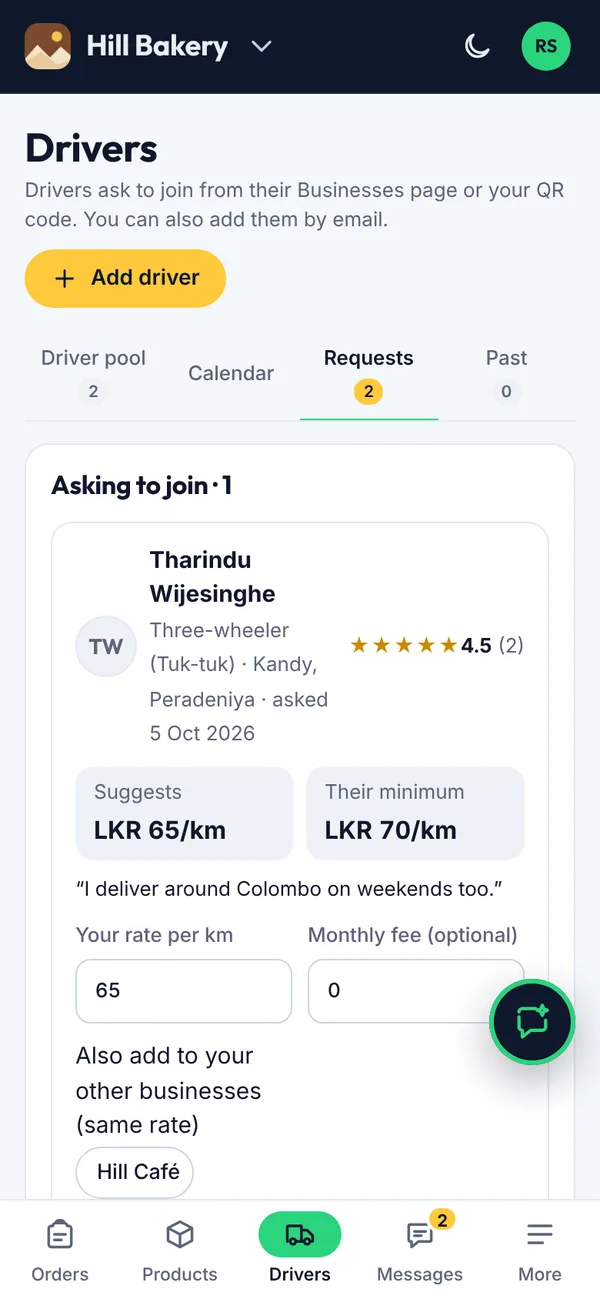
Open Drivers and tap the Requests tab.
Check the rate they suggest, set the rate and any monthly fee, then tap Accept (or Decline).
When a driver asks for a new rate, tap Accept, Offer a different rate or Decline.
Figure 4.32Requests to join and rate requests
What you’ll see
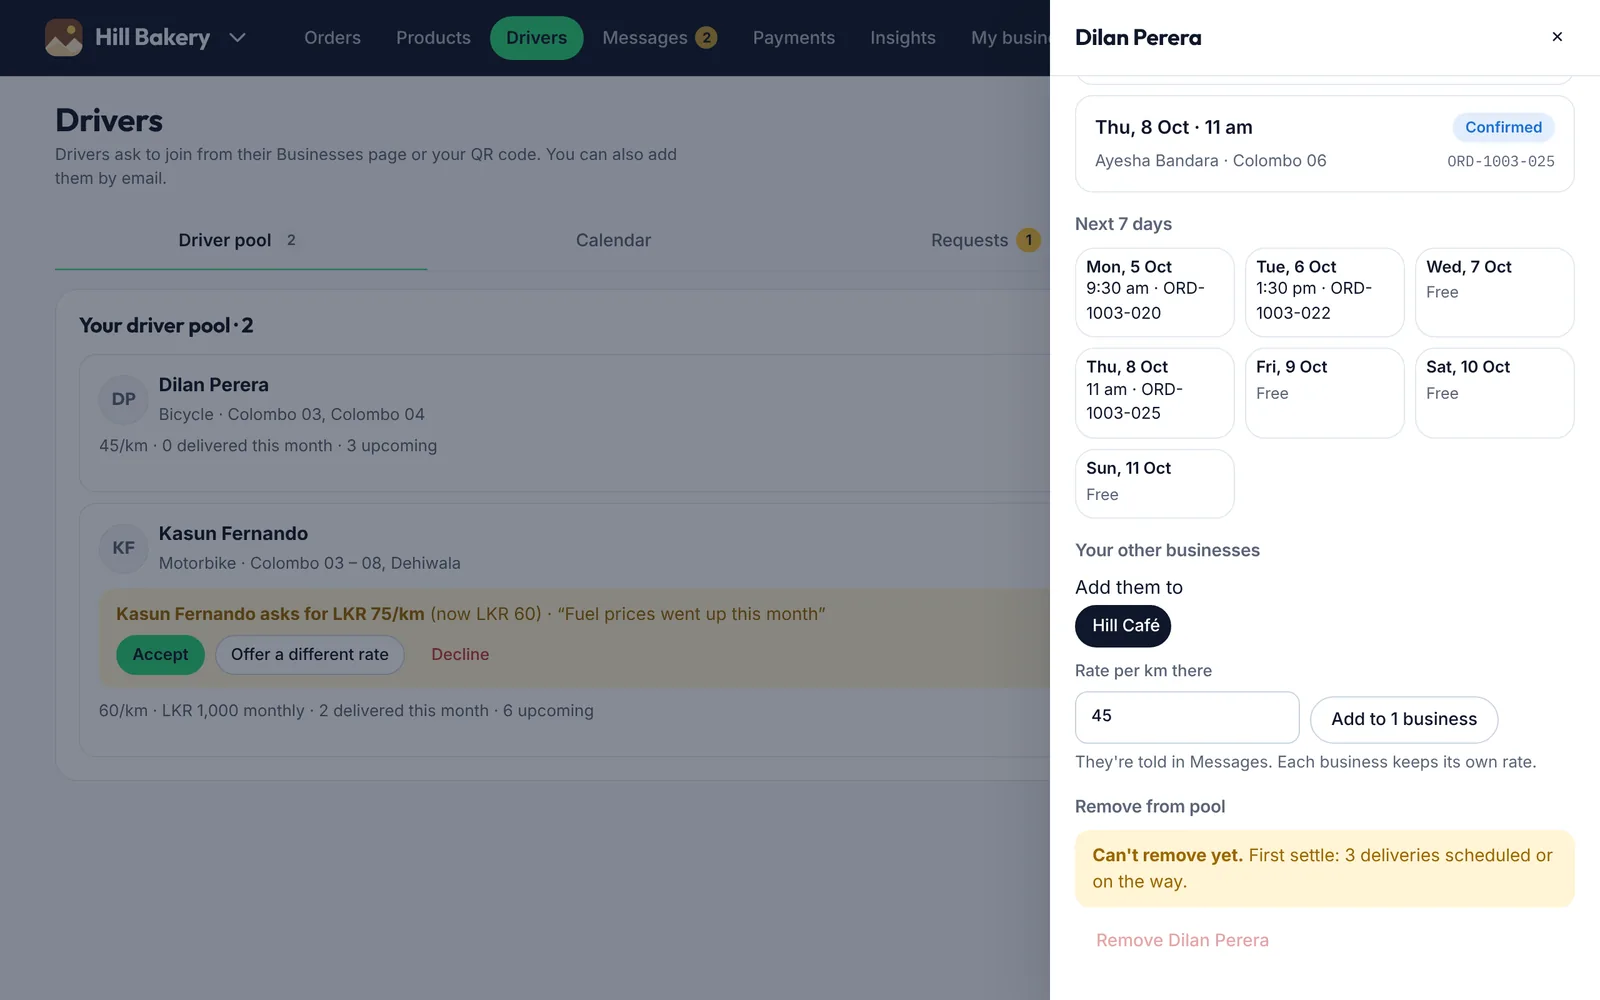
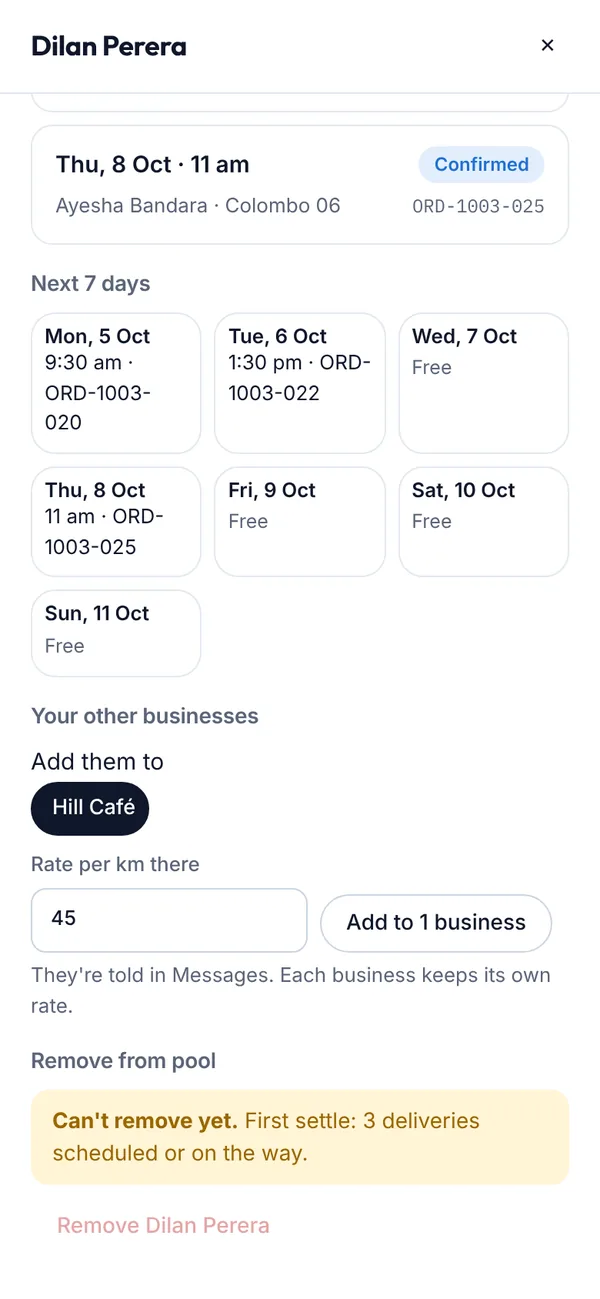
Accepted delivery people appear in your Driver pool and can be chosen when you schedule. Tap Add driver to add someone by email. If you run several businesses, you can add them to your other businesses at the same time, each at its own rate.
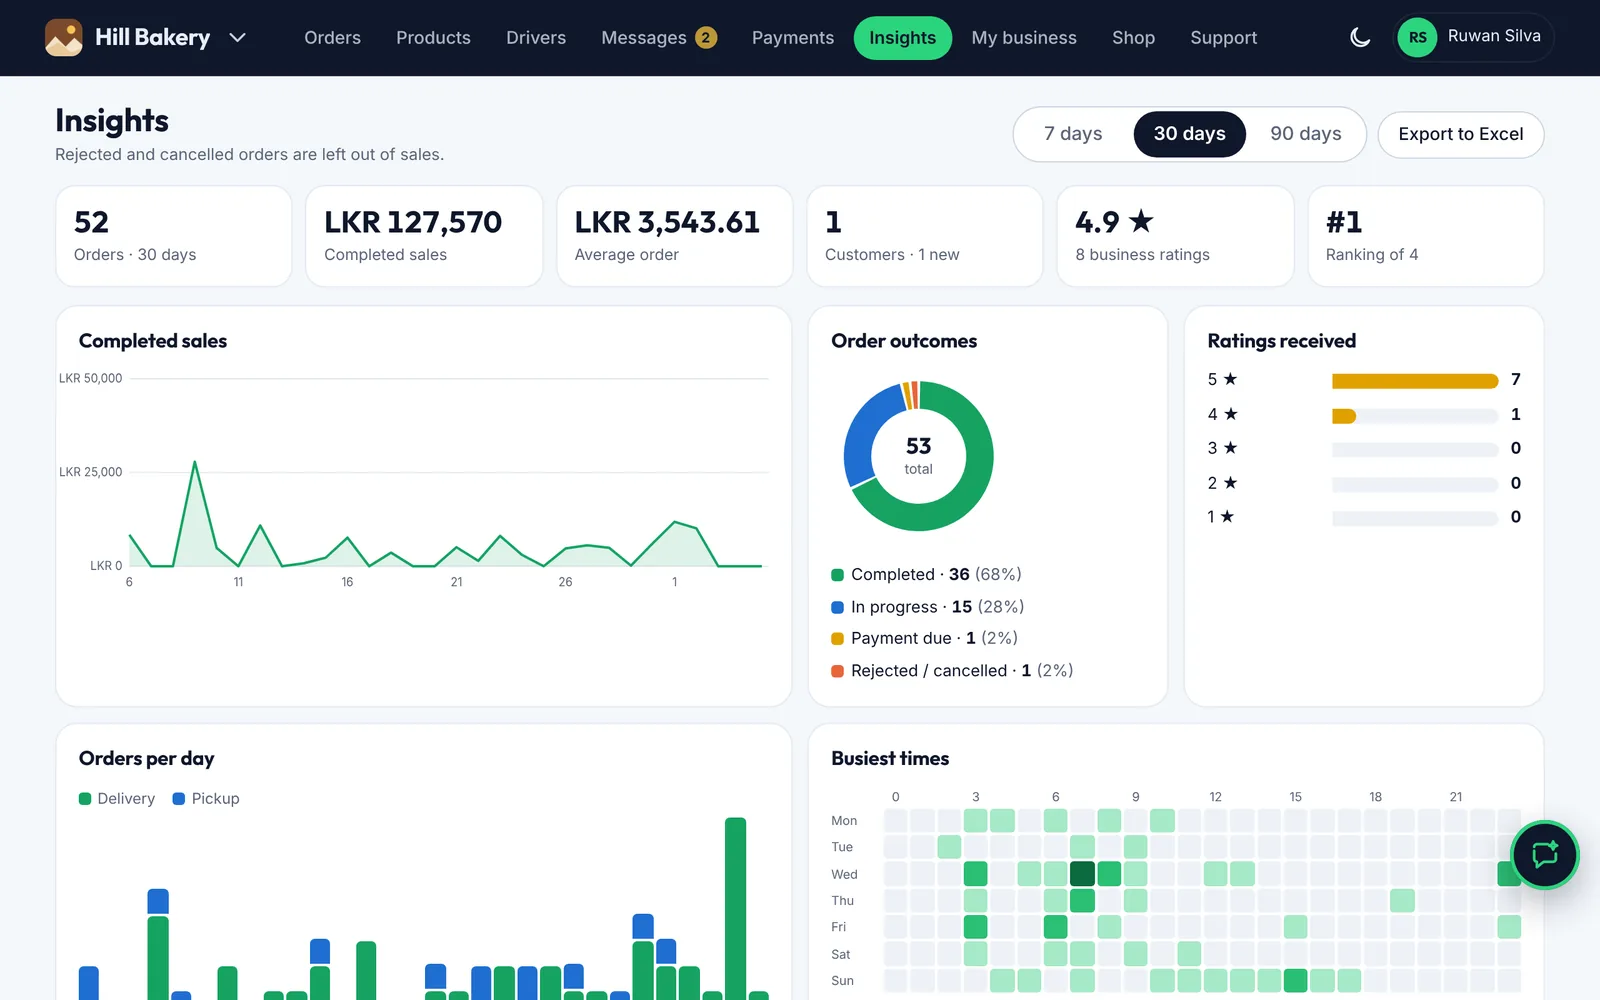
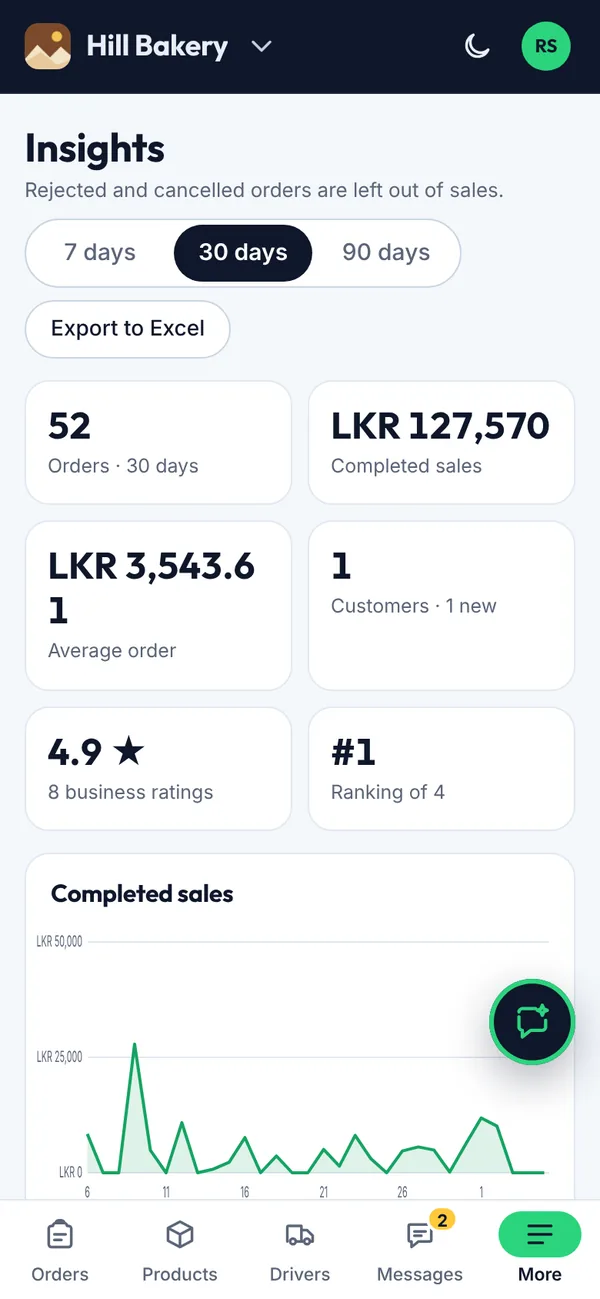
See how your business is doing. Sub-owners see Insights only if the owner allows it.
Steps
Choose 7, 30 or 90 days.
Tap Export to Excel to download the numbers.
Figure 4.34Insights
What you’ll see
You see orders, sales, average order, customers, your rating, your ranking, and your busiest days and times.
4.24How to change your business settings and payment methods
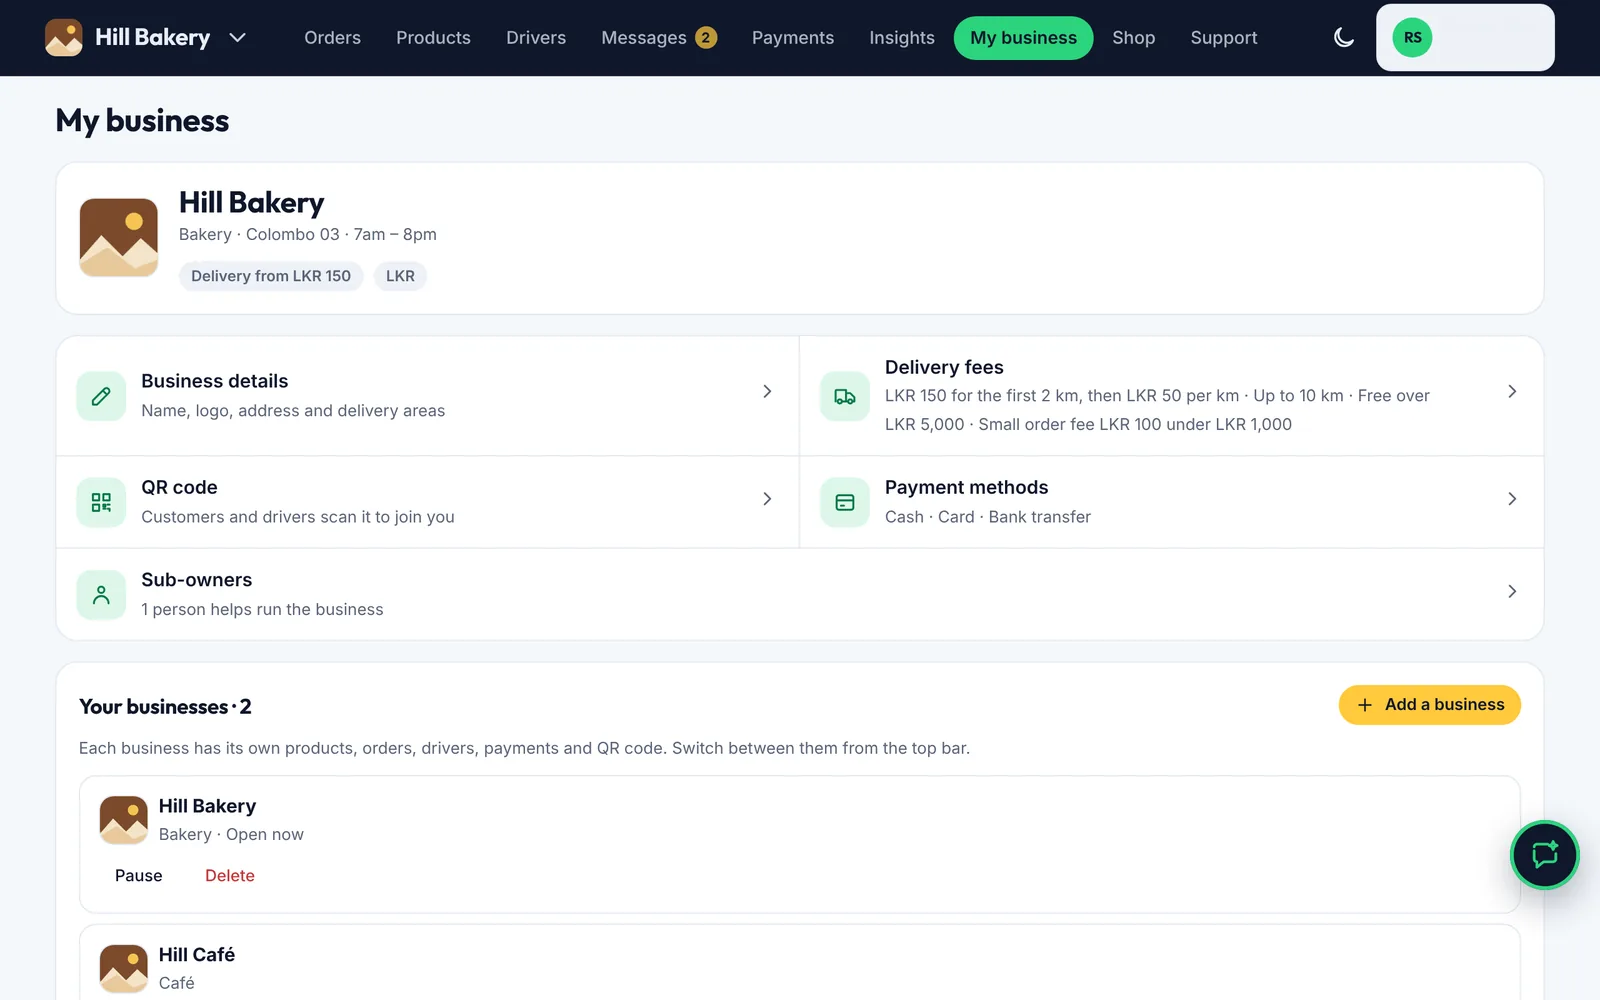
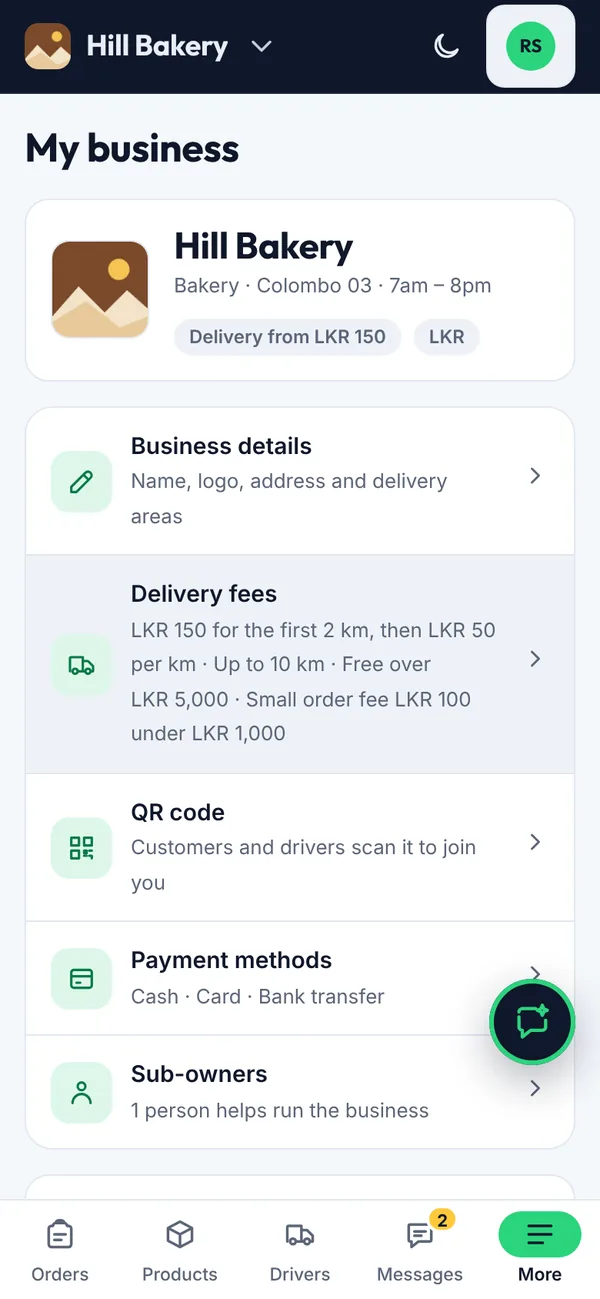
My business holds your details, QR code, payment methods and team.
Steps
Business details: name, logo, address, opening hours, delivery areas and driver pay limit. Delivery fees have their own row (see 4.33).
Opening hours (in Business details): tap the days you're open, then choose when you open and close. Tick Different hours on some days for a shorter Saturday, for example, and tap + Add a lunch break if you close for lunch. Customers see shows the words the Shop will show, and the Shop also shows Open now or Closed now.
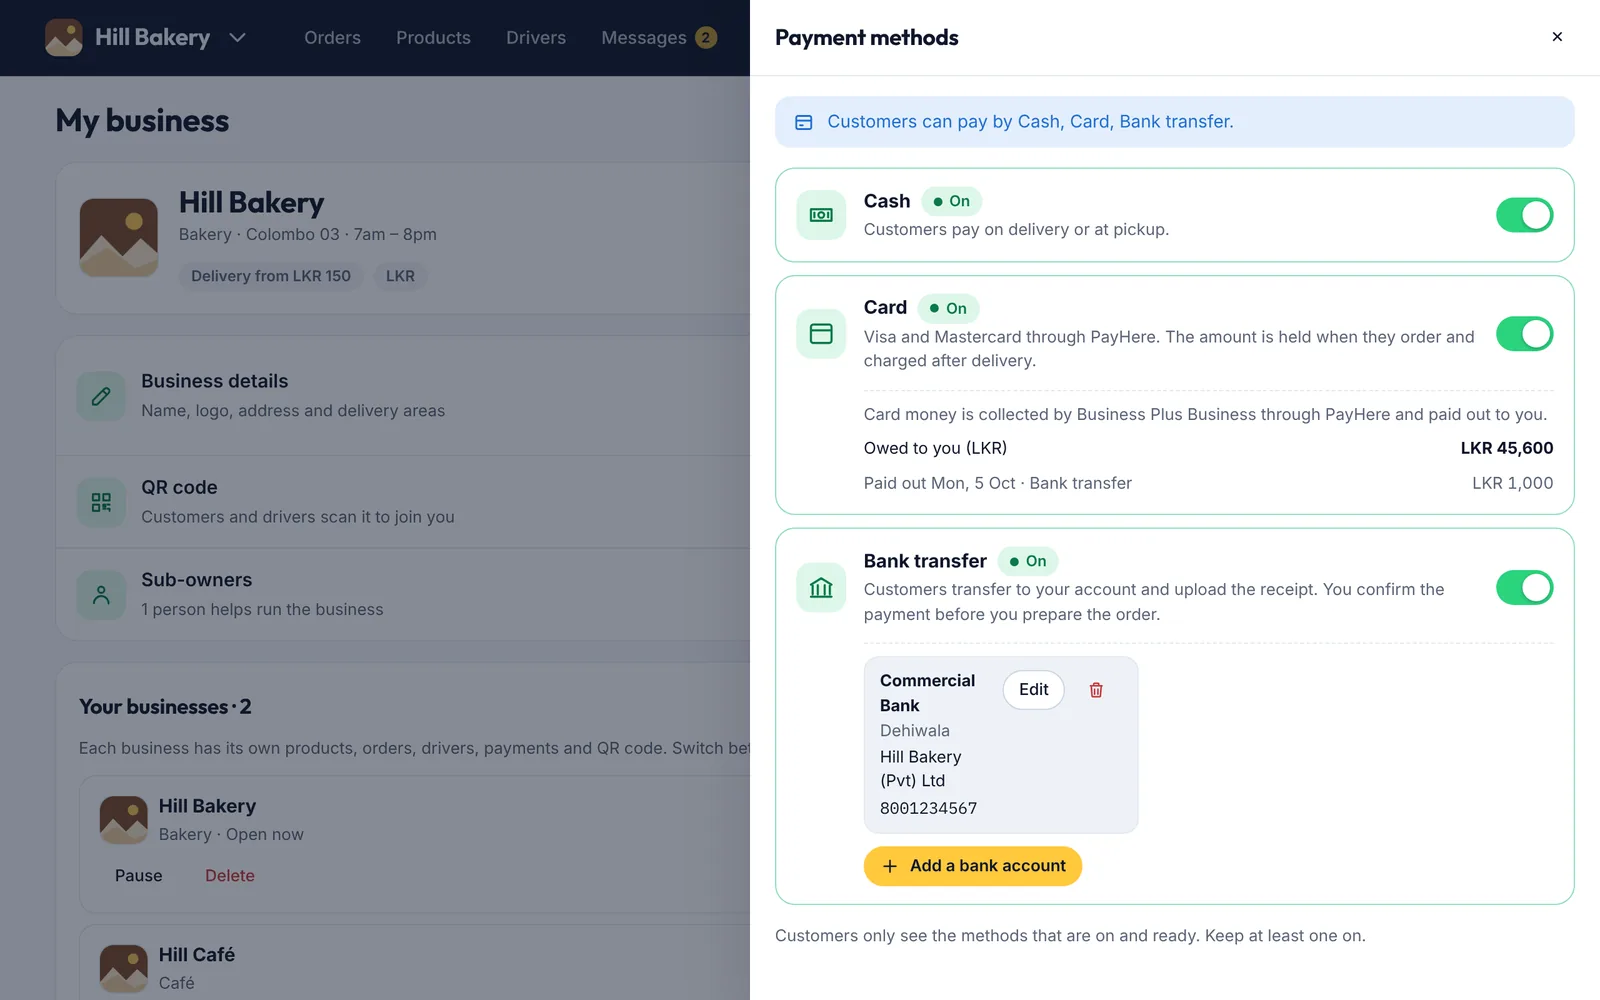
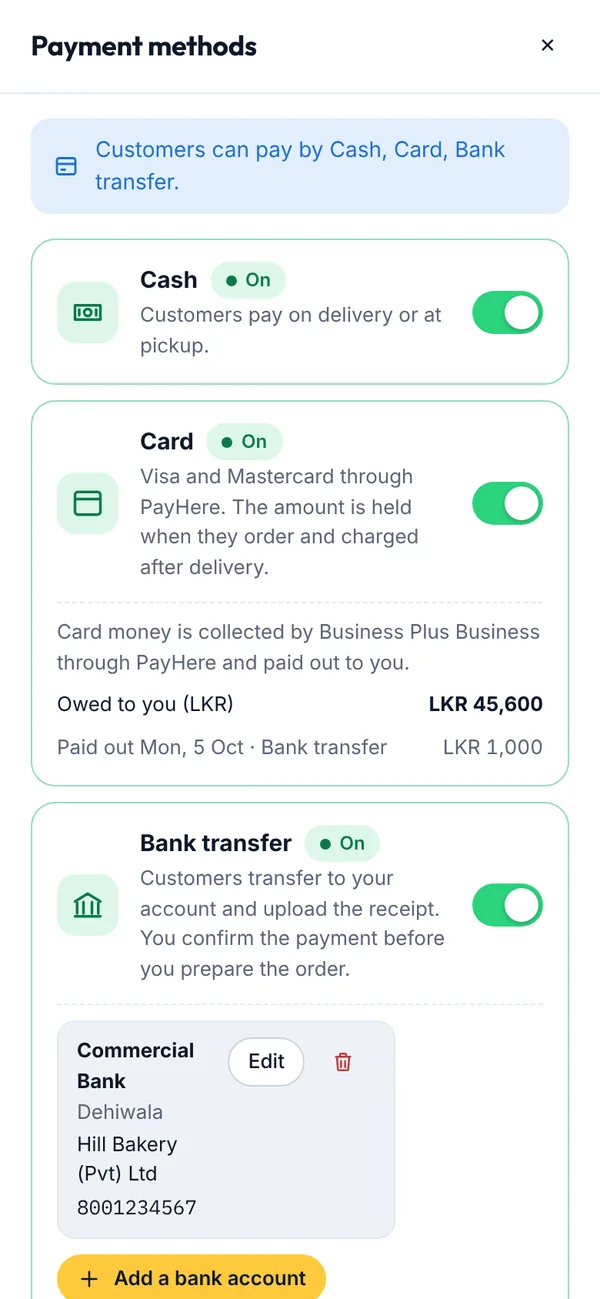
In Payment methods, use the switch next to Cash to take or stop taking cash.
Switch Card on so customers can pay by card through PayHere. Card money is collected by Business Plus Business and paid out to you; what you're owed shows here.
Switch Bank transfer on, then tap Add a bank account. Enter the bank, branch, account name (exactly as the bank has it) and account number. You can add several accounts.
Figure 4.36Payment methods
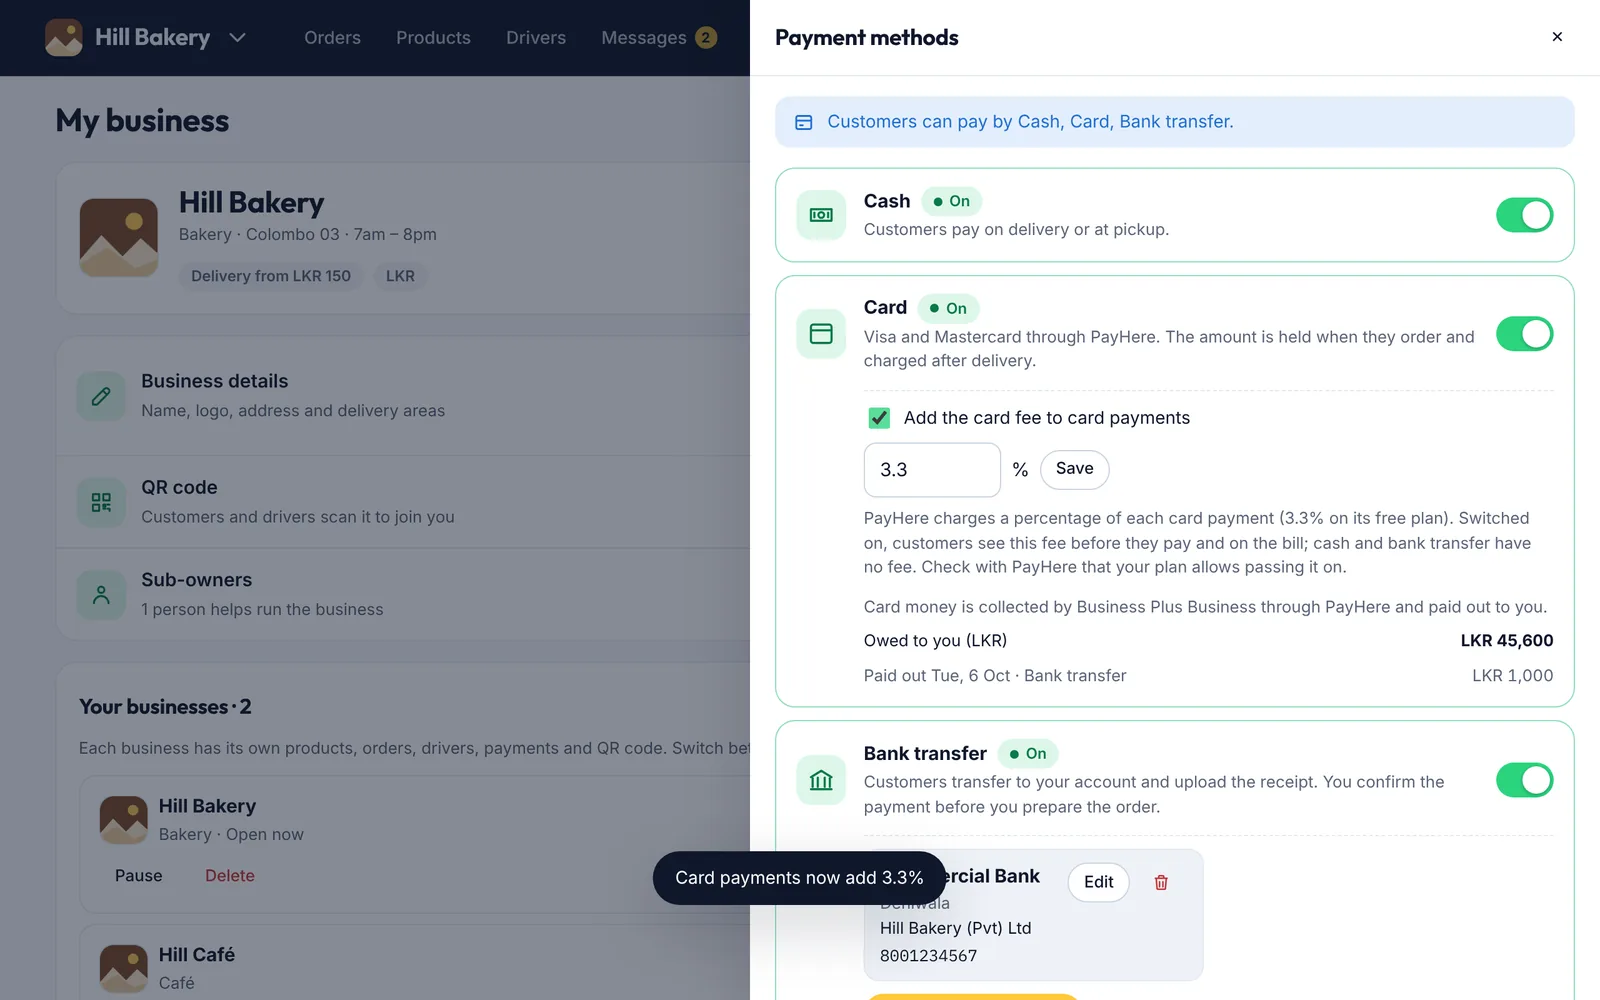
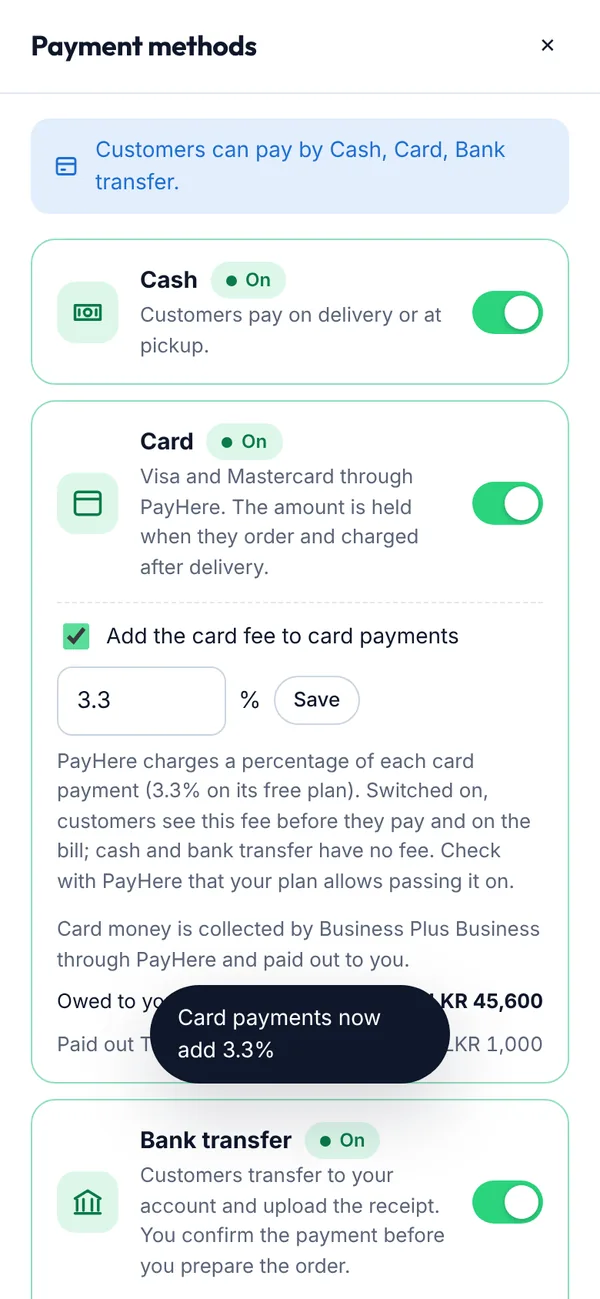
Under Card, tick Add the card fee to card payments to pass PayHere's fee on to customers who pay by card.
Check the percentage (PayHere's free plan charges 3.3%) and tap Save. Customers see the fee before they pay and on the bill; cash and bank transfer have no fee.
Figure 4.37Passing on the card fee
Good to know
The card fee is off unless you switch it on. Check with PayHere that your plan allows passing it on. All three methods are on for a new business. Customers only see a method once it's ready: cards once the app's card payments are on, and bank transfer once you've added an account. At least one way to pay must stay on. Only the main owner can change payment methods; sub-owners can see them.
What you’ll see
The line at the top tells you exactly how customers can pay you now, for example Customers can pay by Cash, Card, Bank transfer.
4.26How to run a service business (salons, repairs and more)
If you sell services, such as a hair salon, spa, clinic, cleaner or repair shop, set your business up for services. Orders are then called bookings, and there is no Drivers page: you or a sub-owner do every visit.
Before you start
When you set up your business, pick a type such as Hair salon; services are chosen for you. You can change it any time in My business → Business details.
Steps
Under What do you offer? choose Services by appointment (or Both if you also sell products).
Open Services and tap Add service. Four short questions: the name, how long it takes and how you charge (One price for the whole service, Per hour or I quote after seeing the job), the price, and where you do it (At my place, At the customer's place or both).
If you go to customers, set your one visit charge in My business → Home visits (for example LKR 1,000, about USD 3.30, added once per visit).
Figure 4.39Setting up a business for services
Share your QR code. Customers tap Book on a service, choose Come to me or I'll come in, pick a time and tap Book now.
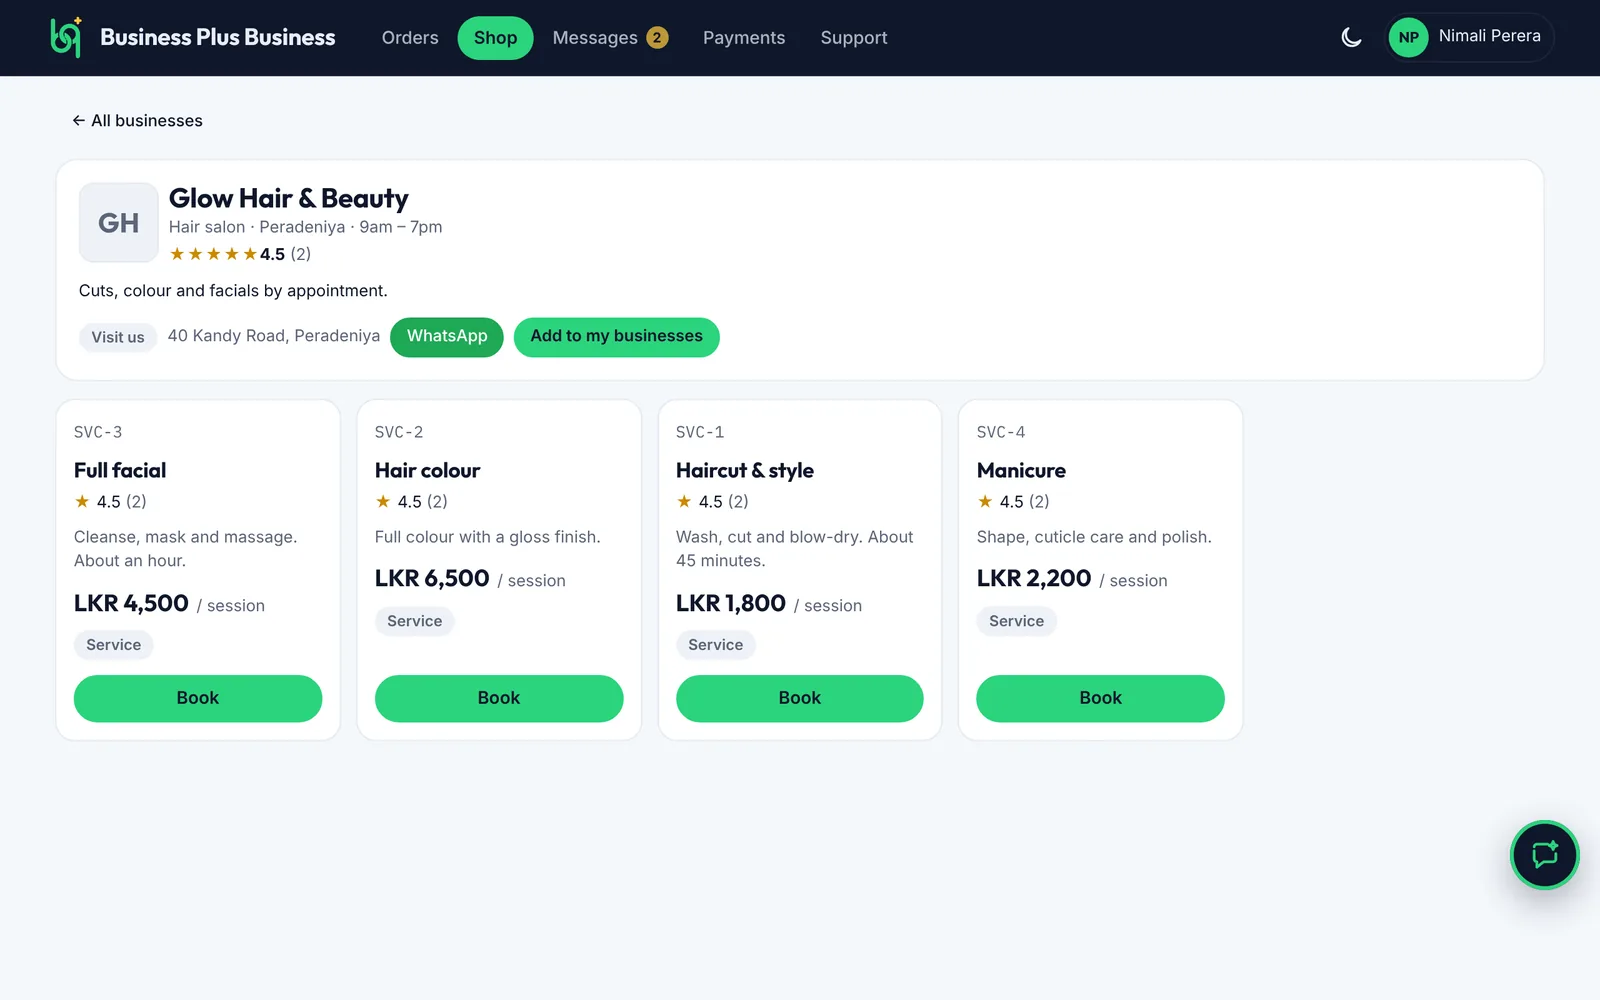
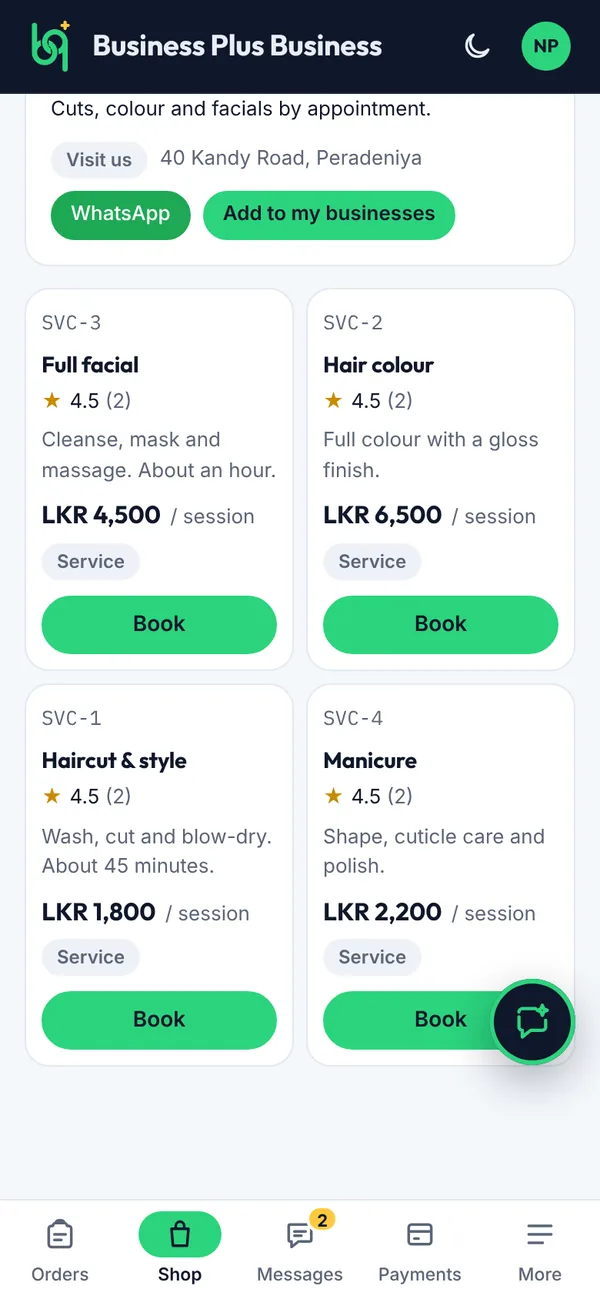
Figure 4.40A salon's services in the Shop
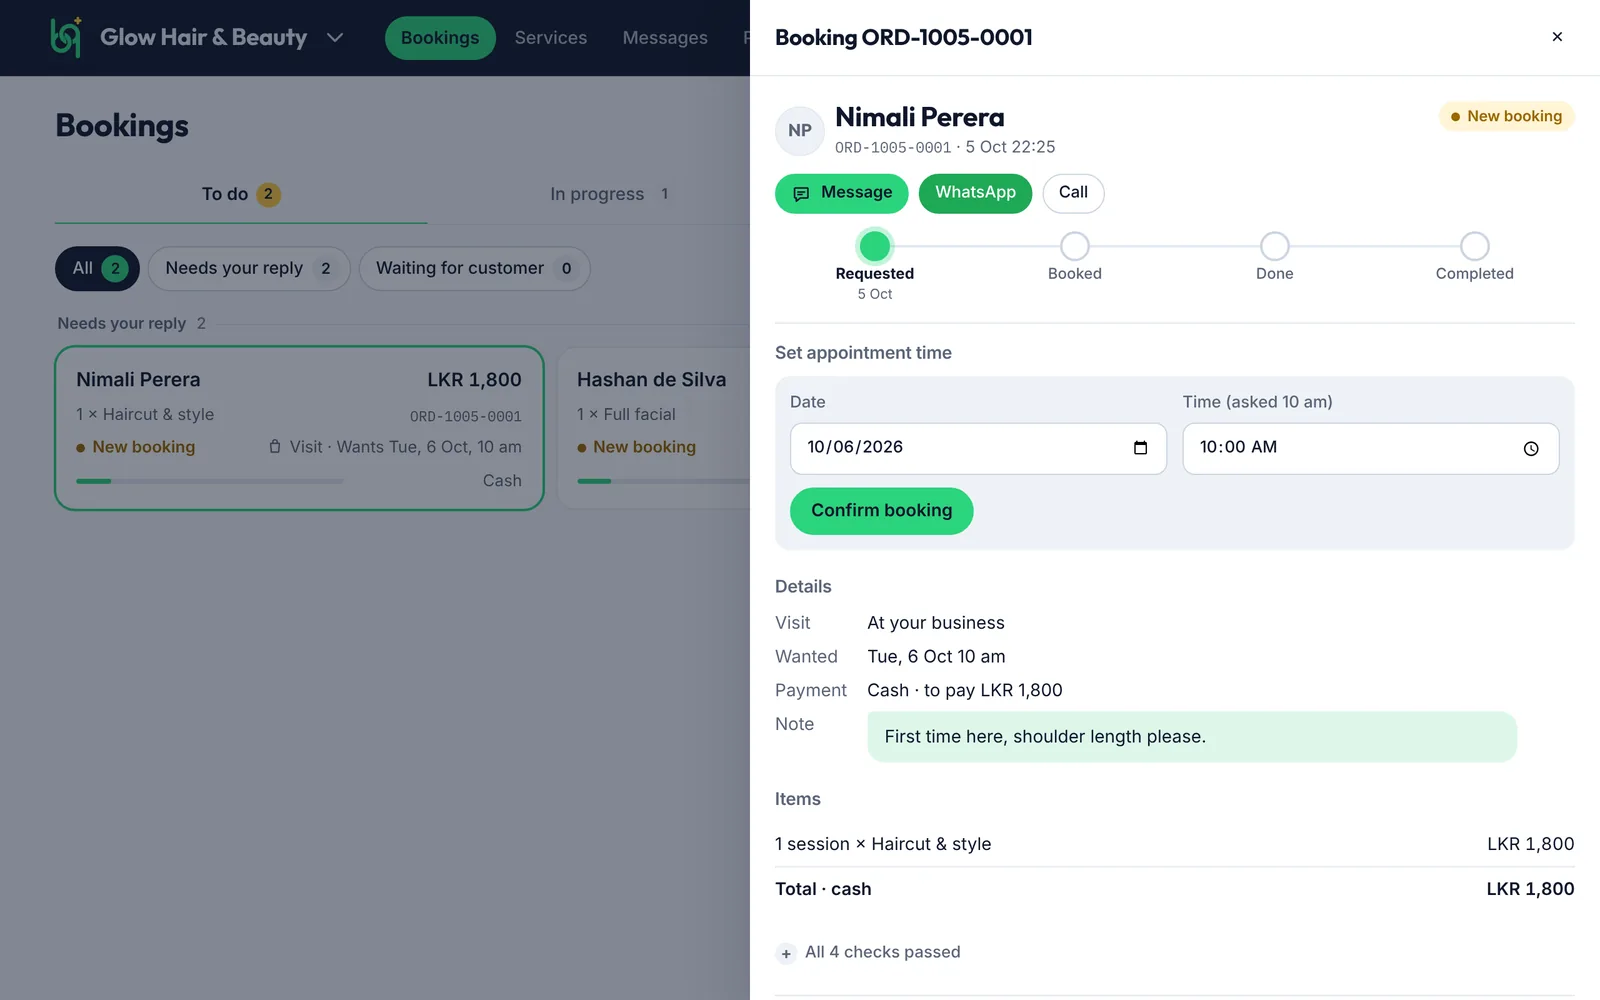
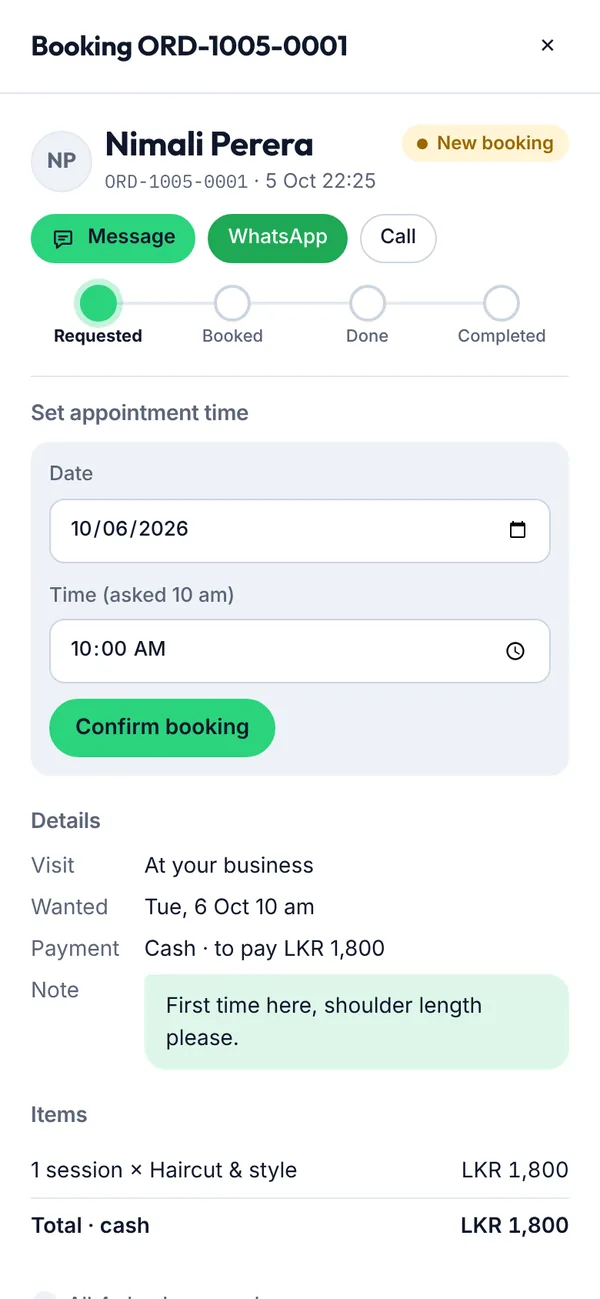
New requests appear in Bookings, which opens on your calendar. Open one, set the time and tap Confirm booking (or Confirm visit for a visit at their place).
When the service is done, tap Service done (or Done for a visit) and record the payment, as with any order.
Figure 4.41Bookings for a salon
What you’ll see
Your menu shows Bookings and Services instead of Orders and Products, and there is no Drivers page. A business that sells both has a Products & services page instead, and keeps Drivers for its products.
4.27How to do visits at the customer's place (no driver)
A service you do at the customer's home needs no driver. You set one visit charge for the whole business, and choose who goes when you confirm each visit: you or one of your sub-owners.
Steps
Open My business → Home visits, enter your Visit charge and tap Save. It's added once to every visit, whatever the service. Enter 0 for free visits.
On each service that you do at the customer's place, tick At the customer's place (in the Add service questions, or Edit → Where).
When a customer books with Come to me, open the booking. Choose the date and time, then under Who's going? tap yourself or a sub-owner, and tap Confirm visit. The person going gets a notice with the address.
On the day, tap On the way, then Started when you begin, and Done when you finish. The customer gets a message at each step.
What you’ll see
Visits show in pink on your calendar. Products still use your delivery fee and your drivers.
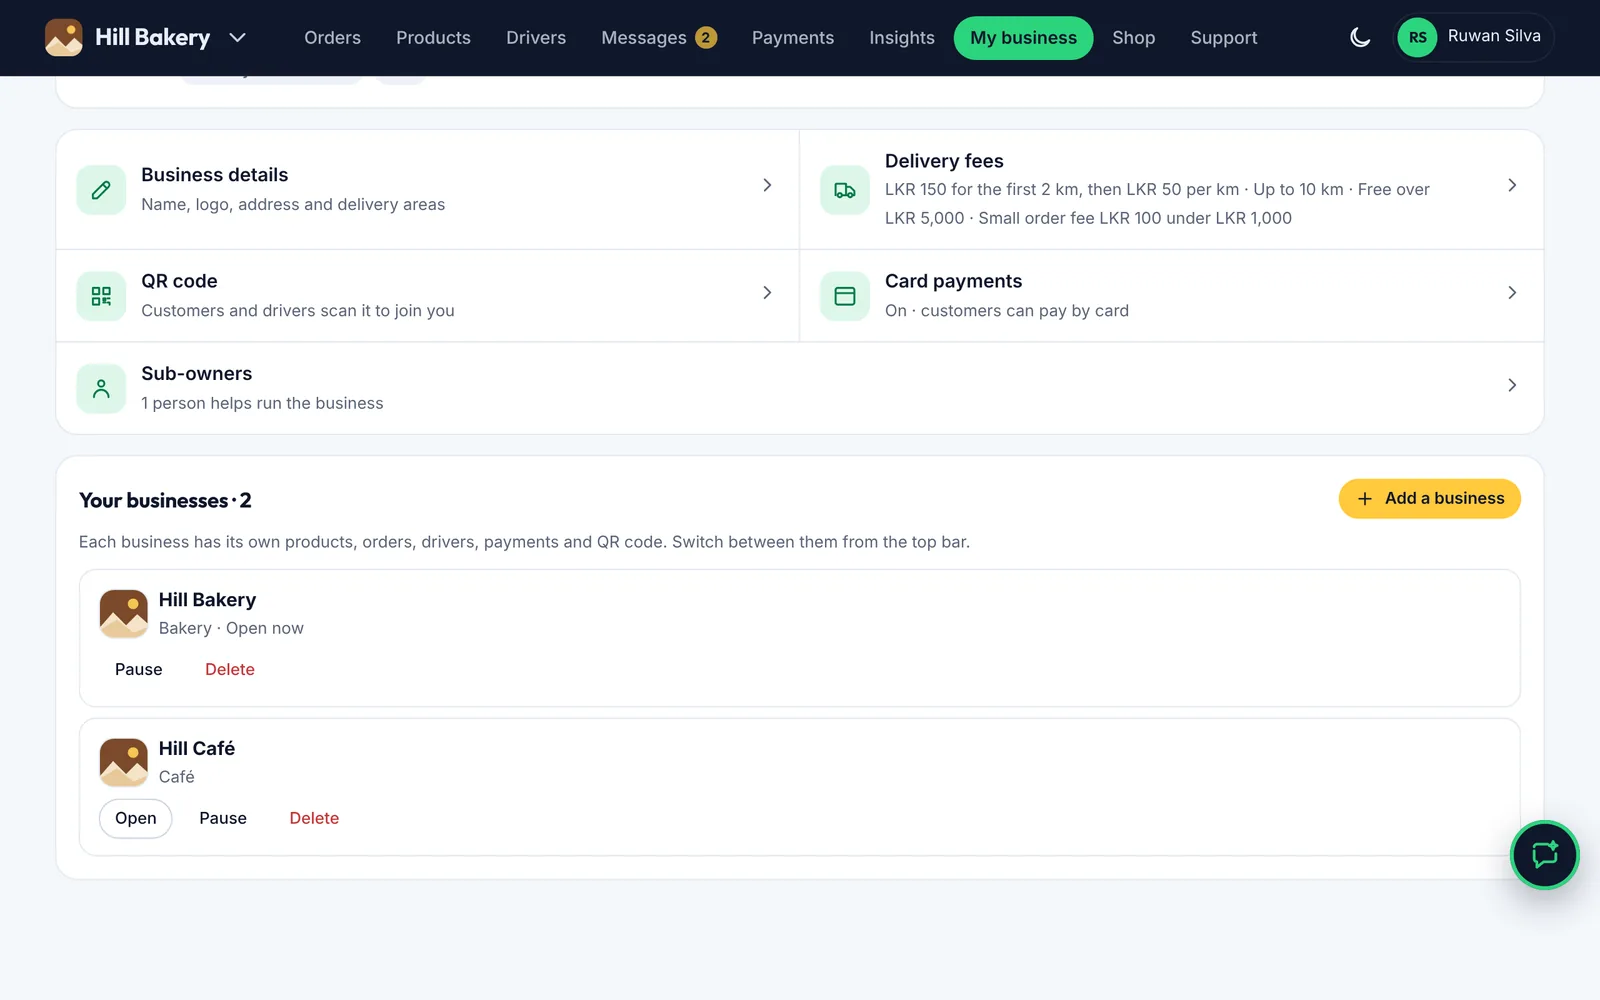
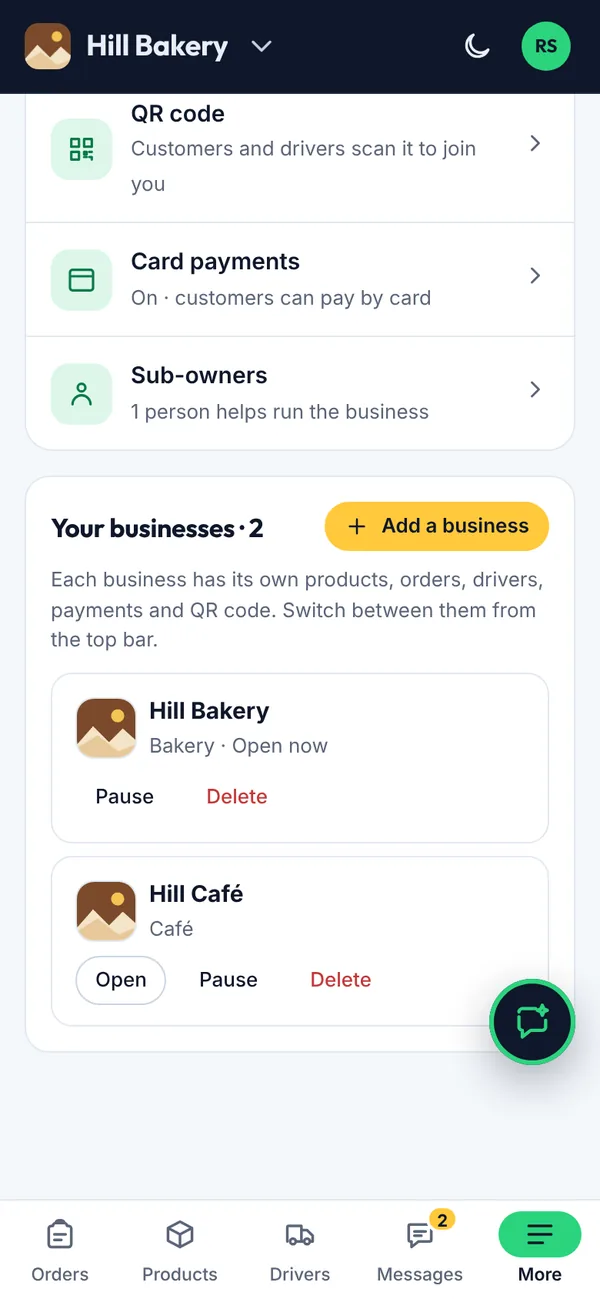
One account can run several businesses, for example two branches, or a bakery and a café. Each business has its own products, orders or bookings, drivers, payments, QR code and settings.
Steps
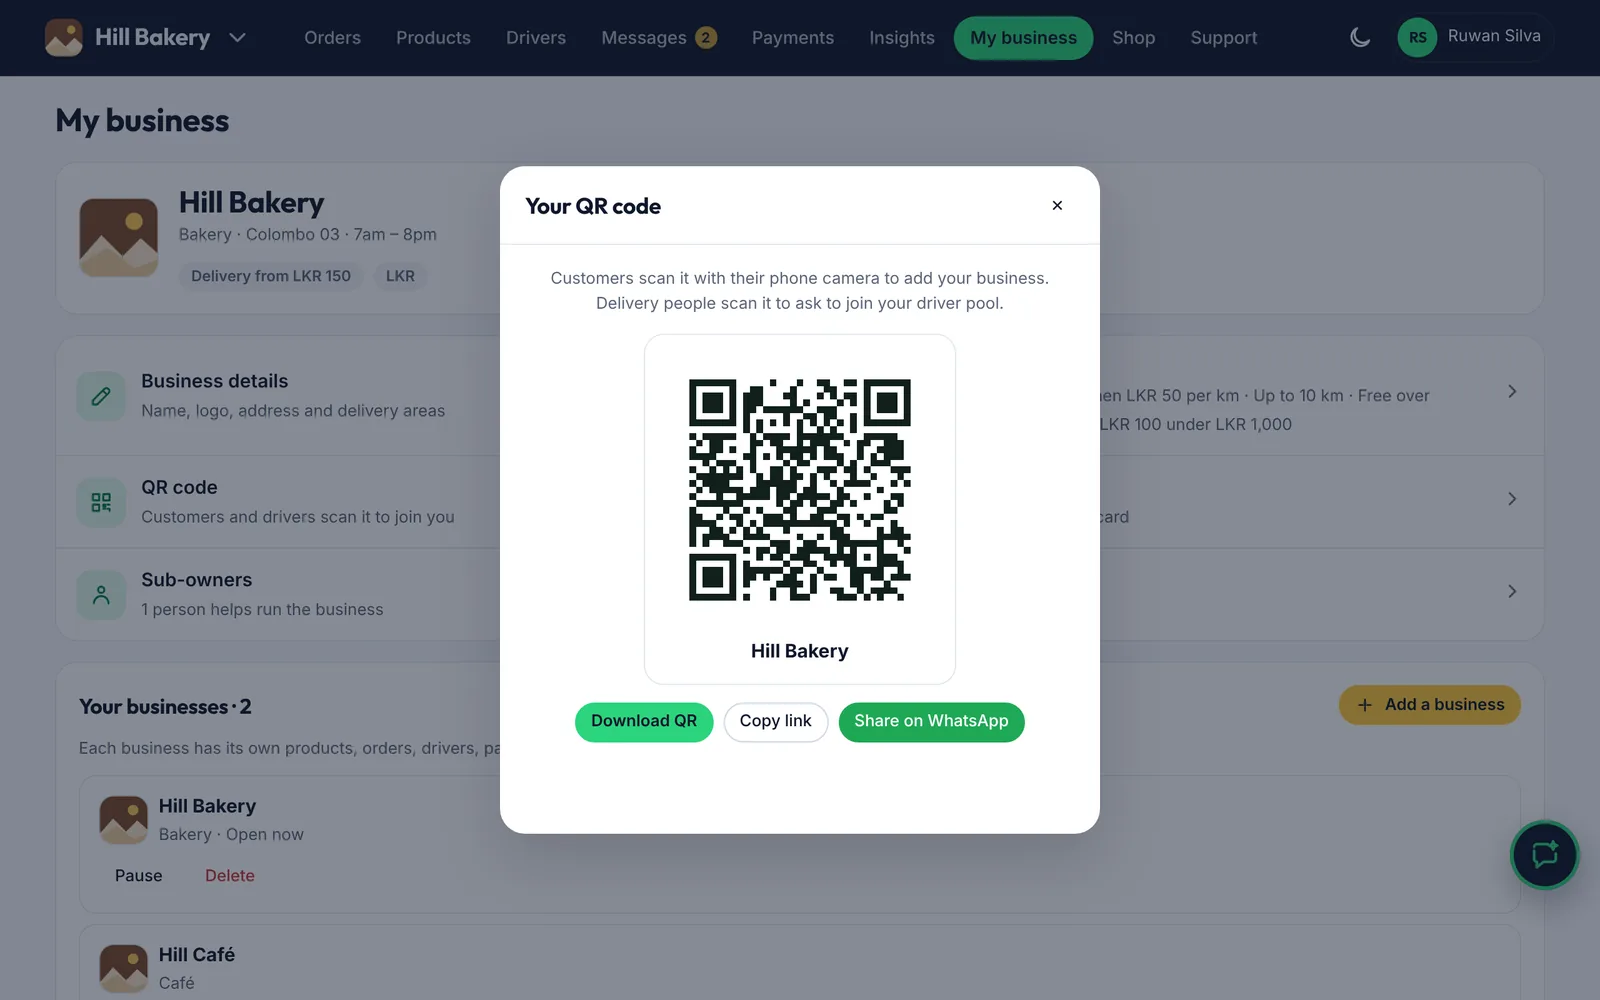
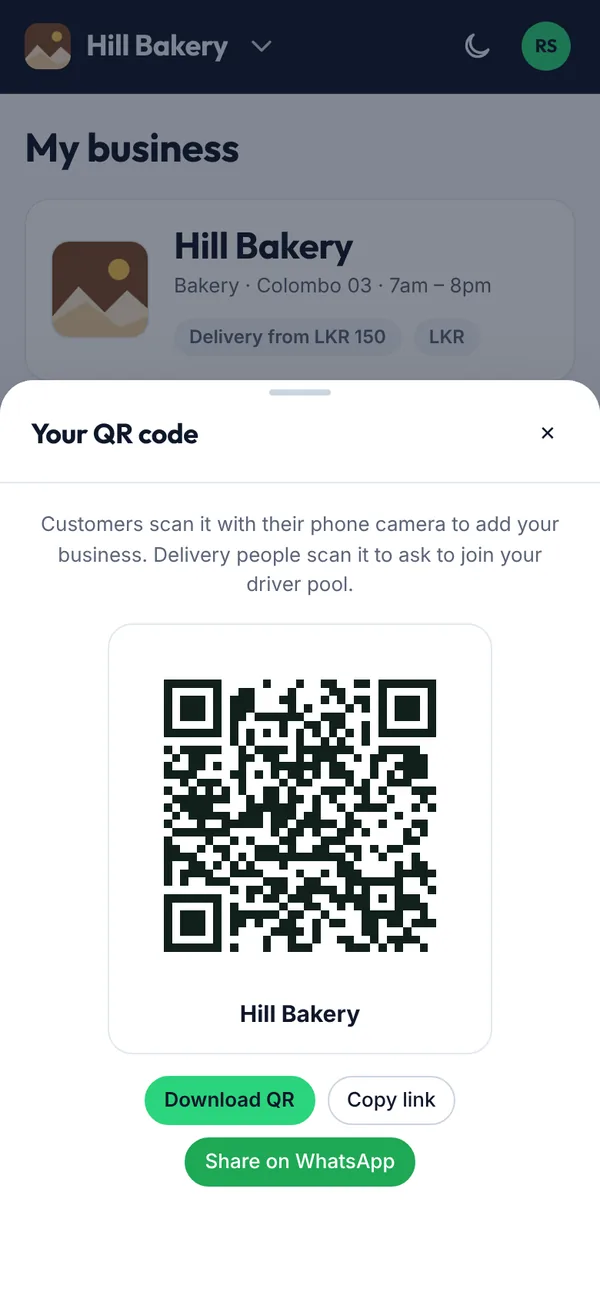
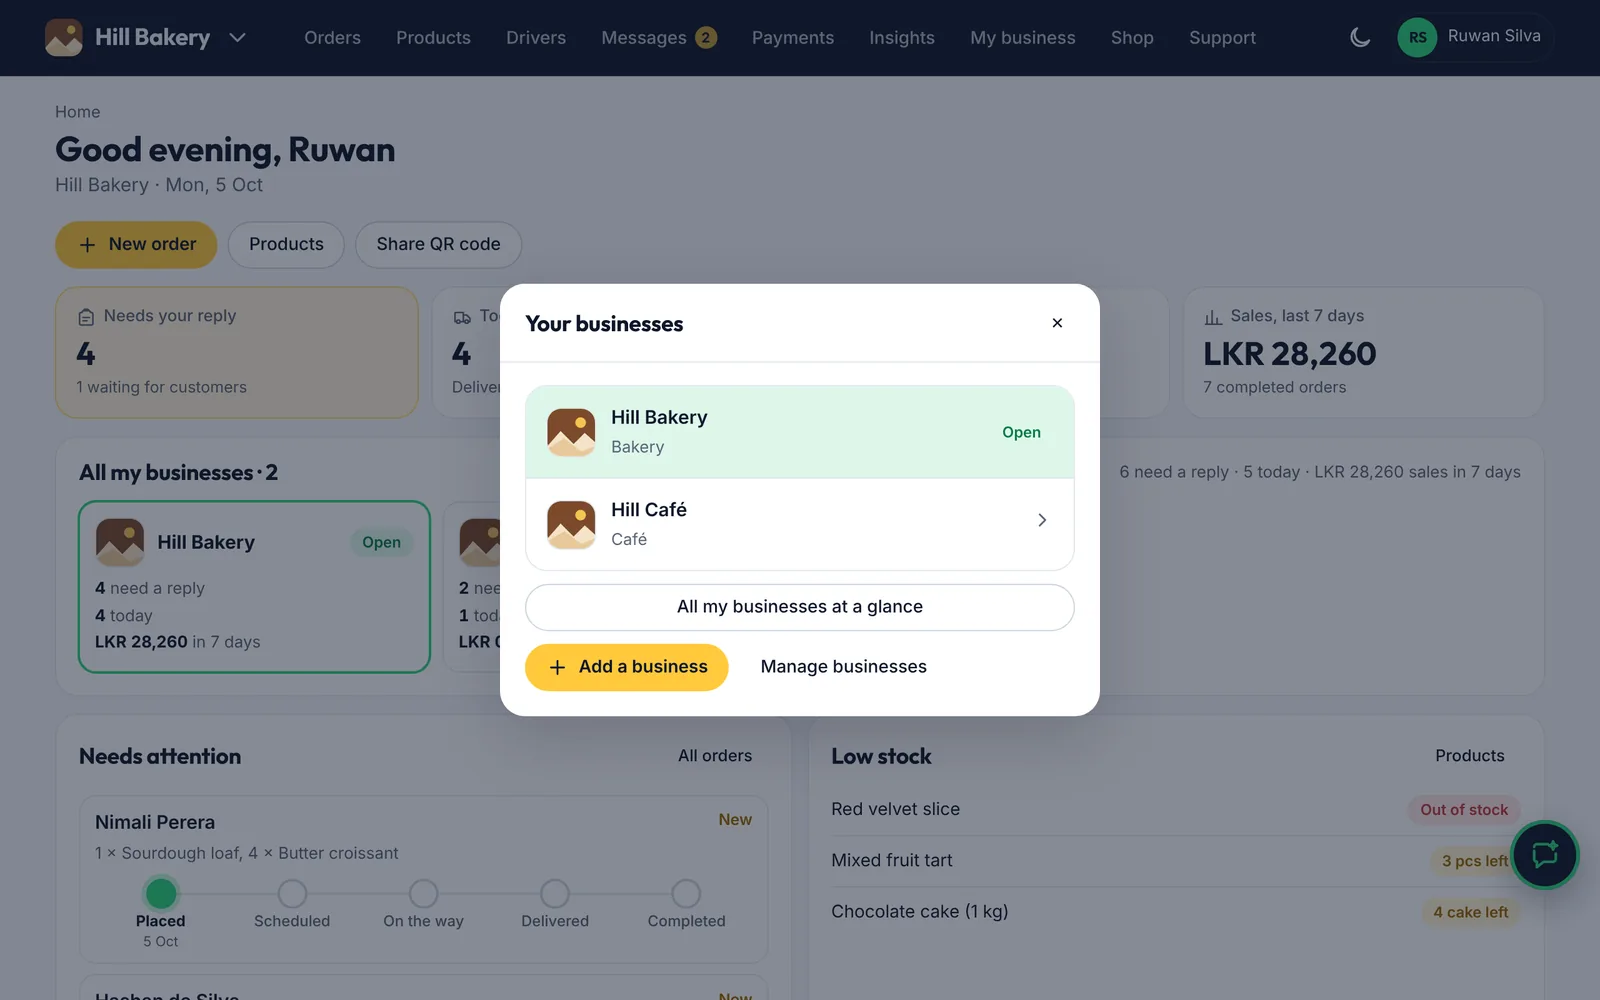
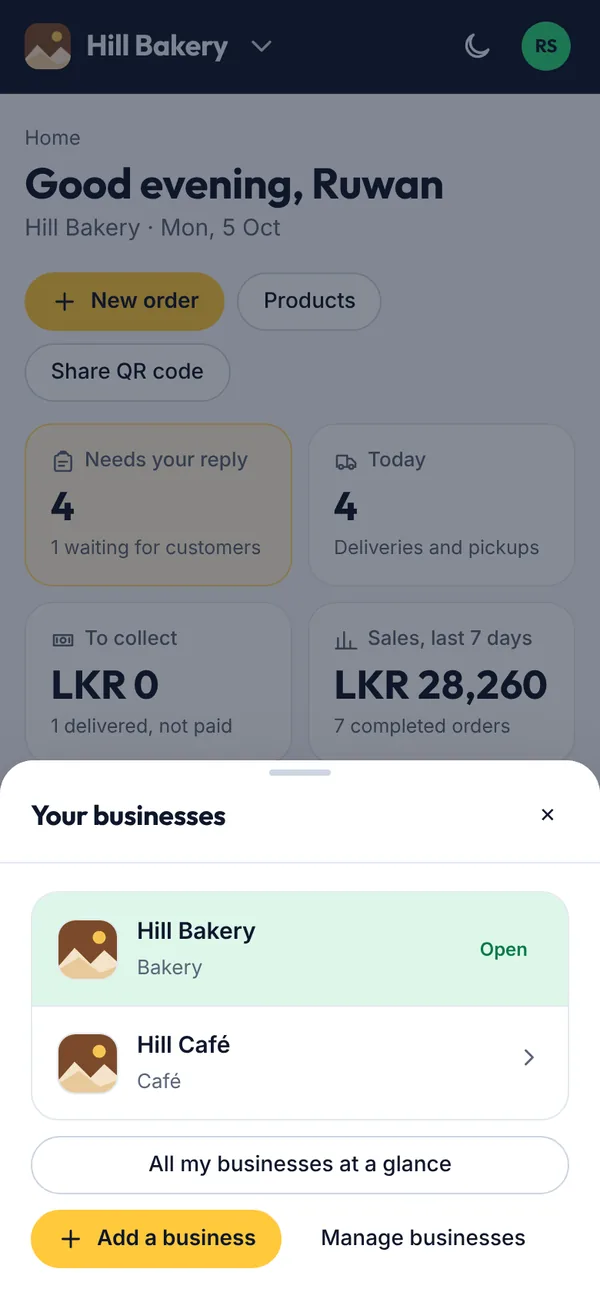
Tap the small arrow next to your business name at the top to see your businesses.
Tap a business to switch to it. The app remembers which one you last used.
Tap Add a business and fill in the short form. The new business opens straight away.
Figure 4.42Switching between your businesses
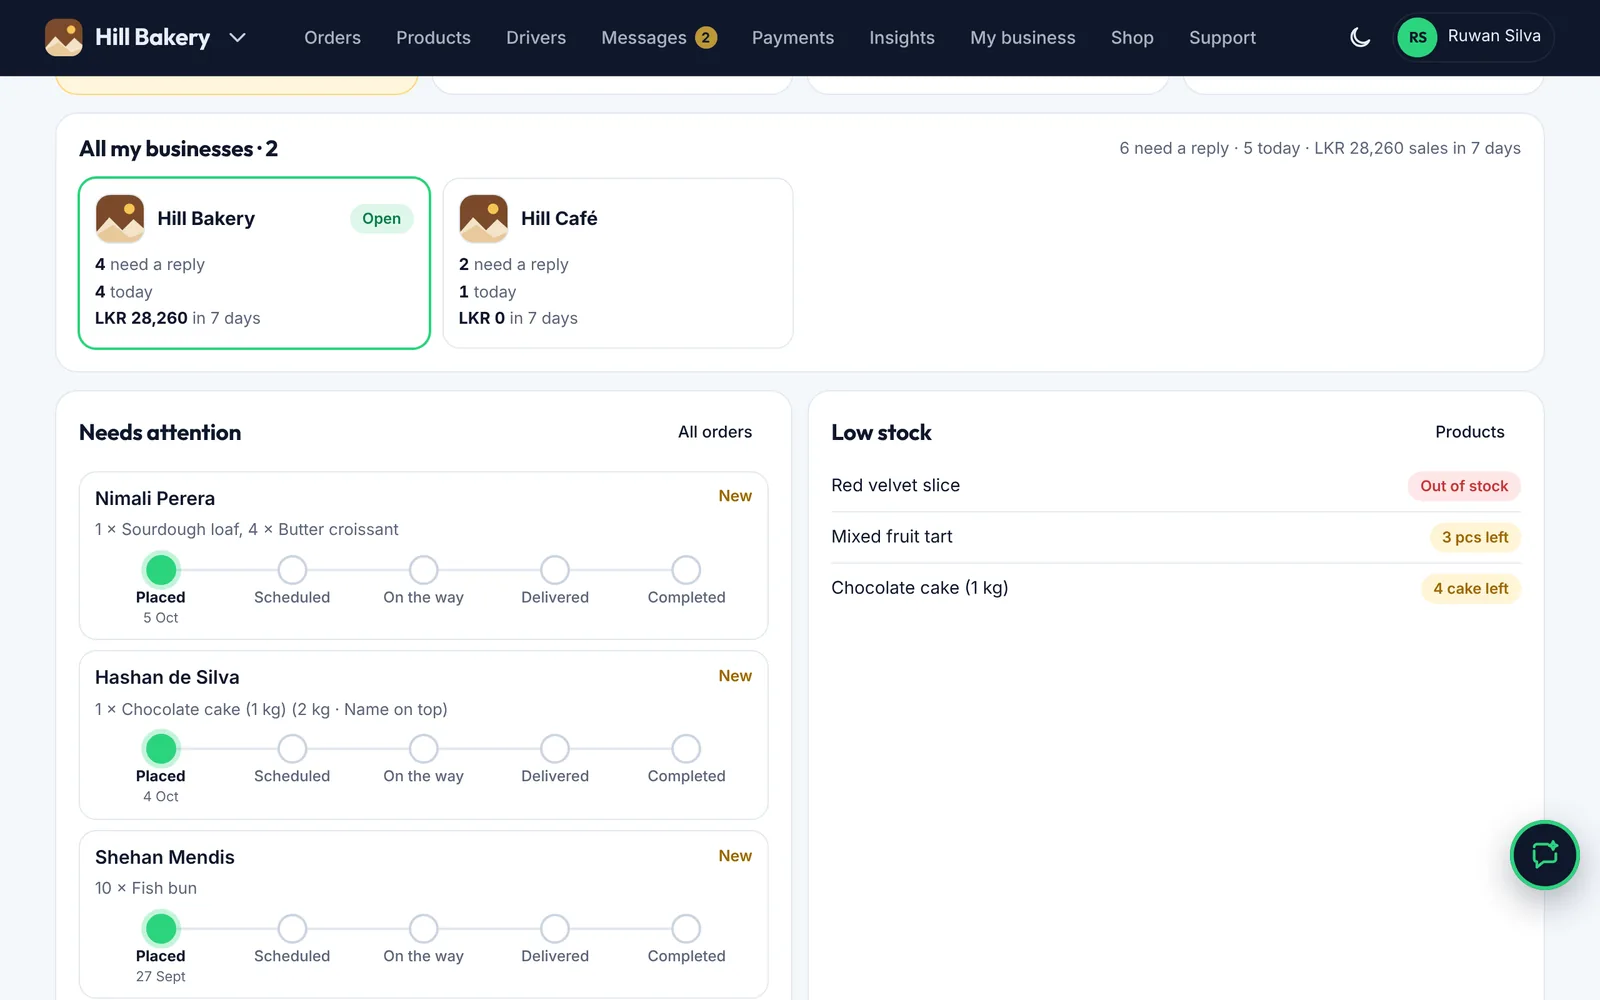
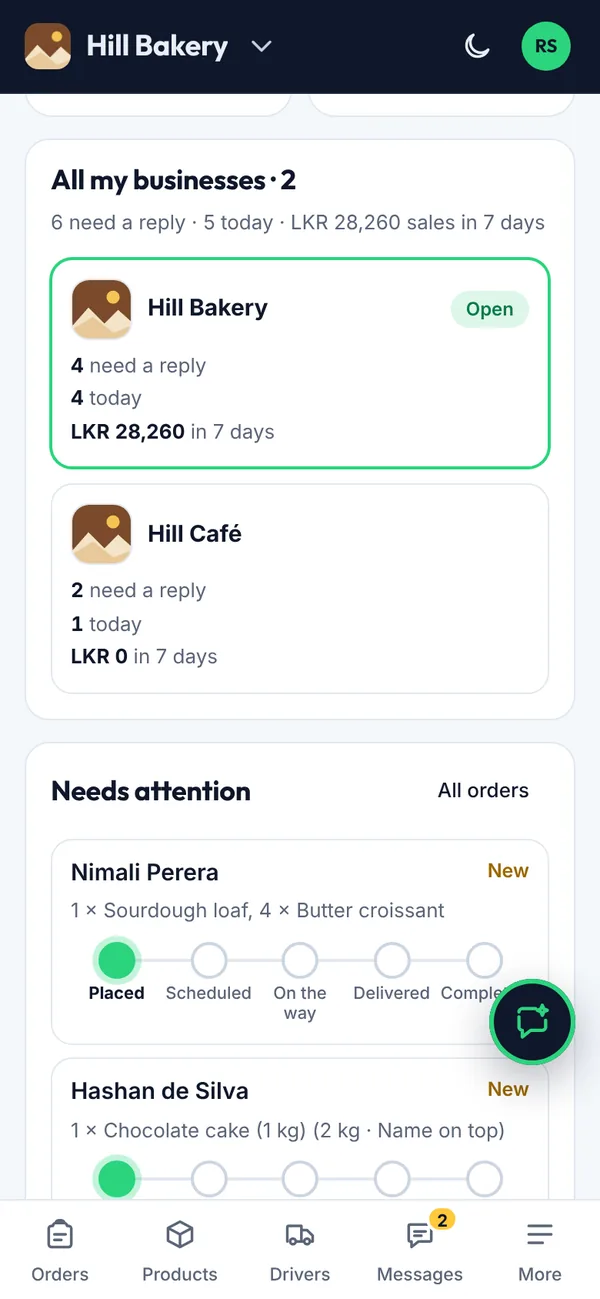
On Home, All my businesses shows each one's new orders, today's work and sales. Tap one to open it.
Figure 4.43All my businesses on Home
On Orders, choose All my businesses to see every order together. The business name shows on each order.
Figure 4.44Orders from all your businesses
To pause a business (hidden from the Shop, no new orders), open My business, find Your businesses and tap Pause. Tap Switch back on any time.
To delete one, tap Delete and type its name to confirm. All its orders must be finished and its payments settled first. You can restore it from the same list for 30 days; after that it's removed for good.
Figure 4.45Pausing or deleting a business
Sub-owners
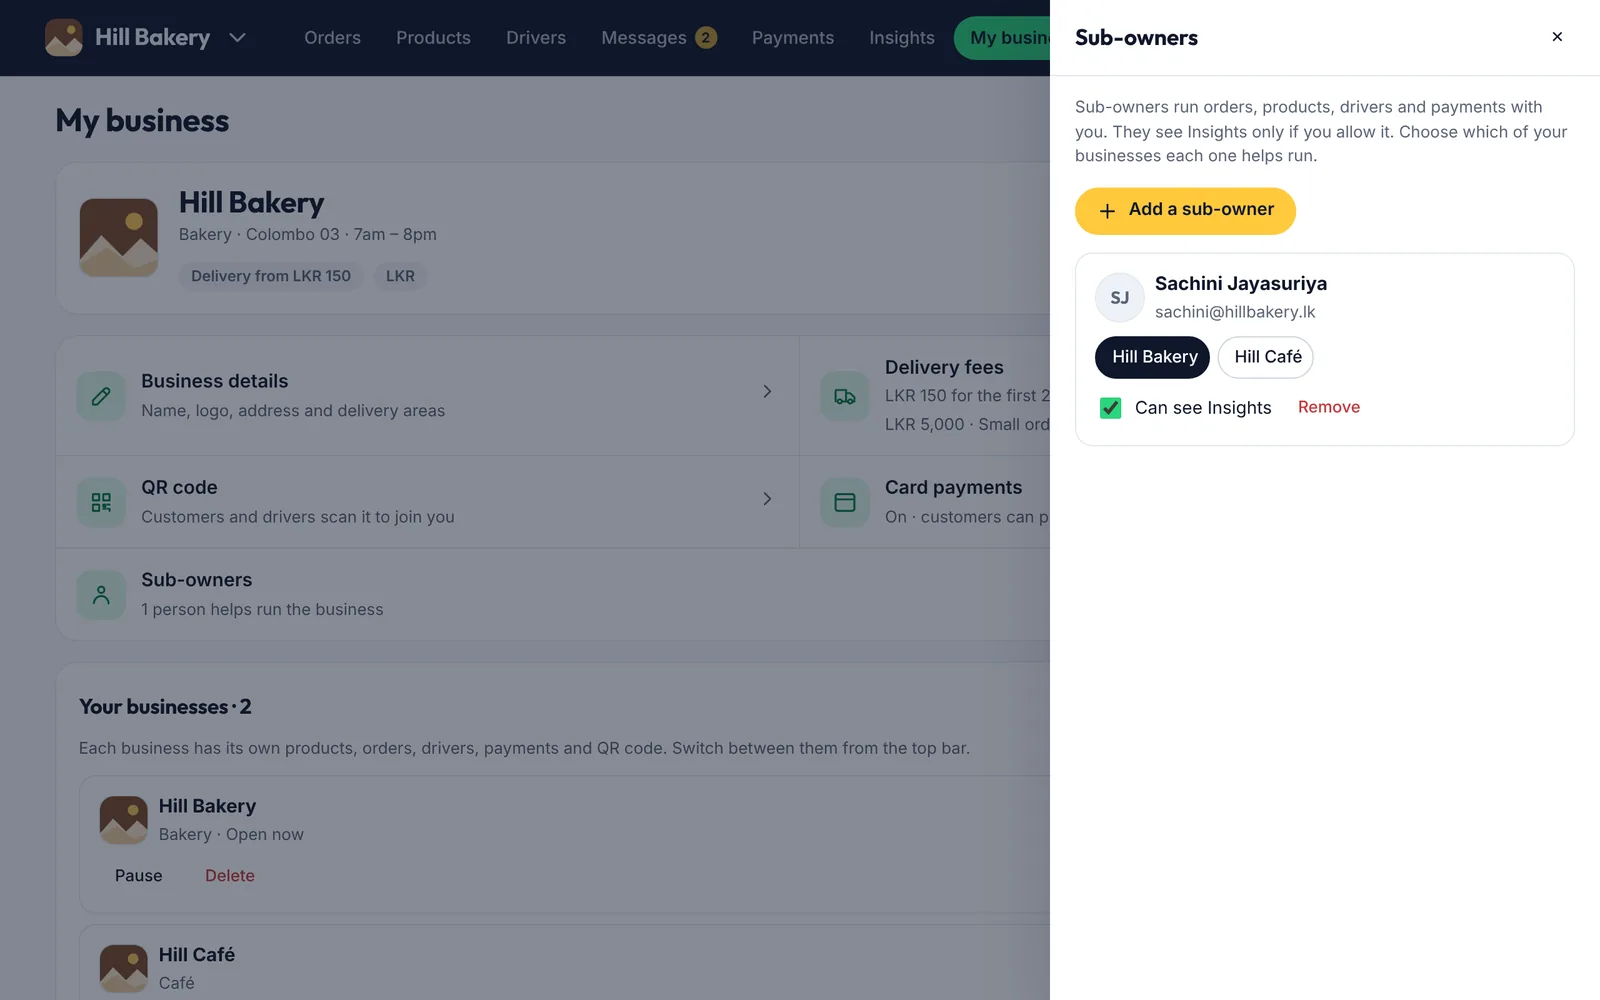
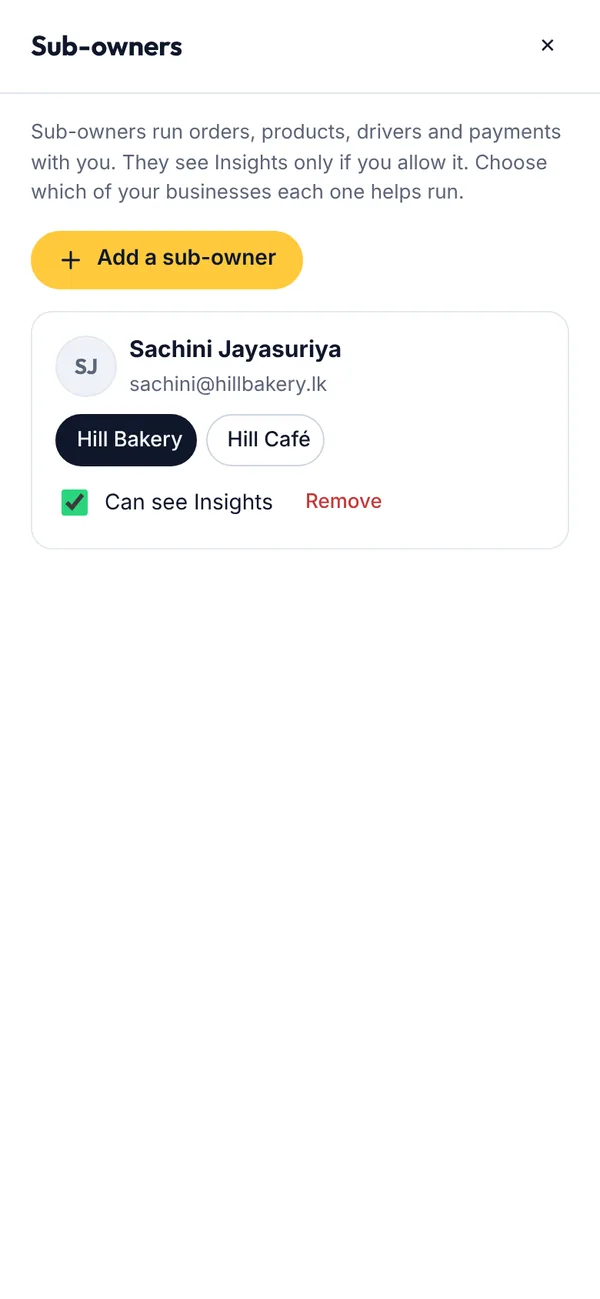
Only you, the owner, can add, pause, delete or restore businesses. Under My business → Sub-owners you choose which of your businesses each sub-owner helps run.
Group what you sell into categories (for example Bread, Pastries and Cakes), mark specials, and let customers choose sizes and extras.
Steps
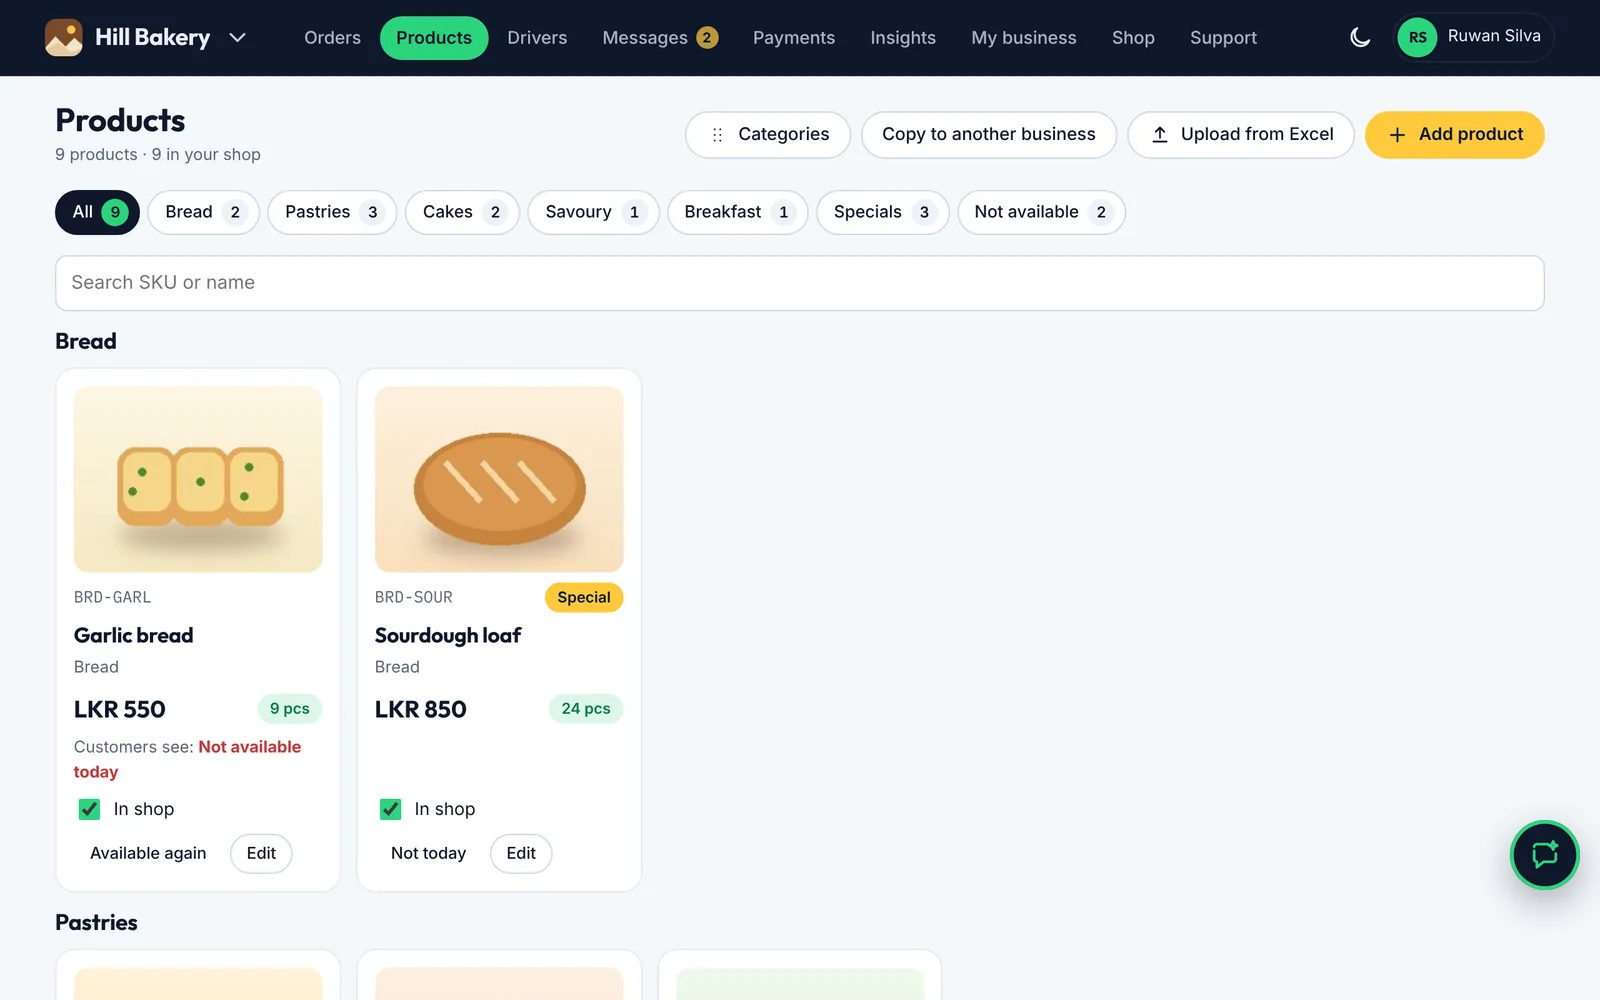
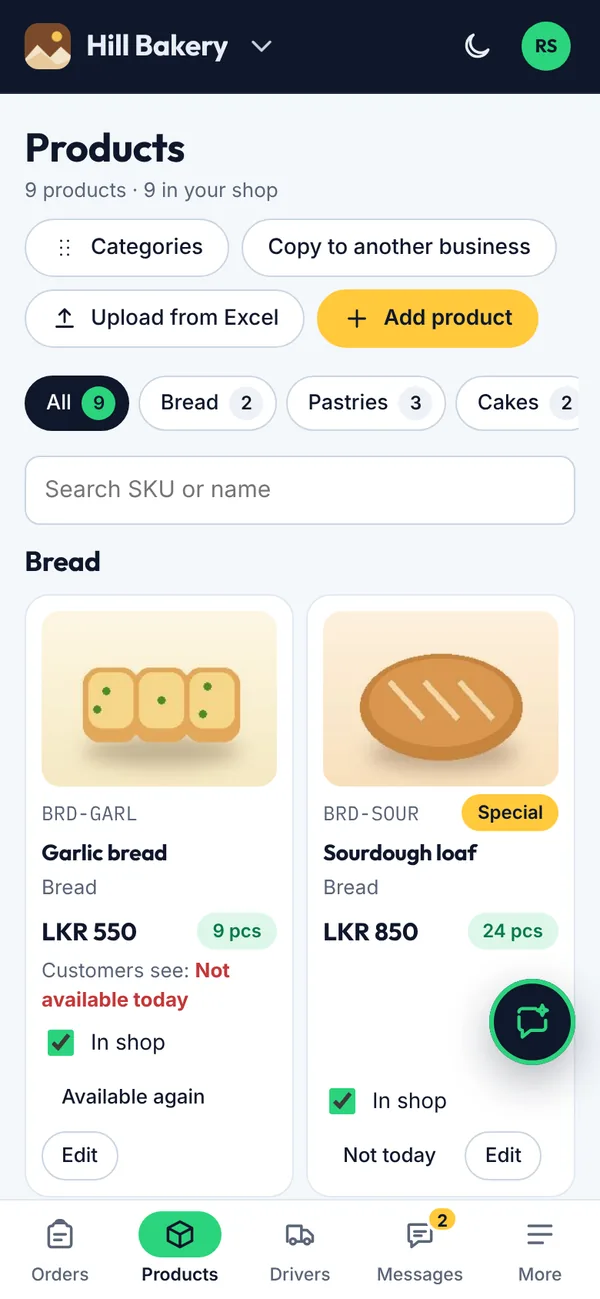
Open Products and tap Categories. A new business starts with suggested categories for its type. Add, rename, reorder (arrows), hide or delete them.
When something runs out for the day, tap Not today on it. Customers see “Not available today” and can't add it; it comes back by itself the next morning.
Running another business with the same items? Tap Copy to another business to copy products, with their categories and options.
Figure 4.46Products with categories and what customers see
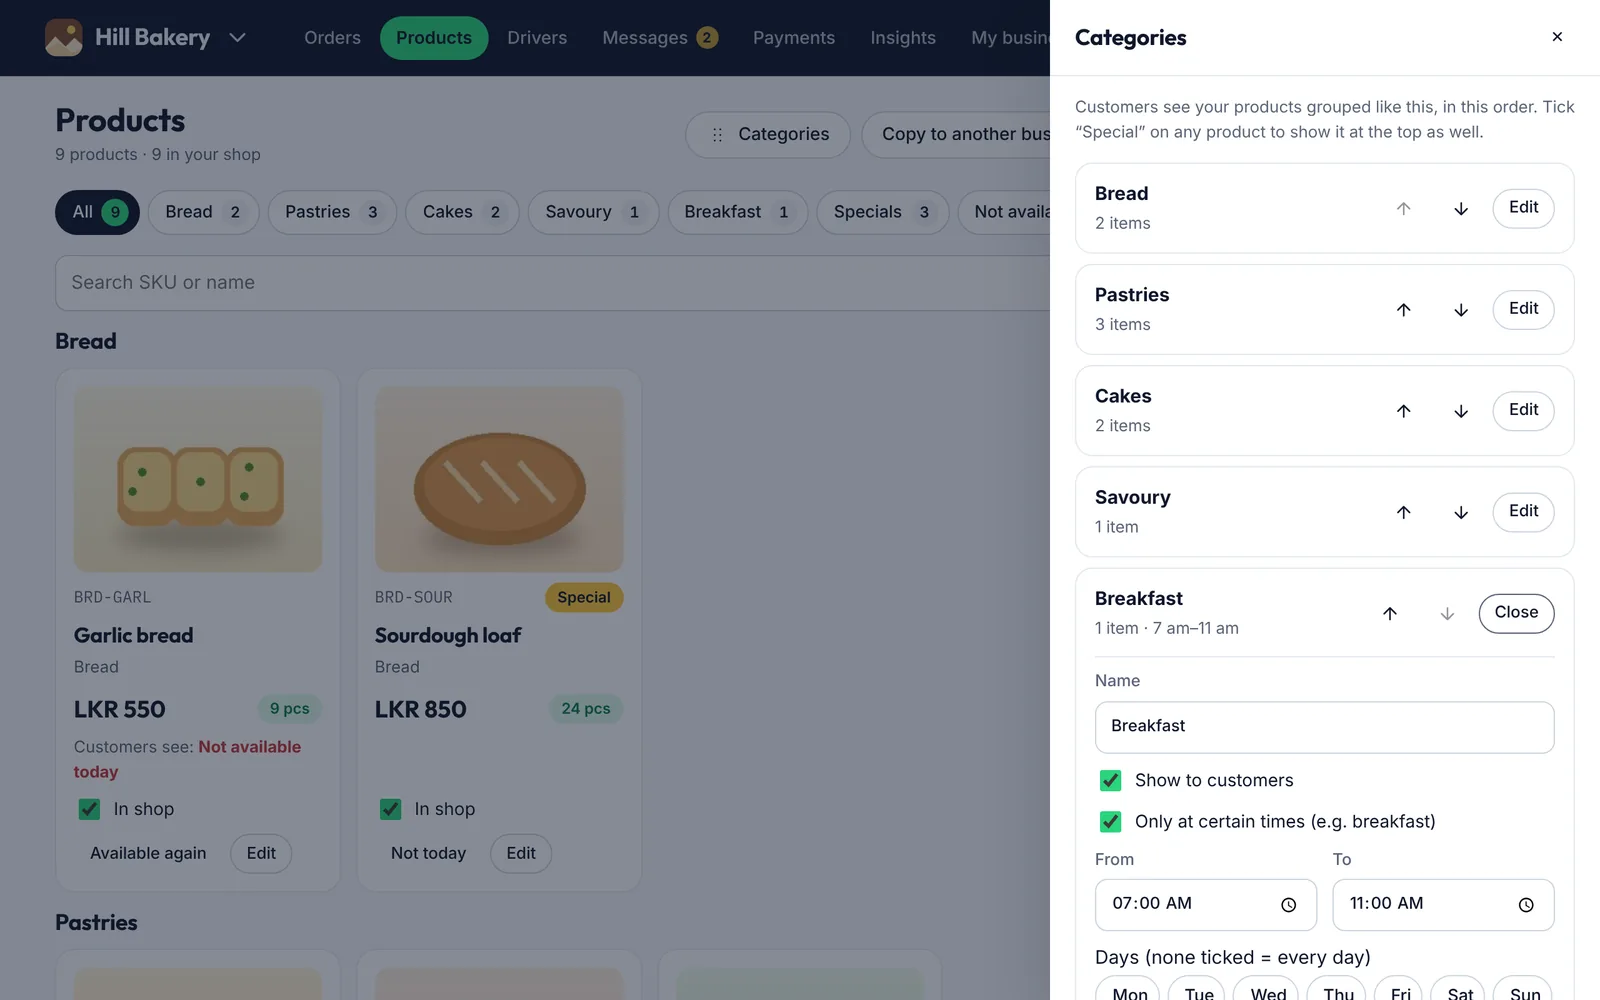
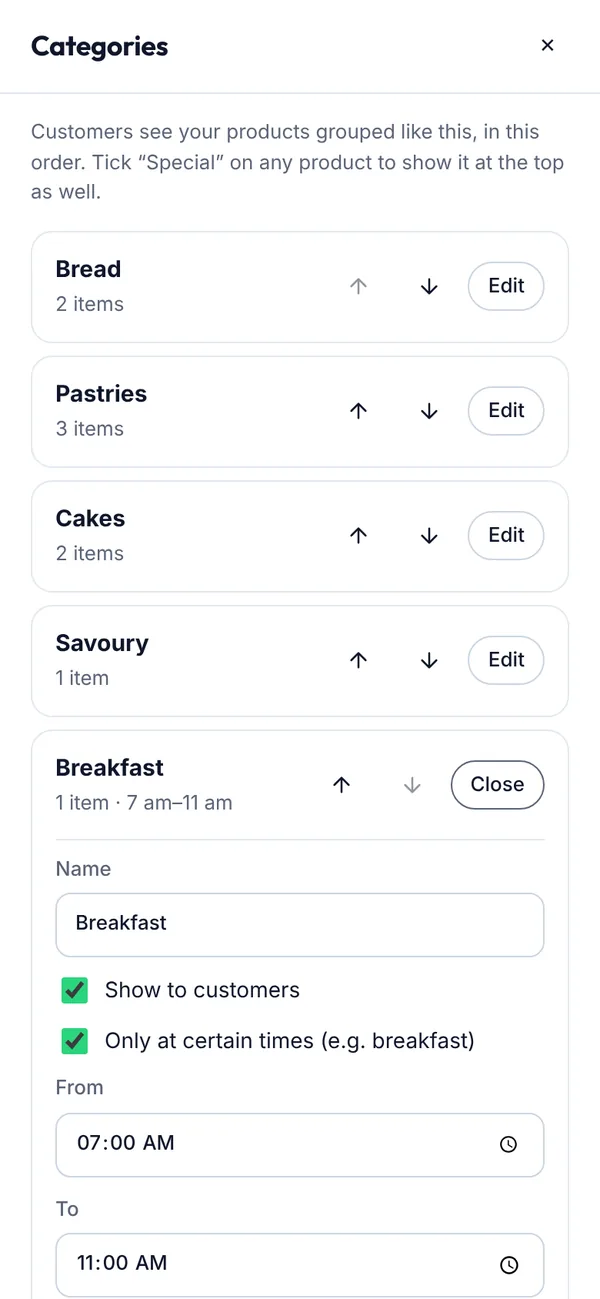
To serve a category only at certain times, tap Edit, tick Only at certain times and set the hours and days (for example breakfast 7–11 am). Customers can still order those items for a time inside the hours.
Figure 4.47Setting hours for a category
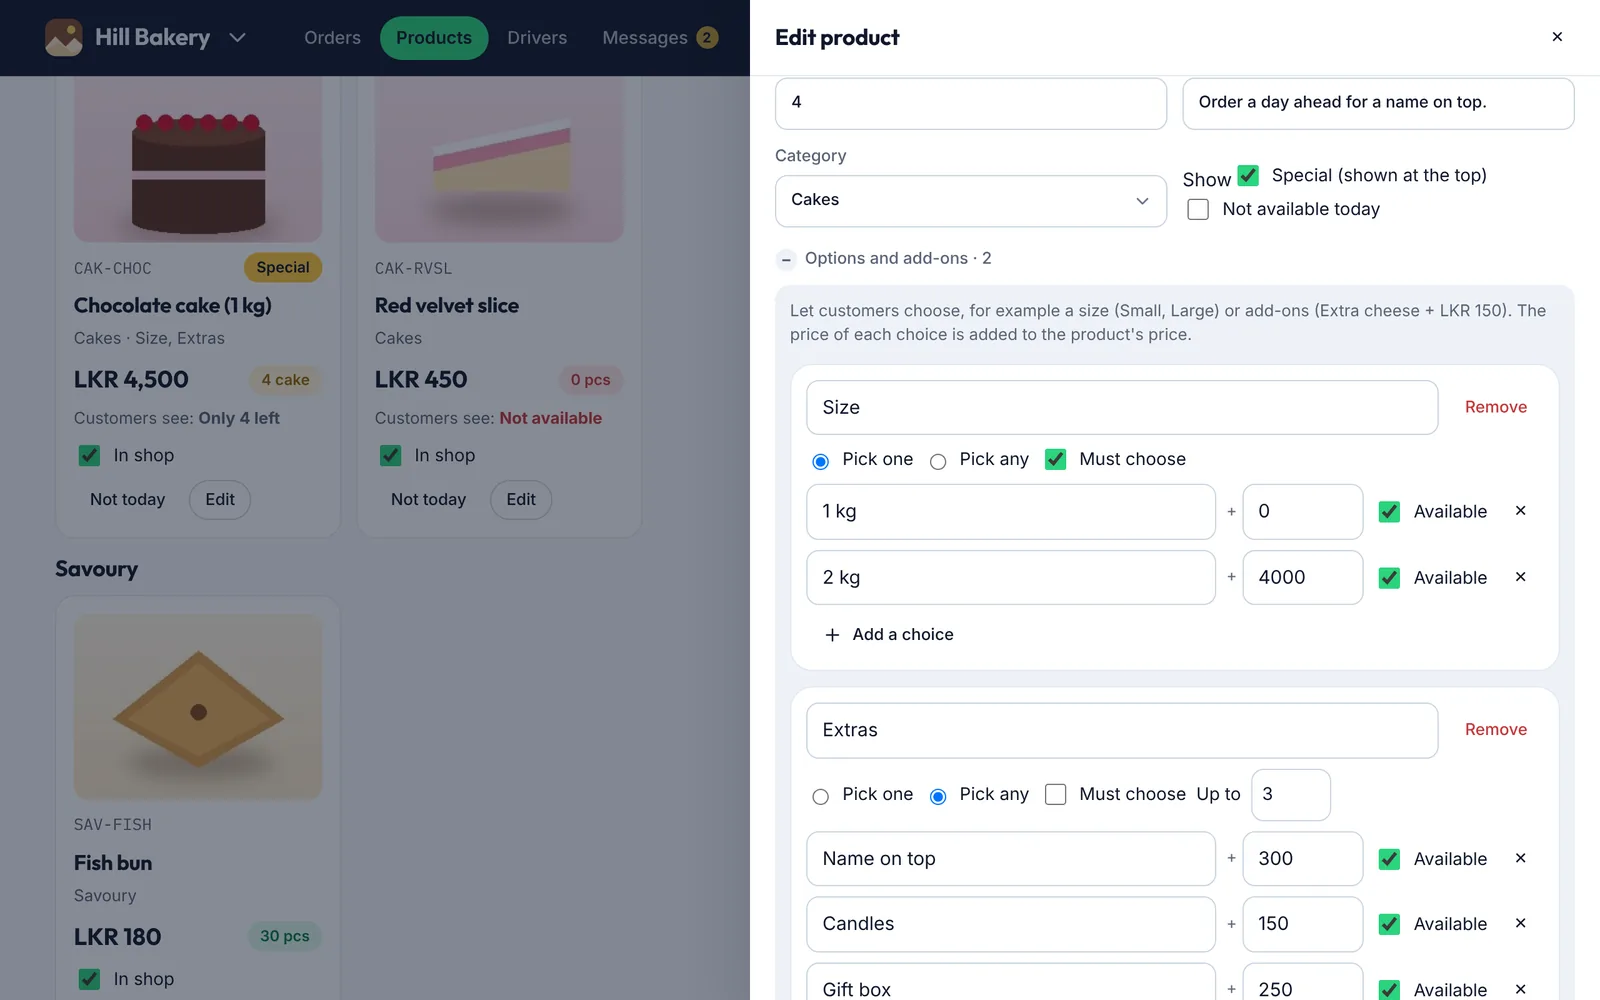
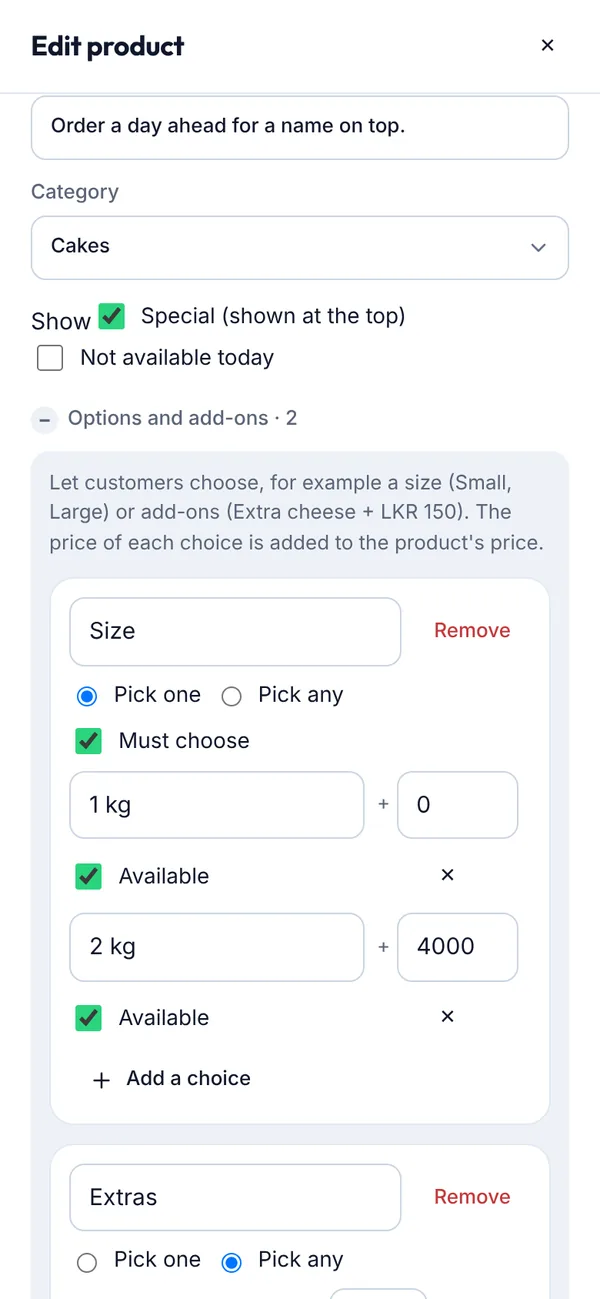
In a product, choose its Category. Tick Special to show it at the top of your shop as well.
Under Options and add-ons, tap + Sizes or + Add-ons, name each choice and add its extra price. Choose Pick one or Pick any, and tick Must choose when the customer has to pick one.
Figure 4.48A product's category, special tick and options
What you’ll see
Your shop shows category tabs, with Specials first. Items with no stock show “Not available”, and items with 5 or fewer left show “Only 3 left”. If something sells out while it's in a customer's cart, it's marked and left out of their order.
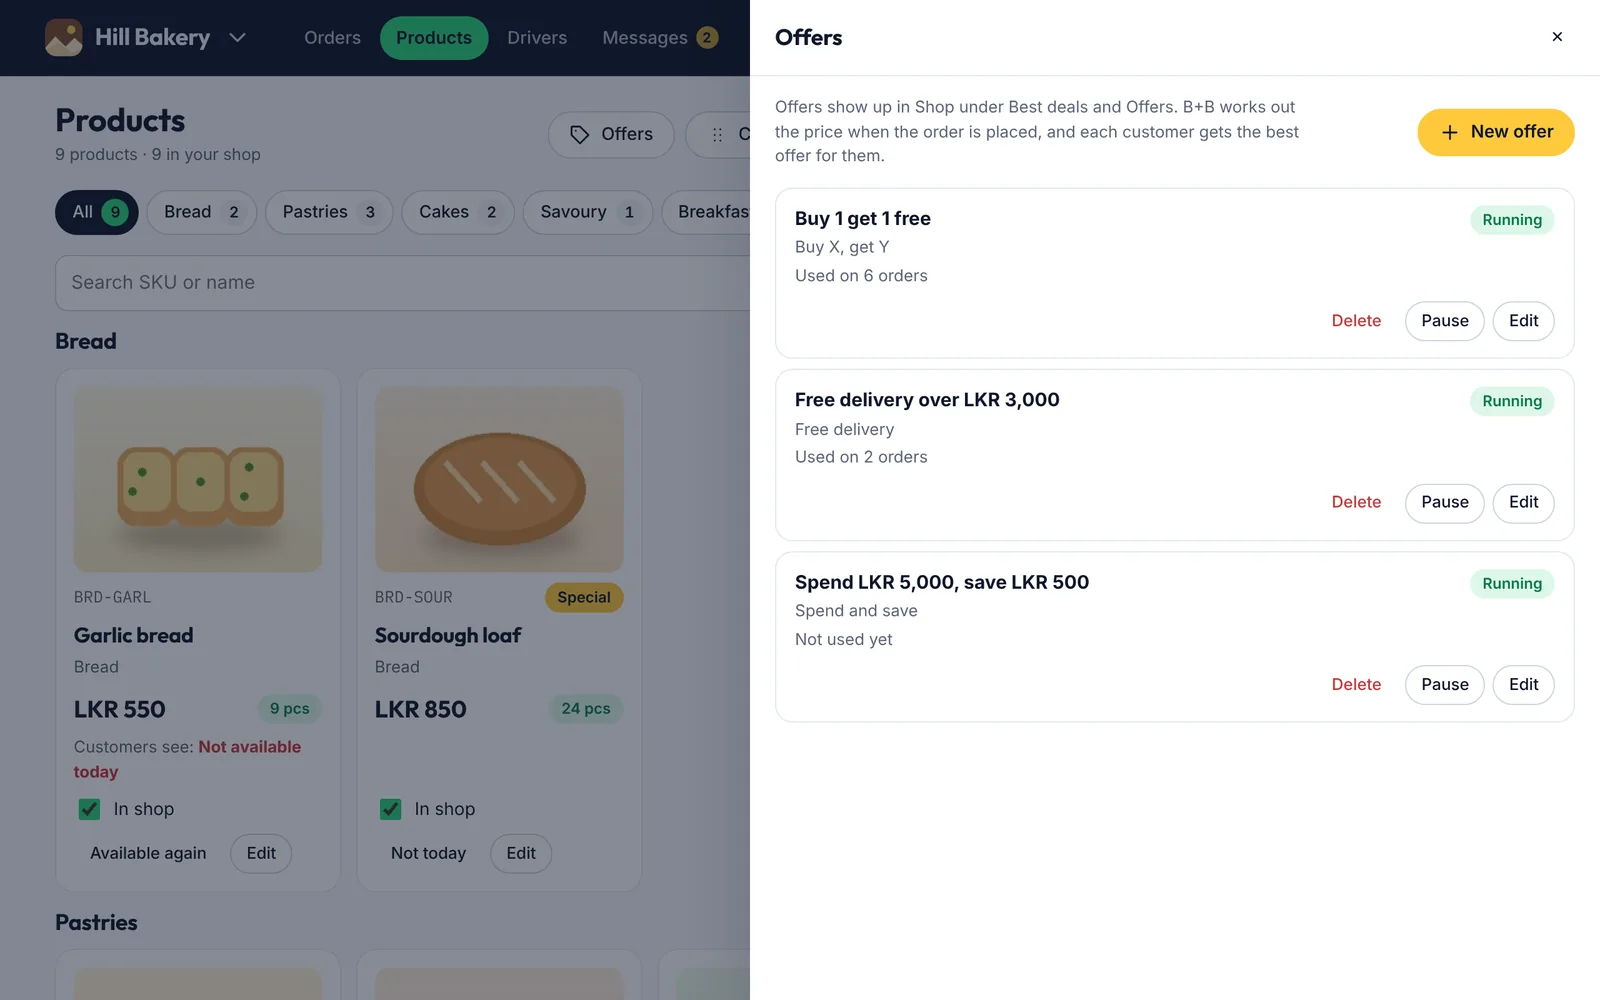
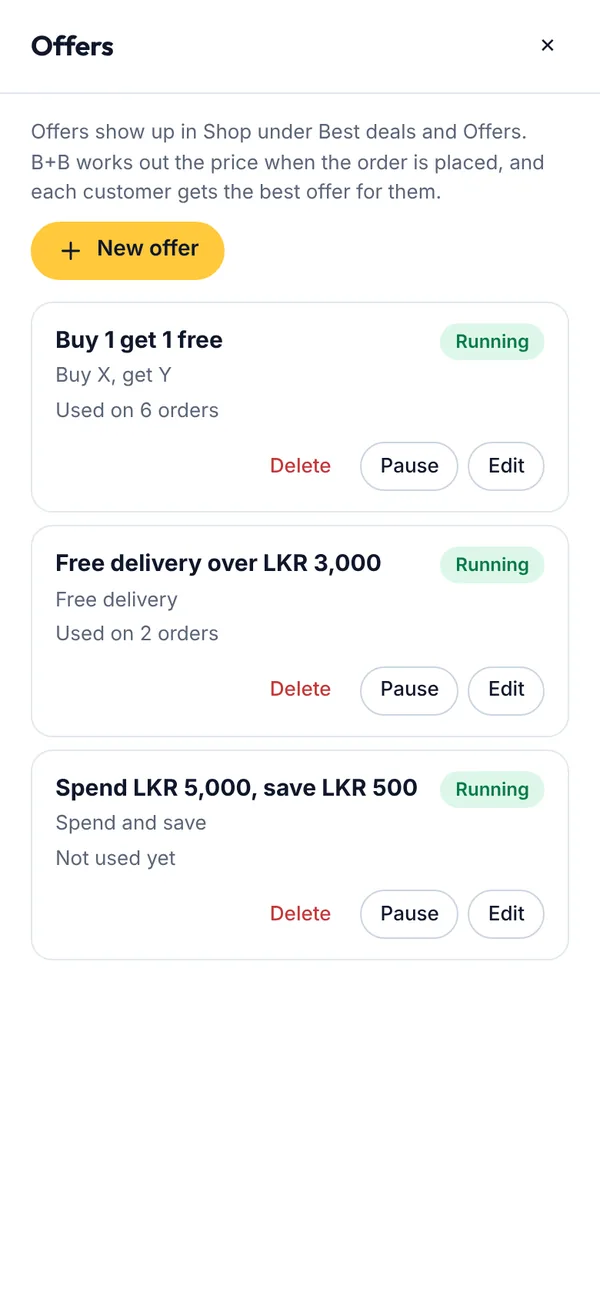
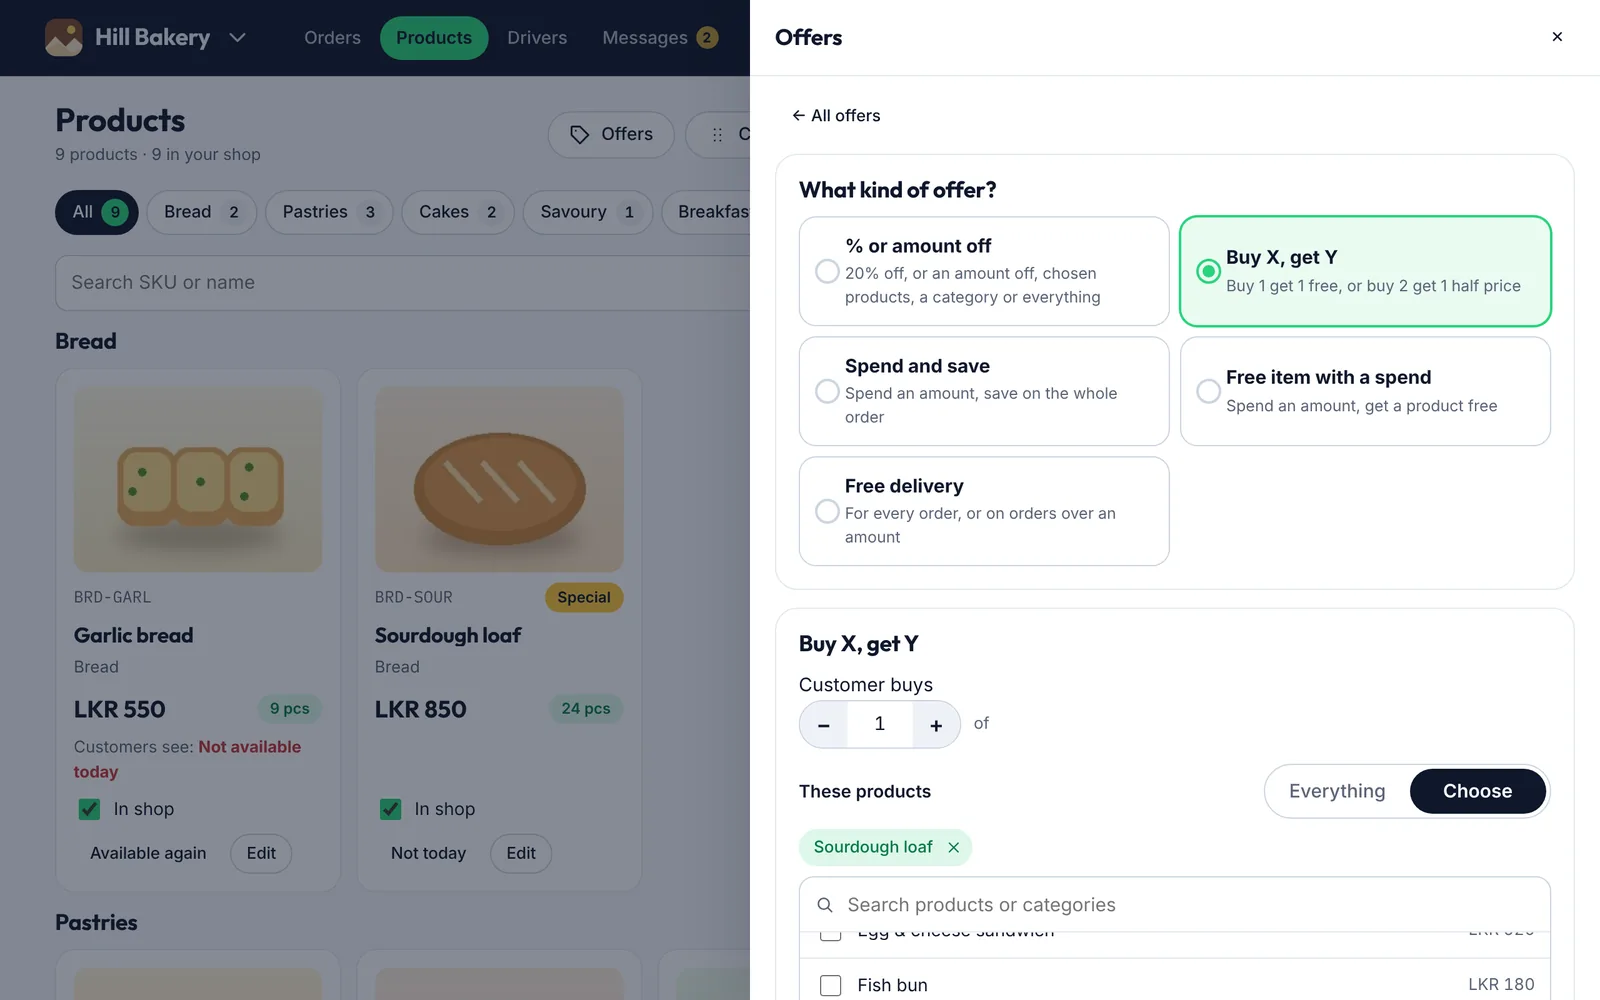
Offers bring customers in. They show first in Shop under Best deals and Offers and discounts, and B+B works out the price when each order is placed.
Before you start
Open Products and tap Offers.
Steps
Tap New offer.
Figure 4.49Your offers, with how many orders used each
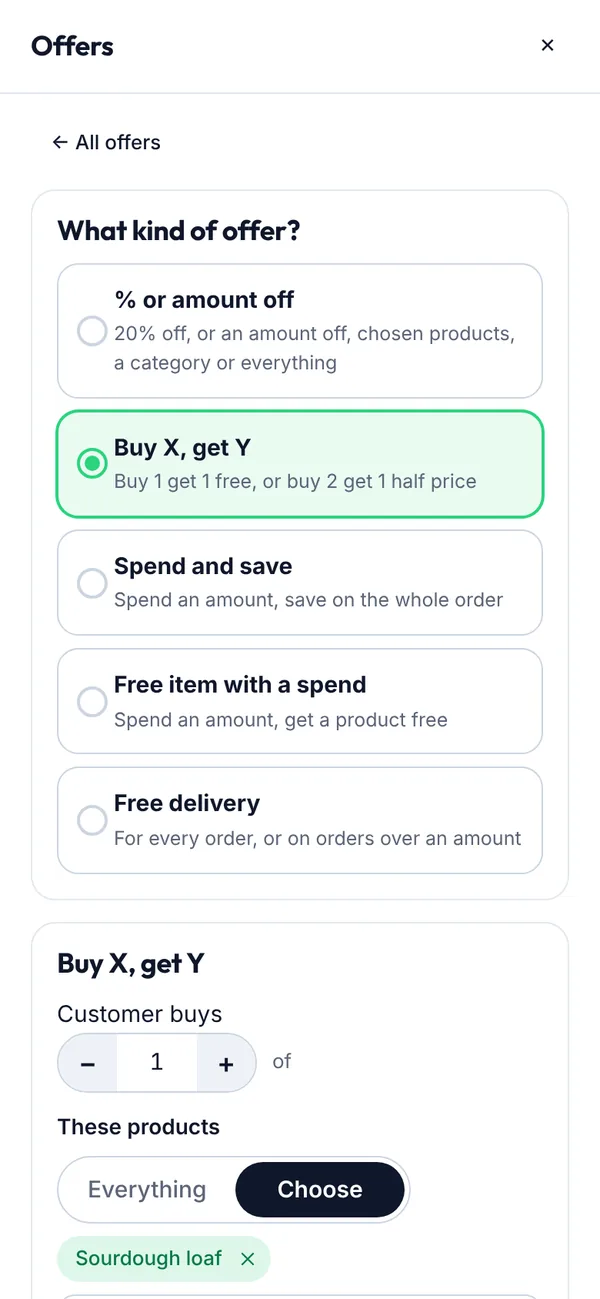
Choose the kind: % or amount off, Buy X, get Y (for example buy 1 get 1 free, or buy 2 get 1 half price), Spend and save, Free item with a spend or Free delivery.
Fill in the details. For Buy X, get Y, choose how many they buy, the products (or a whole category), how many they get, and Free or a % off. You can limit the free items per order.
Under Who and when, choose Everyone or First order only, the start and end, and if you like, only certain days and times (for example weekdays 3–6 pm).
Check Customers will see. You can change the offer's name there.
Tap Start offer.
Figure 4.50Making a Buy X, get Y offer
How offers combine
A product gets one item offer at a time, and an order gets one order offer (spend and save, a free item or free delivery). B+B picks the one worth most to the customer. Products already on a price offer are left out of buy-X-get-Y while that runs. Orders already placed keep their discount if you change or end the offer. A product's own % or amount off (in the product form) still works too.
What you’ll see
The offer is listed as Running (or Scheduled). Tap Pause to stop it for a while, Edit to change it, or Delete. Each one shows how many orders used it.
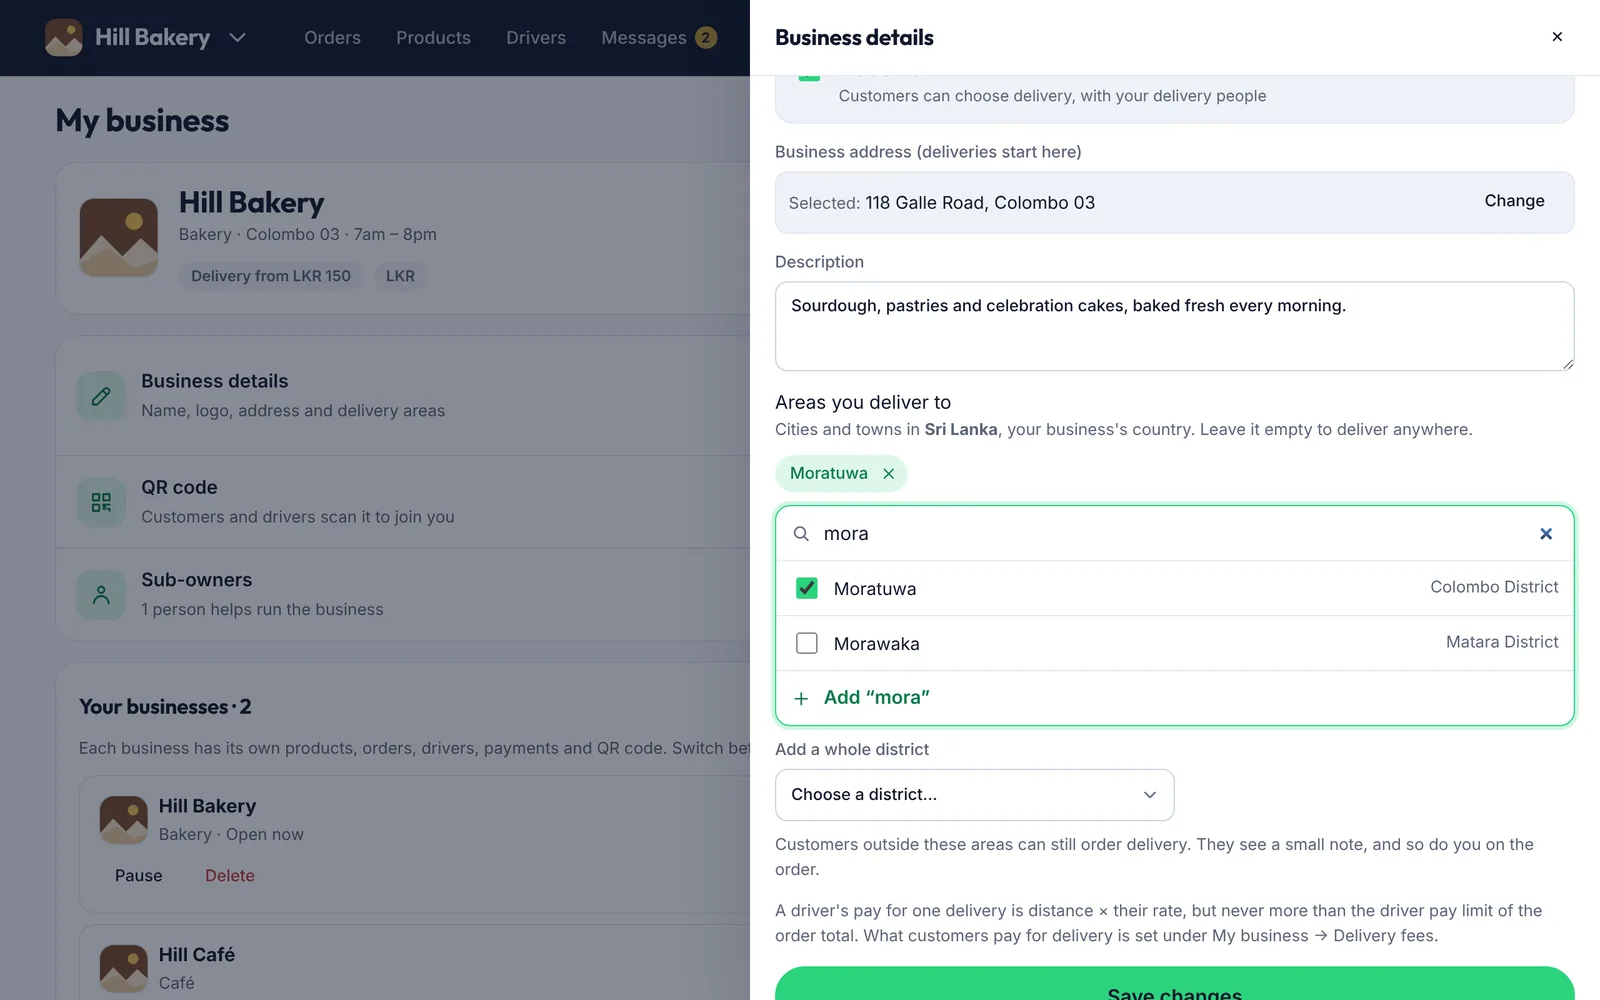
Delivery areas tell customers where you usually deliver. They never stop anyone ordering.
Before you start
Open My business and tap Business details.
Steps
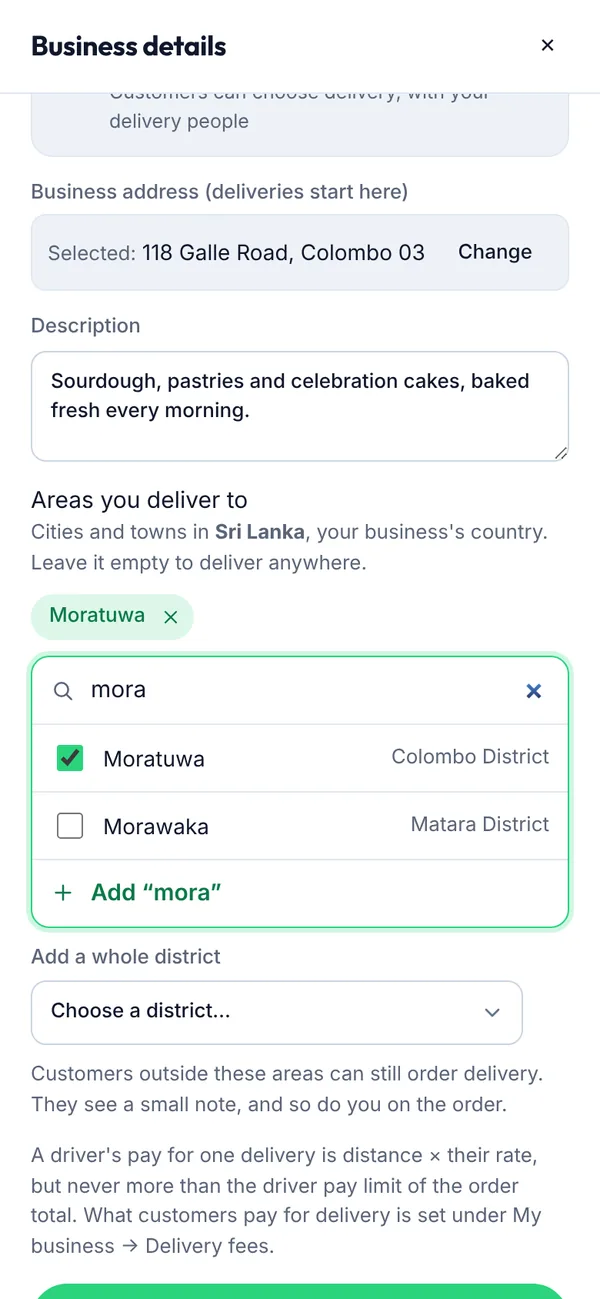
Under Areas you deliver to, type a city or town. The list shows places in your business's country.
Tick each place you deliver to. To add a place that isn't listed, type it and tap Add.
To add a whole district at once, choose it under Add a whole district (Sri Lanka).
Tap Save changes.
Figure 4.51Choosing the places you deliver to
What you’ll see
Customers outside your areas can still order delivery. They see a small note, and so do you under Checks on the order, so you can accept it or suggest pickup. Leave the list empty to deliver anywhere.
See every driver's deliveries for the week in one calendar, the same way drivers see their own.
Steps
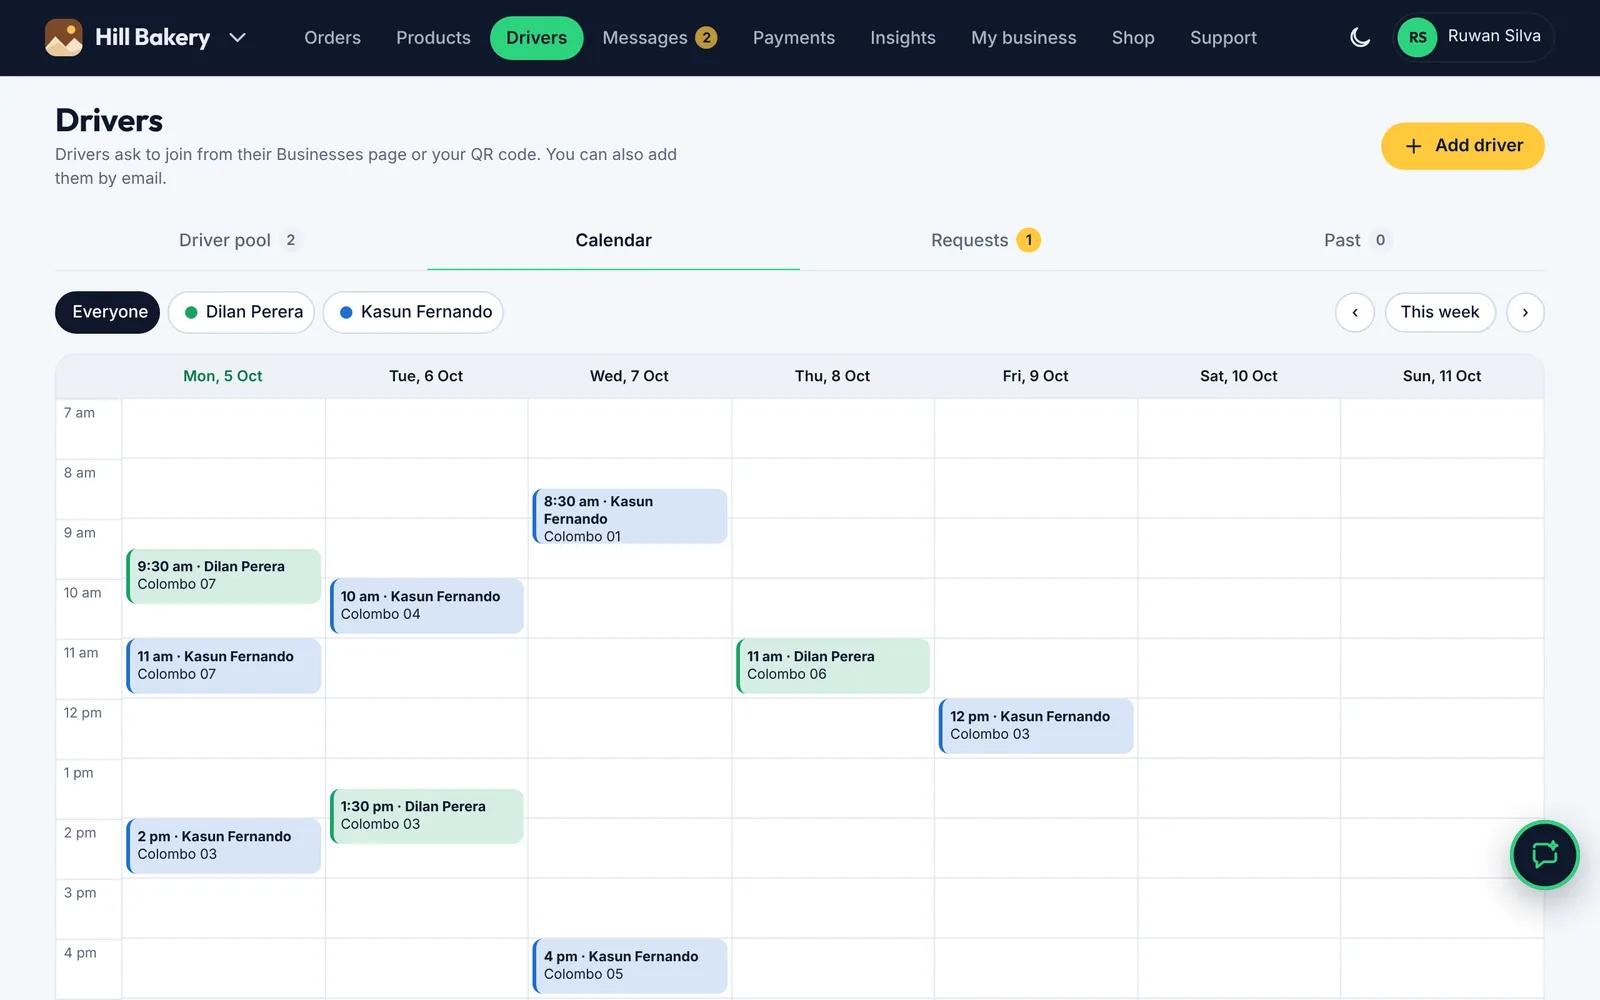
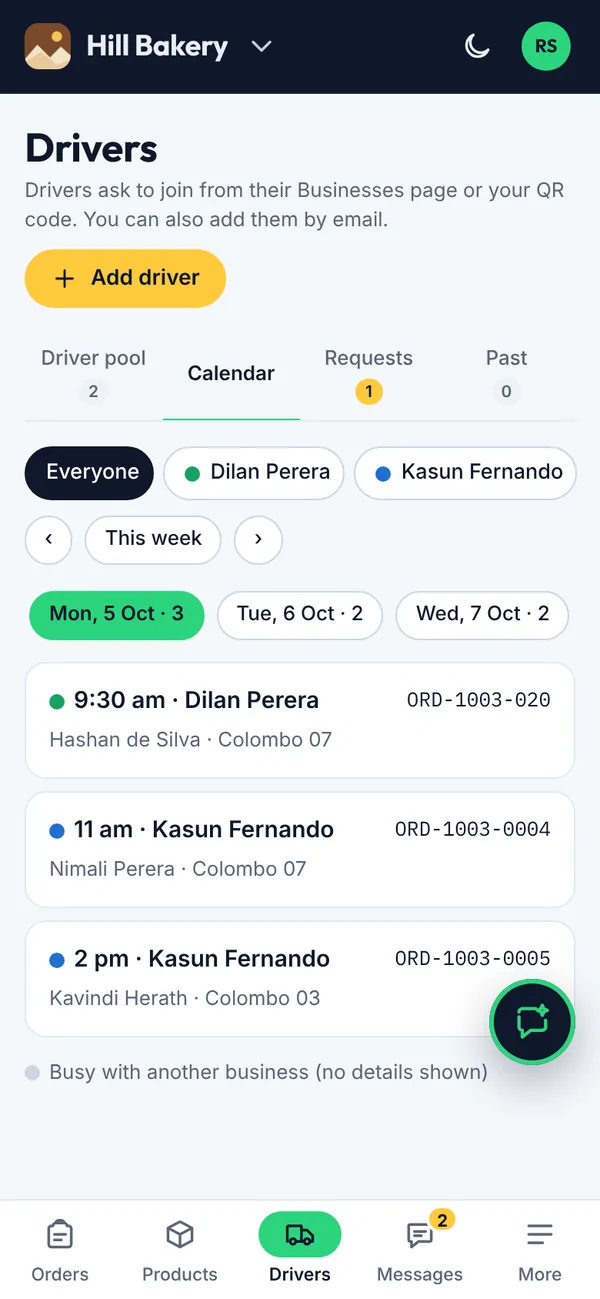
Open Drivers and tap Calendar. Each driver has a colour. Use the arrows to change the week, or tap a driver's name to show only them.
Tap a delivery to see its details, then Open order or Driver details.
Grey striped blocks mean the driver is busy with another business at that time. You don't see that business's details.
Figure 4.52Your drivers' week
In Driver details you see their upcoming jobs and rates. If you run several businesses, you can add the driver to your other businesses there, each at its own rate.
Figure 4.53Driver details and adding them to another business
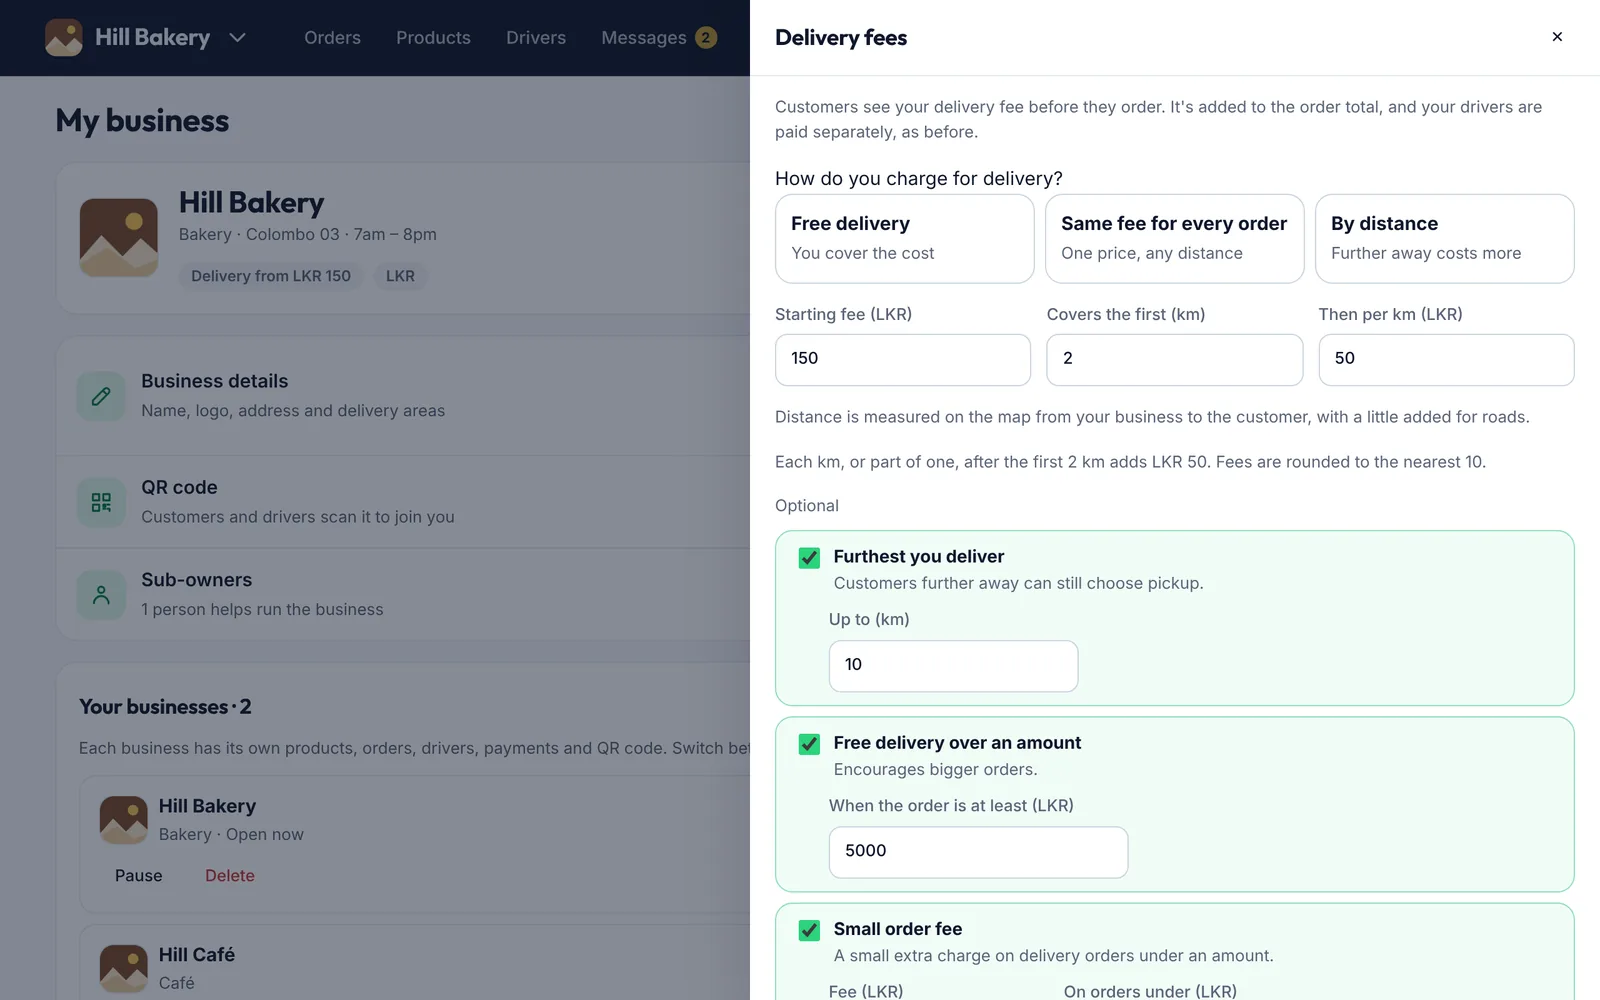
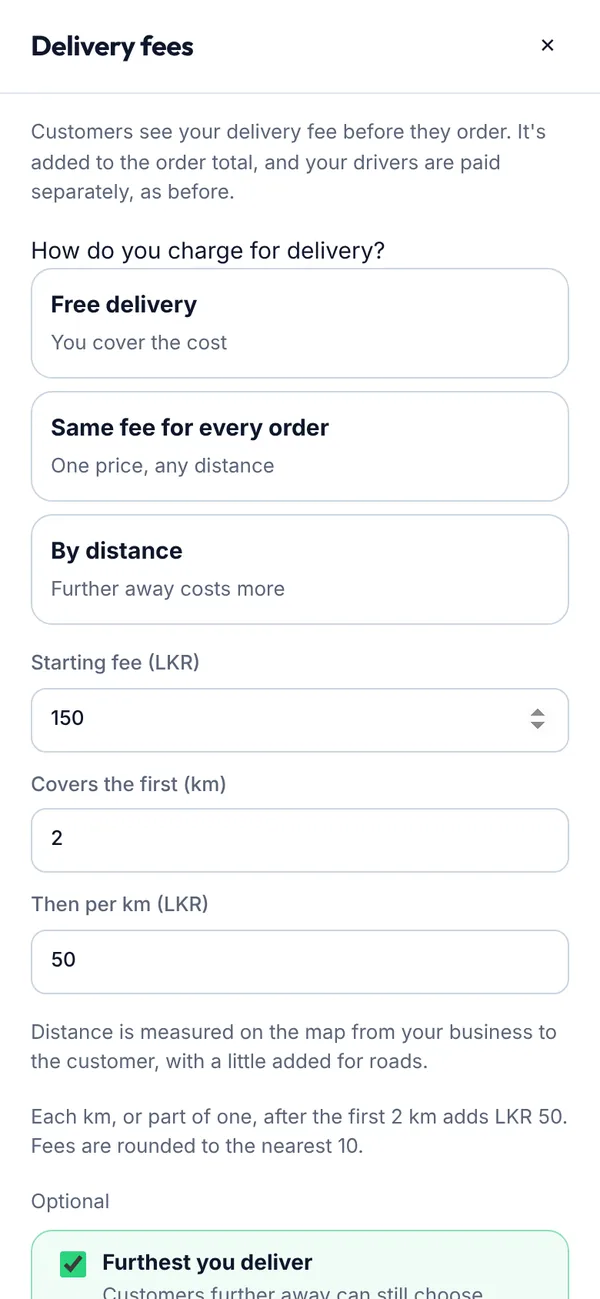
Choose what customers pay for delivery. They see it in your shop and at checkout before they order, and the same amount is added to the order. Your drivers are paid separately, as before.
Before you start
Open My business and tap Delivery fees. Until you choose, customers see “Free delivery” and Home reminds you.
Steps
Choose how you charge: Free delivery, the Same fee for every order, or By distance.
By distance: enter a starting fee, how many km it covers, and the fee for each km after that. For example LKR 150 for the first 2 km, then LKR 50 per km.
Figure 4.54Choosing how to charge for delivery
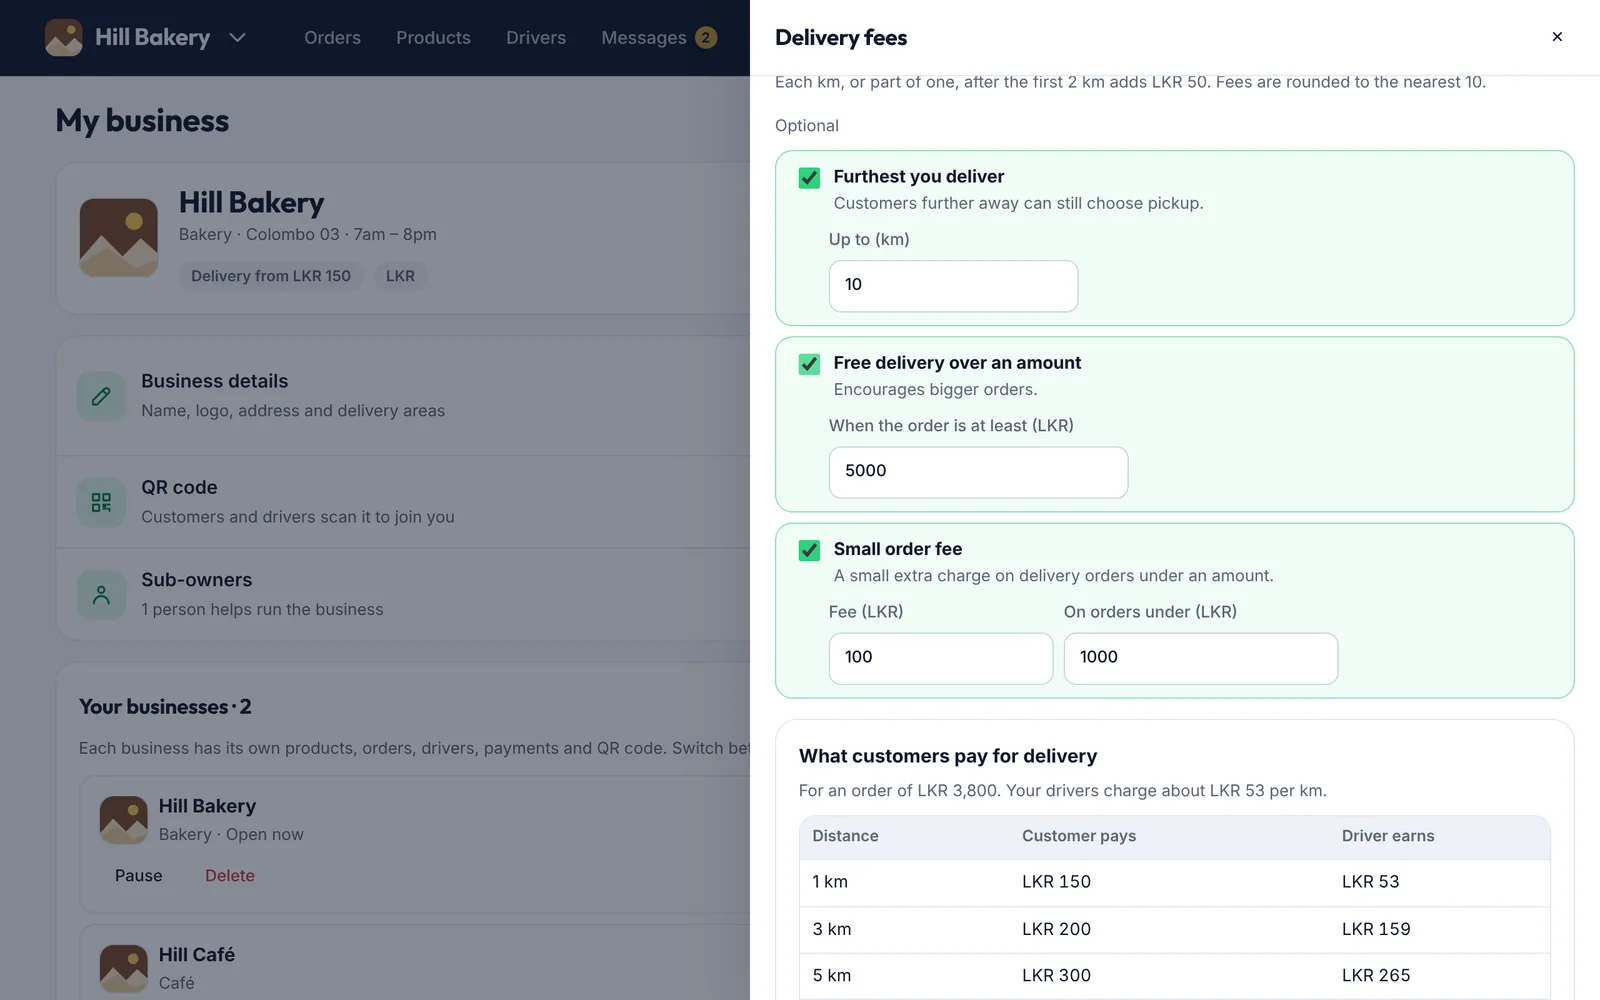
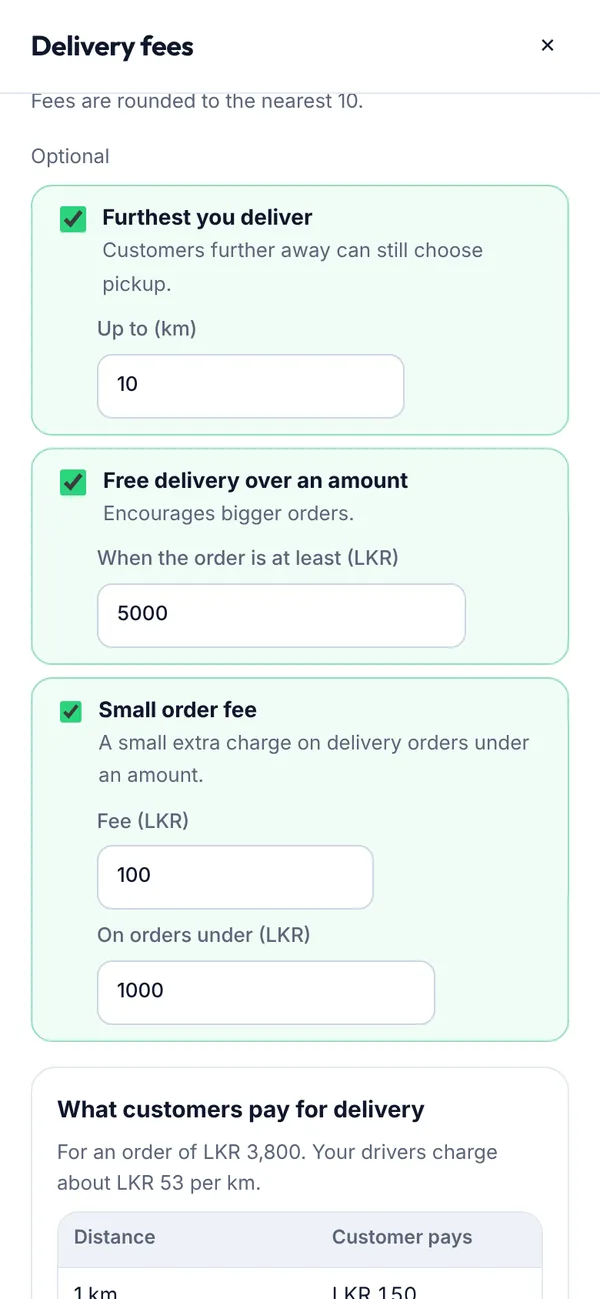
Optional: tick Furthest you deliver and enter the km. Customers further away can still choose pickup.
Optional: tick Free delivery over an amount to encourage bigger orders.
Optional: tick Small order fee and enter the fee and the order amount it applies under.
Check What customers pay for delivery. It compares the fee with what your drivers usually earn for the same trip, so you can see where you cover the cost. Then tap Save delivery fees.
Figure 4.55Optional limits and the price preview
What you’ll see
Customers see “Delivery from LKR 150”, “Free over LKR 3,000” and similar in your shop, and the exact fee, with the distance, at checkout. Distance is measured on the map from your business address, with a little added for roads; if a customer's address has no map location, the starting fee is charged. When you enter or change an order yourself, the fee is worked out the same way, and you can still deliver beyond your usual distance.
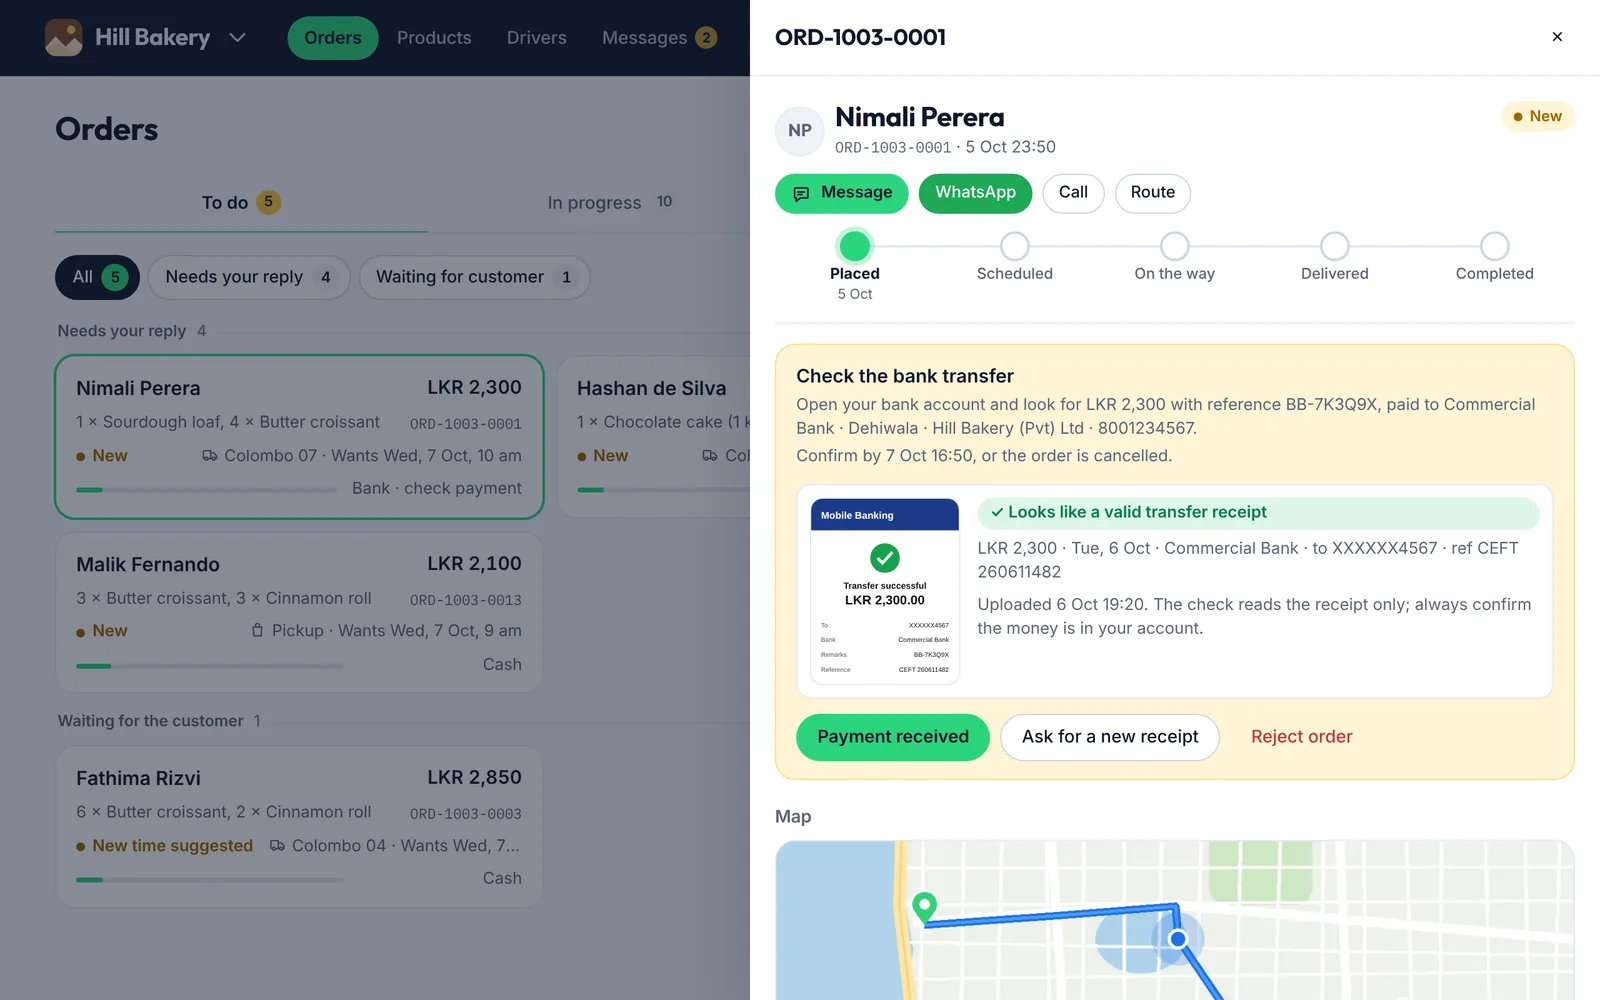
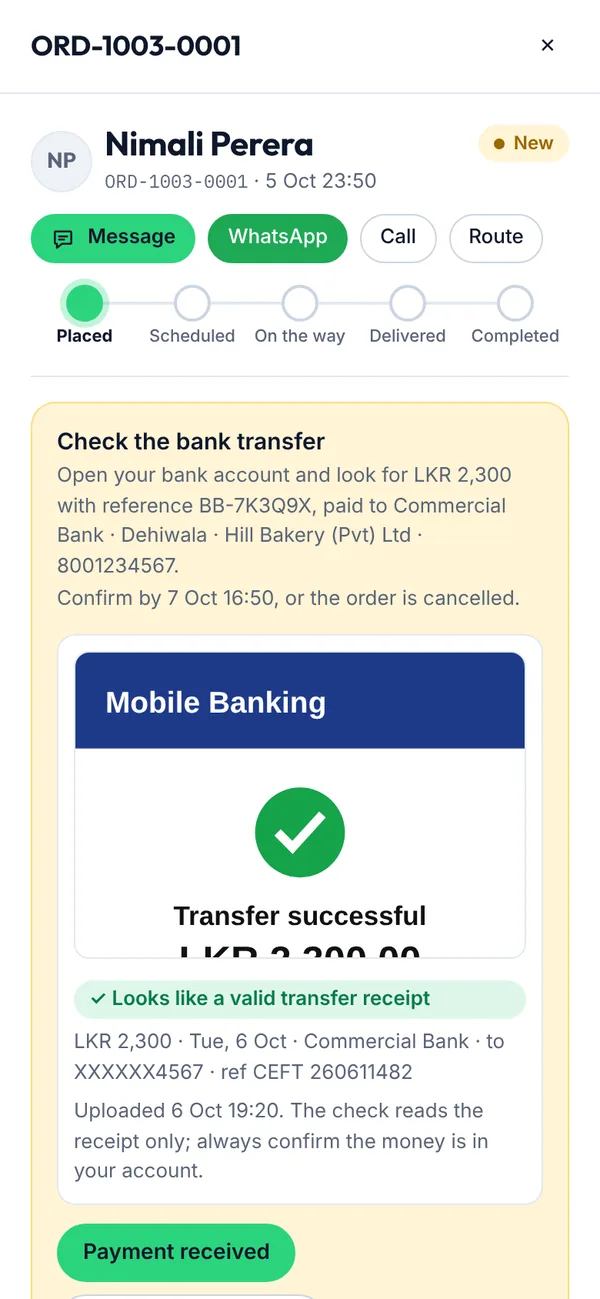
When a customer pays by bank transfer, the order arrives with their receipt. Check that the money is in your account before you prepare the order.
Before you start
Switch on bank transfers and add your account (see 4.24). Home shows how many transfers are waiting to be checked.
Steps
Open the order. Check the bank transfer shows the amount and the reference (for example BB-7K3Q9X) to look for in your bank account, and the customer's receipt with what the app read from it. Warnings, such as a different amount or account, are listed under it.
If the money is in your account, tap Payment received. Then schedule the order as usual.
If it isn't, tap Ask for a new receipt, choose or type the reason and send it. The customer has 24 hours to upload a new receipt.
Figure 4.56Checking a bank transfer
Always check your bank account
The app reads the receipt and refuses files that aren't transfer receipts, but only your bank account proves the money arrived. Orders can't be scheduled, changed or delivered until you tap Payment received.
24 hours to confirm
If a bank transfer isn't confirmed within 24 hours, the order is cancelled automatically and the stock goes back. If you reject or cancel an order that was already paid by bank transfer, refund the customer yourself. Every receipt, decision, who made it and when stays on the order under Payment receipts.
What you’ll see
The order shows Bank transfer · paid and is ready to schedule. The customer gets a message that the payment was received.
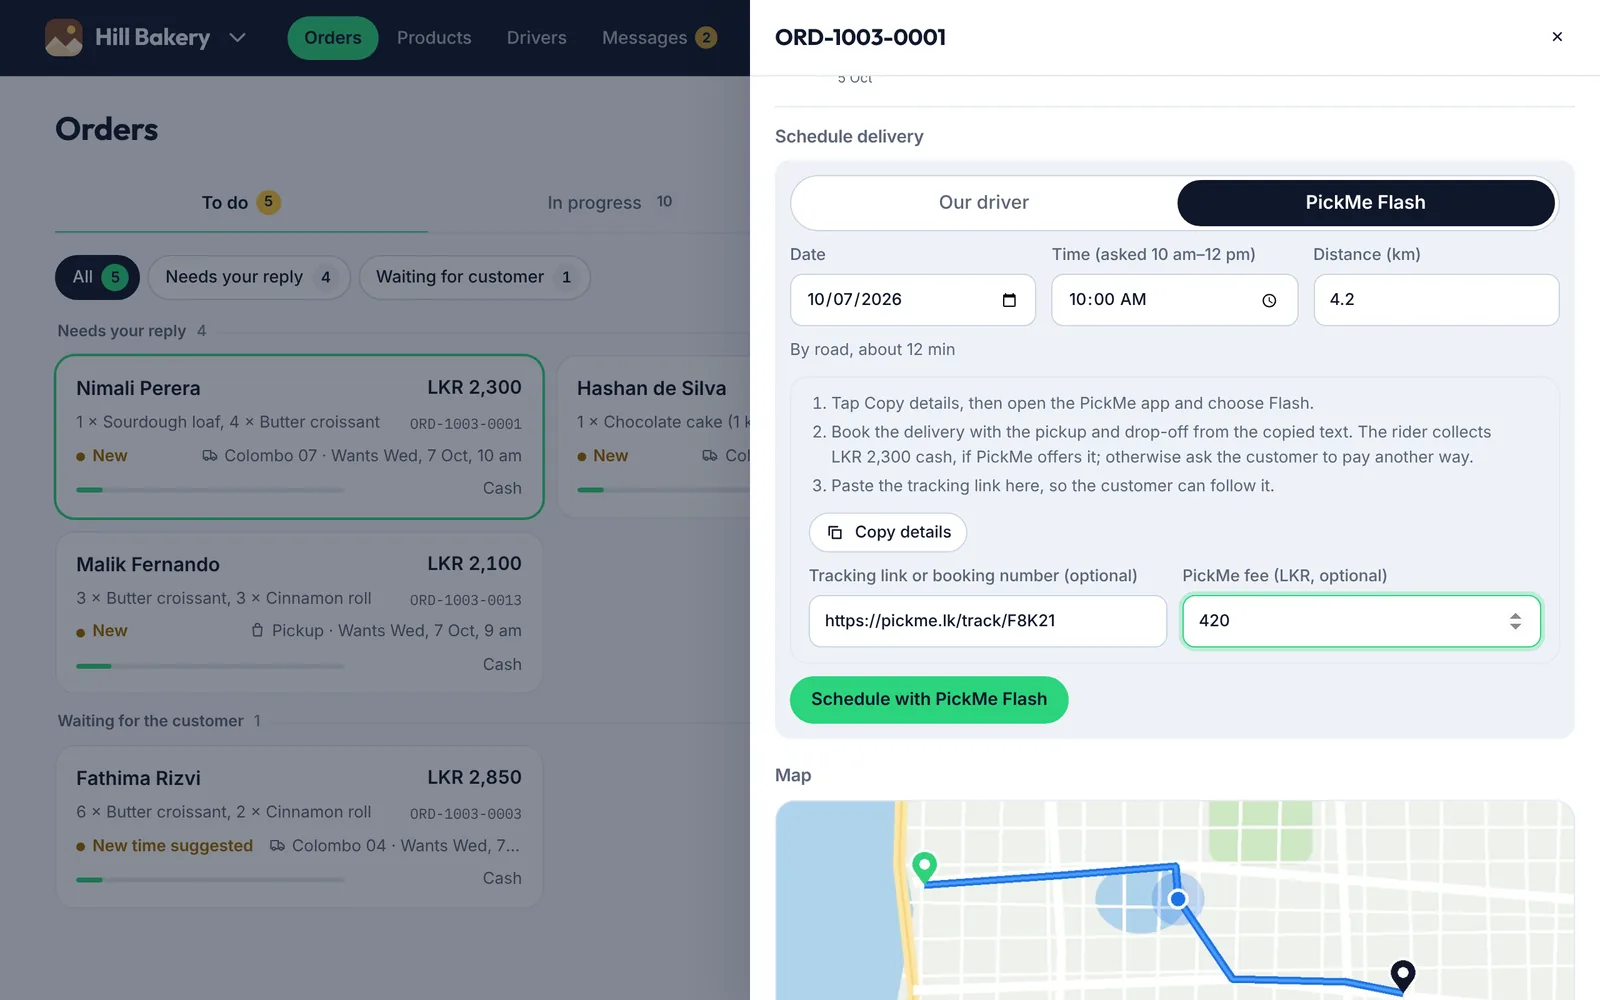
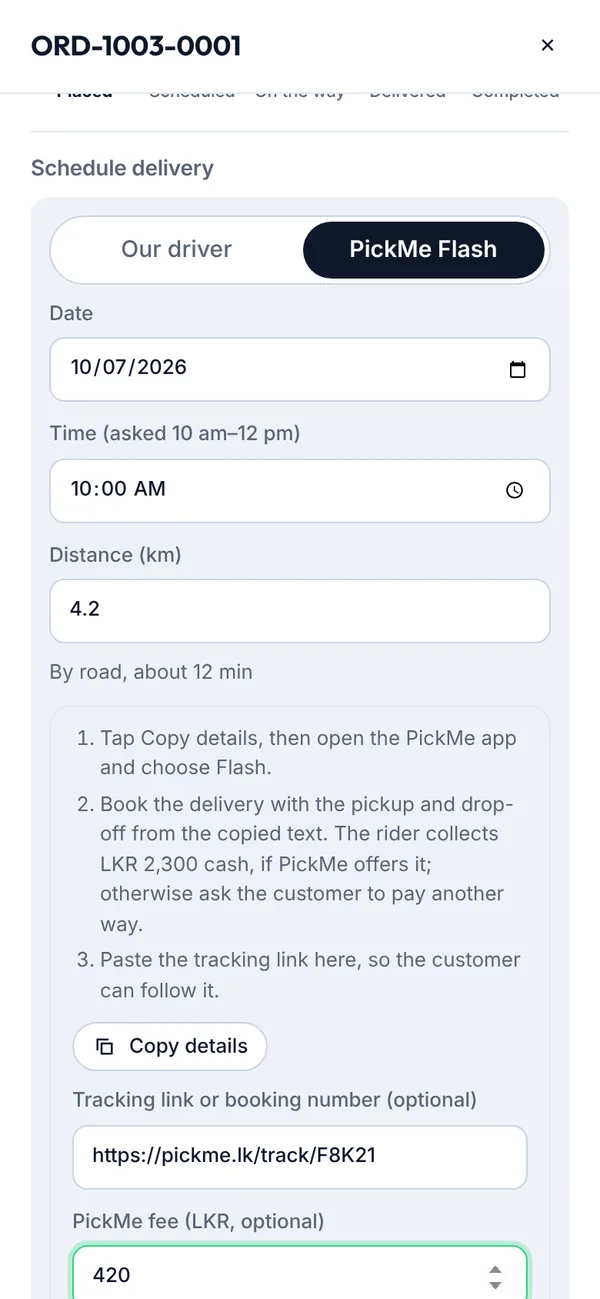
Use PickMe Flash when your own drivers are busy, or you don't have any. You book the rider in the PickMe app, and record it on the order so everyone can follow it.
Steps
Open the order and, under Schedule delivery, tap PickMe Flash. Choose the date and time.
Tap Copy details. It copies the pickup and drop-off addresses, the customer's name and number, the items and any cash to collect. Open the PickMe app, choose Flash and book the delivery with those details.
Paste the PickMe tracking link (or booking number) and, if you like, the fee PickMe charged you.
Tap Schedule with PickMe Flash.
Figure 4.57Scheduling a delivery with PickMe Flash
Good to know
No driver pay is recorded for PickMe orders; the fee you enter is kept for your records. You can add or change the tracking link later from the order (Add tracking or Edit). Mark the order On the way and Delivered yourself, as PickMe doesn't update the app.
What you’ll see
The customer sees Delivery by PickMe Flash on their order, with a Track link when you've added one.
Every business is on the Turnover plan unless B+B moves it to the Fixed plan. In-store billing (walk-in, phone and WhatsApp orders you enter yourself) stays free. Until B+B switches billing on, everything is free.
Steps
Your plan shows as a pill, Turnover plan or Fixed plan, on My business (with a Your plan card) and next to each of your businesses.
Open Payments → Billing. This month so far shows your in-app orders and what B+B would charge if the month ended today.
Turnover plan: 3% on the first LKR 500,000 of in-app orders, 2.5% up to 1 million, 2% up to 3 million, 1.5% up to 5 million and 1% above. Each rate applies only to its own part. Delivery fees don't count.
New stores get 3 free months, counted from the month the store went live.
On the 1st of each month you get an invoice for the month before. If customers paid you by card, the bill is taken from that card money first (each payout shows the card fee and the B+B bill).
Anything still to pay: tap Pay by bank transfer, transfer to B+B's account with the invoice number as the reference, then Choose the slip and Send the slip. B+B confirms it.
Good to know
You have 7 days to pay, with reminders. After that, new orders pause until the bill is paid; orders already placed carry on and nothing is deleted.
The Fixed plan
A set price instead of a share of your orders: LKR 100,000 a month (about USD 300), or LKR 1,000,000 a year (about USD 3,030) paid once for 12 months. B+B may set a limit on how many businesses one account can run and how many customers each business can have; Your plan shows them (unlimited unless B+B says otherwise). Ask B+B if you'd like it.
A members-only store isn't shown in the Shop. Customers find it under Exclusive and ask to join; only the people you add can see your products and order.
Steps
Open My business → Business details. Under Who can shop here, choose Members only and tap Save.
Everyone who had already added your business becomes a member straight away.
A new Members page appears in your menu. Under Requests you see each person's name and message: tap Add as member or Decline. We tell them when you add them.
Under Members you can Remove someone. To open your store to everyone again, choose Everyone in Business details.
Good to know
You can still enter orders yourself (walk-in, phone, WhatsApp) for anyone. On the Fixed plan, members count towards your plan's customer limit.
Don't know how to set up your online store? A B+B Store Creator (trained and certified by B+B) can set it up with you. The fee is a one-off LKR 5,000 (about USD 17), paid straight to them only after B+B approves your store.
Steps
When you sign up as a business owner, answer Do you know how to set up your online store? with No, please help me. Already signed up? Tap Get help from B+B on the first setup question.
Enter your business name, the kind of business and your district. The town, the best time and how to contact you are optional.
Check the message (it starts with Hi B+B, I don't know how to set up my online store. Please help me.) and tap Send my request.
Your Home page shows Waiting for a Store Creator. We email you when a Store Creator is on the way, and they contact you to arrange a call or a visit.
Changed your mind? Tap I'll set it up myself on the card on Home (only before your Store Creator starts building).
Good to know
Your store is kept hidden from customers until it goes live. Your Store Creator adds your details, products and delivery fees from their own account: they never need your password, and they can't see your orders or bank accounts. You add your bank account yourself in My business → Payment methods.
What you’ll see
When B+B approves the store, you pay your Store Creator and your store goes live (see the next article).
A B+B Store Creator can set up your store with you. When B+B approves it, we email you a link that works for 7 days.
Steps
Open the link. Step 1: set your own password (8 or more characters, with a letter and a number). It replaces the temporary one your Store Creator used.
Step 2: pay your Store Creator the one-off LKR 5,000 by bank transfer or LankaQR. If they have more than one account, choose the one you'll pay into (tap Copy account number to copy it). B+B doesn't take any of it.
Step 3: upload the slip (JPG, PNG or PDF, up to 5 MB) and tap Submit. We check it against the account you chose; if it isn't clear, upload a clearer copy.
What you’ll see
Your store goes live as soon as your Store Creator confirms the money arrived, and we email you a receipt. You can also pay from the card on your Home page. Afterwards, a card on your Home page asks How did … do?: tap 1 to 5 stars, add a comment if you like and tap Send rating (or Not now).
4.40How to rate customers and answer reviews
Customers rate your business after each order, and you can rate them and your driver. Every rating is optional.
Steps
On Home, a card asks Rate a finished order. Tap Rate (or Not now). You can also rate from the order itself.
Give the customer 1 to 5 stars and tap what fits (like Paid on time). Give the driver a thumbs up or down. Tap Save ratings.
Open Insights and scroll to Reviews to see your stars, what customers love, problems, and thumbs up for each item.
Tap Reply under a review, write a short public answer and tap Post reply. If a review breaks the rules, tap This rating is unfair and say why: B+B decides within 2 working days.
What you’ll see
Your ratings of customers and drivers are private: they only ever see averages. Customers' reviews of you show with their first name and initial once you've both rated, or after 7 days. New reviews arrive as a phone notification and under Notifications at the top of Messages, with a weekly summary on Mondays. On a new order you may see the customer's average from businesses (from 5 ratings): it's for your information only. When you choose a driver, the best rated are listed first, with a Top driver badge. Highly rated stores get a Top rated badge and appear in Top rated near you in the Shop.
Posts are drawn by the app from your product or service, in B+B's own look, so the words and the price are always right. You can't type on a post; to change the words, edit the product. Every post needs the product's own photo: without one, the post can't be made, and the app asks you to add a photo first.
Steps
Tap Feed → Make a post. (After adding a product, the card Make a Feed post? does the same, or asks you to Add a photo first.)
Choose a template: New on B+B (one product or service), Offer now (while its discount is running) or Our range (2 to 4 products).
Pick the product. Tap Regenerate for another look (dark or light, the phone on the other side), then tap Post to the Feed.
It's in the Feed straight away. My posts shows each post with its likes, saves, shares, link opens and orders. If B+B takes a post down, you see why there.
What you’ll see
Posts stay in the Feed for 30 days (an offer until it ends). You can have 5 in the Feed at a time, and remove your own posts any time. When B+B approves your store, your welcome post with your QR code is made automatically: share it from My posts.
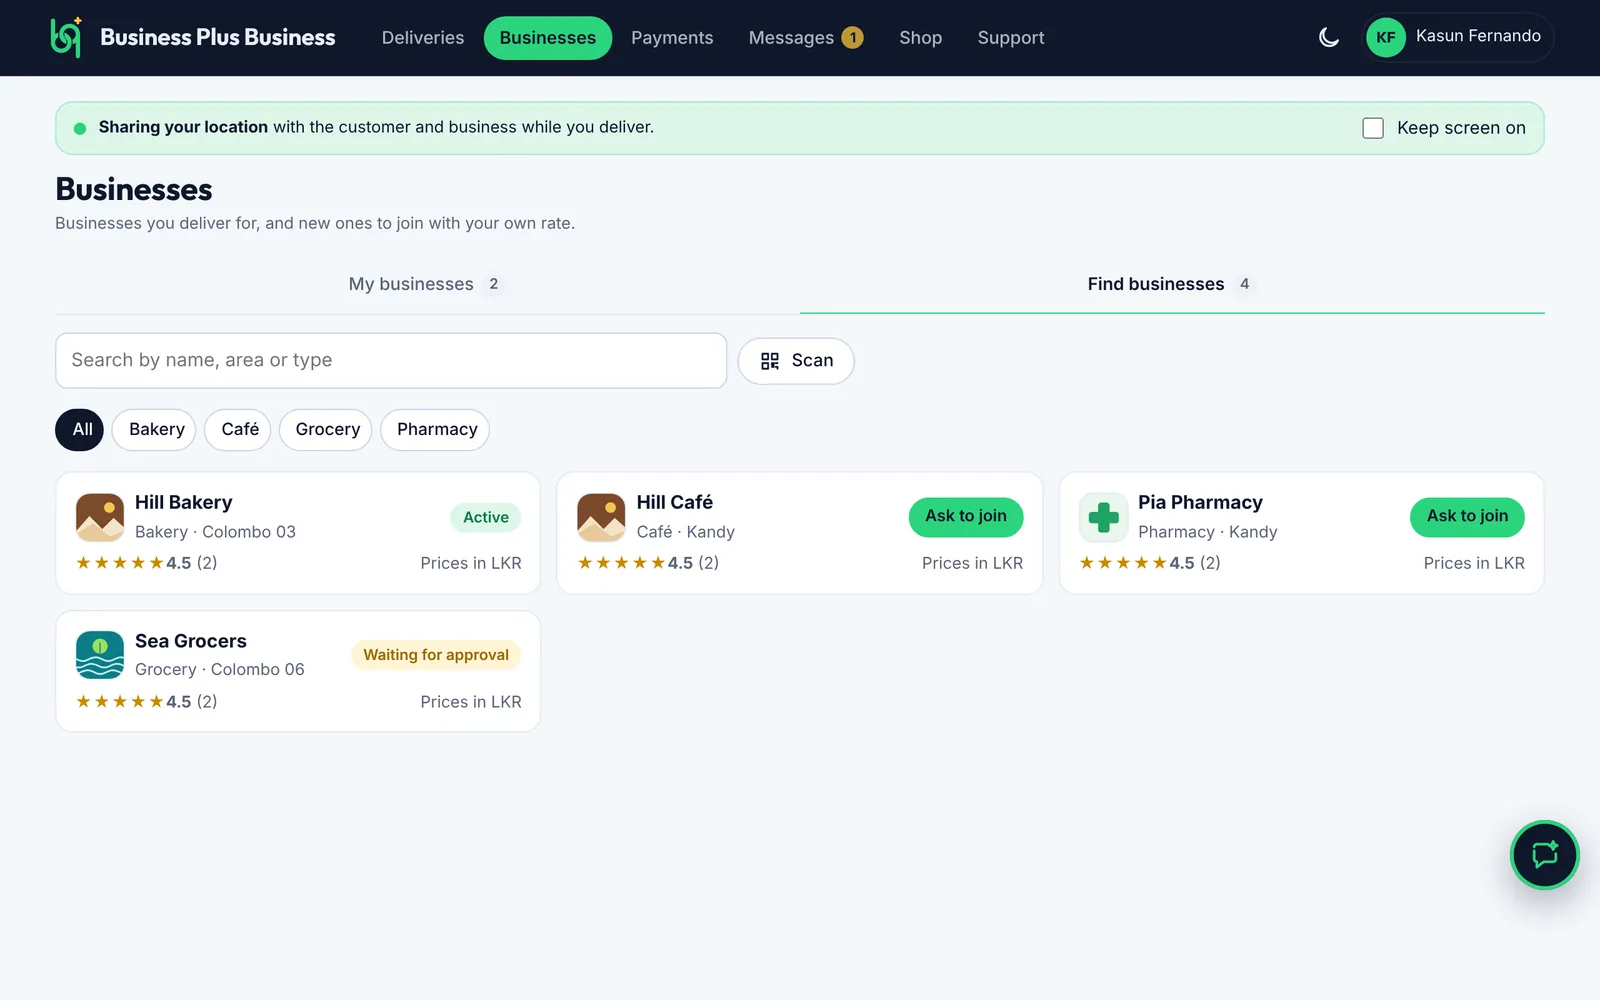
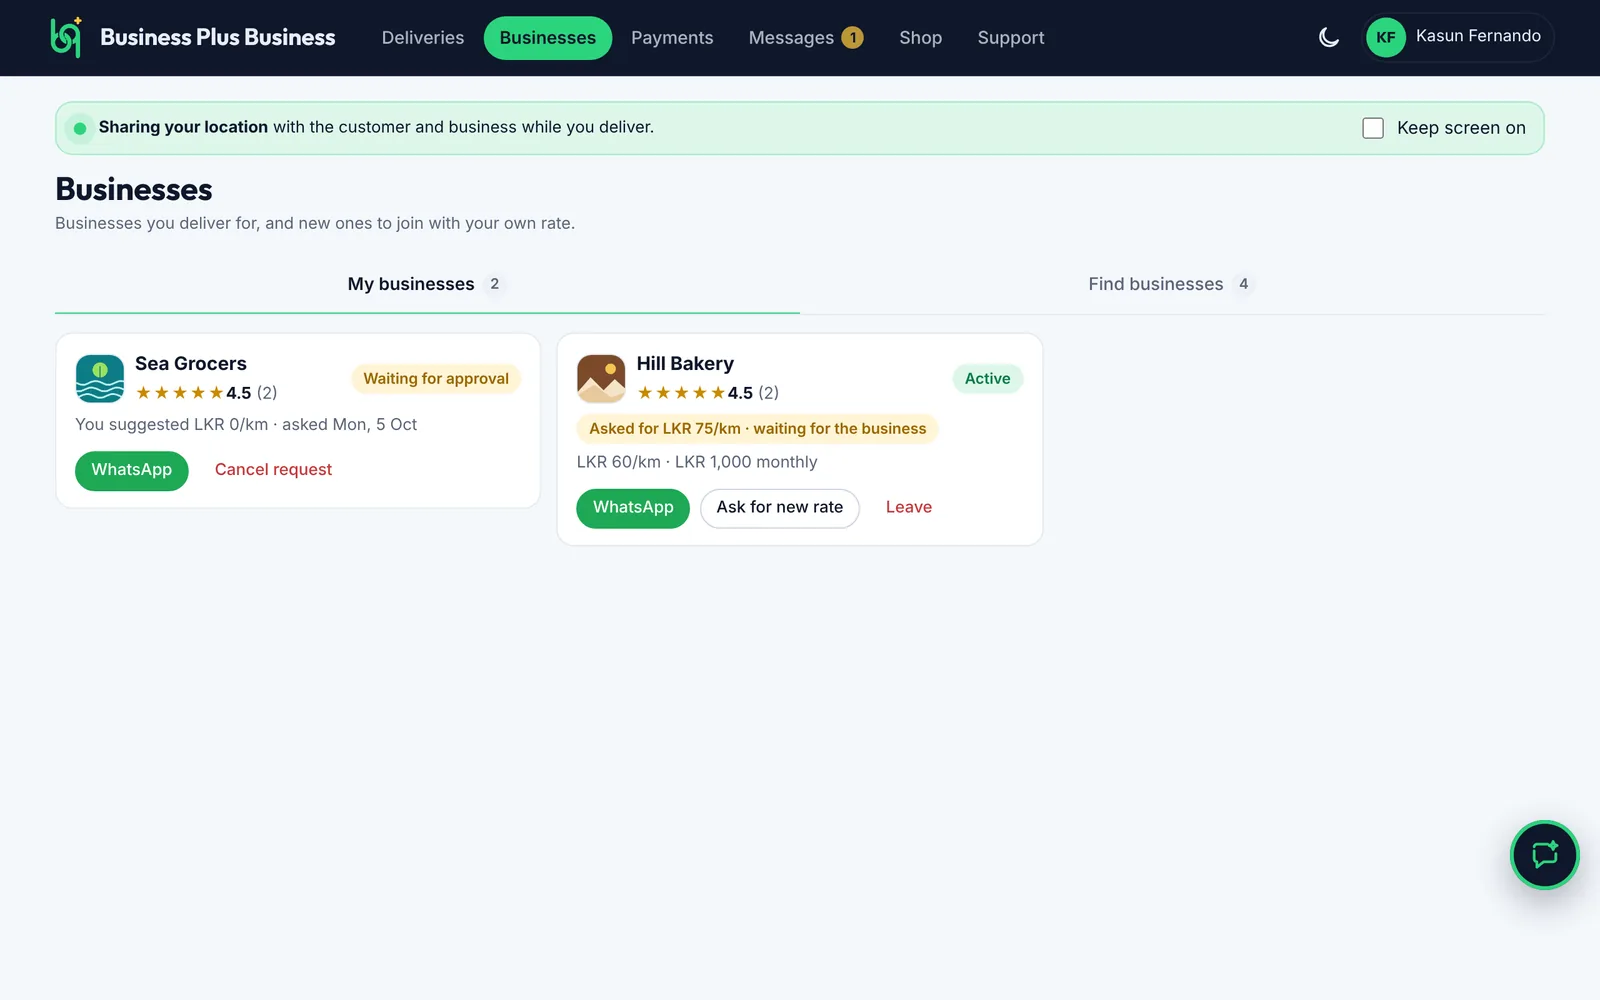
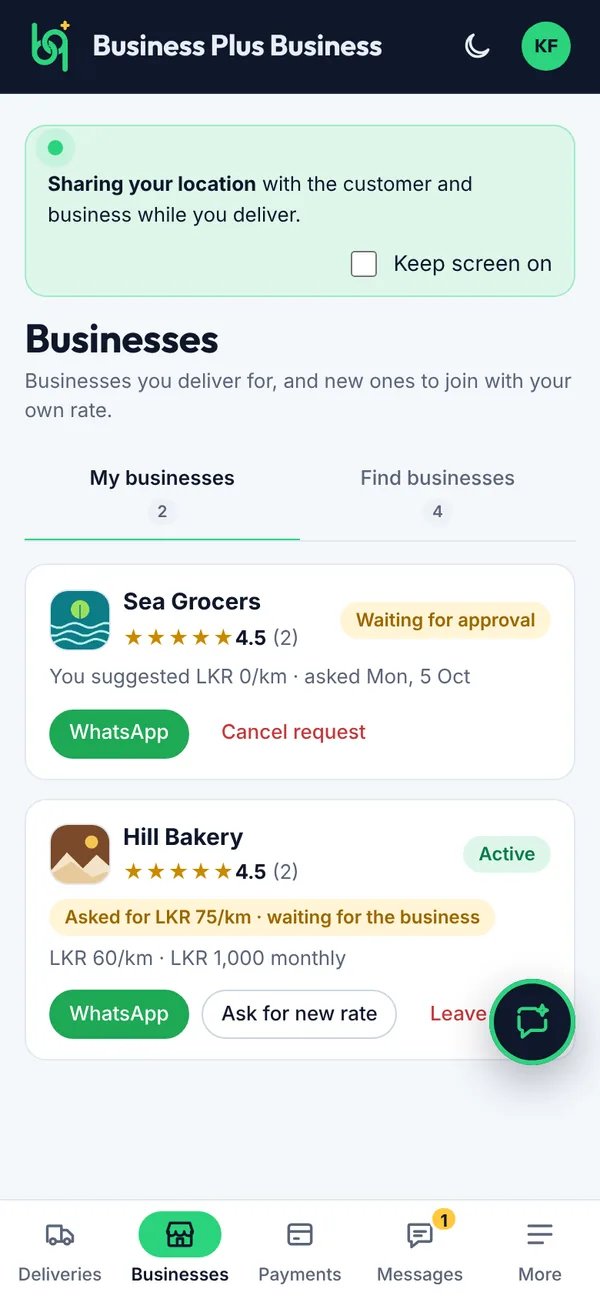
Ask to join a business at the rate you want. The owner or a sub-owner accepts your request.
Steps
Open Businesses and tap Find businesses. Search, or tap Scan to scan a QR code.
Tap Ask to join on a business.
Your request shows Waiting for approval until it's accepted.
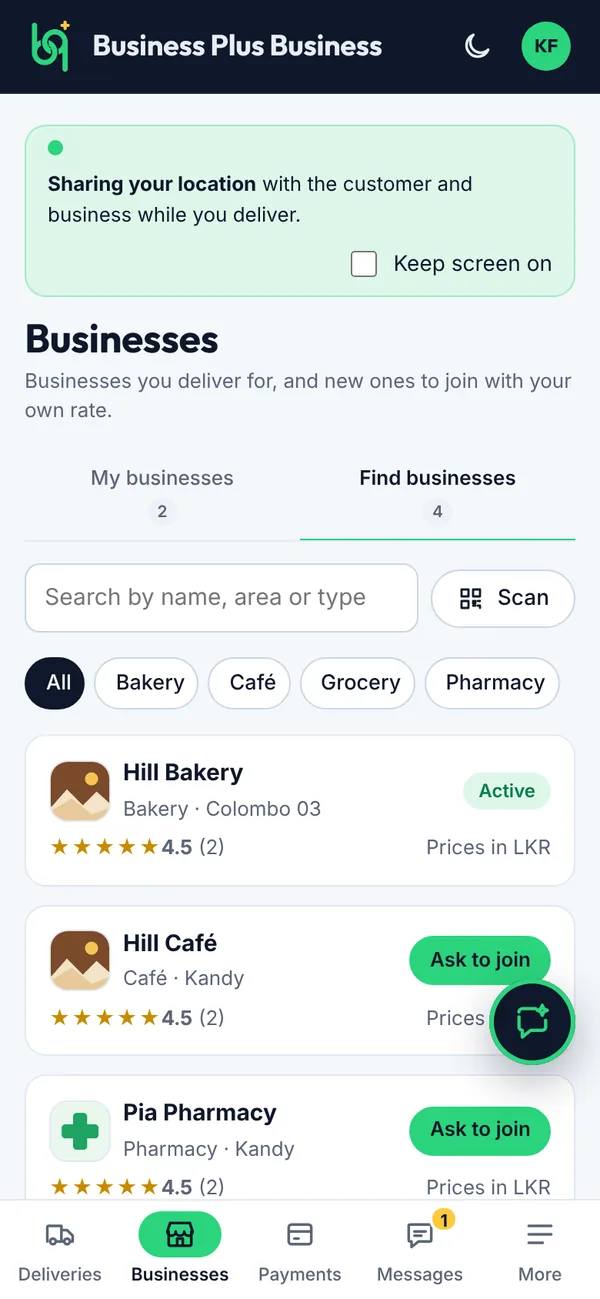
Figure 5.3Find businesses
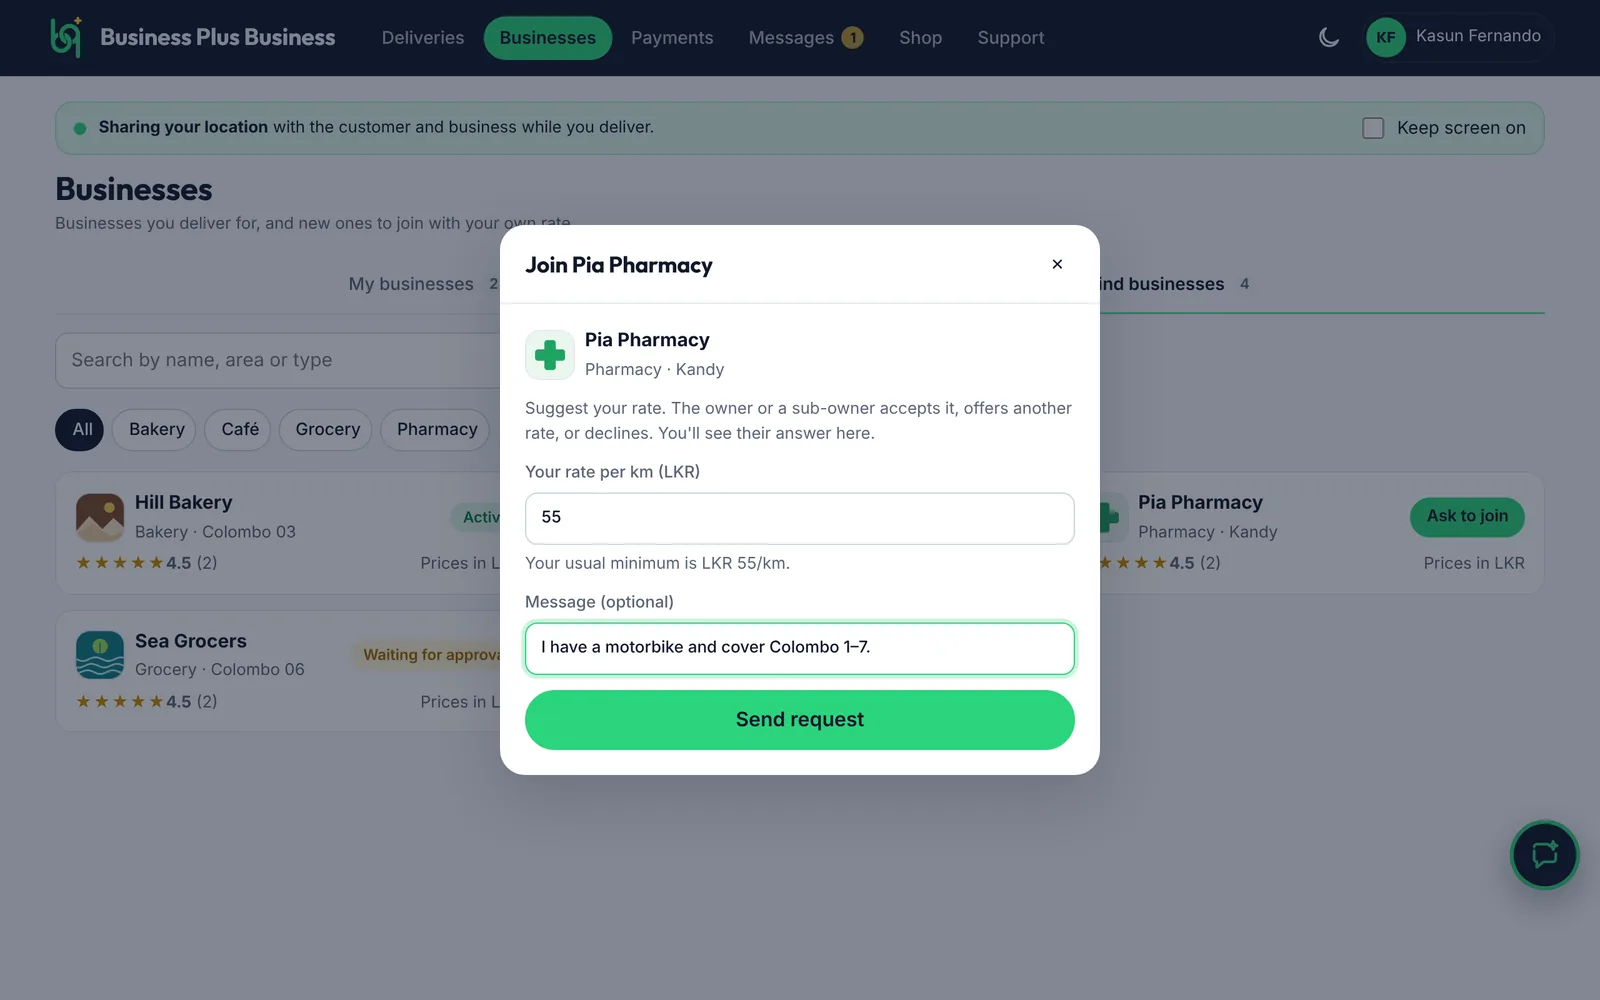
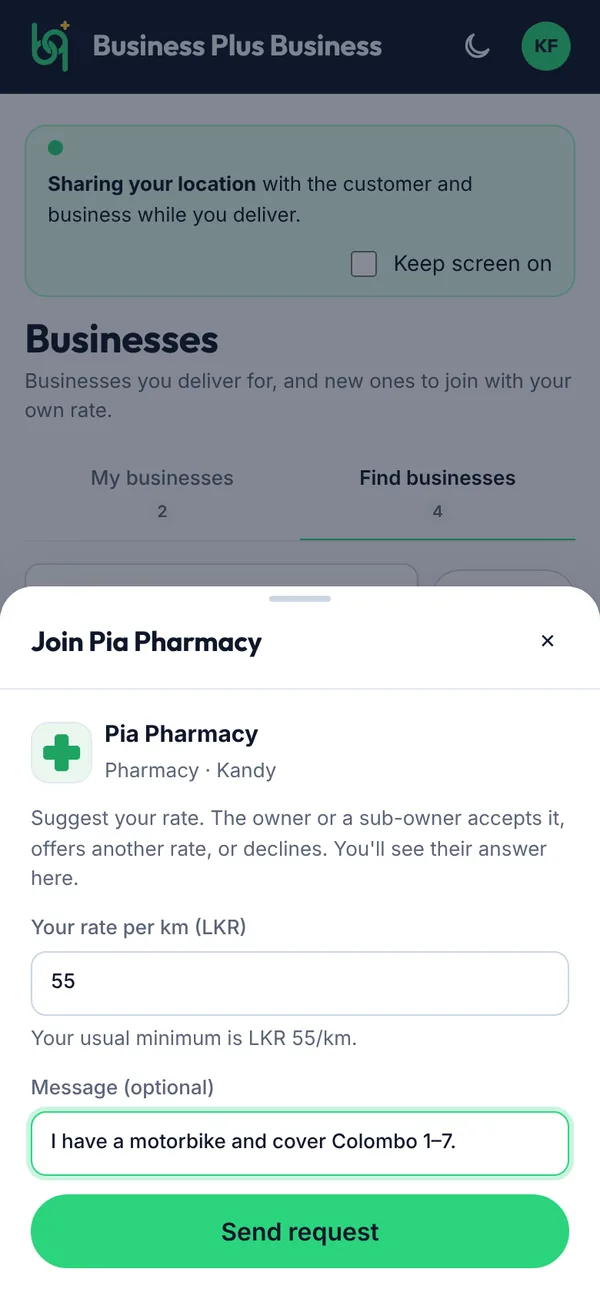
Figure 5.4Asking to join with your rate
What you’ll see
In the join window, enter your rate per km and a short message, then tap Send request. Once accepted, the business shows Active and its jobs can come to you.
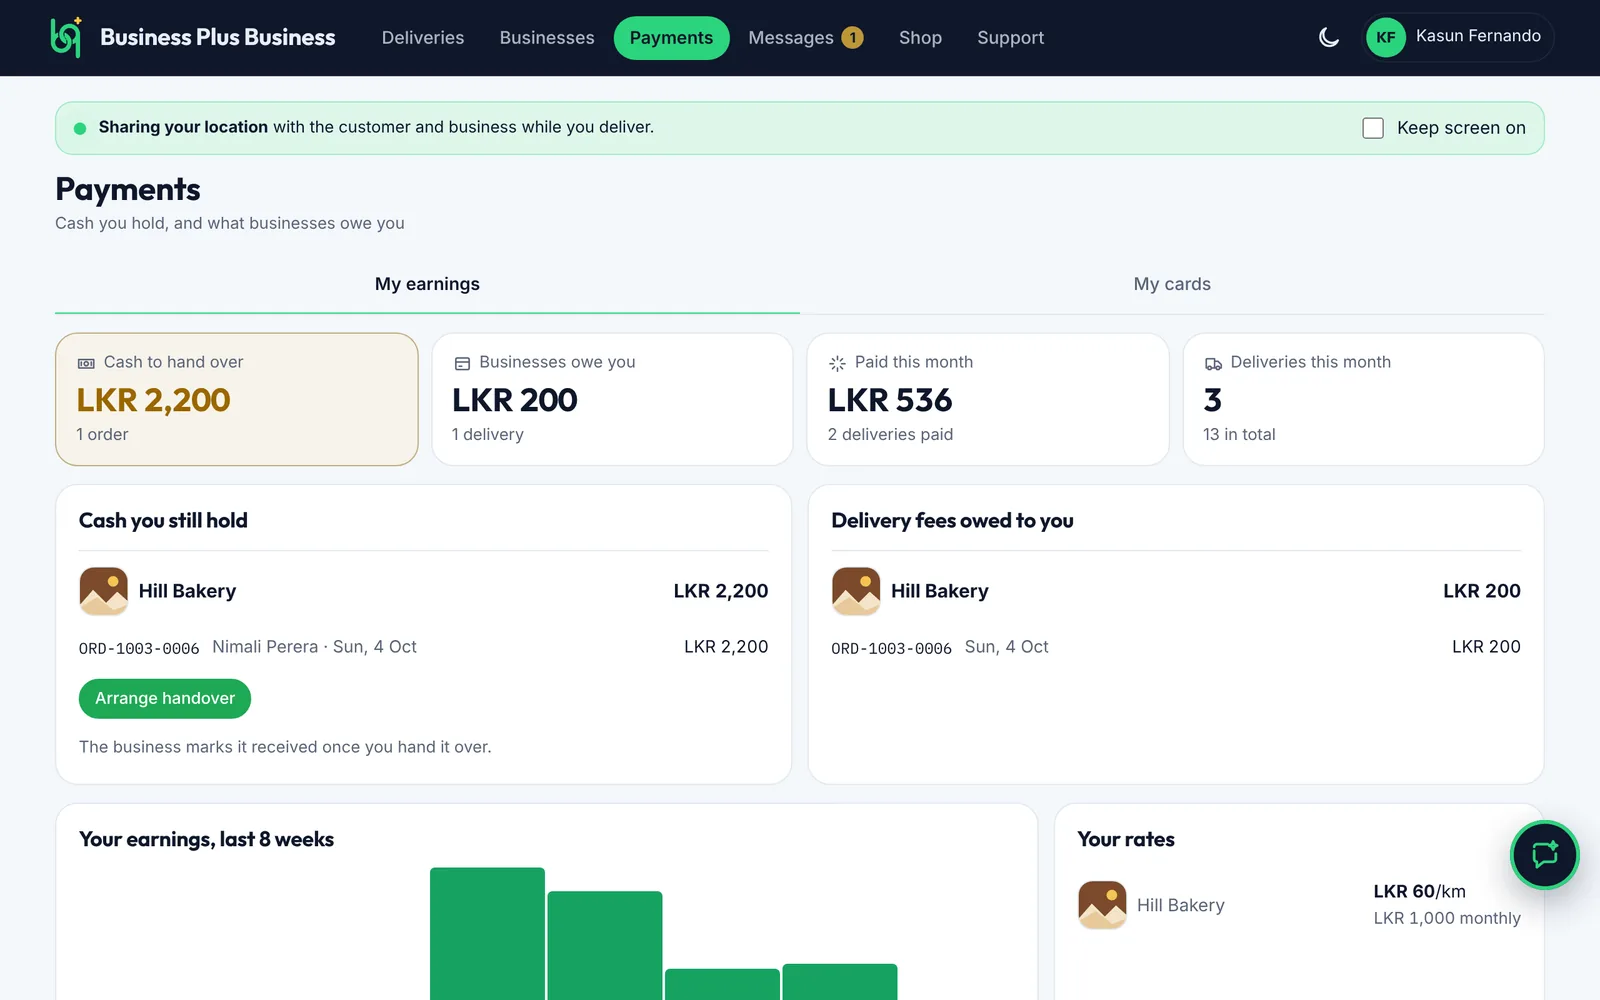
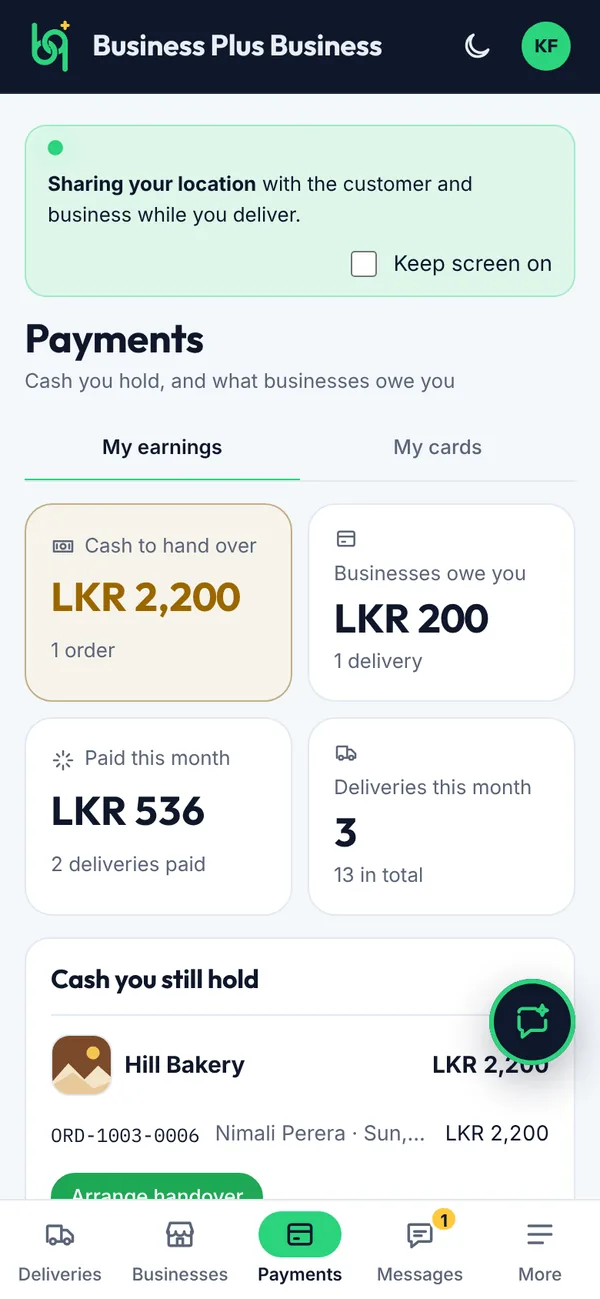
Payments shows the cash you hold, what businesses owe you and what you've earned.
Steps
Tap Arrange handover to message the business about the cash you hold. They mark it received when you hand it over.
Delivery fees owed to you lists what each business still has to pay you.
Figure 5.11My earnings
What you’ll see
You also see what you've been paid this month, your earnings for the last 8 weeks and your rate with each business.
5.9How ratings work for delivery people
Customers and businesses give you a thumbs up or down after each delivery, and you can rate them too. It's optional.
Steps
On Home, a card asks How was this delivery?. Tap Rate, give the business and the customer a thumbs up or down and tap what fits (like Long wait), then Save ratings. You have 3 days.
Open Account → My rating to see your thumbs up %, what people say, and recent low ratings (no names).
If a low rating isn't fair, tap This rating is unfair. B+B looks at it.
What you’ll see
Your % uses your last 100 rated deliveries. A customer's Late doesn't count when you told us the business kept you waiting (Long wait) on that order, and ratings from people who rate almost everyone low don't count either. Businesses see your % when they choose a driver; very good drivers get a Top driver badge, updated every Monday.
Section 6 · For Store Creators
6Store Creators
Apply on the website, send your documents, finish your training and build stores for local businesses. You earn LKR 5,000 (one-off, paid by the business owner) for every store that goes live.
Applying is on the website only. In the phone app you can sign in once you have an account, but you can't sign up as a Store Creator there.
Before you start
Have your NIC number, a clear photo of your face and your CV (PDF or Word, up to 5 MB) ready.
You need to be 18 or over, with a laptop and an internet connection.
Steps
Open businessplusbusiness.lk/careers in your web browser and tap Apply now.
Create your account: full name, country, email, WhatsApp number and a password (8 or more characters, with a letter and a number). If your email or number is already registered, sign in instead.
Tick the four requirements, then fill in your details. Your age is worked out from your NIC.
Add your photo and your CV. A file that's too big shows its size and the limit.
Tap Read the applicant declaration, read it, then tap I accept.
Tap Submit application. Not finished? Tap Save draft and come back later.
What you’ll see
You get a reference like SC-00042 and an email. Sign in again at any time to see where it stands. If B+B asks for changes, you'll see Changes requested with what to fix: edit and submit again.
Sign in at businessplusbusiness.lk/app or in the B+B phone app with the same email and password.
Steps
Home (tap the logo) always shows Your next step with a button that takes you there, and Your journey: applied, documents, training, certificate, bank account, your first activity and your first live store. You are here marks where you are.
When something changes for you (selected, documents accepted or returned, training given, certified, a store approved or returned, an owner's slip, a store live), a pop-up tells you what it means and what to do next. You don't need to refresh: it checks every minute and when you come back to the app.
The first time you sign in, a short tour points at each page. Tap Take the tour again on Home to see it again.
Tap Add your photo (or Change your photo) on Home. Your certificate, ID card and business card show the new photo straight away. Without a photo they show your initials with B+B artwork.
Leads keeps every business you talk to. Activities has the businesses you build stores for. Training has your modules. Onboarding has your documents, certificate, business card, ID card and bank accounts.
What you’ll see
Once you're certified, a green tick shows on your photo.
When you're selected, B+B asks you to sign the job description and the freelance agreement and to send a photo of your ID before your training starts. You do it all in the app: no printing or scanning.
Steps
Open Onboarding (or tap Sign my documents on Home). 1. Read: read the job description, scroll to the end and tap Next: the agreement. Read the agreement to the end and tap Next: your details.
2. Your details: your full name and NIC come from your application (if one is wrong, tap Ask B+B to correct it before you sign). Check your initials and today's date, tick the three boxes and tap Next: sign.
3. Sign: sign in the box with your finger (or a mouse or touchpad on a laptop). Not happy? Tap Clear. Or tap Type it to use your typed name. Tap Next: check and send.
4. Send: check the signed pages (tap Agreement or Job description to open the full copies). Choose NIC, licence or passport and add a photo of the front and the back (a passport needs the front only; up to 5 MB each).
Tap Sign and send.
Prefer paper?
Tap Upload signed printouts instead: download both documents, print them, sign where asked, then upload clear scans or photos (PDF, JPG or PNG, up to 10 MB each) with your ID and tap Send my documents. Signing in the app is legally valid under the Electronic Transactions Act No. 19 of 2006 (clause 14.3 of the agreement).
What you’ll see
Your name, NIC, initials, date and signature are written into the real documents where they ask (your initials on every agreement page), with a signature record page at the end. B+B checks them and signs the agreement too; you get the copy signed by both by email and under Your signed documents in Onboarding.
Each module has videos, documents or links and usually a short quiz.
Steps
Open Training and tap a module.
Tap Play video and watch to the end. The video is ticked off when it finishes.
Tap Open document or Open link for the other items.
When everything is done, the quiz opens. Answer every question and tap Check my answers.
What you’ll see
If you don't reach the pass mark you see your score, for example “Not yet: you scored 60%. You need 80%.” Look again at the videos and try again as often as you need. After a few tries B+B is told, so someone can call you to help. When all modules are done, B+B verifies you and issues your certificate.
Once B+B verifies you, your onboarding pack unlocks.
Steps
Open Onboarding and tap Certificate, Business card or ID card.
Tap Print or save as PDF.
Under Your bank accounts, add your account and tap Save bank account. Tap + Add another bank account to add more (up to 5). Each saved account has Edit, Remove and Make main. Owners see all of them, choose which one to pay and upload the slip for that account.
What you’ll see
Activities unlock once you're verified and have a bank account. The certificate prints on one A4 page (landscape); the ID card and business card print at their real size.
An activity is a business that asked B+B for a store. You reach the owner, meet them, build the store with them, and they pay you once B+B approves it.
Steps
Open Activities → Available and tap Accept. The first to accept gets it. You can hold 5 at a time (B+B may set a different number for you). Turn on Notify me about new activities to hear about new ones.
Open it in My activities to see the contact details. Contact them the way they prefer. If they don't answer, tap Couldn't reach them and log how you tried; after 3 tries you can close it as unreachable.
When you reach them, tap I reached them, then Schedule a call or visit (we remind you an hour before) and I've met them afterwards.
Tap Create the account to make the owner's B+B account, and sign in with the temporary password in a private (incognito) window to build the store with the owner. The owner gets an email at once with a link to set their own password. Lost the temporary password? Open the activity and tap Show a new temporary password (until the owner sets their own).
In the owner's account, add the business (it's kept hidden until it's live), the products, delivery and opening hours. Follow the build guide on the activity (see the Store Creator handbook). When steps 1 to 6 are done, tap Go live on the owner's Home, or Submit for B+B review on the activity: both send it to B+B. If B+B returns it, make the changes and send it again.
Not interested? Tap Not interested with the reason. Can't continue? Release this activity (before you submit) gives it back.
What you’ll see
Your earnings and live stores show at the top of Activities. Found a business yourself? Tap + Add my own.
Some activities come from owners who signed up and asked B+B for help. They show Owner asked in the app. The owner already has an account and their business is added (kept hidden until it's live), so there's no account to create.
Steps
Accept it, reach the owner and meet them as usual, then tap Start building.
Tap Open the store builder. Add the business details (logo, opening hours, address, delivery areas), the products with prices and photos, and the delivery fees with the owner.
The owner adds their own bank account and payment methods. You can't see their orders or bank accounts.
When steps 1 to 6 of the build guide are done, tap Submit for B+B review. You can open the store builder again if B+B returns it for updates.
What you’ll see
It counts towards your activity limit until the store is live, like any other activity.
6.8Store Creator handbook: building a store, step by step
Every activity you build has a build guide with 8 steps. It shows how many are done, ticks each one off as you go and marks the step to do now. B+B checks steps 1 to 6 before the store can be sent for review.
Before you start
Meet the owner first, and build the store with them (in their account, or in the store builder if they asked in the app).
Have the owner's logo or a shop photo, their price list and photos of what they sell. None yet? You make them with the owner on the visit (steps 2 and 4).
Build their full business, not just the products: working hours, delivery and drivers, payment methods, team and QR code.
Steps
1. Business details: name, type, description, WhatsApp, address and the areas they deliver to (My business → Business details).
2. Logo: a clear, square logo or shop photo. No logo? Make a simple one with the owner (the business name in clear letters on a plain background in a colour they like; a free Canva logo template works well) and use it only once they approve it.
3. Working hours: tap the days they're open, choose the times, and add a lunch break or different hours on some days if they need them. For appointments, set the booking hours too (My business → Bookings).
4. Products: at least 5, up to 50. Each with a price and a clear photo, grouped in categories. Many products? Use Upload from Excel. Start with their best sellers; they can add more later. No photos? Take them on the visit: daylight, a plain background, one item per photo, the item filling the frame.
5. Delivery and drivers: do they deliver or is it pickup only, the delivery fees and areas, and the minutes to get an order ready. If they deliver but have no driver on B+B, help their delivery person sign up in the app as a Driver, then in the owner's account open Drivers → Add driver, type the driver's email and rate per km, and tap Add driver. Services at the customer's place: set the visit charge in Home visits.
6. Payment methods: cash, and bank transfer with the owner's own bank account (the owner adds it in Payment methods; you can't see it).
7. Extras, if the business needs them (optional): bookings, repeat orders, offers, sub-owners (family or staff who help run it), and show the owner their QR code to share with regular customers.
8. Check it with the owner, then send it to B+B: open the Shop together, check every name, price and photo, then tap Submit for B+B review.
Good to know
Submit stays off until steps 1 to 6 are done, and the activity says what's missing. If B+B returns the store, their note shows on the activity and on your Home, with what to change.
What you’ll see
When B+B approves it, the owner pays you LKR 5,000 (one-off) and the store goes live as soon as you confirm the money arrived.
When B+B approves the store, the owner gets an email link to set their password, pay you LKR 5,000 (one-off) and upload the slip. B+B checks the slip automatically.
Steps
You get an email and a notification when the slip is uploaded. Open the activity and tap View the slip. A yellow Check carefully note means the automatic check wasn't sure.
The activity shows which of your accounts the owner paid into. Check that account. If the money is there, tap Money received: the store goes live straight away.
If it isn't, tap Not received and say what happened. The owner and B+B are told, and the owner can upload a new slip.
6.10Following up on your live stores
A store going live isn't the end. Check in with each owner on day 1, day 7 and day 30, so their store keeps working and they rate you well.
Steps
Open Activities and tap Follow up. Each store you made live in the last 45 days is there, with its products, orders since going live and whether it's open for orders.
Tap Call or WhatsApp to reach the owner. Day 1: check the first orders came in and they can accept one. Day 7: how did the first week go? Day 30: any new products or changes?
When you've talked, tap Mark done, add a short note if you like and tap Save check-in.
What you’ll see
We send you a phone reminder on day 7. Owners can rate you from 1 to 5 stars after their store goes live; your rating shows at the top of Activities (Owners rate you), and B+B sees it too. When the owner pays you and you tap Money received, you both get a receipt by email and a phone notification.
B+B's team can message you, and sends announcements (new features, training sessions) to Store Creators.
Steps
Open Messages. A number on it means something new.
Announcements are at the top. Tap Read more for the whole message, or Open the link if there is one.
To ask B+B something, type in Write to B+B… and tap Send. Any of the B+B team can answer, usually within a working day.
What you’ll see
You get a phone notification when B+B writes, and announcements also come by email. Your messages are private: only you and B+B's super users can see them.
Applications hold private details, so only super users with the People Manager permission can open them.
Steps
Another super user opens Users, ticks People Manager next to your name and taps Save.
On a computer, open More (or tap your name) and choose Store Creators.
What you’ll see
Every look at a full NIC, CV, contract or ID copy is recorded with your name and the time.
7.2What's waiting for you: counts and alerts
You don't need to refresh to see what's new.
Steps
The Store Creators menu item shows how many things are waiting for you. Each tab shows its own count: yellow means waiting for you (applications, documents to check, inquiries, stores to review, payment issues), grey is a total (certified Store Creators).
The counts update every minute and when you come back to the page. When something new arrives (an application, documents, finished training, an owner asking for help, a store to review, a payment issue), a card shows in the corner with a button that opens the right tab.
The same alerts go to your phone if you turned on notifications in Account.
What you’ll see
Alerts carry names and districts only, never NIC numbers, mobile numbers or CVs.
7.3How to review an application
The Applications tab lists everyone who applied. Each row has its own buttons.
Steps
Use the filters (To review, Changes requested, Approved, Rejected, All) and the search box.
Tap the reference, or View, to see the photo, the four requirements, the declaration and any earlier applications. Show full NIC and Open CV are recorded.
Tap Approve: they're emailed to send their documents.
Tap Return and write what to change: they see your comment and can submit again.
Tap Reject and write an internal comment: only People Managers see it. They get a polite email and can apply again after 3 months.
What you’ll see
Rejected applications and their files are deleted 6 months after the decision.
The Documentation tab follows each selected person to their certificate. The Next step button on each row takes you straight to what needs doing.
Steps
To check: tap Check documents, open the signed job description, the signed agreement and the ID. Signed in the app shows when and how they signed, and the name and NIC printed; check them against the ID photo. Then tap Accept and countersign (B+B's saved signature, initials and today's date are added and they get the copy signed by both) or Ask to sign again with a comment they see. For a Paper upload the buttons are Accept documents and Request re-upload.
Ready to appoint: tap Appoint, tick the training modules in the order they should do them, add a welcome note and tap Appoint and give training.
Needs help: someone failed a quiz several times. Tap Help them to see every try, then call or WhatsApp them.
Ready to verify: tap Verify, check their results and tap Verify and issue certificate.
What you’ll see
Certified Store Creators move to the Certified tab. At the top you see how many are certified, stores live, what Store Creators have earned and payments pending; each row shows their active activities, live stores, leads (with how many went live), earned and pending. Tap a name for their Overview (earned, pending, active activities, average days to go live, recent stores) and Details and history. There you can Suspend, Restore or Remove them (a reason is emailed) and Download CSV.
Tap + New module, give it a title and pick an icon.
Add each video, document or link. Choose From my device to upload a file (up to 50 MB) or Link to paste a web address. YouTube links play inside the page.
Add quiz questions with up to 4 answers each and tick the right one. The pass mark starts at the one in Settings.
Choose Published (or keep it a Draft) and tap Save module.
To give a published module to several people, tap Add people on its row. People who already passed it aren't listed.
What you’ll see
Changing the items or the quiz makes a new version; people who already finished keep their result.
7.6How to create and follow activities
Create an activity for every business that asks for a store outside the app (Facebook, Instagram, TikTok, WhatsApp, a call, the website).
Steps
Open the Activities tab and tap + Create activity.
Enter the name of the person or the company, and an email or a mobile. The rest is optional: nature of business, district and city, best time and way to contact them, where the request came from, notes.
If the email or mobile matches a store or another activity, you see the match. You can still tap Save anyway.
Use the filters (status, Store Creator, source, age) to follow them. Open one to edit it, give it to a Store Creator, Reassign it, Take back (after the days set in Settings) or Close it.
What you’ll see
Store Creators who turned alerts on get an email or a phone notification. The days open, and then the days since it was accepted, update every day.
7.7How to handle owners who ask for help
Business owners who sign up and choose No, please help me (or tap Get help from B+B) appear in the Inquiries tab. Each one is also an open activity, so certified Store Creators see it in Available and the first to accept gets it.
Steps
Open Store Creators → Inquiries. You see the business, the owner's contact details, the district and their message.
To choose who helps, open it and under Give it to a Store Creator pick a name and tap Give it. The list shows how many activities each one holds; someone already at their limit can't take more.
Follow it like any activity: reassign, take back or close it. The owner can cancel with I'll set it up myself until building starts.
What you’ll see
The B+B inbox and the owner get an email when a request comes in, and the Store Creator gets one when it's given to them.
The Store reviews tab lists stores waiting for B+B, oldest first, with the Store Creator, days in review and the review round.
Steps
Tap Review, check the checklist and tap Preview the store to see the products, photos and details.
Tap Approve: the owner is emailed a link (valid 7 days) to set their password, pay the Store Creator and upload the slip.
Or write what to change and tap Return for updates. The Store Creator sees your comment.
7.9Payments between owners and Store Creators
The Payments tab shows every slip, the automatic check's result (Pass or Unsure, with the reason) and the Store Creator's answer.
Steps
To confirm are slips the Store Creator hasn't answered yet. AI unsure are slips the check wasn't sure about.
Payment issues are payments the Store Creator says didn't arrive. Open one to see both notes and the slip; tap Mark issue sorted when it's settled.
Owner's link expired? Open the activity and tap Send the owner's link again.
What you’ll see
The store goes live automatically when the Store Creator confirms the money arrived.
7.10B+B's signature and details for agreements
Agreements signed in the app get B+B's side added automatically when a People Manager taps Accept and countersign. Set it up once.
Steps
Open Settings → B+B's details on the agreement.
Type the Company registration number and Registered office (they stay blank on agreements until you do), check Signs for B+B, Title and B+B's initials.
The person who signs for B+B signs once in the box (with a finger, mouse or touchpad). Tap Save. To change it later, tap Change the signature.
Signing spots in each document checks the job description and the agreement in the Onboarding pack. All found means every blank (dates, initials on every page, name, NIC, signatures) is filled in automatically. If a new version shows not found, those details still go on the signature record page at the end.
What you’ll see
The signature is kept private and is only added when a People Manager accepts someone's documents.
Every super user can message Store Creators and applicants, and send announcements to a group. You don't need the People Manager permission.
Steps
Open Store Creators → Messages. Conversations are newest first; a number shows unread ones.
Tap a conversation, type and tap Send. To start a new one, type a name in Search or start a chat and tap the person.
For an announcement, tap Announcement, choose who gets it (Everyone, Certified, In training, Sending documents or Applicants; each shows how many people), choose a district if you like, write the title and message, add a link if needed and tap Send to ….
What you’ll see
They get a phone notification; announcements also go by email. Sent before shows how many have read each announcement. When a Store Creator writes, every super user's phone is notified.
Selected candidates download the job description and the freelance agreement in their Documents step. Certified Store Creators also see the rest of the pack.
Steps
Open the Onboarding pack tab.
Choose the kind (Job description, Freelance agreement, Working manual, Starter pack or Other), choose the file and tap Add to the pack.
7.13How to check new stores
Every new store waits for a super user before customers can see it. You get an email and a phone notification when one is ready, and a reminder if one waits more than 24 hours.
Steps
Open Businesses → To review. Stores are listed oldest first, with the owner, the number of products and the Store Creator (if any).
Tap Review to see the store's details, products and orders.
Tap Approve. A store the owner built goes live straight away. A store a Store Creator built goes to payment: the owner pays the Store Creator, then it goes live.
Or write what needs changing and tap Return with comment. The owner (and the Store Creator) see your comment.
Good to know
Switching a store on yourself in the Businesses table also marks it as checked. To let new stores go live without a check, turn off Check new stores before they go live in Settings.
Billing is off until you switch it on. Then invoices are made on the 1st of each month for the month before.
Steps
Open Settings → Billing. Check the Turnover plan slabs, the Fixed plan's Price a month and Price a year, its two limits (Businesses per owner account and Customers per business: Unlimited or Set a limit), the card fee, the days to pay, the free months, VAT, the rates for other currencies and B+B's bank account, then tap Save billing settings.
Tap Bill businesses and Yes, switch it on. The first billed month is the next full month.
Open Billing → Invoices. Slips to confirm: open one, tap View the slip, check your bank, then Money received or Not received.
Other actions on an open invoice: Mark paid (cash or a transfer you've seen), Change the amount, Give more time (orders come back on) or Waive, each with a note.
Open Billing → Businesses and tap Change to choose Turnover plan or Fixed plan for a business and, for the Fixed plan, Monthly or Yearly. It applies from next month. A yearly bill covers 12 months: no bills for those months.
Good to know
Owners get reminders 2 days after the invoice and 2 days before the due date. When the days to pay run out, new orders pause until the bill is paid. The limits apply to Fixed plan businesses only: an owner at the limit can't add another business, and a full business can't take new customers (existing customers always stay). Card payments for bills (saved card, Pay now) come once PayHere is set up.
Every super user can change the Store Creator rules in one place. Payment settings stay on Payments.
Steps
Open More and choose Settings.
Change Activities a Store Creator can hold, Days before an activity can be taken back, Quiz pass mark or Flag for help after, then tap Save.
To give one Store Creator a different number of activities, open them in Certified and change Activities at a time.
Under Billing, set how businesses pay B+B and switch billing on (see How to run billing).
Under Stores, Check new stores before they go live is on. Turn it off to let new stores go live straight away (Store Creator stores are always checked).
7.16How to give more training to certified Store Creators
Give a new module to one person, a few, or every certified Store Creator, for example when B+B adds a feature.
Steps
Open Store Creators → Training, find the module and tap Add people. Tick people, or tap Tick all … certified Store Creators.
Choose Required (and a Complete by date; 7 days unless you change it) or Optional, then tap Give it to … people.
For one person: open them from Certified, tap Details and history, tick modules under 2. Appoint and train and tap Give this training.
What you’ll see
Their certificate and access stay as they are. Required training sends reminders (2 days before, on the day, then every 3 days); nothing is paused. Late training shows as Overdue on the person and at the top of the Training tab.
7.17How to check reported reviews
Businesses can report a review, and drivers or customers can ask B+B to look at a rating they think is unfair.
Steps
Open Businesses → Reviews.
Read the rating, the reason and any held comment (comments with phone numbers, links or rude words wait for you).
Add a note if you like, then tap Keep or Remove.
What you’ll see
Removed ratings stop counting and are hidden; kept held comments become visible. The person who asked gets an in-app notification with your note. Lowest rated lists businesses and drivers to call or train: nothing happens to them automatically.
7.18How to take down or delete Feed posts
Businesses' posts go into the Feed straight away. Super users get a notification for each new post, and can take down or delete any post, including the welcome posts made automatically when a store goes live. This works in the app and on the website.
Steps
Tap the notification New in the Feed (or open Feed). Check the photo is the shop's own, the product is real and allowed, and the price looks right.
On any post, tap ⋯ → Take down (hidden, kept for the record) or Delete for everyone (gone for good). Both ask for a reason the business sees.
Reported lists posts hidden after 3 reports: Put back, take down or delete. Welcome posts lists live stores without one, with Make welcome post. Post from B+B makes an announcement.
What you’ll see
Every QR code on a post opens the exact store, product or service on it. A deleted post's link says This post was removed and offers the store.
Section 8 · For everyone
8Help and troubleshooting
How to reach us, and fixes for the most common problems.
Open Support for answers written for your role, or send us a message. We reply within 24 hours.
Steps
Call the hotline, WhatsApp us or email us from the top of the page.
Search the common questions. Many answers have a Take me there button.
Under Send us a message, choose a topic, describe what happened, add a screenshot if it helps and choose how we should reply.
Tap Take the tour to see the welcome tour again.
Setting up a business and finding it hard? Tap Help me set up on any setup question, and the B+B team will contact you on WhatsApp and set it up for you.
 Business Plus Business